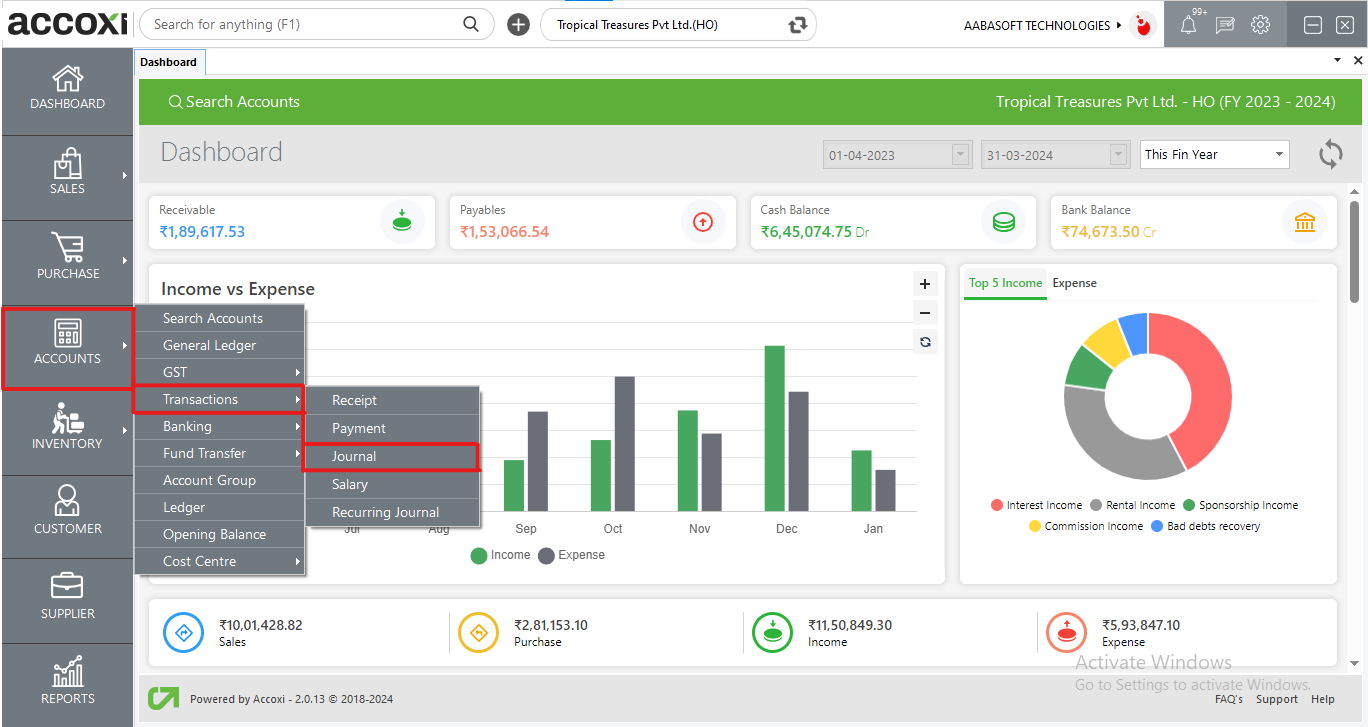
Navigating through the journal entry of Accoxi

A journal is a detailed account that records all the financial transactions of a business, to be used for future reconciling of and transfer to other official accounting records, such as the general ledger.
This video illustrates how to create/manage a new journal on your free accounting software, Accoxi. Key Features: • Can enter both debit and credit aspects of the journal • Auto Reference number is available for easy identification. • Can enter narration to the journal

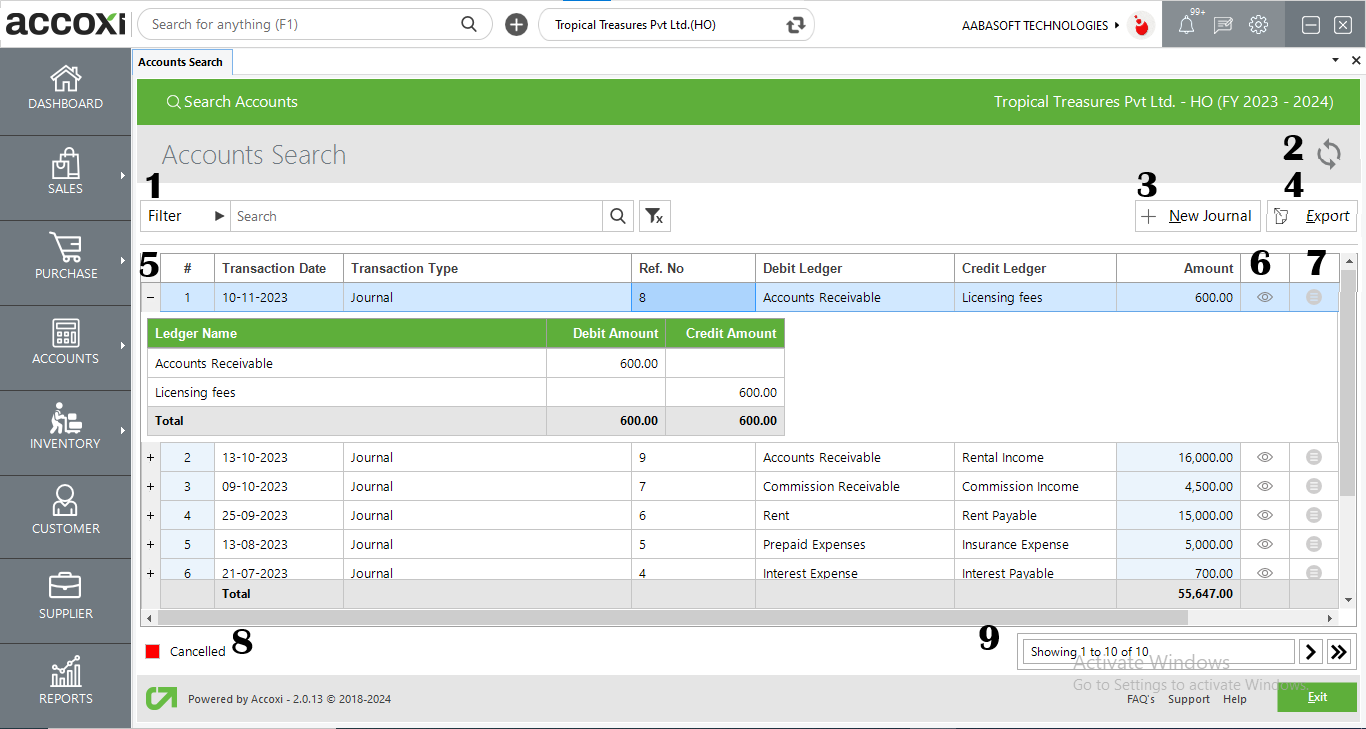
Contents Available in Journal Search:
|
Fields |
Description |
|
1. Filter |
The filter of transactions can be done in two ways-Either you can directly enter the transaction type into the search bar near the filter option or by clicking the filter dropdown. Users can filter the data by transaction type, ledger name, ref no, canceled, or date. If the transaction data can filter by using the date format, need to enter the starting date and the end date of the transactions. Data filter by transaction type include sales invoices, purchase invoices, bills, debit notes, credit notes, etc.
|
|
2. Refresh |
If the latest data is not displayed, click on the refresh icon on the top left corner of the page to fetch the new data.
|
|
3. +New Journal |
The +new Journal is for users to create a journal and takes the user to the journal creation window
|
|
4. Export |
The journal list can be exported to Excel format. Click the Export button at the top right corner near the +New Journal button. Select the file location and click on save.
|
|
5. ledger View |
the journal can be viewed in ledger format displaying the ledger accounts present in the transaction |
|
6. View |
The view menu lets the user view the journal invoice that has already been created. |
|
7. More options |
This Menu Includes An Edit Function And If The User Wants To Edit The Created Form, It Can Be Done By Using This Menu. After Clicking The Edit Option, The Invoice Form Will Appear On The Screen. |
|
8. Cancelled Journal |
The canceled journal are to be shown in red |
|
9. Pagination Control |
It Controls The Page Navigation And The Page Size. Page Size Can Be Set To 10, 20, 50, Or 100. And By Giving The Page Number In The Box And Clicking On The Go Button. It Jumps To The Said Page. |
STEPS TO ENTER A NEW JOURNAL

|
Fields |
Description |
|
Ref. Number |
Reference number is automatically generated by the ACCOXI for easy identification of journals. |
|
Date |
User can enter the date of the journal entry
|
|
Narration |
The narration for the journal entry can be entered here |
|
# |
Serial number of table content |
|
Type |
User can select the type which is DEBIT/CREDIT |
|
Debit/Credit account |
Enter debit or credit account which includes all the ledgers created as well as accounts of all the suppliers and customers,
|
|
Narration |
Then user can enter narration to corresponding account
|
|
Amount |
Then user can enter amount to corresponding debit/credit columns But the debit and credit aspects should be equal only then user can save the journal otherwise a validation message will popup. |
|
Delete |
This option can be used to delete the line entries. |
|
Amount in words |
Shows amount entered in words |
|
Total debit |
This column shows the total debit amount in the journal |
|
Total credit |
This column shows the total credit amount in the journal |
|
Balance |
The difference between debit and credit is shown in this column. If the difference is in the debit aspect it shows a (dr.) balance and if the difference is in credit aspect is shows a (cr.) balance. Not able to save if there is any balance. To save the voucher debit and credit side should match. |
|
Save as draft |
User can save the journal as draft for further alterations and can convert to voucher later |
|
Save |
By clicking save, the journal entered by the user will be saved and it will be visible in transaction menu. User can track the journal using the reference number of the journal. |
|
Clear |
To clear the data entered in the journal window this option can be used |
|
Refresh |
If your latest data is not displayed, click on the refresh icon on the top left corner of the page to fetch the new data. |
|
Exit |
To close the journal window without saving. User can click the exit button. |
|
FIELDS |
DESCRIPTION |
|
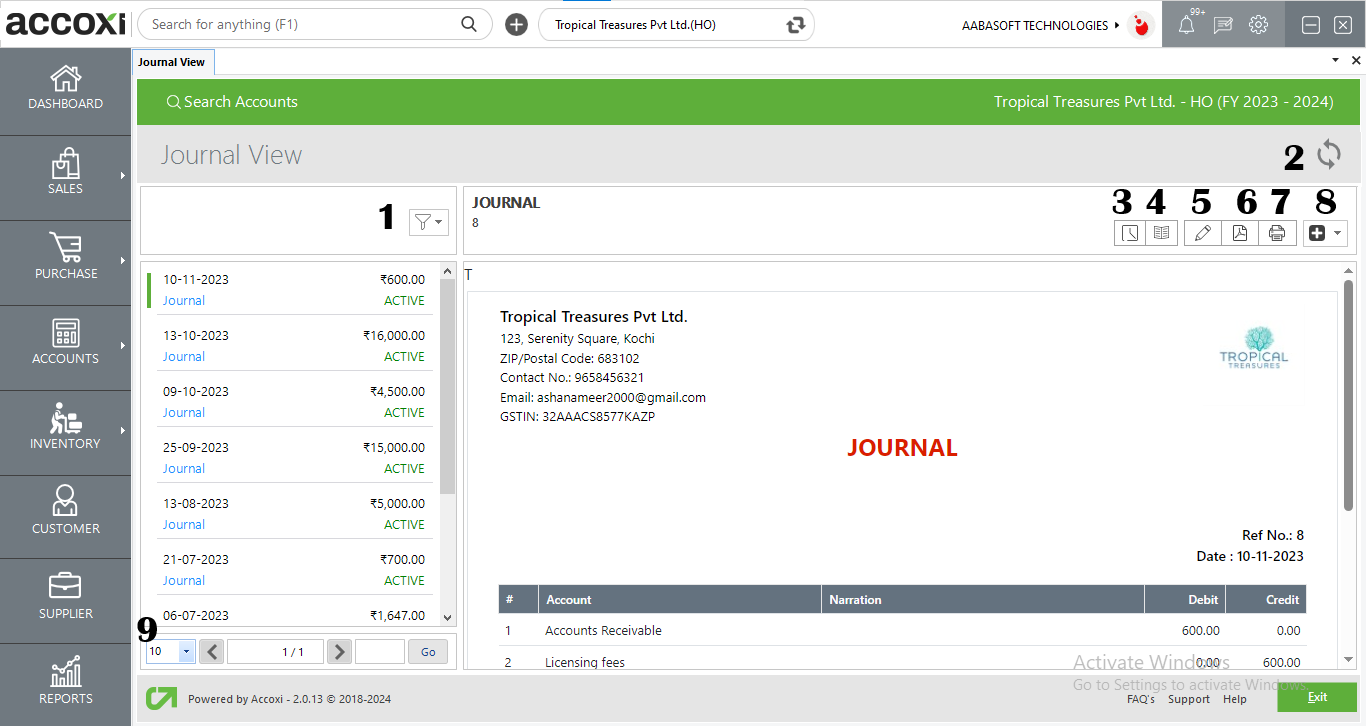
1. Filter |
can filter out the journal contras based on active, canceled, and drafts |
|
2..Refresh |
If your latest data is not displayed, click on the refresh icon on the top left corner of the page to fetch the new data. |
|
3. History |
This menu helps the user to obtain the history details of the journal contra. OPTIONS AVAILABLE IN THE HISTORY WINDOW
|
|
4. VIEW JOURNAL |
It is the menu that shows the journal view of the transaction. The Journal view shows both debit and credit aspects of the amount. |
|
5. Edit |
The Edit menu helps the user edit or correct the details that are entered in the transaction. |
|
6. Export to PDF |
If the user wants to convert the Journal to PDF format, then the export to PDF option is available. After clicking export to pdf, a save as directory option will appear and the user can opt the pdf file saving location |
|
7. Print |
The print menu helps the user to print the journal if required. After clicking the print button it will redirect to print options where the user can select the printer, number of copies to take etc. |
|
8. More Features |
In the More features option user can cancel the payment. By clicking cancel, a validation message will pop up. Then click “YES” to cancel the payment and click “NO” to cancel and close the option. |
|
9. Pagination control |
It controls the page navigation and the page size. Page size can be set to 10, 20, 50 or 100. By giving the page number in the box and clicking on Go button, it jumps to the said page.
|
You cannot delete a journal once created. It can only be cancelled.