Item Creation In Accoxi

In a business context, an item refers to any tangible or intangible, visible or invisible entity. It can take the form of a product or service offered for sale, whether physical or in virtual or cyber form. Every item is subject to a cost of acquisition or production and is subsequently sold at a price.
An item is a crucial component in Accoxi, encompassing both products and services utilized in trading. This functionality empowers users to create and manage multiple products and services, facilitating seamless business transactions.
Key Features of Items:
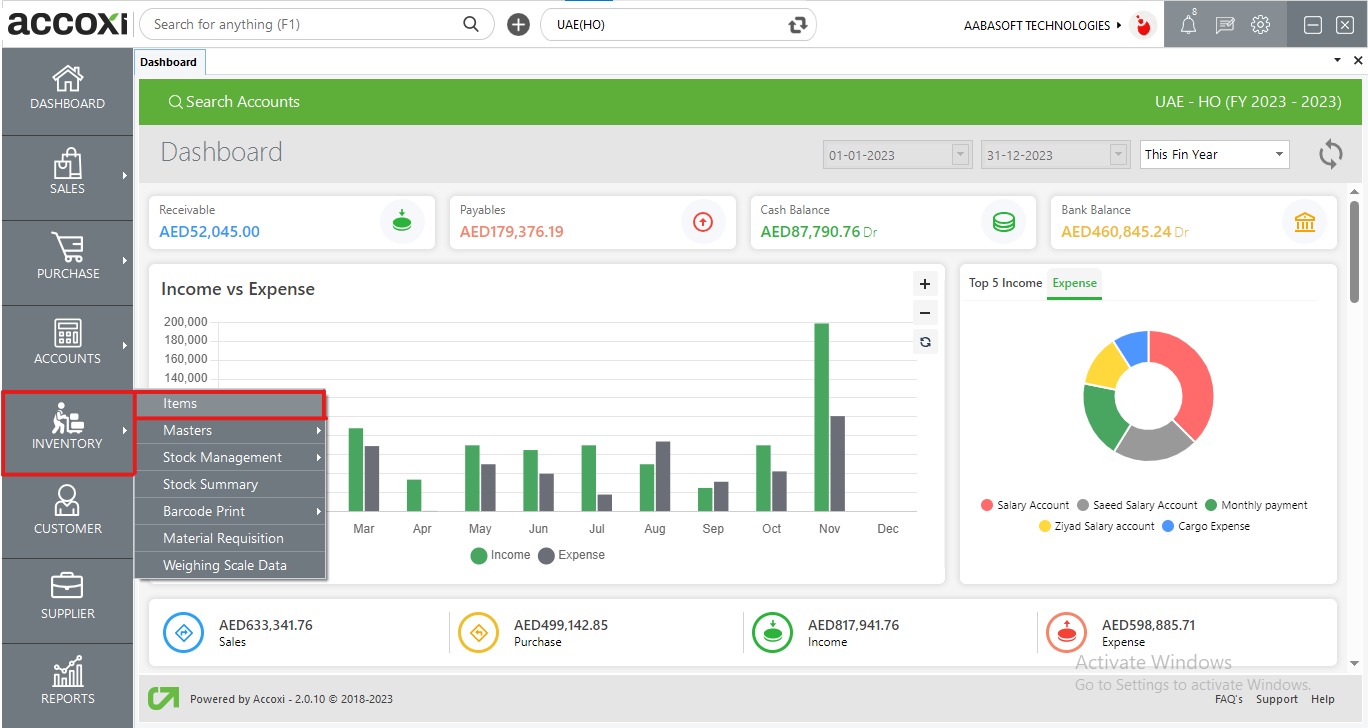
To access the Items page in the Inventory Module, click on the Inventory Module and then select "Items." This action will open the Items page.
Items comprise various menus displaying details of all entered items in the business. They can be organized under different categories, subcategories, groups, and brand-wise product management. Multiple images can be added to products using the multiple image functionality. Additionally, it allows users to manage batch-wise stock, shelf, rack management, and more.
|
Field |
Description |
|
Product/Service Name |
This field displays the name of the product/service associated with the particular item. |
|
Product Code |
The product code associated with the item will be displayed. |
|
Type |
The type of item, whether it is a product or service, will be displayed in this field. |
|
Closing Stock |
The "Closing Stock" field displays the total remaining stock of items. |
|
Reserved Stock |
The stock is reserved for various purposes such as delivery challans, sales orders, stock transfers, etc. And the reserved quantity is showing here. |
|
Available Stock |
This field displays the current quantity of available stock for the item, allowing users to identify the available stock of each item. |
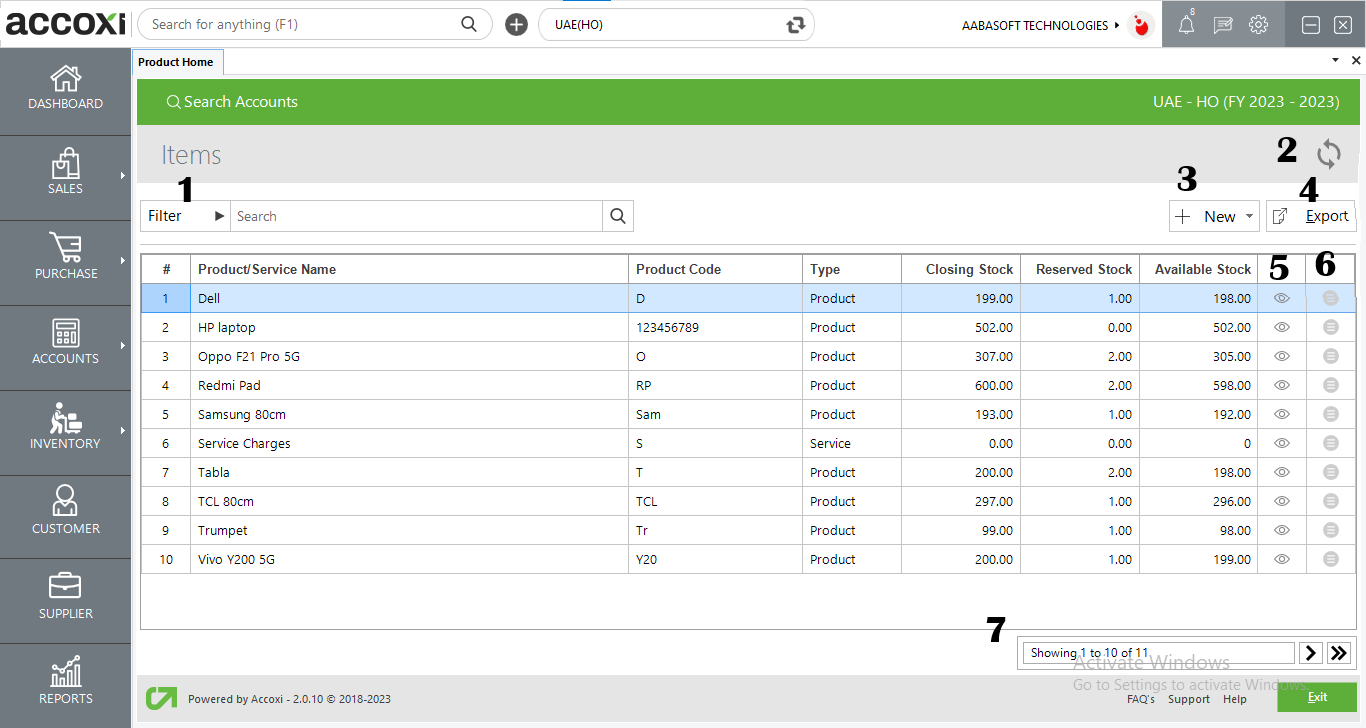
1. Filter:
2. Refresh:
3. +New:
The +New menu offers two options: Product and Service. This menu is utilized for creating either a new product or a new service.
Batch-wise Inventory: This feature can be enabled from Settings -> Preference -> Inventory.
|
Field |
Description |
|
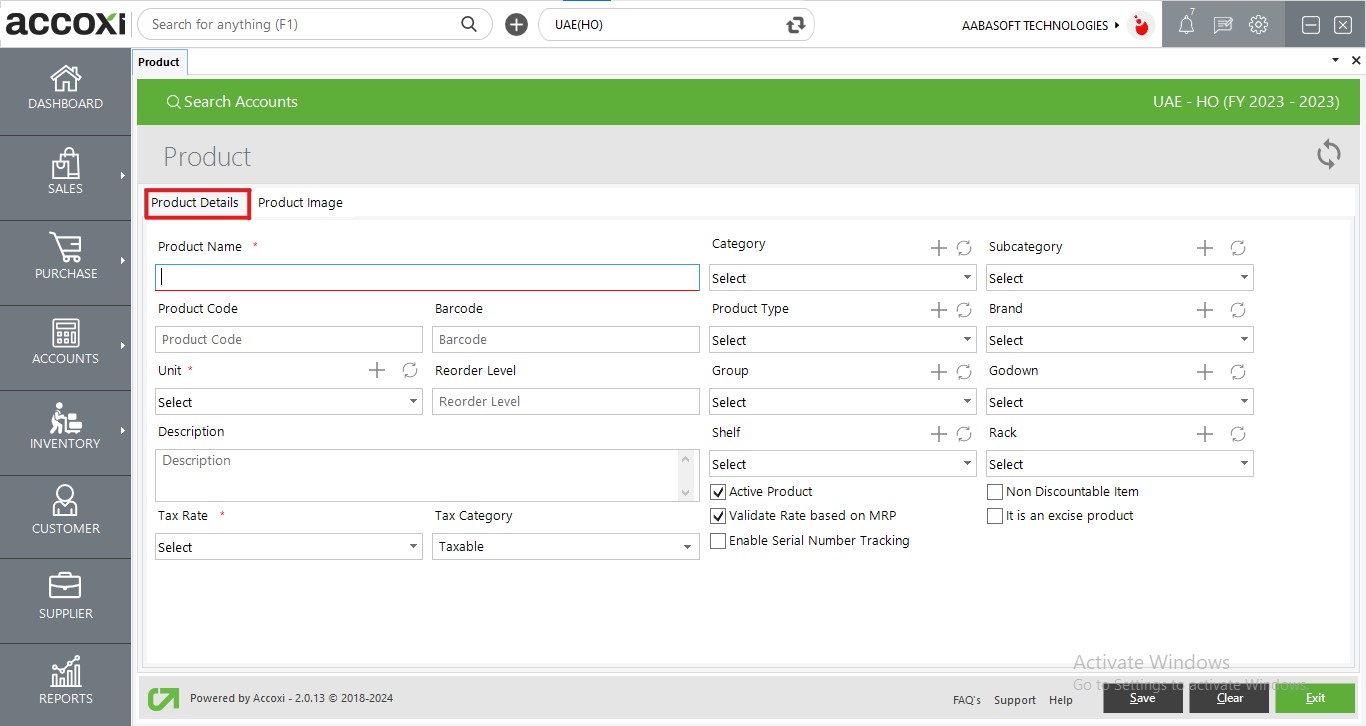
Product Name |
Each product is assigned a unique name, and users are prompted to input the product name in this field. |
|
Product Code |
Every product is given a distinctive code, and users are instructed to enter the product code in this field. |
|
Barcode |
In this field, users can input the barcode number associated with the product. |
|
Unit |
A standardized measure of physical quantity, such as NOS, KGs, TON, etc., is referred to as a unit. Users can designate the unit for a product in this field. By clicking the select menu, a list of available units will appear, and the user can choose the appropriate unit from the list.
If the user desires to create a new unit for the product, one that is not included in the existing list, they can do so by clicking the menu labelled + (Add New). |
|
Reorder Level |
The reorder level signifies the inventory threshold that prompts the initiation of restocking for a specific item. It represents the minimum quantity of an item that a firm maintains in stock. When the stock diminishes to this level, it signals the necessity to reorder the item. Users can input the reorder level number in this field. |
|
Description |
In this field, users have the option to provide additional explanations or details about the product. |
|
Tax Rate |
For taxable products, users can designate the appropriate tax rate for the product in this field. By clicking on the select option, a list of defined tax rates will appear, and the user can choose the required one.
The tax rate field will be blocked for items falling under exempted and zero-rated tax categories. In other words, if the user selects the tax category as exempted or zero-rated, no input can be entered in this field. |
|
Tax Category |
The tax category defines the taxation method for products based on their nature. It includes taxable, zero-rated, or exempted classifications. |
|
Category |
Firms create product categories to systematically organize their products. Users can specify the category of the product in this field.
If the user wishes to create a new category for the product that is not listed, they can do so by clicking the menu labelled + (Add New). |
|
Sub Category |
Firms establish product subcategories to further organize their products. After selecting the category of the product, users can then choose the subcategory in this field.
If the user desires to create a new subcategory for the product that is not listed, they can do so by clicking the menu labelled + (Add New). |
|
Product Type |
Product type represents a set of common specific characteristics in products or goods. Users can designate the product type of the product in this field.
If the user wishes to create a new product type not listed, they can do so by clicking the menu labelled + (Add New). |
|
Brand |
Users have the ability to group products based on their brands and can select the brand of the product in this field.
If the user desires to create a new brand for the product that is not listed, they can do so by clicking the menu labelled + (Add New). |
|
Group |
A product group serves as a high-level categorization of products. Users can choose the group for the product in this field.
If the user wishes to create a new group for the product that is not listed, they can do so by clicking the menu labelled + (Add New). |
|
Godown |
A Godown or warehouse serves as the storage location for products or goods before their transfer to another destination. Users can choose the Godown for the product in this field. By clicking on the select option, a list of available Godown will appear, and the user can select the required one.
If the user wishes to create a new Godown for the product that is not listed, they can do so by clicking the menu labelled + (Add New). |
|
Shelf |
Users can designate the shelf name for the product in this field. By clicking on the select option, a list of available shelf names will appear, and the user can choose the required one.
If the user wishes to create a new shelf for the product that is not listed, they can do so by clicking the menu labelled + (Add New). |
|
Rack |
Users can choose the rack name for the product in this field. By clicking on the select option, a list of available rack names will appear, and the user can select the required one.
If the user desires to create a new rack for the product that is not listed, they can do so by clicking the menu labelled + (Add New). |
|
Active Product |
To save the product as an active item, click on the checkbox next to the "Active" option. If the product is not in existence, unselect the checkbox for the "Active" button to deactivate the item. |
|
Non Discountable Item |
If the item is non-discountable, you can select this checkbox. If a discount is applicable, unselect the checkbox. |
|
Validate Rate based on MRP |
If the rate should be validated based on MRP, select the checkbox. |
|
It is an excise product |
If the product is an excise product, select the checkbox. |
|
Enable Serial Number Tracking |
Inorder to enable the feature of serial number tracking for the item, select on this checkbox. |
|
Save |
After entering all the details, click on the "Save" menu to either create a new product or save the entered form. |
|
Clear |
The "Clear" button is used to erase or remove all the data entered by the user. |
|
Exit |
The "Exit" menu is used to navigate to the previous page without saving the product form. |
Product Image
This form serves the purpose of adding images for a product. Users can include multiple images for a single product.
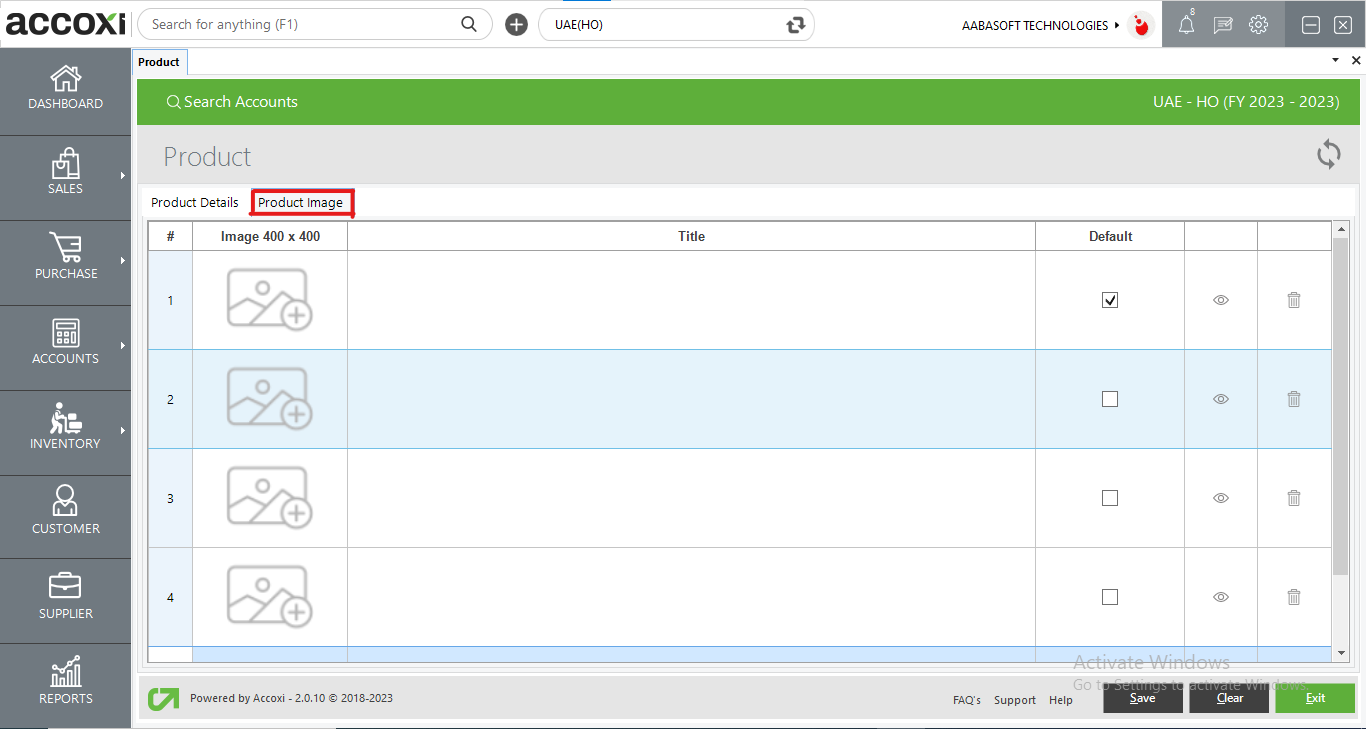
|
Field |
Description |
|
Image |
Users can upload product images in this column. By clicking on the field, an open folder will appear, allowing them to select images from the tab. |
|
Title |
In this field, users can input a title related to the product image. |
|
Default |
Choose and click on the "Default" option to designate the product image as the default image. |
|
Preview |
Clicking on it will display a preview of the image. |
|
Delete |
The delete icon is used to delete unnecessary images after they have been uploaded. |
Once a new product is created, the subsequent step involves creating a batch for the product.
If the user intends to create a new product, it is necessary to generate a batch containing details such as MRP, Purchase Rate, Sales Rate, and Opening Stock for the product. When clicking on the Save option to create a new product, a message will appear on the screen prompting the creation of a new batch for the product.
Click on the "Yes" option to proceed with creating a new batch. Upon selecting "Yes," the new batch form will be displayed on the screen.
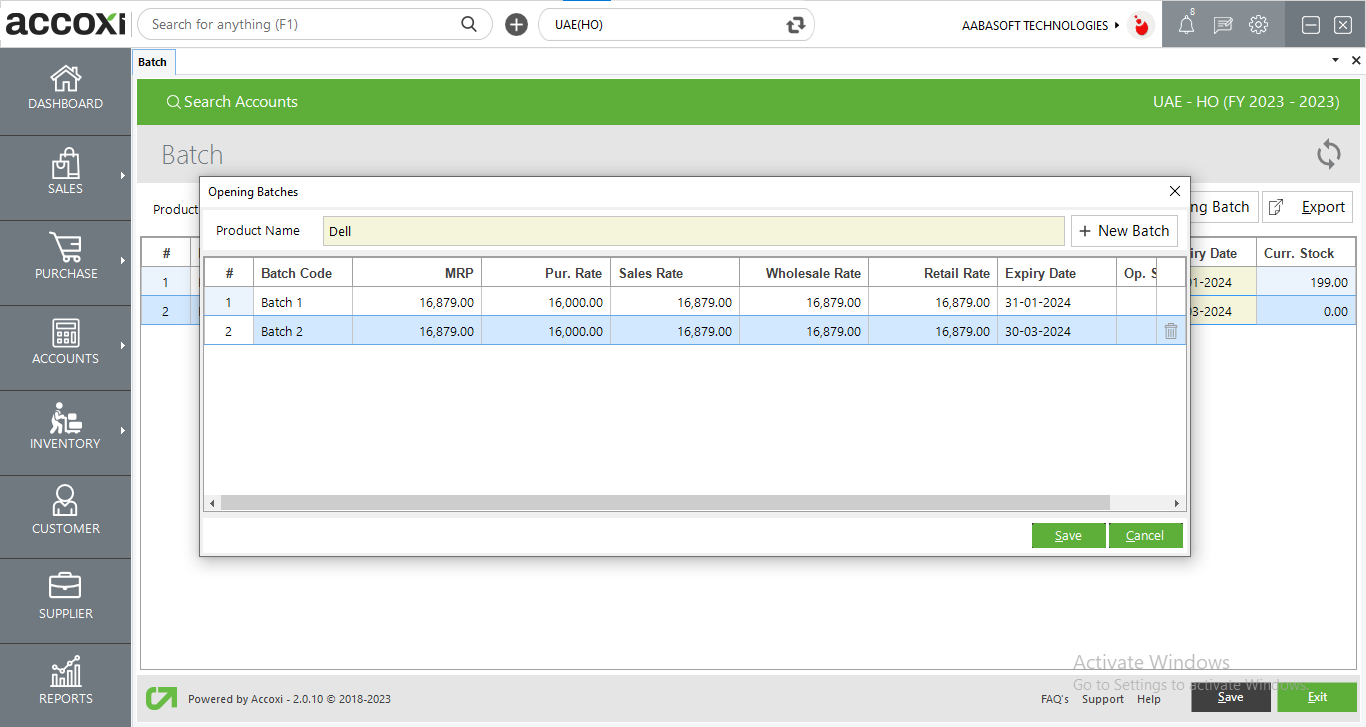
|
Field |
Description |
|
Product Name |
The product name will automatically appear in the field. |
|
+New Batch |
This menu is using for the purpose of adding a new batch for an existing/same product. |
|
Batch Code |
In this field, users can input the batch code for the product. |
|
Expiry Date |
This field pertains to the expiry date of the product, and users can set the expiry date in this field. |
|
MRP |
In this field, users can input the Maximum Retail Price (MRP) of the product. |
|
Purchase Rate |
Users can enter the purchase rate of the product in this field. |
|
Sales Rate |
In this field, users can input the sales rate of the product. |
|
Opening Stock |
Opening stock represents the value of stock available for sale or use at the beginning of an accounting period. Users can add the opening stock value in this field. |
|
Save |
After entering all the details, click on the "Save" menu to either create a new product batch or save the entered form. |
|
Cancel |
The "Cancel" menu is used to navigate to the previous page without saving the product batch form. |
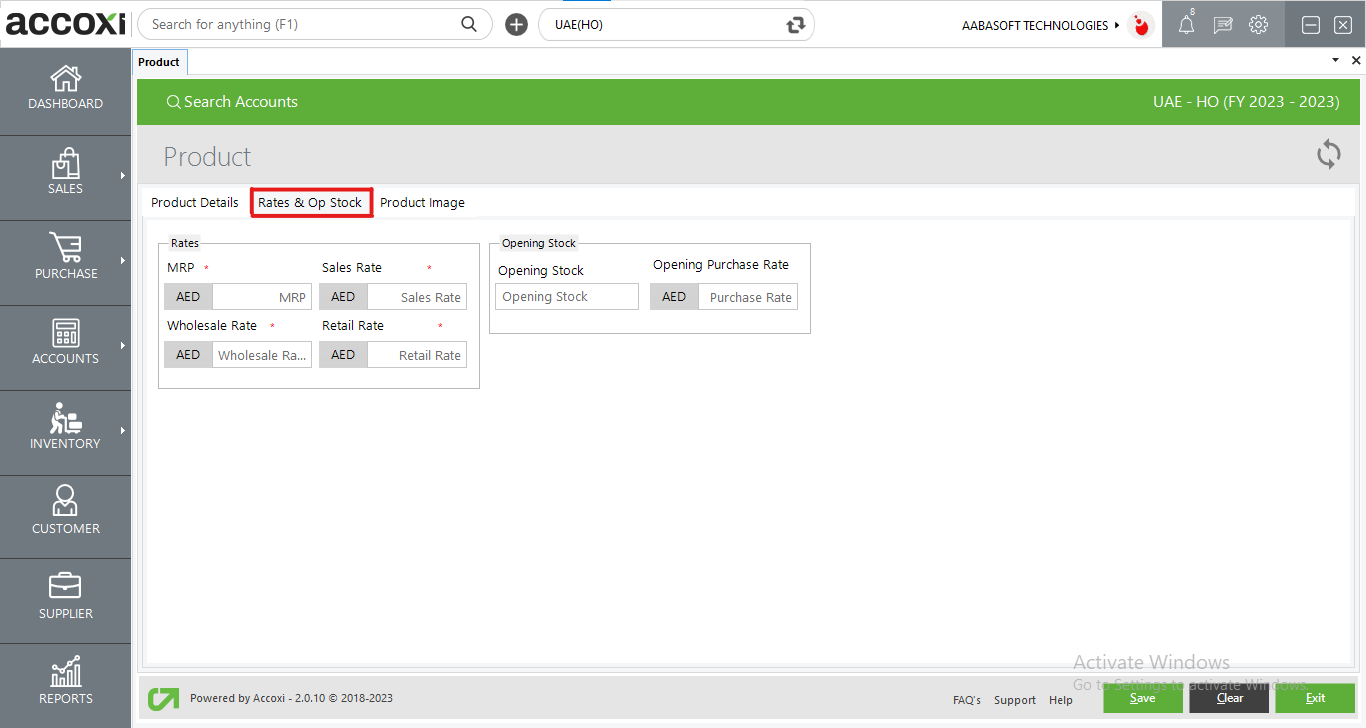
During the creation of a product, a new tab named Rates and Op Stock is introduced for creating items without opting for batch-wise inventory.
|
Field |
Description |
|
MRP |
Input the Maximum Retail Price (MRP) of the product to determine its price. |
|
Sales Rate |
The rate at which the product is being sold is determined here. |
|
Opening Stock |
Enter the current opening stock of the product. |
|
Opening Purchase Rate |
Input the rate at which the product is purchased from suppliers. |
|
Save |
Once all the details have been entered, click on the "Save" option to either create a new product or save the entered form. |
|
Clear |
The "Clear" menu is used for clearing or removing all the data entered by the user. |
|
Exit |
The "Exit" menu is used to navigate to the previous page without saving the product form. |
This menu option is used to initiate the creation of a new service. Clicking on the Service menu prompts the appearance of a new form where the user can enter the necessary details to create a service.
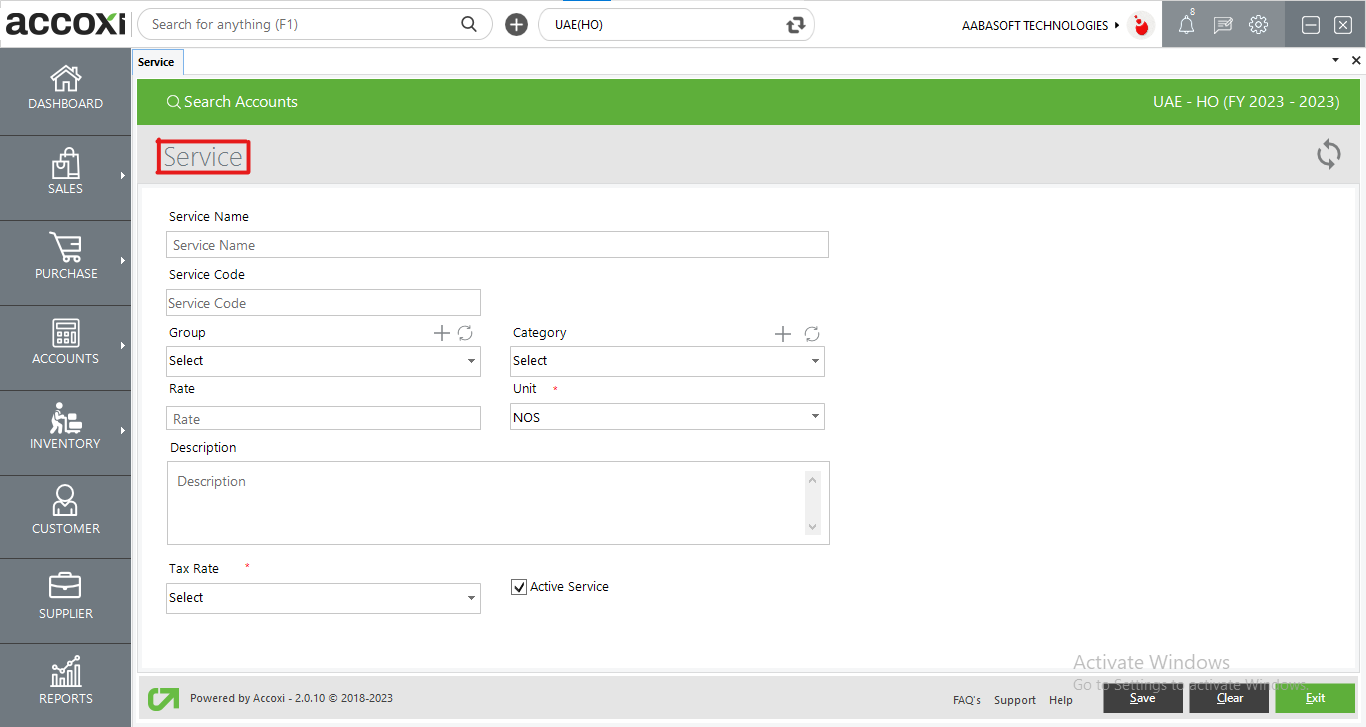
|
Field |
Description |
|
Service Name |
Each service has its unique name, and the user is required to input the name of the service in this field. |
|
Service Code |
In this field, users can input the service code. |
|
Group |
A service group is a high-level grouping of services or products. Users can select the group for the service in this field. |
|
Category |
Service categories are established by the firm to organize services with products. Users can select the category of the service in this field.
If the user wishes to create a new category for the service that is not in the list, it can be done by clicking the menu labelled + (Add New). |
|
Rate |
Users can input the appropriate rate for the service in this field. |
|
Unit |
A standard amount of physical quantity, such as NOS, KGS, TON, etc., is termed as a unit. Users can select the unit for the service in this field. By clicking the select menu, a list of units will appear, and the user can choose the required unit from the list.
If the user wants to create a new unit for the service that is not in the list, it can be done by clicking the menu labelled + (Add New). |
|
Description |
In this field, users can add additional explanations or details regarding the service. |
|
Tax Rate |
In the case of a taxable service, users can select the appropriate tax rate in this field. |
|
Status |
To save the service as an active service, click on the checkbox next to the "Active" option. Unselect the checkbox for the "Active" button to deactivate the service. |
|
Save |
After entering all the details, click on the "Save" menu to either create a new service or save the entered form. |
|
Clear |
The "Clear" button is used to erase or remove all the data entered by the user. |
|
Exit |
The "Exit" menu is used to navigate to the previous page without saving the service form. |
4. Export: The list of items can be exported to Excel format. Click the Export button at the top right corner, near the +New button. Select the file location and click Save.
5. View: This menu option allows the user to view the created item format by clicking the view icon.
6. More Options: The more options menu includes three additional features:
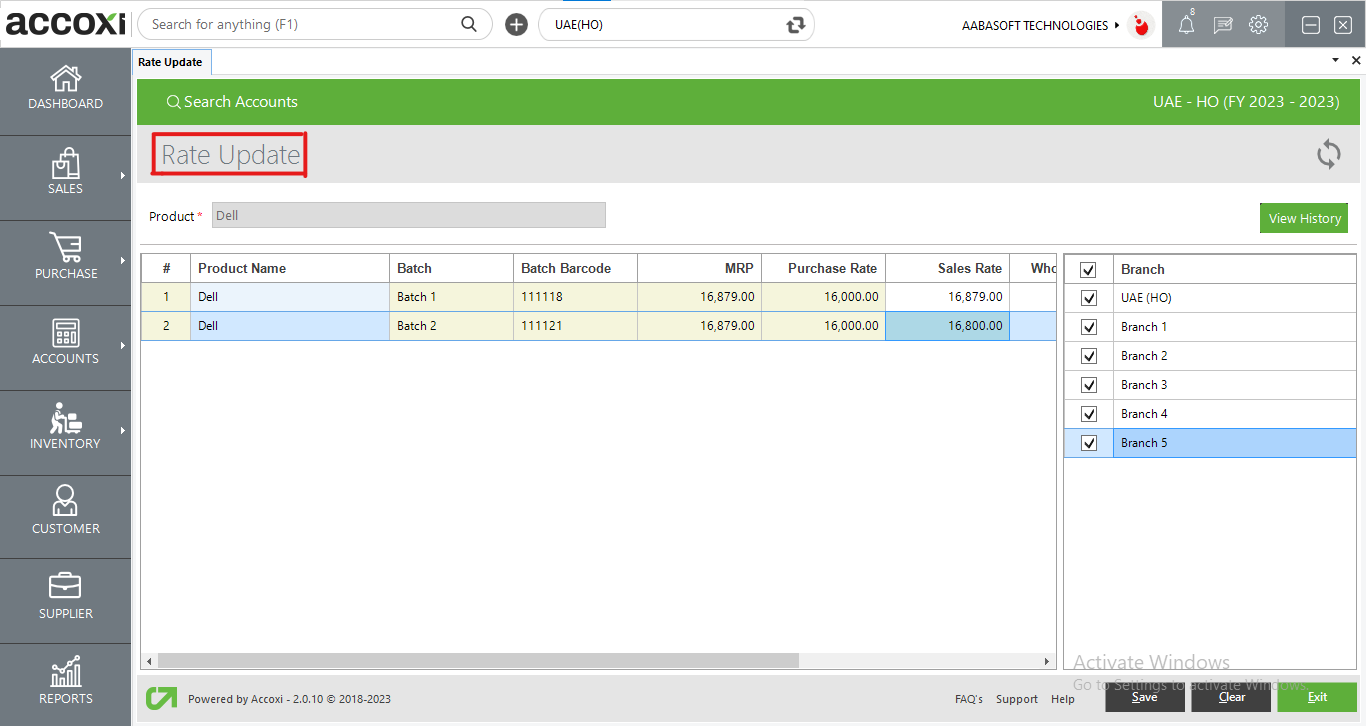
This is the rate update form. Users can update the stock rate by double-clicking the sales rate and modifying the rate.
The View History option shows previous rate updates made to the stock by the user.
Users can select the branch to which the rate updates shall apply.
7. Pagination Control: This feature manages page navigation and page size. The page size can be set to 10, 20, 50, or 100 by entering the page number in the box. Clicking the "Go" button will display the intended page.