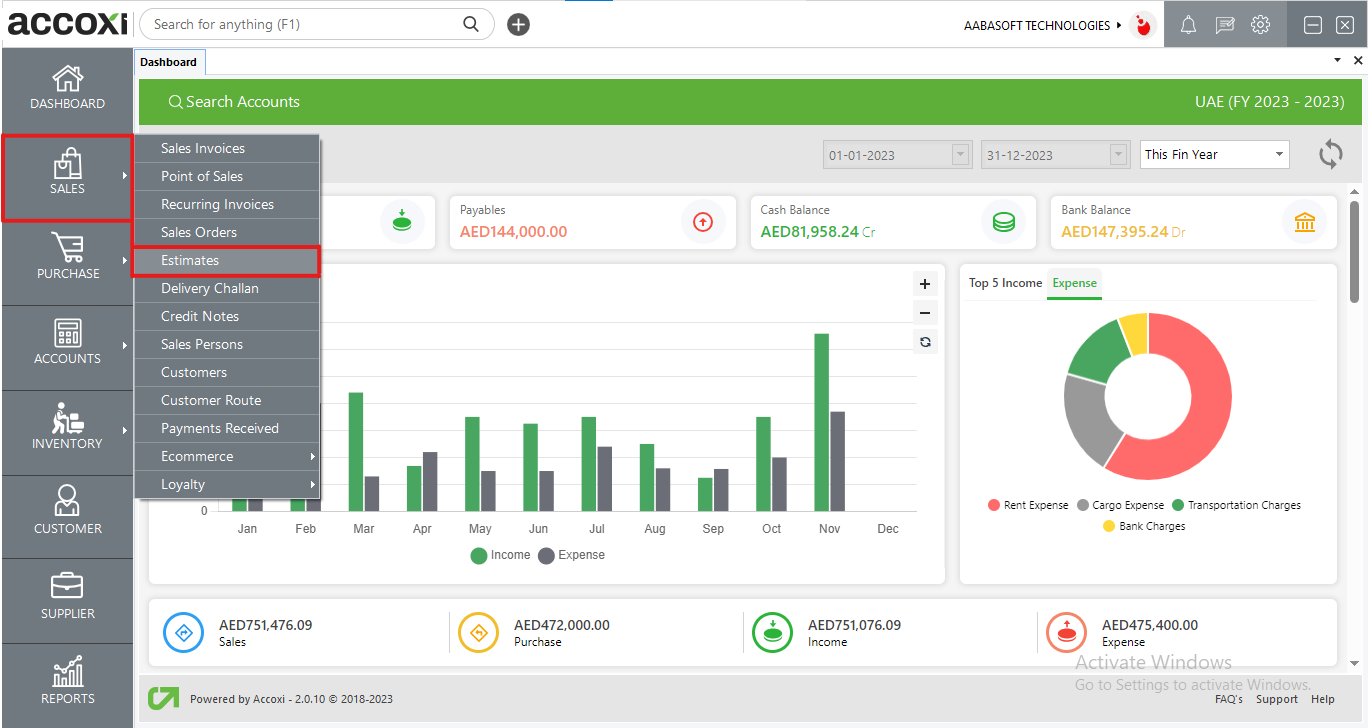
Creation of sales estimates AKA Quotations in Accoxi

A sales estimate is a preliminary document, like a proposal, invoice, or quote, provided by a business to potential customers, outlining the anticipated cost of the offered products and services. Once customers agree to the estimate, it is then converted into an invoice.
Key Features of ESTIMATES
ESTIMATE SEARCH
The ESTIMATE search comprises various menus and presents the details of all created estimates.
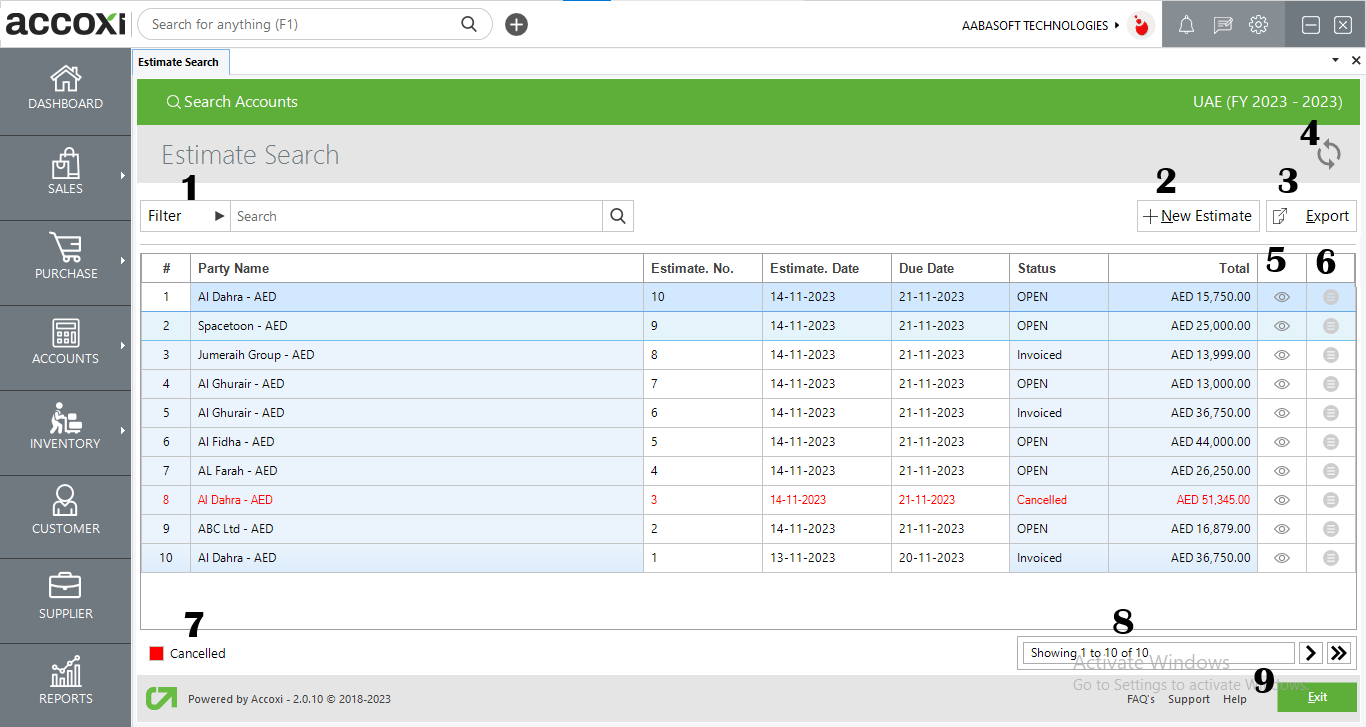
1. FILTER: The filter option in the ESTIMATE search window enables users to refine the displayed data. The primary method for filtering estimates involves entering the party name or the reference number of the estimates. Alternatively, estimates can be filtered by selecting time intervals using start and end dates, allowing users to narrow down estimates created during specific timeframes. Additionally, estimates can be filtered based on their status, such as open, invoiced, or cancelled.
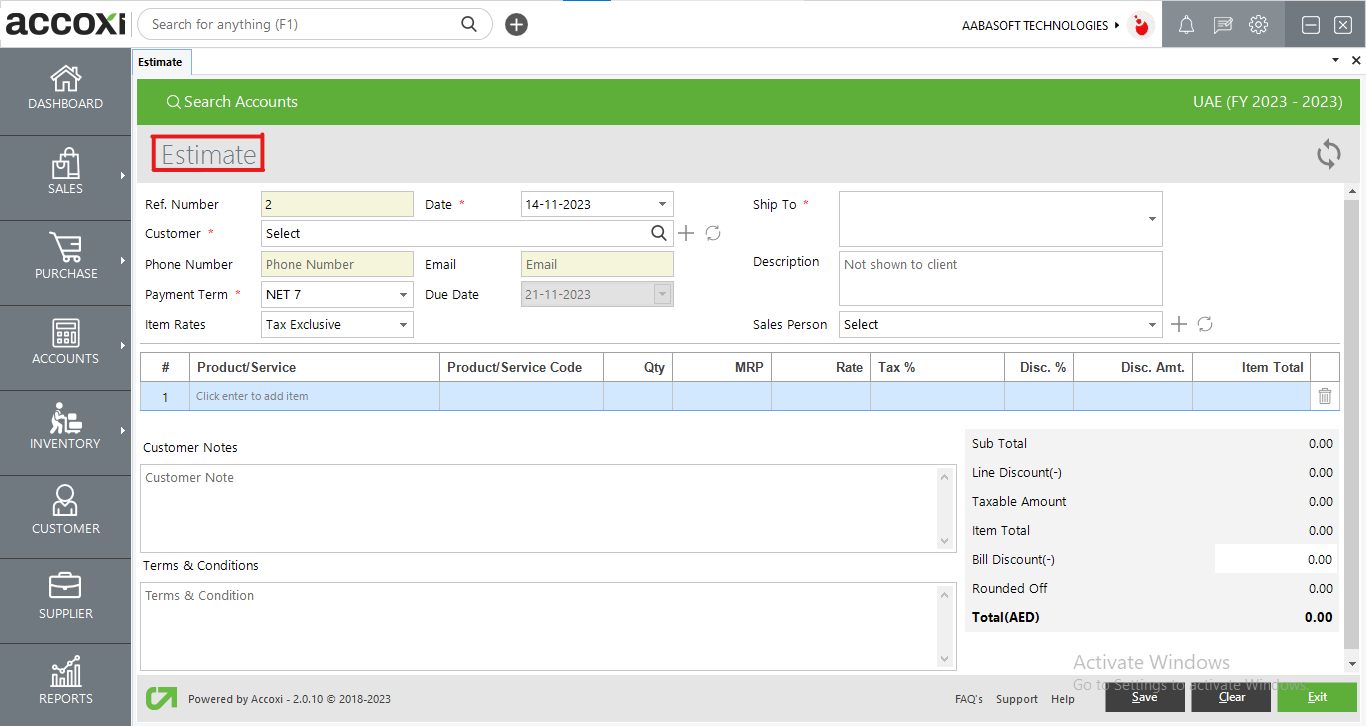
2. NEW ESTIMATE: A new estimate can be created by using the "New Estimate" button.
To add a NEW ESTIMATE, follow these steps:
|
Field |
Description |
|
Ref Number |
The reference number of the sales estimate will be generated automatically. |
|
Date |
Enter the date of the sales estimate. By default, the date will be set as the current date. |
|
Item Rates |
The items can be either tax-exclusive or tax-inclusive. |
|
Customer |
Choose the customer from the drop-down menu. |
|
Phone Number |
It will be automatically updated when the user selects the customer. |
|
|
It will be automatically updated upon selecting the customer. |
|
Description |
Input the description of the estimate. |
|
Ship To |
Input the customer's shipping address. Multiple shipping addresses for a customer can be defined when creating new customers. These available addresses will be accessible in the shipping address drop-down menu. |
|
Payment Term |
Choose a payment term to determine the duration within which the payment is expected. |
|
Salesperson |
Choose the salesperson who is responsible for the sale. |
|
Due Date |
It will be automatically selected when the user chooses the customer. The due dates will be updated automatically based on the payment term defined during the creation of the new customer, as well as any changes made to payment terms in the new sales invoice menu. |
|
Product Or Service |
Input the product or service here, and by pressing the Enter key, you'll receive details for all the products you've entered. |
|
Batch |
Choose the batch of the product by clicking on the "Batches" column. |
|
QTY |
Input the quantity of the products and then save. |
|
Discount |
In this column, the user can enable discounts allowed on sales estimates. These discounts can take various forms, including discounts after tax, before tax, item-level discounts, or restricted discounts. To enable these options, the user should navigate to Settings => Preferences => Sales Invoice => Do You Give Discounts option. |
|
Customer Note |
If necessary, provide information in the customer note section. |
|
Terms And Conditions |
Define the terms and conditions of the invoice. |
|
Save |
By clicking "Save," a sales estimate is created, and the user will be redirected to the Sales Estimate View window. |
|
Clear |
This option allows the user to clear the data entered in the New Sales Estimate window. |
|
Exit |
The user can exit from the Estimate window by clicking this button. |
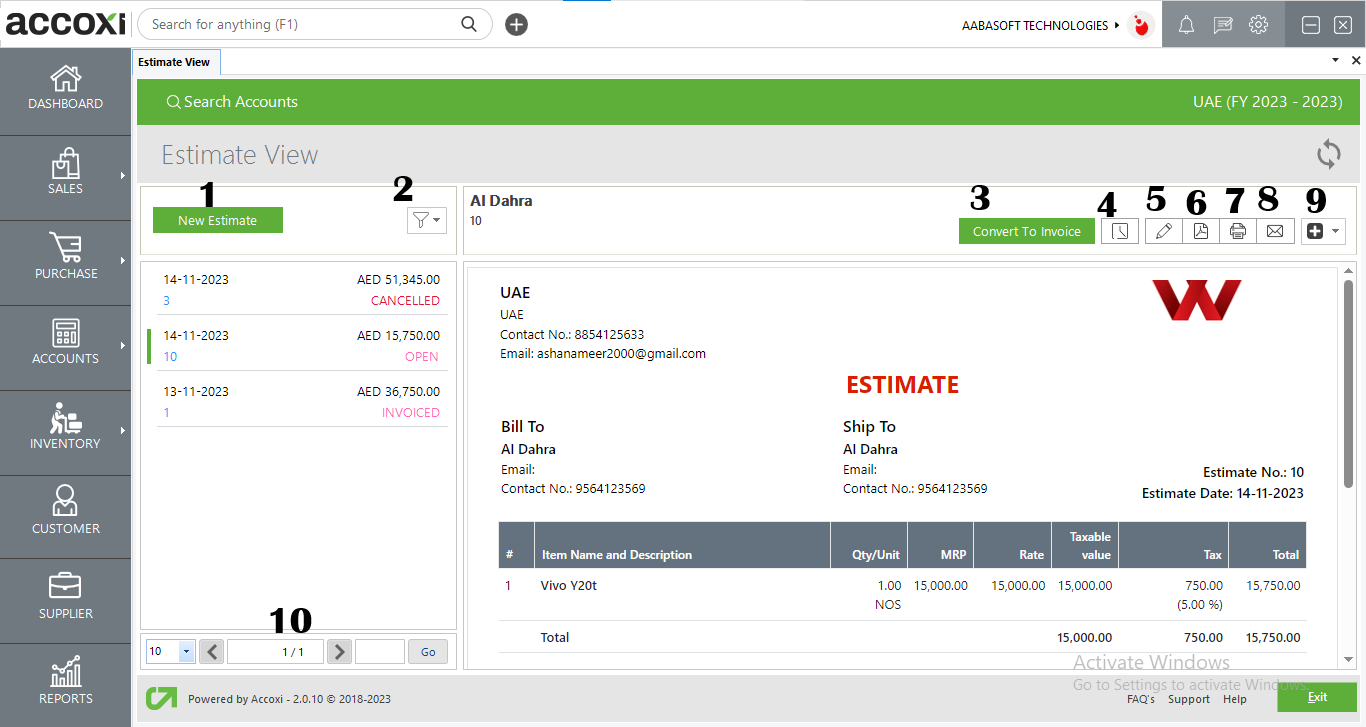
MENUS AVAILABLE IN ESTIMATE VIEW
|
Field |
Description |
|
1. New ESTIMATE |
Clicking the "New ESTIMATE" button directs you to the Create New ESTIMATE window. |
|
2. Filter |
The "Filter" menu enables the user to filter the sales estimate data based on options such as All, Invoiced, Open, and Cancelled. |
|
3. Convert to invoice |
This directs the user to the sales invoice menu along with the sales estimate data, simplifying the process of creating a sales invoice. |
|
4. History |
This menu assists the user in accessing the history details of the SALES ESTIAMTE.
OPTIONS AVAILABLE IN THE HISTORY WINDOW:
Displays all the edits and modifications made to the sales estimate, including the date of each change. Presents details about the invoices created from the estimate, specifying the date, voucher number, and amount. |
|
5. Edit |
The "Edit" menu allows the user to edit or rectify the details entered in the sales estimate and save them again. |
|
6. Export To PDF |
If the user wishes to convert the sales estimate to PDF format, the "Export to PDF" option is available. After clicking on "Export to PDF," a "Save As" directory option will appear, and the user can choose the location to save the PDF file. |
|
7. Print |
The "Print" menu assists the user in printing the created sales estimate if needed. After clicking the Print button, it will redirect to print options where the user can select the printer, number of copies, etc. |
|
8. EMAIL |
The user can send the created sales estimate to customers or anyone via email using the Email button. By default, the customer's email ID will appear. |
|
9. More Features |
Convert to Sales Order: Redirects the user to the Sales Order menu with the sales estimate data, making it easy to create a sales order.
Create Duplicate: This function serves as a convenient tool to replicate invoices. It redirects you to the Sales estimate window with the same data that you entered previously. |
|
10. Pagination Control |
This feature manages page navigation and page size. The page size can be configured to 10, 20, 50, or 100. By entering the page number in the designated box and clicking the "Go" button, the system will navigate to the specified page. |
|
11. Cancel |
This option is used to cancel the estimate that has been created. When the user clicks the Cancel button, it opens a cancellation window. By default, it displays customer details such as the customer's name, invoice number, and transaction amount. The user is required to enter the reason for the cancellation and then click "OK" to cancel the transaction. Selecting "Close" exits the window without saving. |
3. Export: To export the sales estimate list to Excel format, click on the Export button at the top right corner near the +New button. Choose the file location and click on save.
4. Refresh: If the most recent data is not displayed, click on the refresh icon located at the top left corner of the page to fetch the new data.
5. View icon: This icon directs the user to the Sales Estimate View window.
6. More options: You can edit, view, export to a PDF file, as well as print the estimate details if required using the more icon.
7. Color filter: Cancelled estimates are highlighted in red to signify their cancellation.
8. Pagination Control: This feature manages page navigation and page size. The page size can be set to 10, 20, 50, or 100. By entering the page number in the designated box and clicking on the "Go" button, it navigates to the specified page.
9. Exit: Below the pagination control, there is an exit button. Click on the exit button if you want to exit the estimate search page.