Stock transfer is the act of moving goods from one part of the distribution chain to another.
Stock transfer is moving goods from one part of the distribution chain to another. An internal purchase order is created for stock transfer between branches and warehouses. Accoxi provides a Stock Transfer system to the users and it enables the transfer of goods from Head Office to branch or from branch to head office or between branches.

Video tutorial explains how the Stock transfer is conducted in Accoxi to move goods from HO to branch or vice versa or between branches.
Key Features;-
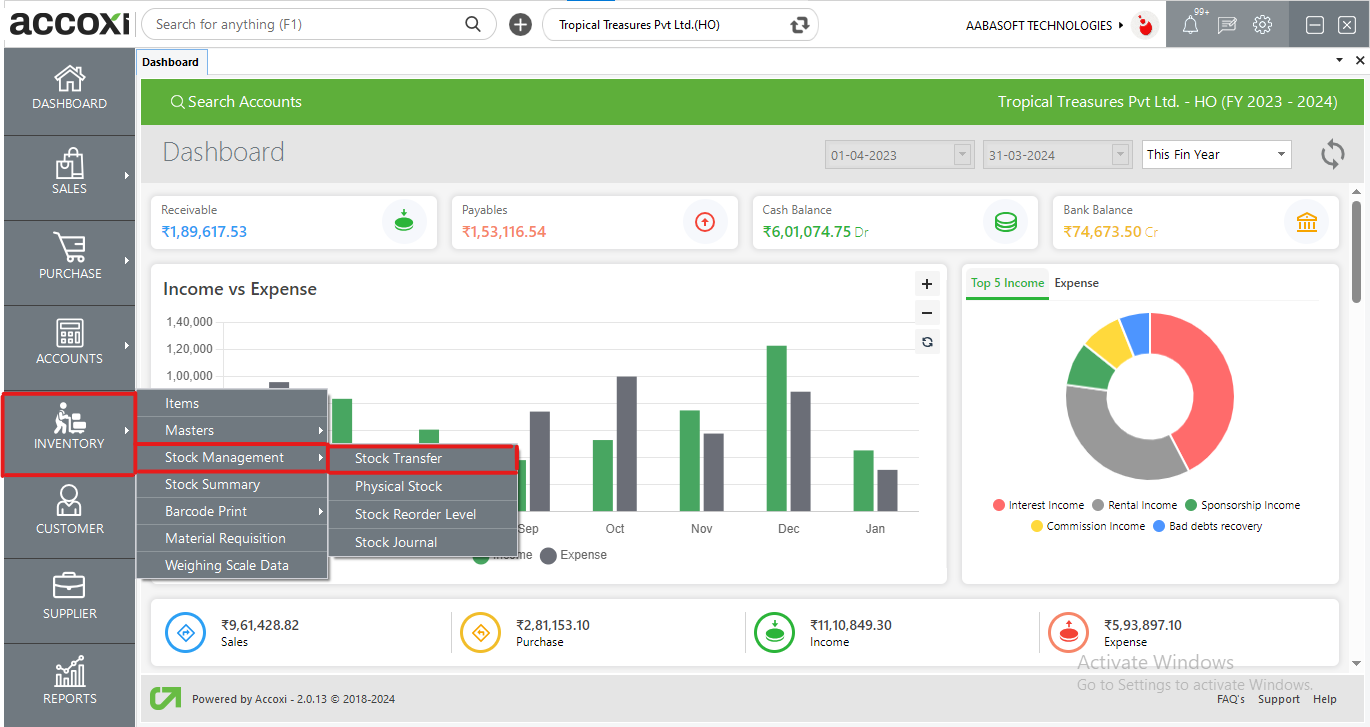
Click on the Inventory module and select the Stock Transfer option.
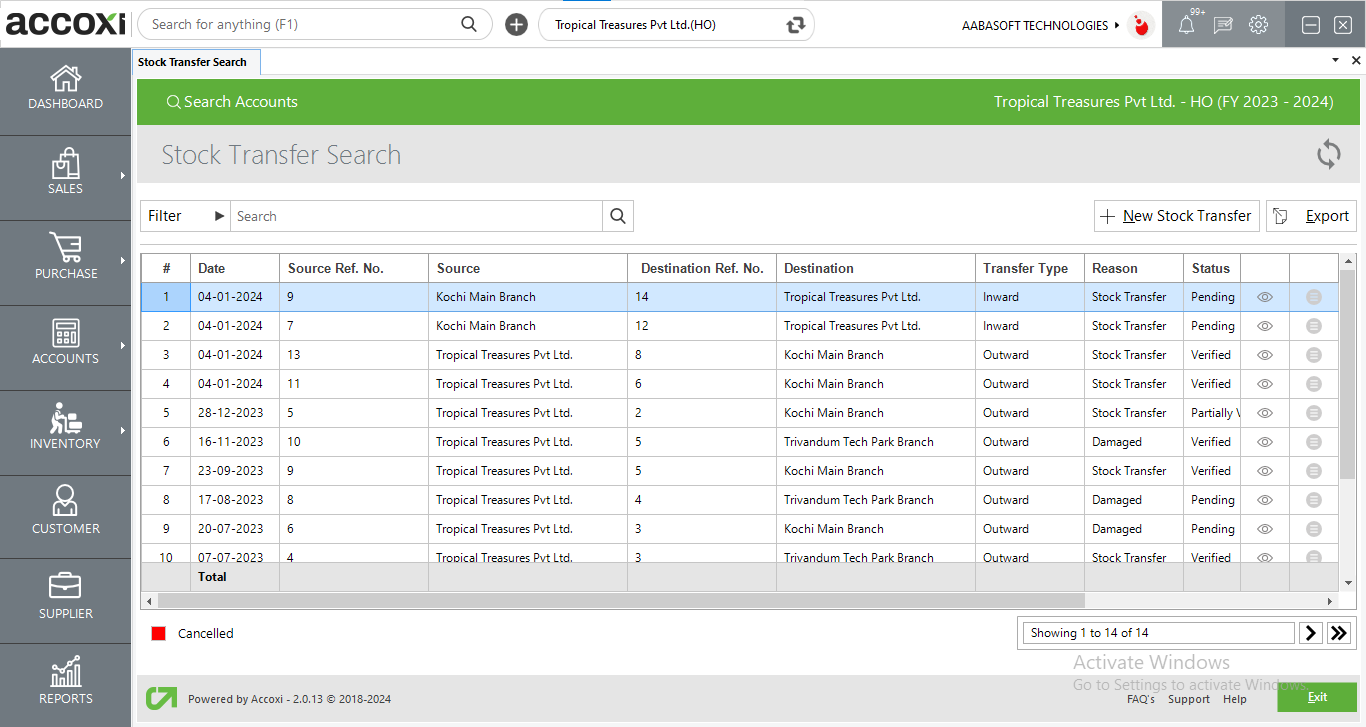
When clicking on the option Stock Transfer, then it opens the Stock Transfer Search page.
Stock Transfer
It consists of various menus and it shows the details of the stock transfer of the products along with the source of transfer, destination, transfer type, the reason for transfer, etc.
Data Available in Stock Transfer
|
Fields |
Description |
|
Date |
The date field shows the date of stock transfer. |
|
Source Reference No |
Source reference number helps the user to identify transfer in records and it will be the continuation of the previous transfer form. |
|
Source |
This field shows the source of the transfer. Source is the place, from which the stock originates or obtained. |
|
Destination Reference No |
Destination reference number helps the user to identify transfer in records and it will be the continuation of the previous transfer form. |
|
Destination |
This field shows the destination of the stock transfer. Destination is the place which the stock is going or being sent. |
|
Transfer type |
It shows the type of stock transfer whether it is Inward or Outward. |
|
Reason |
This field shows the reason of the stock transfer. The reason may be normal stock transfer or damaged. |
|
Quantity |
It shows the quantity of the product transferred. |
|
Amount |
This field shows the total amount of particular stock transfer. |
|
Status |
It shows the actual status of the stock transfer. It may be pending, verified, partially verified or cancelled. |
Menus Available in Stock Transfer Search
When click on the option Stock Transfer, it opens to Stock Transfer Search page. It consist of various menus and details of stock transfer.
|
Fields |
Description |
|
Filter |
The user can filter the Stock transfer details in two ways. Either can directly enter the transfer name in to the search bar near filter option or by clicking the filter menu. By clicking the filter option, user can filter the data by transaction type, source and data. User can filter the data by status and by date also. By clicking on the status option, need to select the status of the transfer. By clicking the by date option, need to enter the starting date along with the end date of the stock transfer, and then the data appears on the basis of the date entered.
|
|
Refresh |
If the latest data is not displayed, click on the refresh icon on the top right corner of the page to fetch the new data.
|
|
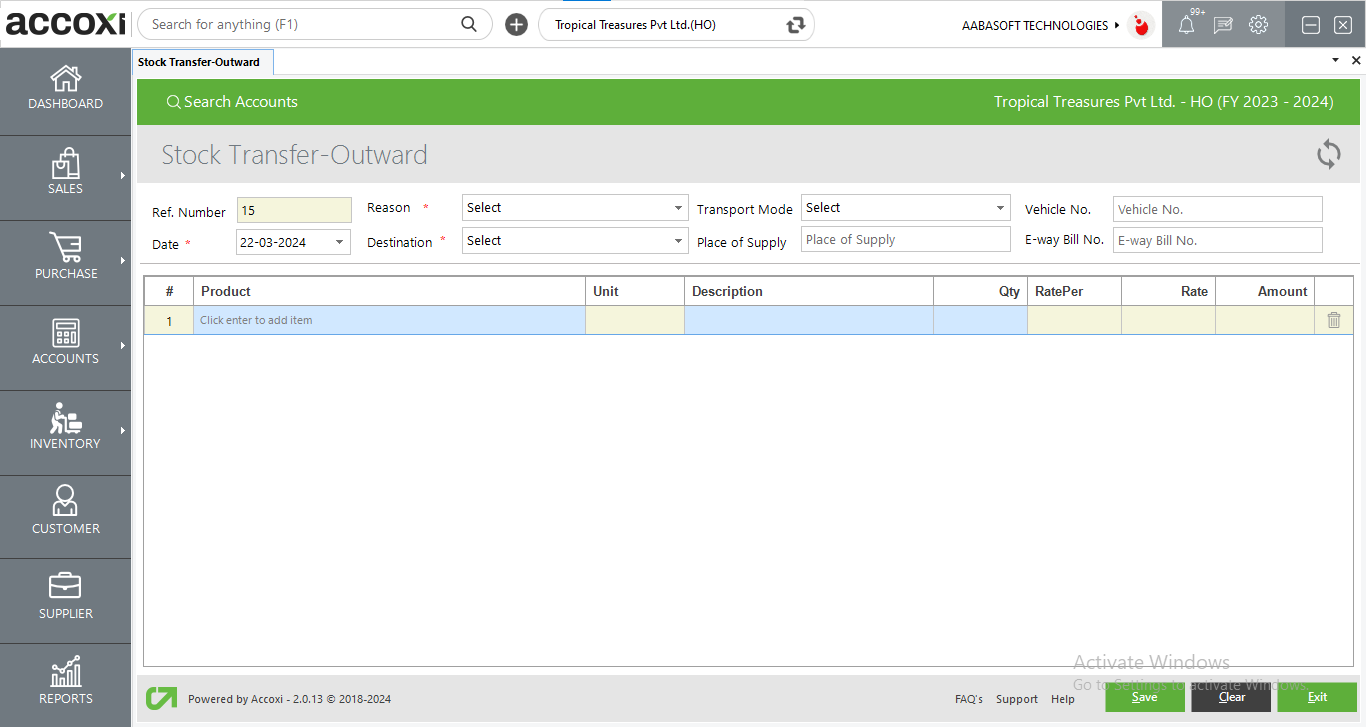
+New Stock Transfer |
The user can add a new stock transfer by clicking on the menu, +New stock transfer. While clicking on the menu, it opens to new form of stock transfer and user needs to enter the details to create new transfer.
|
|
Export |
The stock transfer list can be export to Excel format. Click on the Export button at the top right corner near the +New button. Select the file location and click on save.
|
|
View |
This menu option helps the user to view the created stock transfer form by clicking the view sign. While clicking on the view icon, it opens to Stock transfer view page. |
|
More Option |
This menu includes two options, Edit and Verify. Edit option will helps the user to edit the stock transfer form before its verification. Edit option will visible only before the stock transfer verification. After verified the transfer, user can’t edit the form and the edit menu will be disable.
Verify is the option that using for the purpose of verifying the transferred stock to inward the stock. Verify option will visible only in the case of stock inward time and not visible in the case of stock outward. By clicking on the Verify option, it opens to Stock Transfer Inward page and a new column will appear on the table with marking options. To verify the stock, user need to click/marking on the box, after marking the option, need to click on the Update menu to save the changes. Then transfer status will be change to Verified and if the user not marking, the status of that transfer will be show as pending.
|
|
Cancelled |
Cancelled stock transfers are displays with color format. Red color indicates the cancelled transfer.
|
|
Pagination control |
It controls the page navigation and the page size. Page size can be set to 10, 20, 50 or 100. And by giving page number in the box and clicking on Go button. It jumps to the said page.
|
|
Exit |
Below the pagination control, there is exit button. If you want to exit the stock transfer search page click on exit button.
|
Steps to Create New Stock Transfer
|
Fields |
Description |
|
Reference number |
Reference number helps the user to identify transfers in records. It will automatically appear on the bill form and the user can’t edit the reference number, as it will be the continuation of the previous stock transfer. |
|
Reason |
Users need to select the reason for the transfer on this field. By clicking on the select option, available options will appear and the user can select the reason as damage or stock transfer. |
|
Transportation mode |
Users need to select the transportation mode for the stock transfer in this field. Four types of modes are available;- road, rail, ship, and air. By clicking on the select option, the user can select the required one. |
|
Vehicle No. |
In this field, user needs to enter the registration number of vehicle that using for the stock transfer. |
|
Date |
The date will automatically appear on the date field and it may be the current day date. If the user want to change the date, it can be done by clicking on the date menu and can select the required date. |
|
Destination |
The user needs to enter the destination of the stock transfer on this field. The destination is the place which the stock is going or being sent. |
|
Place of Supply |
In this field, user needs to enter the place of supply. |
|
E-way Bill No. |
User can enter the E-way bill number on this field. |
|
Product |
In this field, the user can enter the products for transfer. |
|
Batch |
When the user enters the product name, needs to press Enter and then the batch will appear on the product and enter the batch also. |
|
Quantity |
In this field, the user needs to enter the required quantity for transfer the product. |
|
Rate |
The rate of the product will automatically appear on the field after selecting the product. The user can’t edit the rate on the field. |
|
Amount |
The amount of the product will automatically appear on the field after selecting the product for creating a stock transfer. The user can’t edit the amount of the product as it has already been fixed and the field was blocked. |
|
Delete |
This menu helps the user to delete unwanted items after entering the products on the field. |
|
Save |
Click on the Save menu to save the details entered and to create a stock transfer. |
|
Clear |
Clear menu is for clear or remove the details and for cancel the page. |
|
Exit |
Exit menu is using for go to the previous page without saving the stock transfer form. |
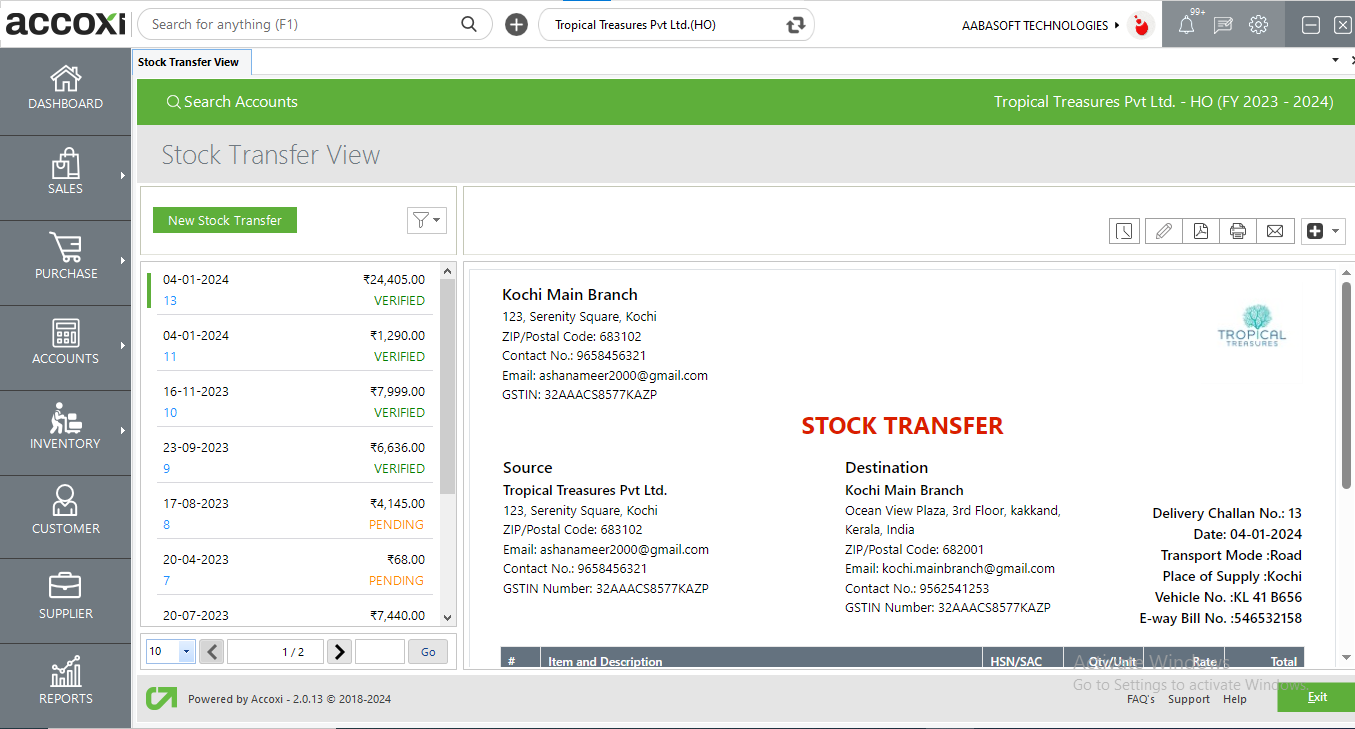
Menus Available in Stock Transfer View
After create the stock transfer form, click on the save option to create the stock transfer and it opens to Stock Transfer View page. It consist of various menus and options.
|
Fields |
Description |
|
History |
This menu helps the user to obtain the history details of the stock transfer. It shows the details of the stock transfer along with the date and the User can add comments in the comment box if required. |
|
Edit |
This menu helps the user to edit the stock transfer-outward form. By clicking on the menu, it opens the page of stock transfer outward and the user can edit the stock transfer order. After edit the form, click on the update menu to save the changes. |
|
Export to PDF |
This menu enable the user to export the Stock transfer form to PDF format and can save in the system. When the user click on the PDF menu, a new tab will appear for save the file. Then user can select the location to save the file, can set a name and click on save button to save the file as PDF format. |
|
|
If the user wants to take the print out of the stock transfer form, it can be done by using the menu Print on the top right side of the stock transfer view. When user click on the print menu, a new tab will appear on the screen and it contains the details regarding the print. User can set the page range, page height, width and can enter the required number of copies here. By clicking on the Print button, user gets the print out of the stock transfer form. |
|
|
Email menu enable the user to send the stock transfer form. By clicking on the Email menu, a new tab will appear that regarding the details of sending mail. It include To id, CC, subject and content. |
|
More Options |
This menu include cancel option of the stock transfer and create duplicate feature. User can cancel the stock transfer by clicking on the cancel option. To create a another stock transfer with same data, create duplicate feature can be used. |
Filter option is available below the stock transfer search bar at the left hand side. Stock transfer can be filtered based on transfer type, source, and status and by date. Either you can give any of the said criteria directly into the search bar near filter option or by clicking the filter down arrow option you can give the details into the fields directly.