Stock transfer is the act of moving goods from one part of the distribution chain to another.
Stock transfer involves the movement of goods within the distribution chain, transferring items from one point to another. Accoxi facilitates this process through its Stock Transfer system, allowing users to create internal purchase orders for transferring stock between various branches and warehouses. This system streamlines the transfer of goods, whether it's from the Head Office to a branch, from a branch to the Head Office, or between different branches within the organization.

Key Features:
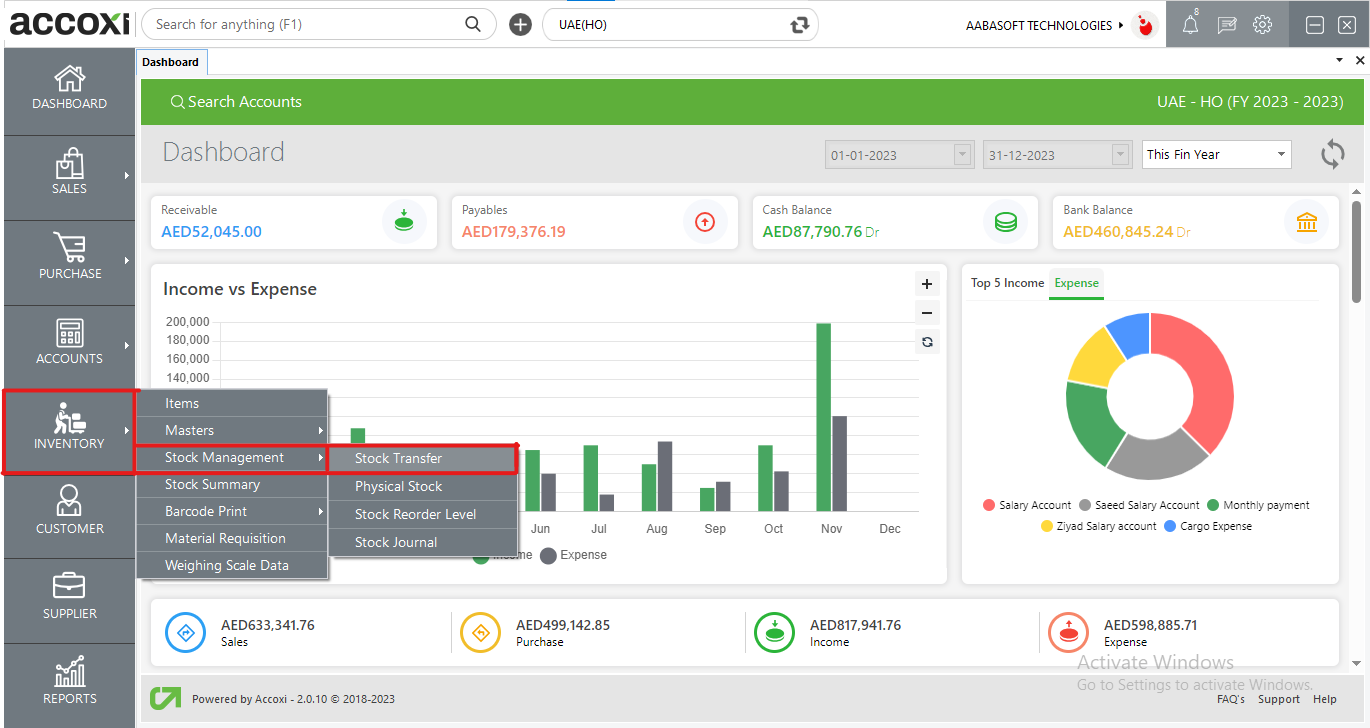
Navigate to the Inventory module and choose the Stock Transfer option.
Upon selecting the Stock Transfer option, it will open the Stock Transfer Search page.
Stock Transfer
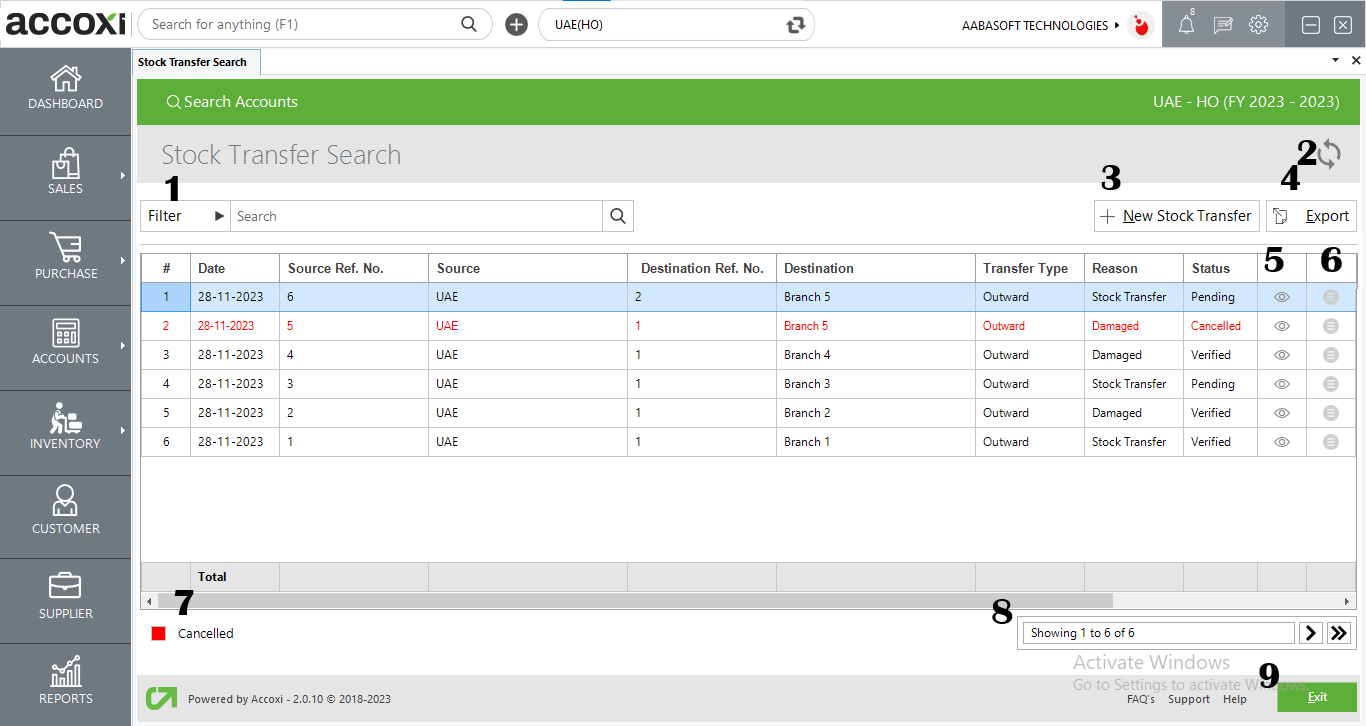
The Stock Transfer Search page encompasses various menus, presenting comprehensive details of product stock transfers. These details include information such as the source of transfer, destination, transfer type, reason for transfer, and more.
Data Available in Stock Transfer
|
Field |
Description |
|
Date |
The Date field displays the date of the stock transfer. This information indicates when the stock transfer transaction took place. |
|
Source Reference No |
The Source Reference Number aids the user in identifying transfers in records, and it continues the numerical sequence from the previous transfer form. This reference number serves as a unique identifier for each transfer transaction. |
|
Source |
This field indicates the source of the transfer. The source refers to the place from which the stock originates or is obtained. It provides information about the starting point of the stock in the transfer process. |
|
Destination Reference No |
The Destination Reference Number assists the user in identifying transfers in records, and it continues the numerical sequence from the previous transfer form. This reference number serves as a unique identifier for each transfer transaction, specifically related to the destination of the stock. |
|
Destination |
This field displays the destination of the stock transfer. The destination is the place where the stock is intended to go or the location to which it is being sent. It provides information about the final or target location for the transferred stock. |
|
Transfer Type |
It indicates the type of stock transfer, specifying whether it is an inward or outward transfer. This information distinguishes the direction of the stock movement in the transfer transaction. |
|
Reason |
This field displays the reason for the stock transfer. The reason could be categorized as a normal stock transfer or a transfer due to damaged goods. It provides insights into the purpose or cause behind the stock movement. |
|
Pending Quantity |
This field displays the value of the pending quantity of the product during a stock transfer. It provides information about the remaining or yet-to-be-transferred quantity of a particular product in the stock transfer process. |
|
Amount |
This field shows the total amount of a particular stock transfer. It represents the overall value or sum associated with the entire stock transfer transaction. |
|
Status |
This field indicates the actual status of the stock transfer. The status could be pending, verified, partially verified, or cancelled, providing a real-time overview of the progress and status of the stock transfer transaction. |
Menus Available in Stock Transfer Search
Selecting the Stock Transfer option opens the Stock Transfer Search page, which includes various menus and provides detailed information about stock transfers.
|
Field |
Description |
|
1. Filter |
The user can filter stock transfer details in two ways. One method involves entering the transfer name directly into the search bar near the filter option. Alternatively, the user can click on the Filter menu. By selecting the Filter option, the user can filter data based on transaction type, source, and date. Data can also be filtered by status and date. For the status filter, the user needs to select the status of the transfer. When using the By Date option, the user must enter the starting date and the end date of the stock transfer, and the data will then appear based on the specified date range. |
|
2. Refresh |
To ensure the display of the most recent data, click on the refresh icon located at the top right corner of the page. This action fetches and updates the page with the latest information. |
|
3. +New Stock Transfer |
The user can initiate the creation of a new stock transfer by selecting the menu option +New Stock Transfer. Clicking on this menu opens a new form for stock transfer, where the user is required to enter the necessary details to generate a new transfer record. |
|
4. Export |
To export the Stock Transfer list to Excel format, click on the Export button located at the top right corner, near the +New button. After clicking, choose the file location and then click on the Save option to save the exported data in Excel format. |
|
5. View |
This menu option allows the user to view the created stock transfer form by clicking on the view icon. Upon selecting the view icon, it opens to the Stock Transfer View page, providing detailed information about the respective stock transfer. |
|
6. More |
This menu comprises two options: Edit and Verify.
|
|
7. Cancelled |
Cancelled stock transfers are displayed with a distinct color format, and in this case, red color is used to indicate a cancelled transfer. This visual cue helps users easily identify and differentiate cancelled transfers from other transfer statuses. |
|
8. Pagination Control |
The Pagination Control manages both page navigation and page size. Users can set the page size to 10, 20, 50, or 100 entries. By entering the page number in the designated box and clicking on the Go button, the system navigates to the specified page. |
|
9. Exit |
Located below the Pagination Control, there is an Exit button. If you wish to exit the Stock Transfer Search page, click on the Exit button. This action allows you to leave the current page and return to the previous navigation level. |
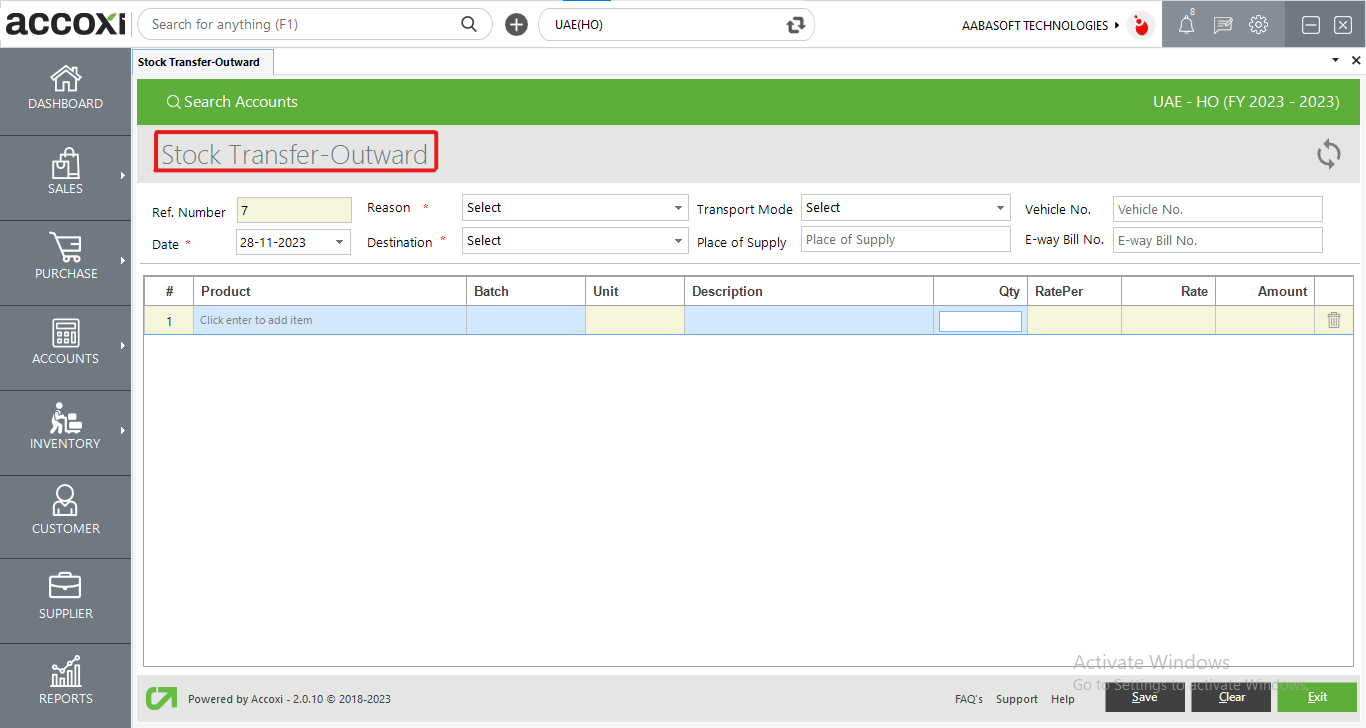
To create a new Stock Transfer, follow these steps:
|
Field |
Description |
|
Reference Number |
The Reference Number serves as a means for users to identify transfers within records. It is automatically populated on the bill form, and users are unable to edit the Reference Number. It follows a sequential pattern, ensuring continuity from the previous Stock Transfer. |
|
Reason |
In this field, users are required to choose the reason for the transfer. By clicking on the Select option, a list of available options, such as Damage or Stock Transfer, will appear, and users can then make their selection. |
|
Transportation Mode |
In this field, users are prompted to choose the transportation mode for the stock transfer. Four available options include Road, Rail, Ship, and Air. By clicking on the Select option, users can choose the preferred transportation mode for the transfer. |
|
Vehicle No. |
In this field, users are required to enter the registration number of the vehicle used for the stock transfer. |
|
Date |
The Date field will automatically display the current day's date. If the user wishes to change the date, they can do so by clicking on the Date menu and selecting the desired date. |
|
Destination |
In this field, users are required to enter the destination of the stock transfer. The destination refers to the place where the stock is intended to go or where it is being sent. |
|
Place Of Supply |
In this field, the user is required to enter the place of supply. |
|
Product |
In this field, users can enter the details of the products intended for transfer. |
|
Batch |
When the user enters the product name, they need to press Enter, and then the batch information will appear for the product. The user can proceed to enter the batch details as well. |
|
Quantity |
In this field, the user is required to enter the quantity needed for transferring the product. |
|
Rate |
The rate of the product will automatically appear in the field after selecting the product. It's important to note that the user cannot edit the rate in this field; it is automatically populated. |
|
Amount |
The amount of the product will automatically appear in the field after selecting the product for creating a stock transfer. It's crucial to note that the user cannot edit the amount of the product, as it is already fixed and the field is blocked for editing. |
|
Delete |
This menu serves to assist the user in deleting unwanted items after entering products in the field. It provides a way to remove unnecessary entries and streamline the list of items. |
|
Save |
Click on the Save menu to save the details entered and create a stock transfer. This action finalizes the information inputted and records the stock transfer in the system. |
|
Clear |
The Clear menu is used to remove or clear the entered details, essentially cancelling the page and discarding the information. |
|
Exit |
The Exit menu is used to navigate back to the previous page without saving the stock transfer form. It allows users to leave the current page without making any changes. |
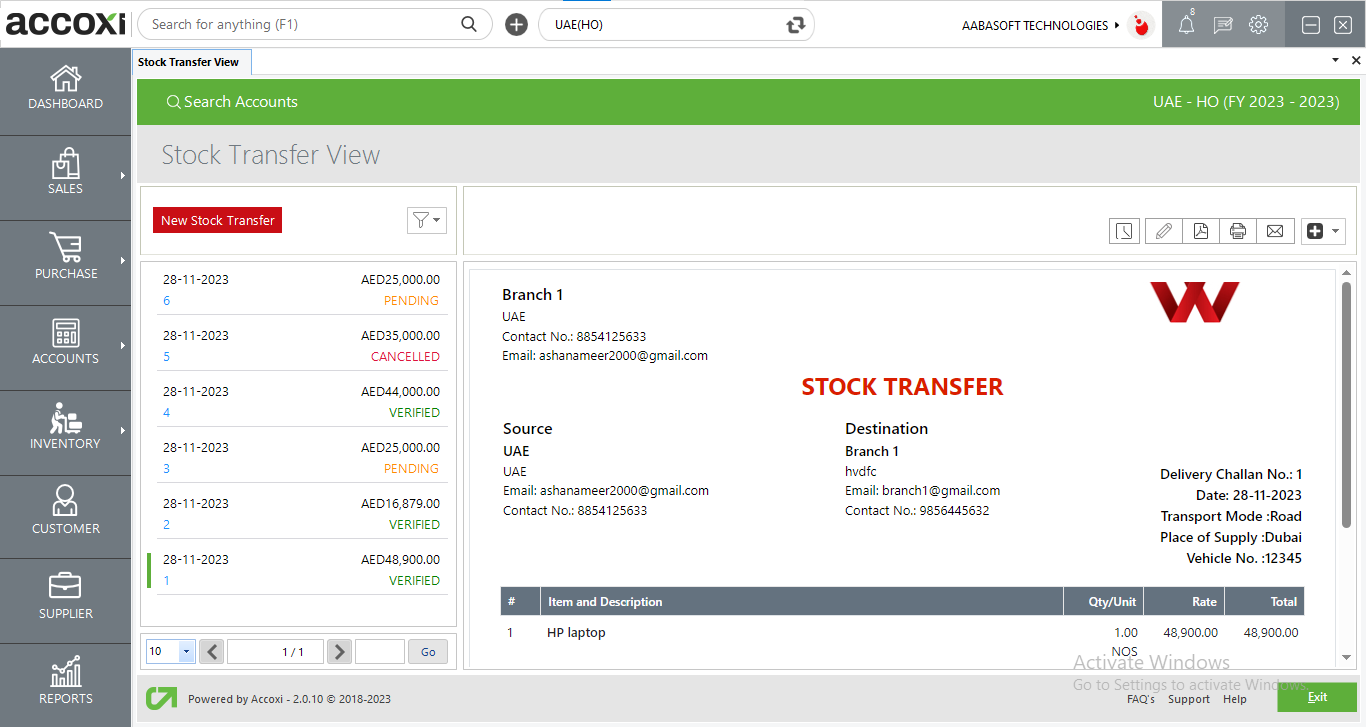
Menus Available in Stock Transfer View
After creating the stock transfer form and clicking on the save option, the system will open the Stock Transfer View page. This page comprises various menus and options, providing additional functionalities and information related to the stock transfer.
|
Field |
Description |
|
History |
This menu serves as a tool for users to retrieve historical details of stock transfers. It displays comprehensive information about each stock transfer, including the date. Additionally, users have the option to add comments in the provided comment box if necessary. |
|
Edit |
This menu facilitates users in editing the Stock Transfer-Outward form. Upon selecting this menu, it opens the Stock Transfer Outward page, allowing users to make modifications to the stock transfer order. After editing the form, users can save the changes by clicking on the Update menu. |
|
Export To PDF |
This menu empowers users to export the Stock Transfer form to a PDF format and save it within the system.
Upon clicking the PDF menu, a new tab will appear for saving the file. Users can choose the location to save the file, set a name, and click on the Save button to store the file in PDF format. |
|
|
To obtain a printout of the Stock Transfer form, users can utilize the Print menu located on the top right side of the Stock Transfer View.
Upon clicking the Print menu, a new tab will appear on the screen, displaying details related to the print. Users can set the page range, page height, width, and enter the desired number of copies. By clicking on the Print button, users can obtain a printout of the Stock Transfer form. |
|
|
The Email menu provides users with the capability to send the Stock Transfer form. Clicking on the Email menu will open a new tab with details for sending the email. This includes fields for the recipient's email address (To), carbon copy (CC), subject, and content. Users can fill in these details and proceed to send the Stock Transfer form via email. |
|
More Options |
This menu incorporates the option to cancel the Stock Transfer. Users can initiate the cancellation of the Stock Transfer by selecting the Cancel option. |