Manual guide on the Purchase order in Accoxi.

A purchase order (PO) is a legally binding document initiated by a buyer and forwarded to a seller, serving as confirmation of the buyer's intent to procure products and/or services. This document meticulously records essential details regarding the buyer's acquisition, encompassing the quantity and specifications of the items, along with stipulations for payment and delivery.
In Accoxi, users have the capability to create or save purchase orders, and they can further convert these purchase orders into purchase invoices. A purchase order (PO) within this context is a formal document issued by a buyer, signifying their commitment to compensate the seller for the anticipated delivery of specific products or services in the future.

Key Features of Purchase Order:
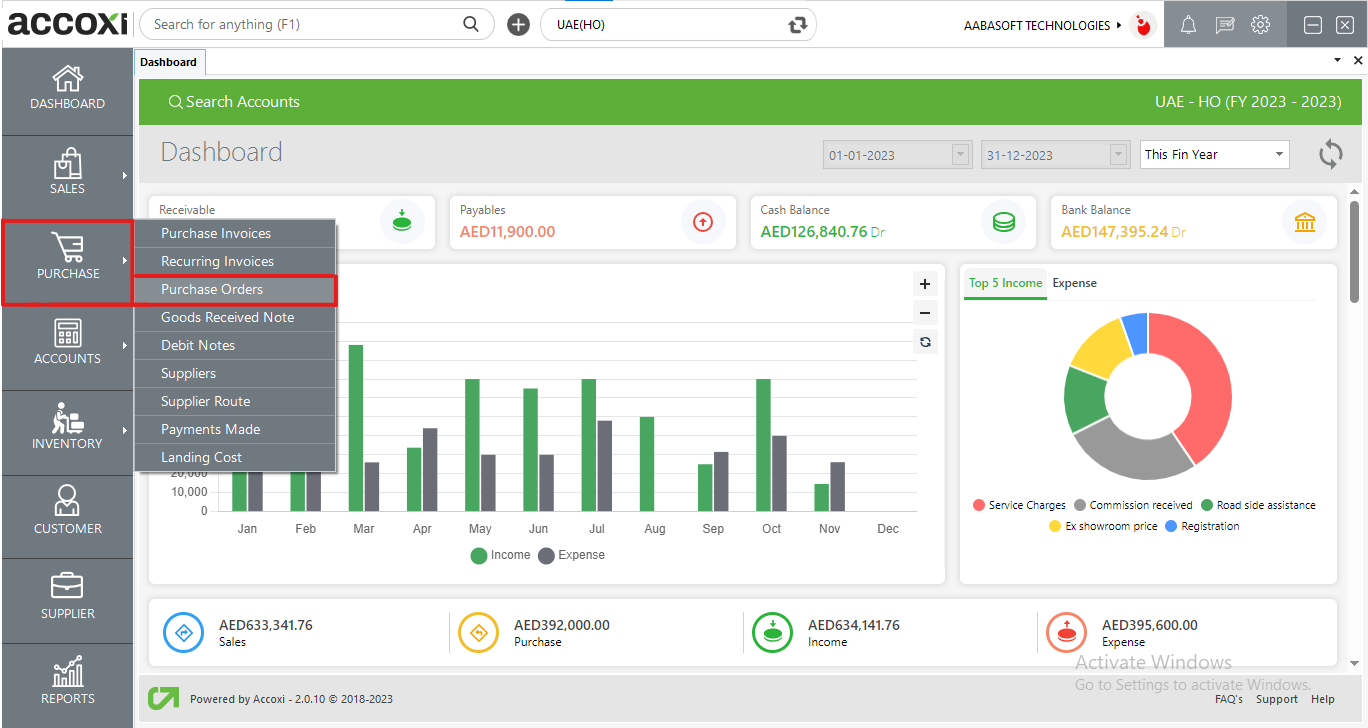
Navigate to the Purchase module and select "Purchase Order."
Upon clicking the "Purchase Order" menu, it directs you to the Purchase Order search page.
The Purchase Order search section encompasses different menus, providing a comprehensive overview of all the purchase orders created by the user.
Menus available in Purchase Order search
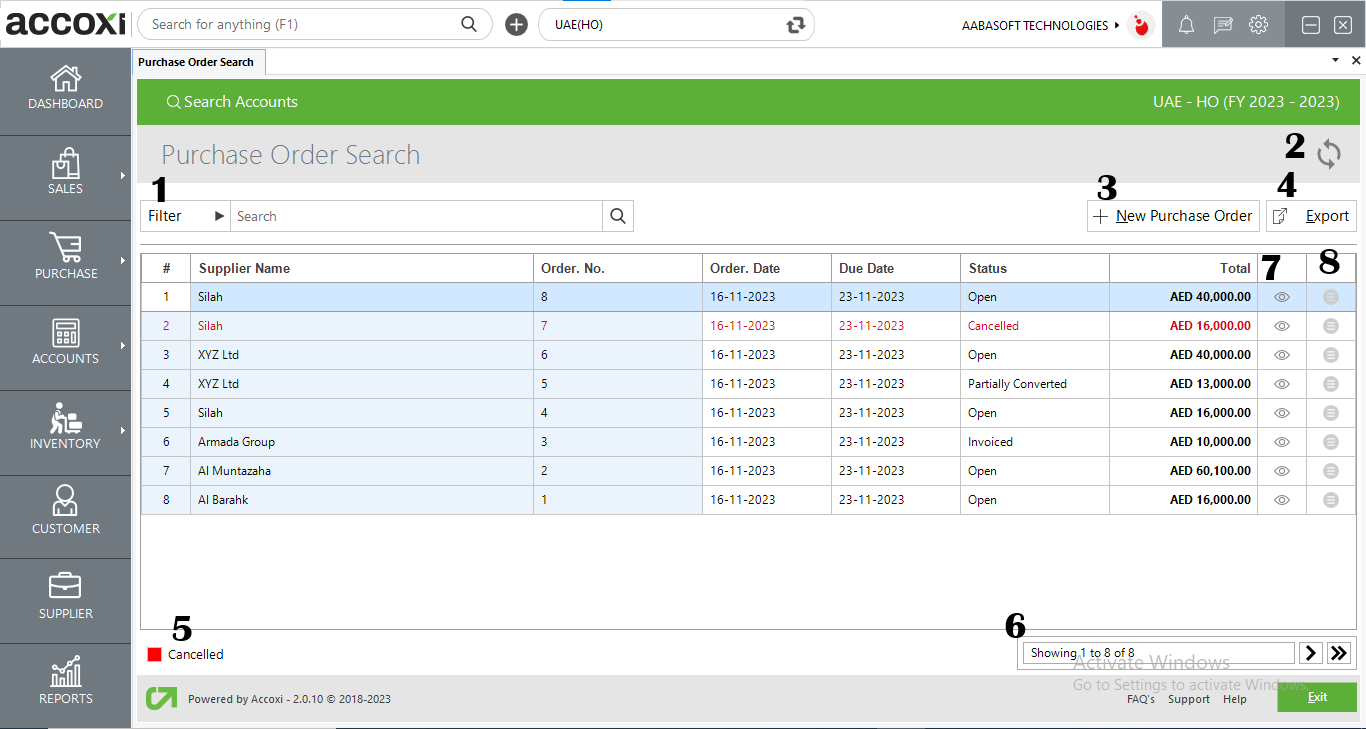
The purchase order filter offers two methods. Users can directly enter the supplier name in the search bar near the filter option, or they can utilize the filter drop-down. Filtering options include order number, supplier name, status, or date. To filter by date, users need to input the starting date and end date of the purchase order. Status-based filtering categorizes data as open orders, cancelled orders, invoiced orders, or all.
If the most recent data is not visible, users can click on the refresh icon located in the top-left corner of the page to retrieve the latest information.
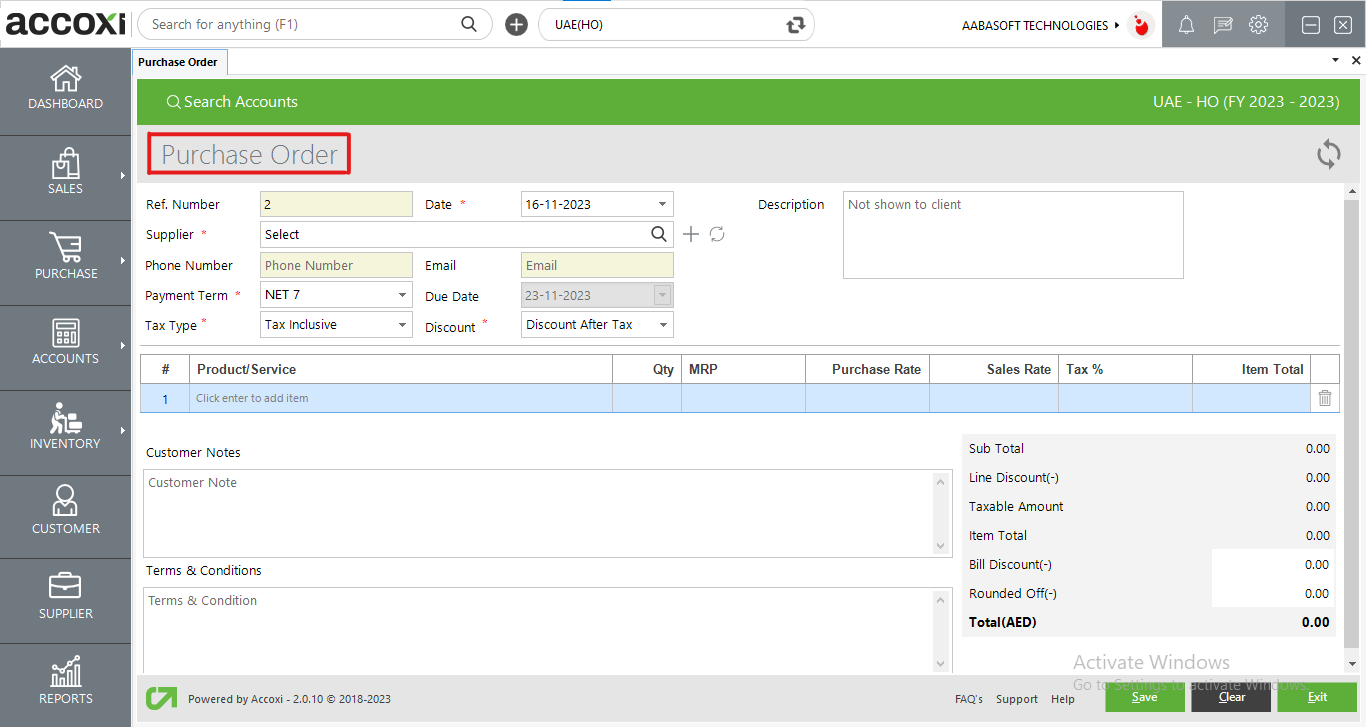
This option is utilized for creating a new purchase order. By selecting "Add New + Purchase Order," a new window will open with the purchase order form.
Steps to Create a New Purchase Order:
|
Field |
Description |
|
Reference No |
The reference number serves as a unique identifier for transactions in records. It is automatically generated and displayed on the Purchase Order form. Users cannot edit the reference number, as it follows the sequence from the previous order. |
|
Date |
The Date field is automatically filled with the current date. If the user wishes to modify the date, they can do so by clicking on the Date menu, where a dropdown calendar will appear, allowing the user to select the desired date for the purchase order. |
|
Supplier |
In the Supplier field, the user can select the supplier from the list by clicking the "Select" menu. A dropdown list of suppliers will appear, and the user can choose the desired supplier from the options. If the user needs to create a new supplier not present in the list, they can do so by clicking the "+ (Add New)" menu.
Once a supplier is selected, the associated information such as phone number and email will be automatically filled in the respective fields. |
|
Phone Number |
Upon selecting the supplier, the phone number details of the chosen supplier will be automatically populated in the corresponding field. |
|
Payment Term |
Choose the payment term from the available options in this field. In certain instances, the payment term may be automatically filled if it has been pre-saved in the supplier account. When selecting the supplier, the associated payment term will be displayed, and it can be edited if necessary. |
|
Due Date |
The due date, representing when the payment is expected, is automatically populated based on the set payment term for the supplier. Users cannot edit or delete the date in this field. |
|
Tax Type |
There exist two tax types: inclusive and exclusive. Upon selecting a supplier, the system will automatically display the corresponding tax type in the designated field. This field is non-editable for the user. However, for registered suppliers or regular dealers, the user has the option to choose between inclusive or exclusive tax types. |
|
|
The email ID of the chosen supplier is visible in the display. Users are unable to input any data into this field. |
|
Description |
If needed, users have the option to provide an additional explanation. |
|
Discount |
The discount menu offers two types of discounts: "Discount Before Tax" and "Discount After Tax." Users can choose the desired discount type from the menu.
If the user opts for the "Discount Before Tax" type, the discount is subtracted from the subtotal amount before calculating the tax. In this case, the user can input the discount rate as a percentage.
On the other hand, if the user selects the "Discount After Tax" type, the discount is deducted after calculating the tax amount. In this scenario, users are required to enter the discount rate. |
|
Product/Service |
Choose the product or service for which you want to generate a purchase order. After entering the product name, press Enter, and the corresponding batch information will be displayed. Enter the batch details as required. Once the product and batch information are entered, the rate and other relevant details will automatically appear in the respective fields. |
|
Unit |
The product unit will be automatically populated in the field once the user selects or enters the product. Users are not allowed to manually enter or edit the unit in this field. |
|
Product/Service Description |
If necessary, users have the option to enter additional explanations or details about the product. |
|
Quantity |
Input the quantity of the product in this field. |
|
MRP |
The MRP (Maximum Retail Price) of the product will automatically be displayed in the field upon selecting the product to create a purchase order. Users are not permitted to edit the MRP, as it is already fixed. |
|
Purchase Rate |
Upon selecting the product, the purchase rate will automatically populate the field. Users have the flexibility to edit the rate in the field if necessary. |
|
Sales Rate |
Upon selecting the product, the sales rate will be automatically displayed in the field. Users have the option to edit the rate in the field if needed. |
|
Taxable Amount |
The taxable amount, the value on which tax is applicable, will automatically appear after entering the rate details. |
|
Tax % |
This field automatically displays the tax rate for the purchased item. |
|
Tax Amount |
The tax amount is the sum for which a business or individual is taxed based on the tax type, whether it is inclusive or exclusive. |
|
Item Total |
Upon entering the details of the purchased item, including the product rate, tax rate, etc., the user obtains the gross amount, representing the total cost of the item. |
|
Round Off |
Rounding numbers facilitates simpler and more convenient value calculations. Users can round off the total amount using this field, with options for rounding downward, upward, or to the nearest value. Preferences for rounding can be selected from the organization settings menu. |
|
Save |
Once all the details have been entered, click on the "Save" option to either create a new purchase order or save the completed purchase order form. |
|
Clear |
The "Clear" option is used to erase or remove all the data entered by the user, clearing the entire input. |
|
Exit |
The "Exit" option is utilized to navigate to the previous page without saving the purchase order form. |
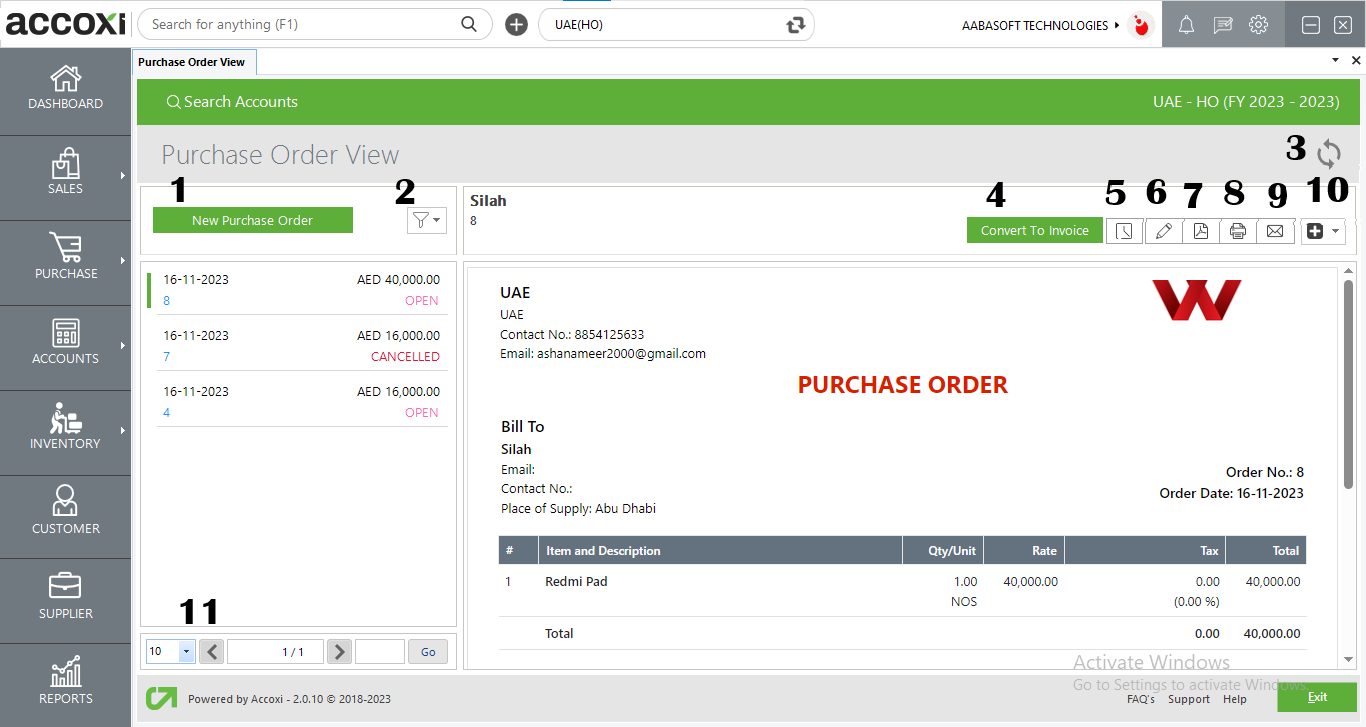
Menus available in the Purchase Order view
|
Field |
Description |
|
1. New Purchase Order |
The "New Purchase Order" menu option is used to initiate the creation of a new purchase order. By clicking on "New Purchase Order," the user is presented with a new form to fill out and generate a fresh order. |
|
2. Filter |
The "Filter" menu allows the user to sort and filter the data based on order status, such as open orders, canceled orders, invoiced orders, or view all orders. |
|
3. Refresh |
If the most recent data is not visible, click on the refresh icon located at the top left corner of the page to retrieve the updated information. |
|
4. Convert To Invoice |
Selecting the "Convert to Invoice" menu will direct you to the Purchase Invoice page, which encompasses all the details, including the purchase order date and number. The user is required to enter the invoice number to generate a purchase invoice.
Once the purchase order is converted into an invoice, the purchase order status will transition from "Open" to "Invoiced." |
|
5. History |
This menu allows the user to access the history details of the purchase order. There are two tabs in the Purchase Order History:
|
|
6. View Journal |
This menu provides a journal view of the purchase order, displaying both the debit and credit aspects along with their respective amounts. |
|
7. Edit |
The "Edit" menu facilitates users in modifying or correcting details entered in the purchase order. Upon selecting the "Edit" menu, the screen will revert to the previous window of the new purchase order form, allowing users to make changes and save the updated information. |
|
8. Export To PDF |
The "PDF" menu empowers the user to export the purchase order form to a PDF format and save it on their system.
Upon clicking the "PDF" menu, a new tab will appear for saving the file. The user can choose the location, set a name for the file, and then click the "Save" button to save the purchase order form in PDF format. |
|
9. Print |
To obtain a printout of the created purchase order form, users can utilize the "Print" menu located on the top right side of the order view.
Upon clicking the "Print" menu, a new tab will appear on the screen containing details for the print settings. Users can configure the page range, page height, and width, as well as input the desired number of copies. By clicking the "Print" button, users can obtain a printout of the purchase order form. |
|
10. Email |
The "Email" menu allows users to send the purchase order form directly to the suppliers.
Upon clicking the "Email" menu, a new tab will appear with details for sending the email. This includes fields for To, CC, Subject, and Content.
In the "To" field, the email ID of the supplier will automatically appear when clicking on the main menu. Users can change the email ID by removing the existing one and entering a new one. Users can enter CC if needed and add additional description as required. If users wish to change the email template, it can be done through the Email Template in Settings. It is necessary to mark the "Attachment" option to send the purchase order form with the email. After marking the options, clicking on the "Send" option will send the email to the selected supplier. |
|
11. More Options |
The "More Options" menu, situated on the top right side of the screen, provides additional functionalities such as creating a duplicate and canceling orders.
To create a duplicate copy of the purchase order, users can select the "Create Duplicate" option from the "More Options" menu. This action redirects the user to the purchase order creation page with the duplicated details.
If the user wishes to cancel the created purchase order, they can achieve this by selecting the "Cancel" option from the "Add New" menu. |
|
12. Pagination Control |
This feature manages page navigation and page size. Users can set the page size to 10, 20, 50, or 100. By entering the desired page number in the box and clicking the "Go" button, the user is directed to the specified page. |
The Purchase Order list is exportable to Excel format. Click the Export button located at the top right corner, near the +New button. Choose the file location and click on save.
Easily identify cancelled purchase orders using a color format; cancelled orders are highlighted in red.
This feature manages page navigation and size. Page size options include 10, 20, 50, or 100. Enter a page number in the designated box and click the Go button to navigate to the specified page.
The View menu allows users to access and review previously created Purchase Order forms.
This menu offers additional functionalities such as editing, viewing, exporting to PDF, and printing the purchase order.