Recurring Purchase invoices- A guide
A recurring invoice is merely an invoice that is sent to the same customer at regular intervals, containing the same invoice details. It might be more efficient for you to set up a recurring invoice, to allow your invoices to be sent to your customers automatically, hassle free.
In ACCOXI in the purchase module user can create a recurring invoice as well as a recurring bill.
Key features:
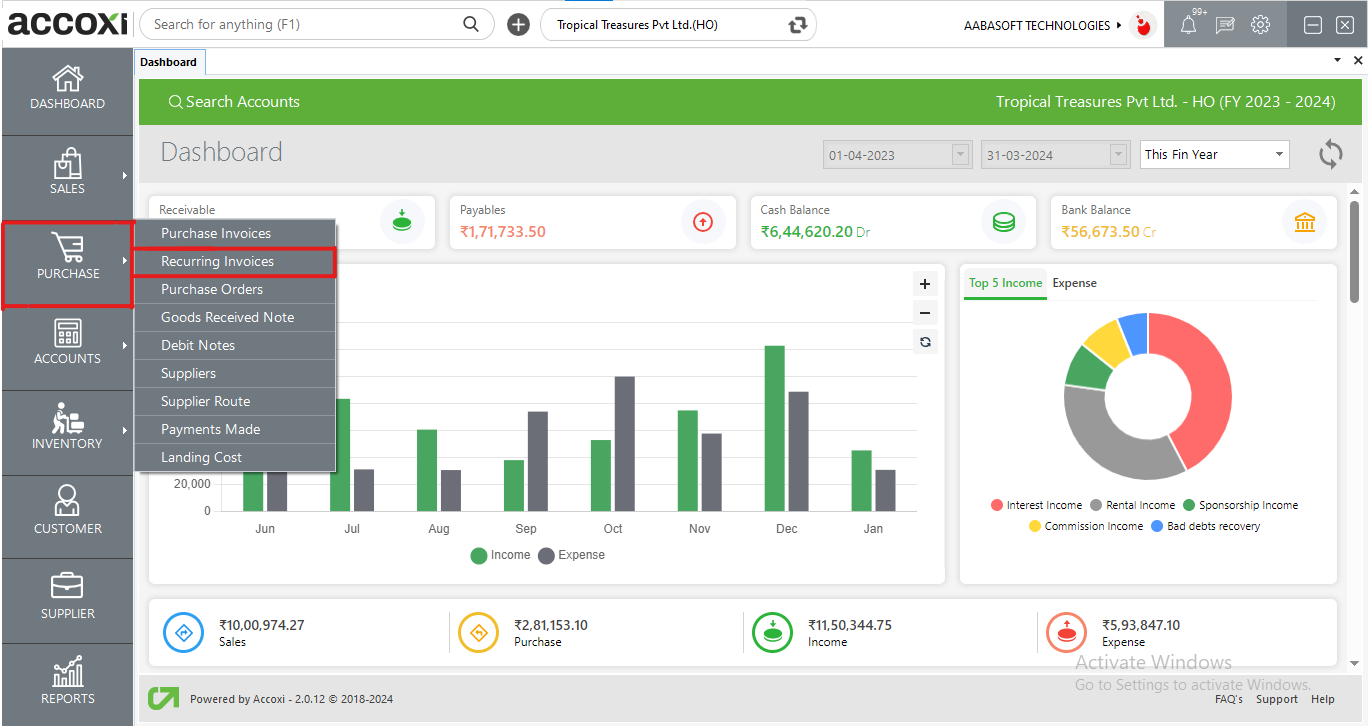
Click on the Purchase module and select the option Recurring Invoices
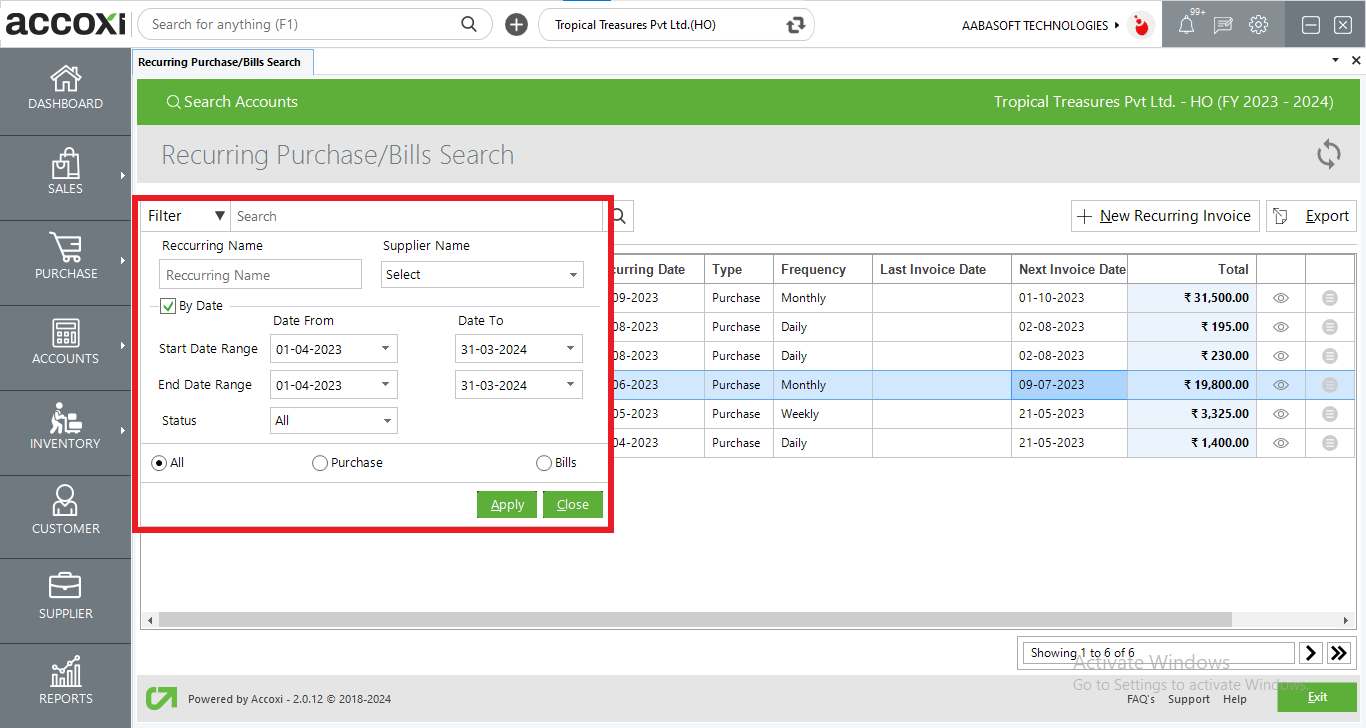
Then it opens to the Recurring Purchase/Bills Search page
Recurring purchase or bills search window gives the user the information regarding all the recurring purchases and bills of the business.
Menus available in Recurring purchase or bills search:
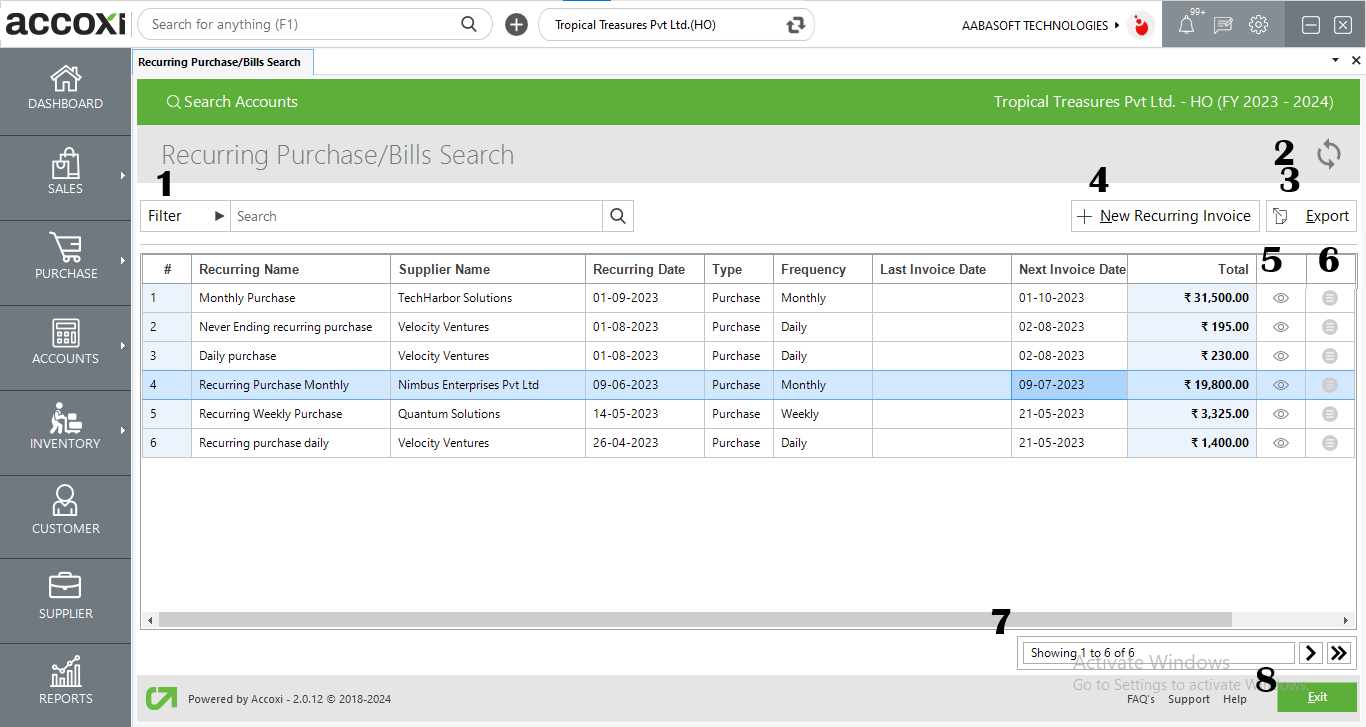
1. Filter: The filter option in the recurring purchase/bills window helps the user to filter the data shown in the window.
a. Filter of recurring purchase/bills search can be done in two ways-Either you can directly enter the recurring name into the search bar near the filter option or by clicking the filter drop-down. You can filter the data by recurring name, Supplier name.
b. There is also an option available, by selecting the by the date the data can be filtered according to the starting date and ending dates of invoices or bills. There is also an option to sort according to the status of the invoice/bill like started, paused and canceled. The view can be filtered using either selecting all or purchase invoices or bills.
2. Refresh:
If your latest data is not displayed, click on the refresh icon on the top left corner of the page to fetch the new data.
3. Export:
The purchase invoice list can be exported to Excel format. Click on the Export button at the top right corner near the +New button. Select the file location and click on save.
4. New: a new recurring purchase can be entered using pressing the new button and by selecting the purchase option.
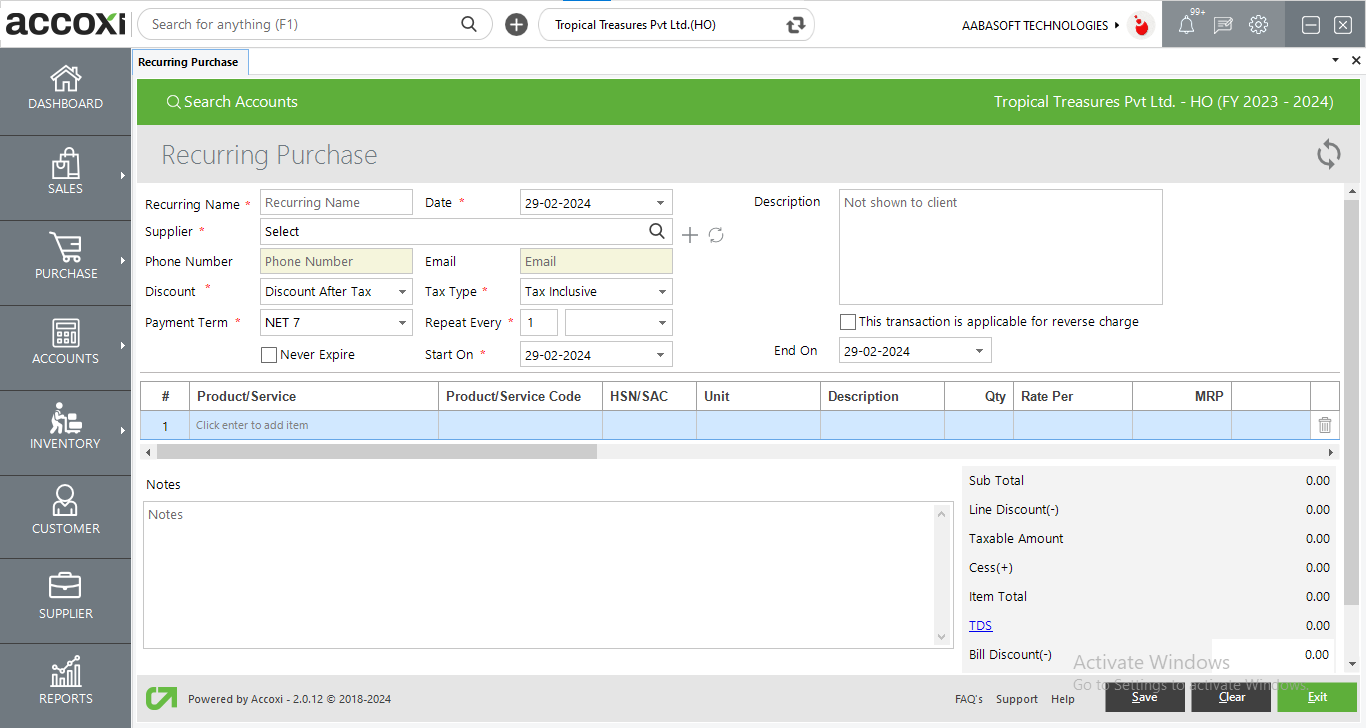
Steps to add a recurring purchase:
|
Fields |
Description |
|
Recurring name |
Enter the name of the recurring purchase |
|
Date |
Enter the date of the recurring invoice. But by default, the date will be set as the date of entering the transaction into ACCOXI. |
|
Supplier |
Select the supplier from the drop-down menu |
|
Phone number |
It will be automatically filled when we select the supplier
|
|
Description |
Enter the description if any |
|
Payment term |
The payment term which is already set with the supplier will be shown here you can change the term if you want |
|
|
It will be automatically filled when we select the supplier
|
|
Tax type |
Select tax type
|
|
Repeat every |
Enter the number of recurring intervals in repeat every day, week, month or year
|
|
Never expire |
Provides an option to apply never expiry for never-ending invoices
|
|
Start on/end on |
Gives access to select a start date and end date of recurring purchase
|
|
Discount |
Select type of discount as after and before tax
|
|
Product or service |
Enter the product here.by pressing the enter key it will give you the details of all products that you entered
|
|
Batch |
Select the batch of the product by clicking on the batches column
|
|
QTY |
Enter the quantity of the products and save
|
|
Discount |
The user can enable discount allowed on the recurring invoices in this column These discounts may be discount after tax, before tax.. |
|
TDS |
TDS can be entered in this section in two ways · Firstly the user can select the tax name from the select drop-down menu and in the amount column the calculated % of tax amount will be shown and the user cant edit that column · Another way is the user can directly use the amount column to enter the TDS amount.
|
|
Other charges |
Other charges open a window that allows the user to add additional charges to the invoice. |
|
Round off |
This column is to round off small amounts and the round-off may be downward, upward and nearest this is selected in the preferences menu => organization settings. |
|
Save |
By clicking save recurring invoice is created and the user will be redirected to the recurring invoice view window. |
|
Clear |
This option enables the user to clear the data entered in the new recurring invoice window
|
|
Exit |
Users can exit from the invoice window by clicking this button. |
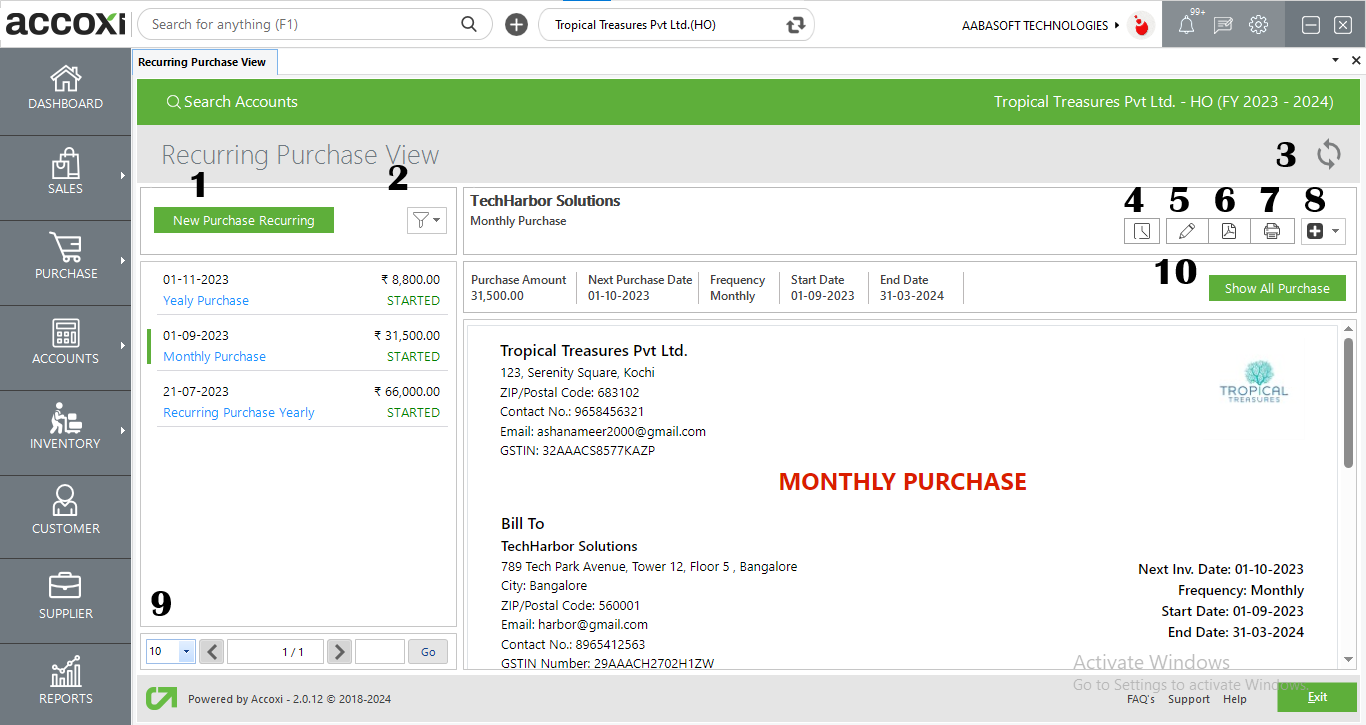
Menu’s available in Recurring purchase view
|
FIELDS |
DESCRIPTION |
|
1. New purchase recurring |
The new purchase recurring button redirects to the create new recurring purchase window |
|
2. Filter |
Filter option filters the recurring invoices of the supplier that you just dealt with according to all, started, expired, and cancelled
|
|
3. Refresh |
If your latest data is not displayed, click on the refresh icon on the top left corner of the page to fetch the new data.
|
|
4. History |
the recurring invoice shows the history/comments of the transactions made Shows all the edits and alterations of the recurring invoice with date of the changes made
|
|
5. Edit |
an option gives the user the permission to edit the invoice if needed
|
|
6. Export to Pdf |
If the user wants to convert the recurring invoice to PDF format, then the export to PDF option is available.
After clicking export to pdf a save as directory option will appear and the user can opt the pdf file saving location
|
|
7. Print |
The print menu helps the user to print the created recurring invoice if required. After clicking the print button it will redirect to print options where the user can select the printer, number of copies to take etc.
|
|
8. More Options |
|
|
9. Pagination control |
It Controls The Page Navigation And The Page Size. Page Size Can Be Set To 10, 20, 50, Or 100. And By Giving the Page Number In The Box And Clicking On Go Button. It Jumps To The Said Page |
10. Show All Purchase
After setting and activating the recurring invoices, it will be saved as a draft (if stated). Then we can convert this draft to an invoice. Since it’s a recurring theme, the purchases made in regular intervals are shown in the ' Show all Purchases.
5. View icon: this icon redirects the user to invoice view window
6. More options
You can edit, view, export to pdf, and print the recurring invoice details if required using the more icon.
7. Pagination Control
It controls the page navigation and the page size. Page size can be set to 10, 20, 50 or 100. And by giving page number in the box and clicking on Go button. It jumps to the said page.
8. Exit
Below the pagination control, there is an exit button. If you want to exit the supplier search page click on exit button.
Yes. You can create duplicate invoice while creating a Recurring Purchase/Bill Invoice.
Yes. You can export the Recurring Invoice data in to Excel format. It can be done by the following steps;