Dive into the process of recording advances, and pending payments, and set off opening balances.

The Payments Made module in Accoxi facilitates various operations, including: 1. Supplier Payments: This feature enables users to make payments for pending invoices related to purchases. It streamlines the process of settling outstanding balances with suppliers. 2. Supplier Advances: The module allows users to manage and make payments for specific advances owed to suppliers. This functionality provides a systematic approach to handling advance payments. 3. Opening Set Off: In the context of settling accounts, the Opening Set Off function is used to write off opening balances that are owed to the supplier. This ensures accurate and comprehensive accounting of financial transactions.
Key Features of the Payments Made Function:
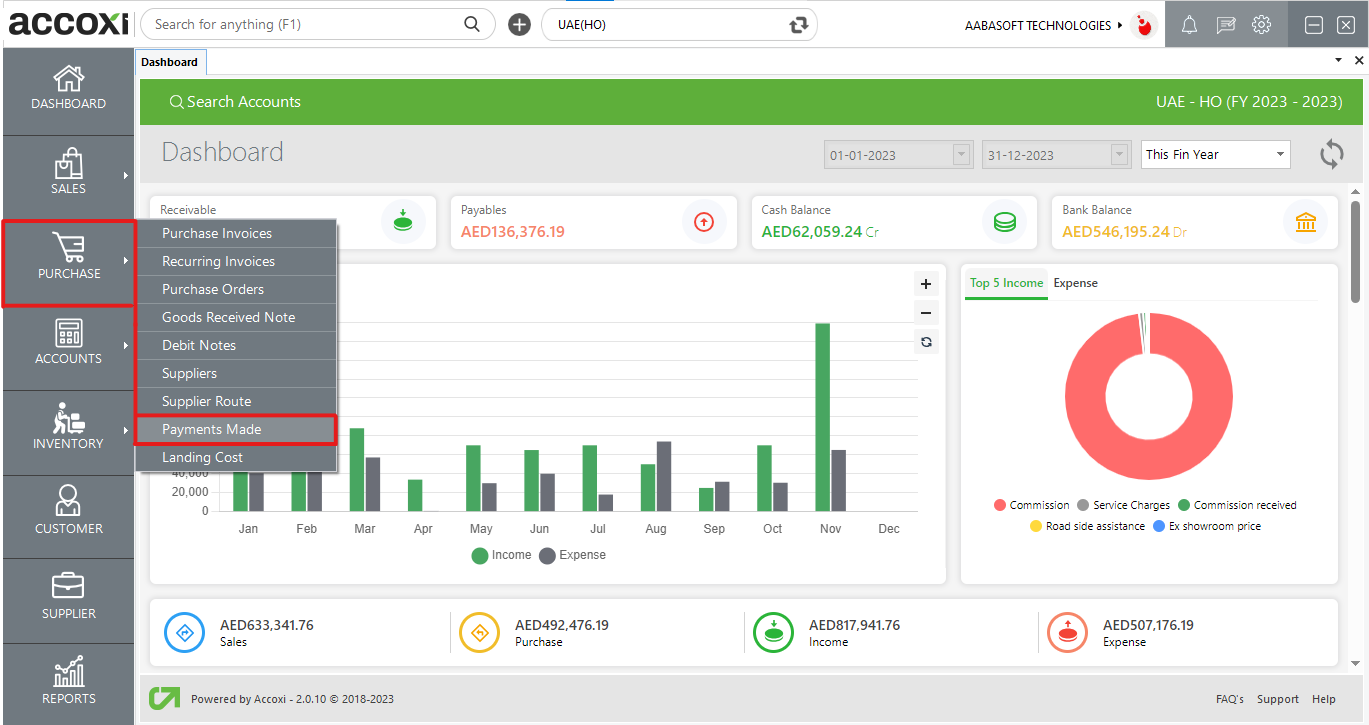
To access the Payments Made option in the Purchase Module:
Upon clicking the Payments Made option, it will open the Payment Made Search, providing users with the interface to search and retrieve information related to payments made within the system.
Payment Made Search
The Payment Made menu encompasses various options and displays the details of the payment lists that the user has previously created.
Data Available in Payment Made Table
It provides a comprehensive overview of payments made by the user, displaying key information such as the date, type of payment, and the number of applied invoices.
|
Field |
Description |
|
Date |
The payment date will be displayed in this field. |
|
Reference Number |
The reference number serves as a means for the user to identify transactions in records, and it continues the sequence from the previous payment form. |
|
Party Name |
This field displays the supplier name associated with a specific payment. |
|
Type |
This field indicates the type of payment, distinguishing between Advance Payment, Supplier Payment, or Opening Set off. |
|
Applied Invoices |
This field provides details about the amount paid in invoices. If any amount has been paid to the supplier, the reference numbers of the paid invoices will be displayed in this field. Users can access the payment history details by clicking on the appropriate field.
To review the payment history of a supplier, click on the "Applied Invoices" field. Clicking on this field will open the Applied Invoices tab on the screen.
In the Applied Invoices tab, reference numbers of the paid invoices are shown. Users can retrieve the invoice details of the paid supplier by clicking on the view icon located on the right side of the tab. Clicking on the view icon will open the Purchase View Form, providing a detailed view of the specific purchase transaction. |
|
Amount Paid |
This field displays the details of the amount paid. If any amount has been paid to the supplier, it will be shown in this field. |
|
Unused Amount |
Through this field, users can identify the unused amount that has not been utilized to purchase anything after the payment was made. |
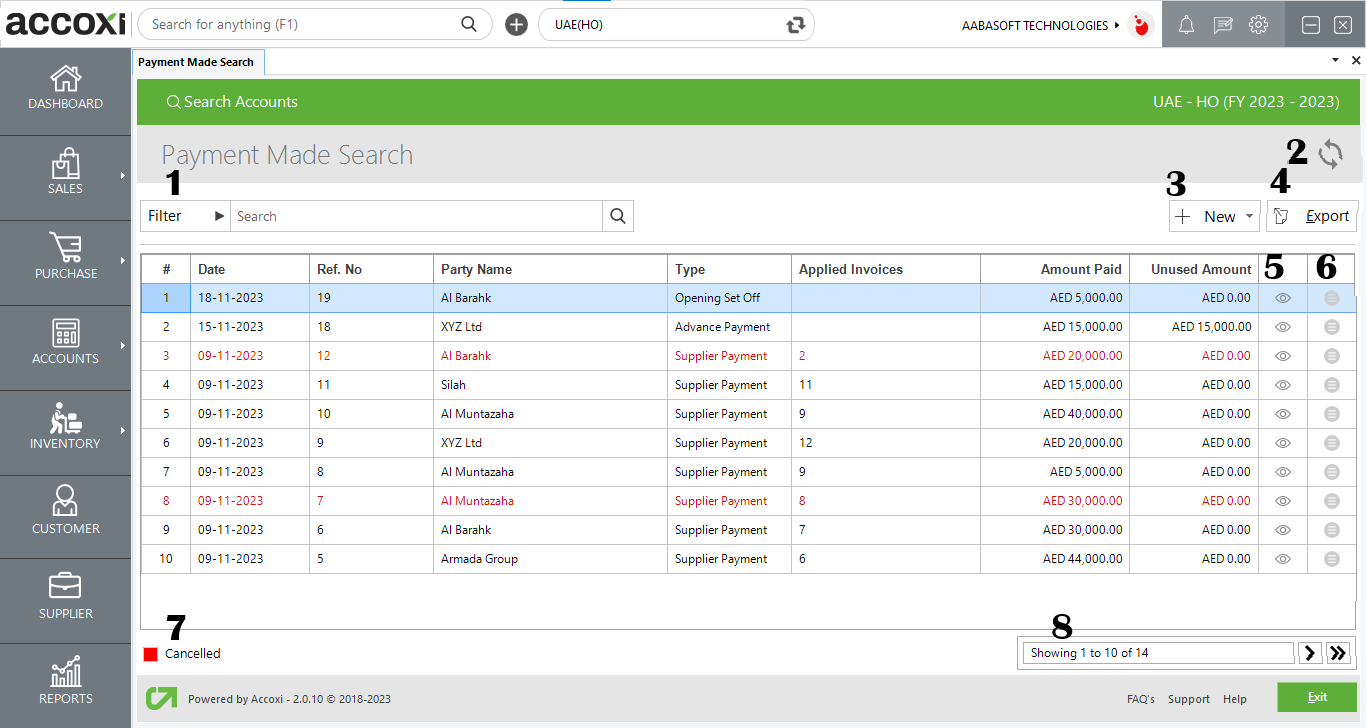
1. Filter: The filter functionality for payments made offers two approaches. Users can either directly input the supplier name into the search bar near the filter option or utilize the filter drop-down. Data can be filtered by invoice number, party name, date, or status. When selecting "By Date," users must input a start and end date. Additionally, filtering can be done by the status of the payment, such as active or cancelled payments.
2. Refresh: If the most recent data is not displayed, users can click on the refresh icon at the top left corner of the page to fetch updated information.
3. Add New +: This option is used to create a new payment. Clicking on the "Add New" menu opens a new window where users can input details to generate a new payment.
Steps to Create a New Payment:
Three payment options available under the +New menu are Supplier Payments, Supplier Advance, and Opening Set off.
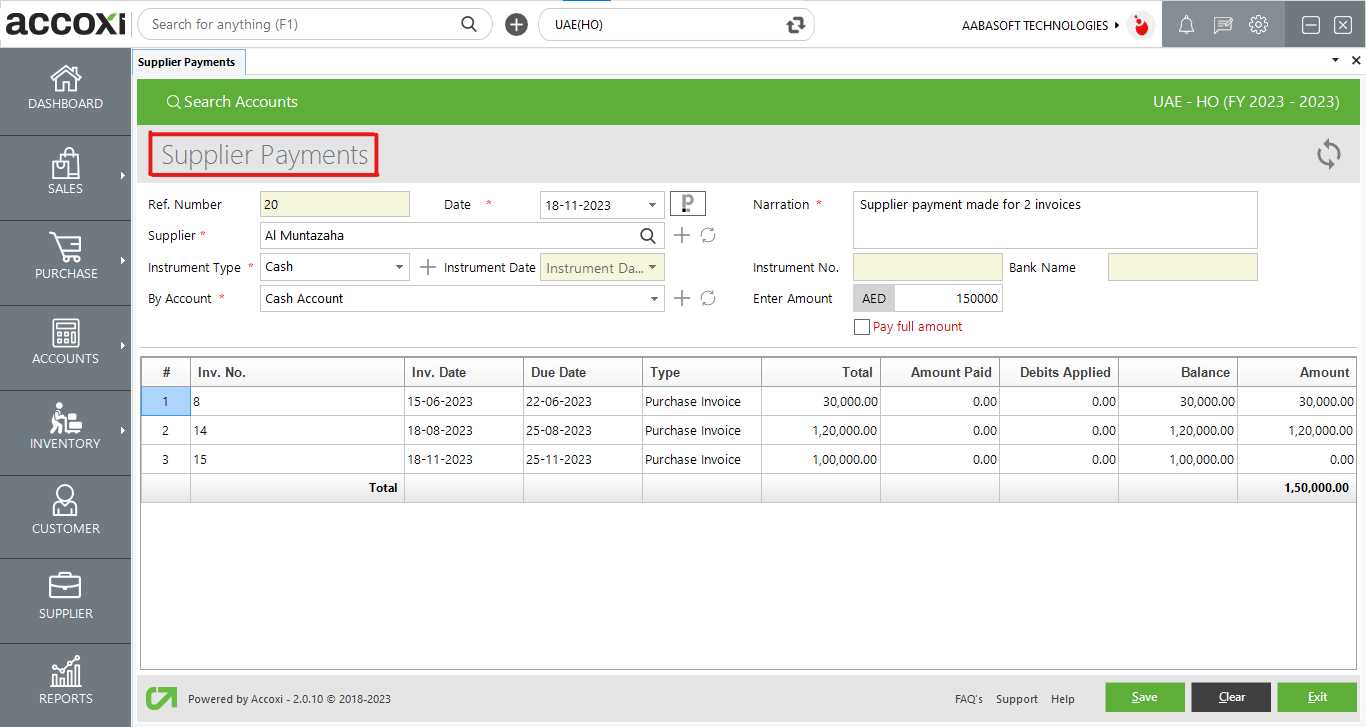
Supplier payment is designed for settling payments that are pending from invoices and bills with suppliers. This payment type allows users to clear outstanding amounts owed to suppliers for purchases. Clicking on the "Supplier Payment" option under Add New opens a payment form where users can input supplier details and complete the payment process.
|
Field |
Description |
|
Reference Number |
The reference number serves as a means for the user to identify transactions in records, and it continues the sequence from the previous payment form. |
|
Supplier |
To choose the supplier for payment, users can click on the "Select" option. This action will display a list of suppliers from which the user can make a selection. |
|
Narration |
In this section, users can include additional explanations or notes related to the payment. |
|
Paperlez Icon |
This option is designed for users who have integrated Paperlez into Accoxi. It enables the attachment or association of documents with supplier payments. Clicking on this option opens a tab displaying all the documents uploaded in Paperlez. Users can then choose the necessary documents to be attached to the payment by associating them with the invoice. |
|
Date |
By default, the system automatically records the transaction date as the current date |
|
By Account |
In this step, the user is required to choose the account type for the payment, whether it is made through an account or in cash. |
|
Instrument Type |
The user must select the instrument type used for making the payment, which can include options such as cash, bank transfer, or cheque. For instrument type payments (excluding cash), the user needs to enter specific details such as the instrument number, instrument date, and bank name. |
|
Instrument Number |
This field is designated for entering the instrument number of the payment instrument. If the user selects the instrument as cash, the instrument number field will be blocked, and there is no need to enter any number. Users can input the instrument number in this field for payment instruments other than cash. |
|
Instrument Date |
This field is intended for setting the date of the payment instrument. Users can select or set the date in this field, except in the case of cash payments. |
|
Bank Name |
In this field, users can enter the bank name, excluding the case of cash payment. The bank name will depend on the instrument type selected, and this field will be blocked if the payment is made in cash. |
|
Invoice No |
This field displays the purchase invoice number associated with the payment. |
|
Invoice Date |
Invoice date refers to the date on which an invoice is issued by a party. When the user selects the supplier, the invoice date will automatically appear in the field. |
|
Due Date |
The due date is the date by which the payment is expected or due. When the user sets the payment term for a supplier, the due date will automatically appear in the field. It's important to note that the user can't edit or delete the date in this field. |
|
Type |
This field denotes the invoice type as a purchase invoice. |
|
Total |
It displays the total amount of the purchase invoice. |
|
Amounts Paid |
Any amount paid to the supplier by the user will be reflected in this field. |
|
Debits Applied |
This field reveals the number of debits applied. If the user has chosen to apply a debit note or any advances, the corresponding amount will be displayed here. |
|
Balance |
This field displays the remaining balance of the payment amount that is still owed to the supplier. |
|
Amount |
Input the desired payment amount in the designated "Amount" field to pay the supplier. |
|
Pay Full Amount |
This option, located on the right side of the page, allows the user to make a full payment to the supplier. By selecting the "Pay Full Amount" menu, the user can complete the payment for the entire outstanding amount. |
|
Save |
Click on the "Save" menu to save the entered details and create the payment. |
|
Clear |
The "Clear" option is used to erase or remove all the data entered by the user, clearing the entire input. |
|
Exit |
The "Exit" option is utilized to navigate to the previous page without saving the Payment form. |
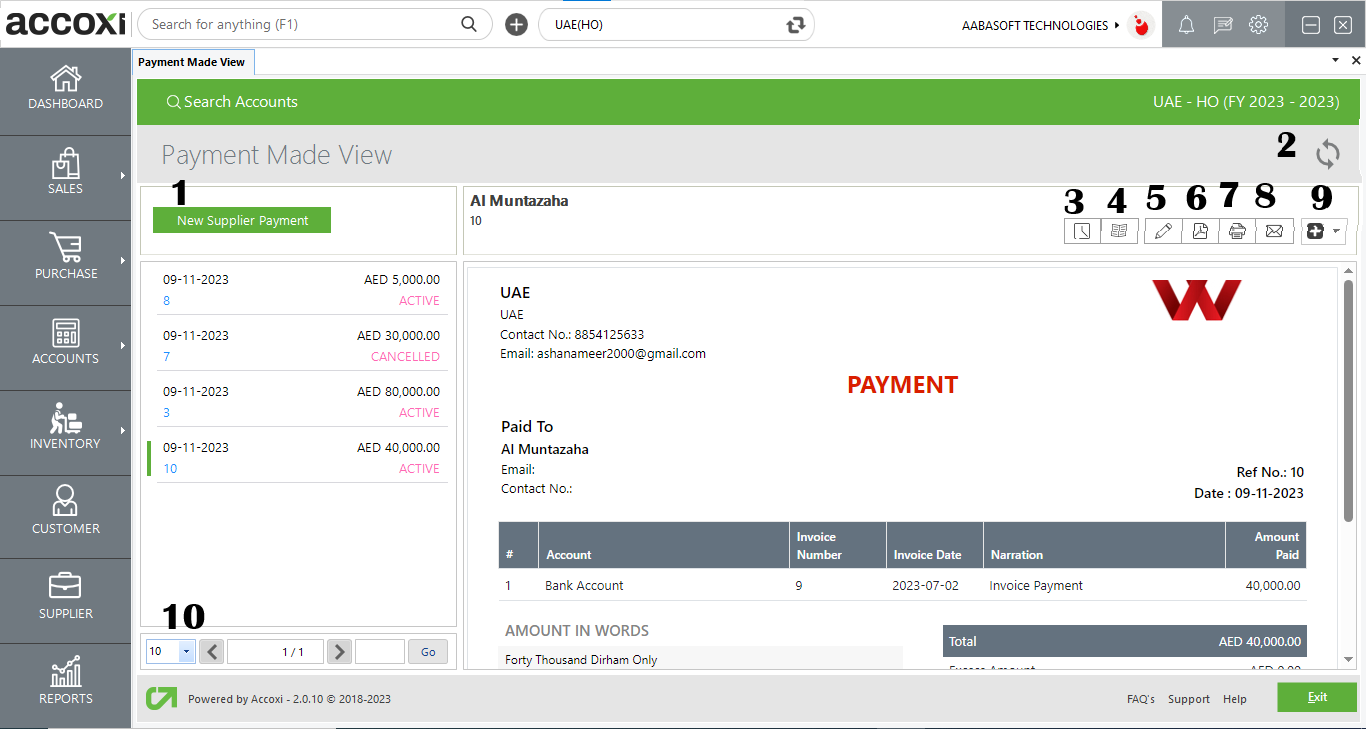
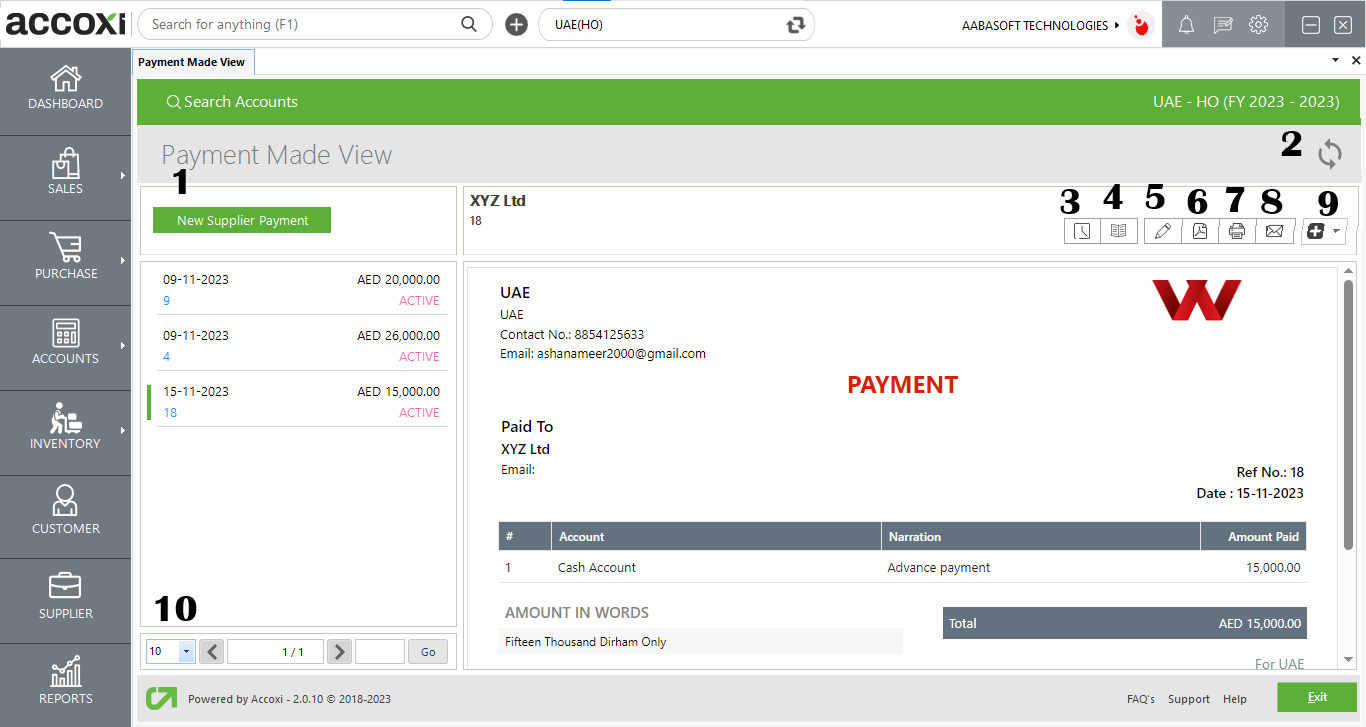
PAYMENT VIEW
|
Field |
Description |
|
1. New Supplier Payment |
Creating a new supplier payment redirects the user to the window for creating a new customer payment. |
|
2. Refresh |
If the most recent data is not displayed, click on the refresh icon located at the top left corner of the page to retrieve the new data. |
|
3. History |
This menu assists the user in obtaining the history details of supplier payments. The options available in the history window include:
|
|
4. View journal |
This menu provides the journal view of the transaction, showing both the debit and credit aspects of the amount. |
|
5. Edit |
The Edit menu allows the user to edit or correct the details that have been entered in supplier payments. |
|
6. Export To PDF |
If the user wishes to convert the supplier payments to PDF format, the "Export to PDF" option is available. After clicking "Export to PDF," a "Save As" directory option will appear, allowing the user to choose the location for saving the PDF file. |
|
7. Print |
The "Print" menu enables the user to print the received payments if needed. Clicking the "Print" button will redirect to print options, where the user can select the printer, number of copies, and other print settings. |
|
8. EMAIL |
After saving the supplier payments window, a "Send Mail" window will pop up. Here, the user can send the mail to the customer (where ACCOXI fetches the customer's email as a default "TO" address) or any other designated person. |
|
9. More Features |
In the "More Features" option, the user can cancel the payment. By clicking "Cancel," a validation message will pop up. Then, click "YES" to proceed with canceling the payment or click "NO" to cancel and close the option. |
|
10. Pagination Control |
Pagination control manages page navigation and page size. Users can set the page size to 10, 20, 50, or 100. By entering the page number in the box and clicking the "Go" button, it navigates to the specified page. |
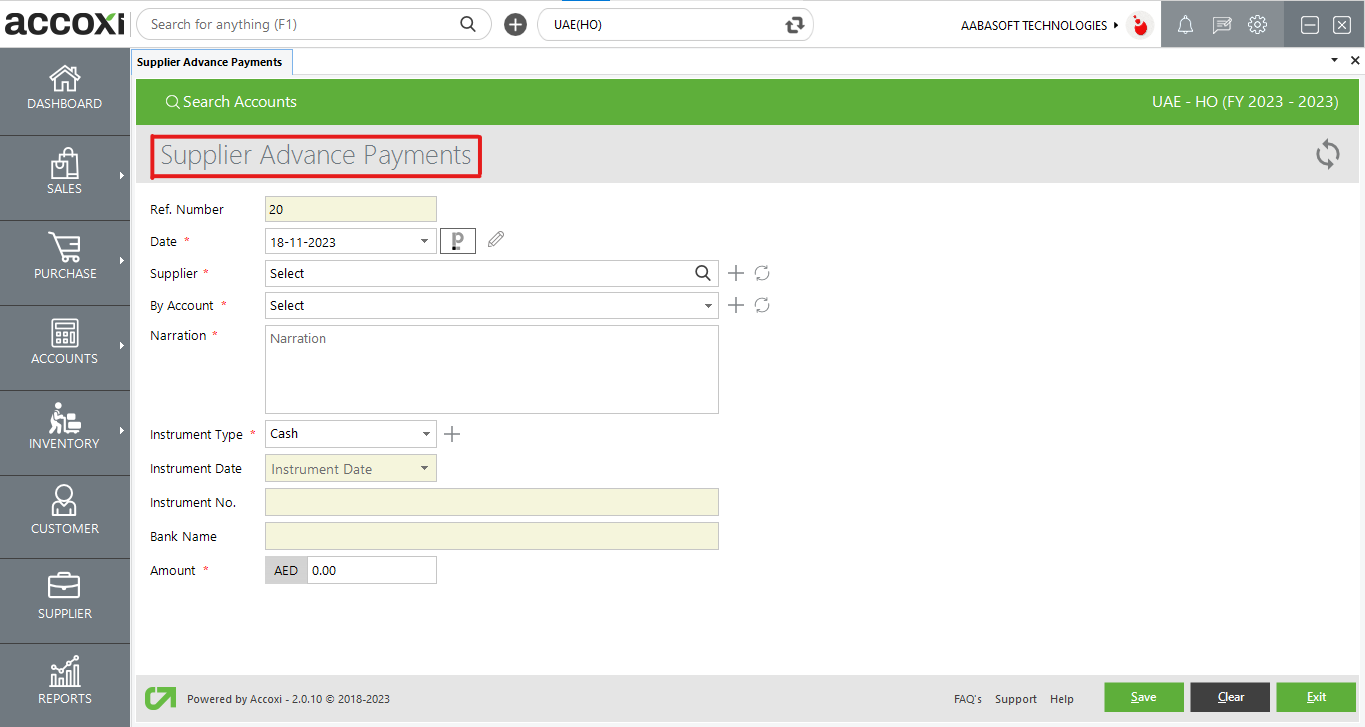
In the Supplier Advance menu, the user has the option to select a supplier and pay a specific sum of money in advance without necessarily purchasing any items. This advance payment can be made to the supplier and subsequently adjusted against a purchase invoice.
|
Field |
Description |
|
Reference Number |
The reference number serves as a means for the user to identify transactions in records, and it continues the sequence from the previous payment form. |
|
Supplier |
To choose the supplier for payment, users can click on the "Select" option. This action will display a list of suppliers from which the user can make a selection. |
|
By Account |
In this step, the user is required to choose the account type for the payment, whether it is made through an account or in cash. |
|
Date |
By default, the system automatically records the transaction date as the current date |
|
Paperlez Icon |
This option is designed for users who have integrated Paperlez into Accoxi. It enables the attachment or association of documents with supplier payments. Clicking on this option opens a tab displaying all the documents uploaded in Paperlez. Users can then choose the necessary documents to be attached to the payment by associating them with the invoice. |
|
Instrument Type |
The user must select the instrument type used for making the payment, which can include options such as cash, bank transfer, or cheque. For instrument type payments (excluding cash), the user needs to enter specific details such as the instrument number, instrument date, and bank name. |
|
Instrument Number |
This field is designated for entering the instrument number of the payment instrument. If the user selects the instrument as cash, the instrument number field will be blocked, and there is no need to enter any number. Users can input the instrument number in this field for payment instruments other than cash. |
|
Instrument Date |
This field is intended for setting the date of the payment instrument. Users can select or set the date in this field, except in the case of cash payments. |
|
Bank Name |
In this field, users can enter the bank name, excluding the case of cash payment. The bank name will depend on the instrument type selected, and this field will be blocked if the payment is made in cash. |
|
Amount |
Input the amount that the user needs to pay to the supplier in the designated "Amount" field. |
|
Narration |
In this section, the user can provide additional explanations or notes related to the payment. |
|
Save |
Click on the "Save" menu to save the entered details and create the payment. |
|
Clear |
The "Clear" option is used to erase or remove all the data entered by the user, clearing the entire input. |
|
Exit |
The "Exit" option is utilized to navigate to the previous page without saving the Payment form. |
|
Field |
Description |
|
1. New Supplier Payment |
Creating a new supplier payment redirects the user to the window for creating a new customer payment. |
|
2..Refresh |
If the most recent data is not displayed, click on the refresh icon located at the top left corner of the page to retrieve the new data. |
|
3. History |
This menu assists the user in obtaining the history details of the supplier advance. The options available in the history window include:
|
|
4. View journal |
This menu provides the journal view of the transaction, showing both the debit and credit aspects of the amount. |
|
5. Edit |
The Edit menu allows the user to edit or correct the details that have been entered in the supplier advance. |
|
6. Export To PDF |
If the user wishes to convert the supplier advance to PDF format, the "Export to PDF" option is available. After clicking "Export to PDF," a "Save As" directory option will appear, allowing the user to choose the location for saving the PDF file. |
|
7. Print |
The "Print" menu enables the user to print the received payments if needed. Clicking the "Print" button will redirect to print options, where the user can select the printer, number of copies, and other print settings. |
|
8. EMAIL |
After saving the supplier payments window, a "Send Mail" window will pop up. Here, the user can send the mail to the customer (where ACCOXI fetches the customer's email as a default "TO" address) or any other designated person. |
|
9. More Features |
In the "More Features" option, the user can cancel the payment. By clicking "Cancel," a validation message will pop up. Then, click "YES" to proceed with cancelling the payment or click "NO" to cancel and close the option. |
|
10. Pagination Control |
Pagination control manages page navigation and page size. Users can set the page size to 10, 20, 50, or 100. By entering the page number in the box and clicking the "Go" button, it navigates to the specified page. |
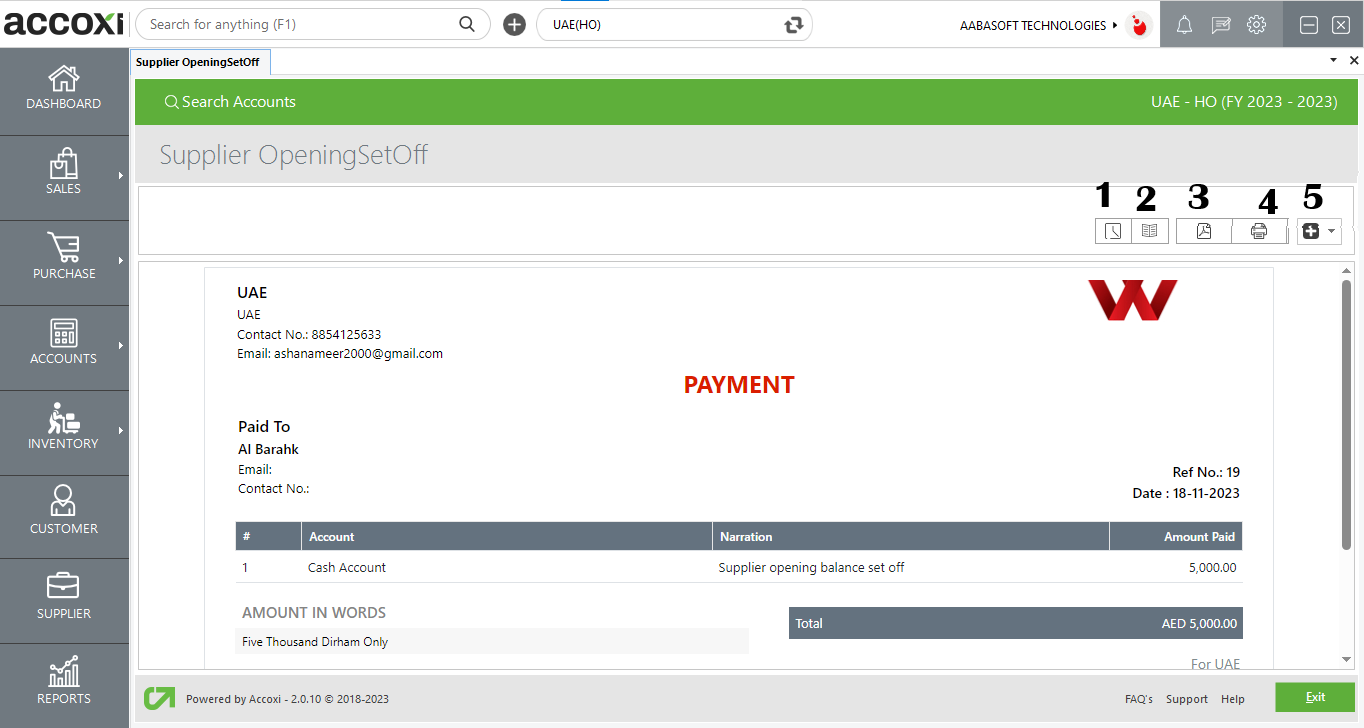
Opening setoff is the third type of payment available in the "Add New Payment Made" option. This payment type is utilized for offsetting the supplier's opening balance. When the user selects a supplier, the system displays the details of that supplier's opening balance, the already adjusted amount, and the remaining balance amount to be set off. The user can enter the amount to be adjusted in the field to offset the remaining balance amount.

|
Field |
Description |
|
Reference Number |
The reference number serves as a means for the user to identify transactions in records, and it continues the sequence from the previous payment form. |
|
Date |
By default, the system automatically records the transaction date as the current date |
|
Supplier |
To choose the supplier for payment, users can click on the "Select" option. This action will display a list of suppliers from which the user can make a selection. |
|
Phone Number |
The information will be automatically populated based on the selected supplier. |
|
By Account |
In this step, the user is required to choose the account type for the payment, whether it is made through an account or in cash. |
|
Narration |
In this section, the user can provide additional explanations or notes related to the payment |
|
Instrument Type |
The user must select the instrument type used for making the payment, which can include options such as cash, bank transfer, or cheque. For instrument type payments (excluding cash), the user needs to enter specific details such as the instrument number, instrument date, and bank name. |
|
Instrument Number |
This field is designated for entering the instrument number of the payment instrument. If the user selects the instrument as cash, the instrument number field will be blocked, and there is no need to enter any number. Users can input the instrument number in this field for payment instruments other than cash. |
|
Instrument Date |
This field is intended for setting the date of the payment instrument. Users can select or set the date in this field, except in the case of cash payments. |
|
Bank Name |
In this field, users can enter the bank name, excluding the case of cash payment. The bank name will depend on the instrument type selected, and this field will be blocked if the payment is made in cash. |
|
Supplier Opening Balance |
When the user selects the supplier, the supplier's opening balance will automatically appear in the designated field. |
|
Already Adjusted Amount |
It Shows The Amount That Is Already Adjusted Towards The Supplier. |
|
Balance Amount |
When the user selects a supplier, the balance amount will be displayed in the field. |
|
Amount To Be Adjusted |
Users can input the amount for balance adjustment. |
|
Save |
Click on the "Save" menu to save the entered details and create the payment. |
|
Exit |
The "Exit" option is utilized to navigate to the previous page without saving the Payment form. |
|
Field |
Description |
|
1. History |
This menu assists the user in obtaining the history details of the supplier advance. The "Comments and History" section displays all edits and alterations made to the supplier payment. It includes the date of changes made, and the user can enter any comments regarding supplier advances. |
|
2. View journal |
It is the menu that displays the journal view of the transaction. The journal view shows both debit and credit aspects of the amount. |
|
3. Export To PDF |
If the user wishes to convert the supplier opening set off to PDF format, the "Export to PDF" option is available. After clicking "Export to PDF," a "Save As" directory option will appear, allowing the user to choose the location for saving the PDF file. |
|
4. Print |
The "Print" menu helps the user print the received payments if required. After clicking the "Print" button, it will redirect to print options where the user can select the printer, number of copies, and other print settings. |
|
5. More Features |
In the "More Features" option, the user has the ability to cancel the payment. Upon clicking "Cancel," a validation message will appear. The user can proceed with cancellation by clicking "YES" or choose to cancel and close the option by clicking "NO." |
4. Export:
5. View:
6. More Settings:
7. Cancelled:
8. Pagination Control: