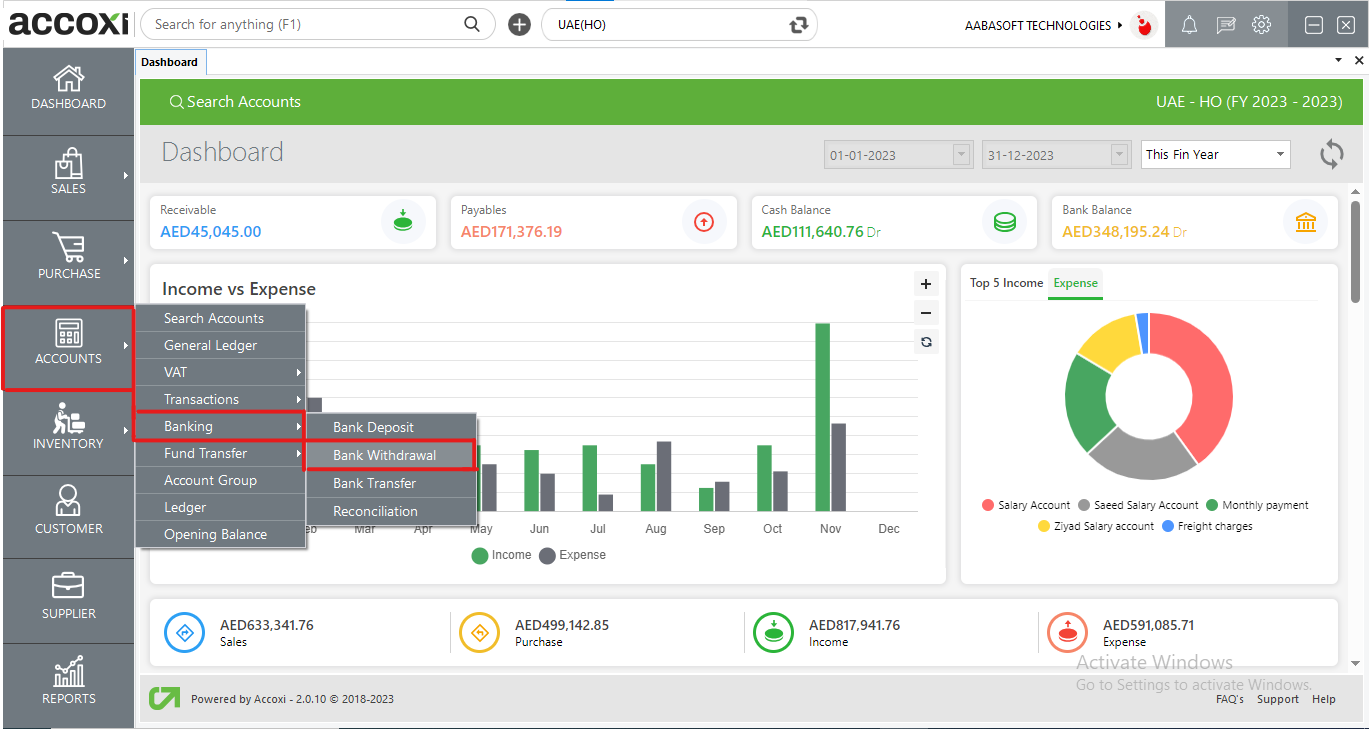
Bank withdrawal means withdrawal of money from the bank account and the user can record it separately in Accoxi.

A withdrawal refers to the process of taking funds out of a bank account, savings plan, pension, or trust. Specifically, within Accoxi, users have the capability to record various bank transactions, including both deposits and withdrawals. This functionality enhances the user's ability to manage banking and business activities efficiently. In the context of Accoxi, a bank withdrawal signifies the act of taking money out of a bank account, and users can record such transactions separately within the platform.
Key Features of Bank Withdrawal:
Steps to Enter Bank Withdrawal in Accoxi:
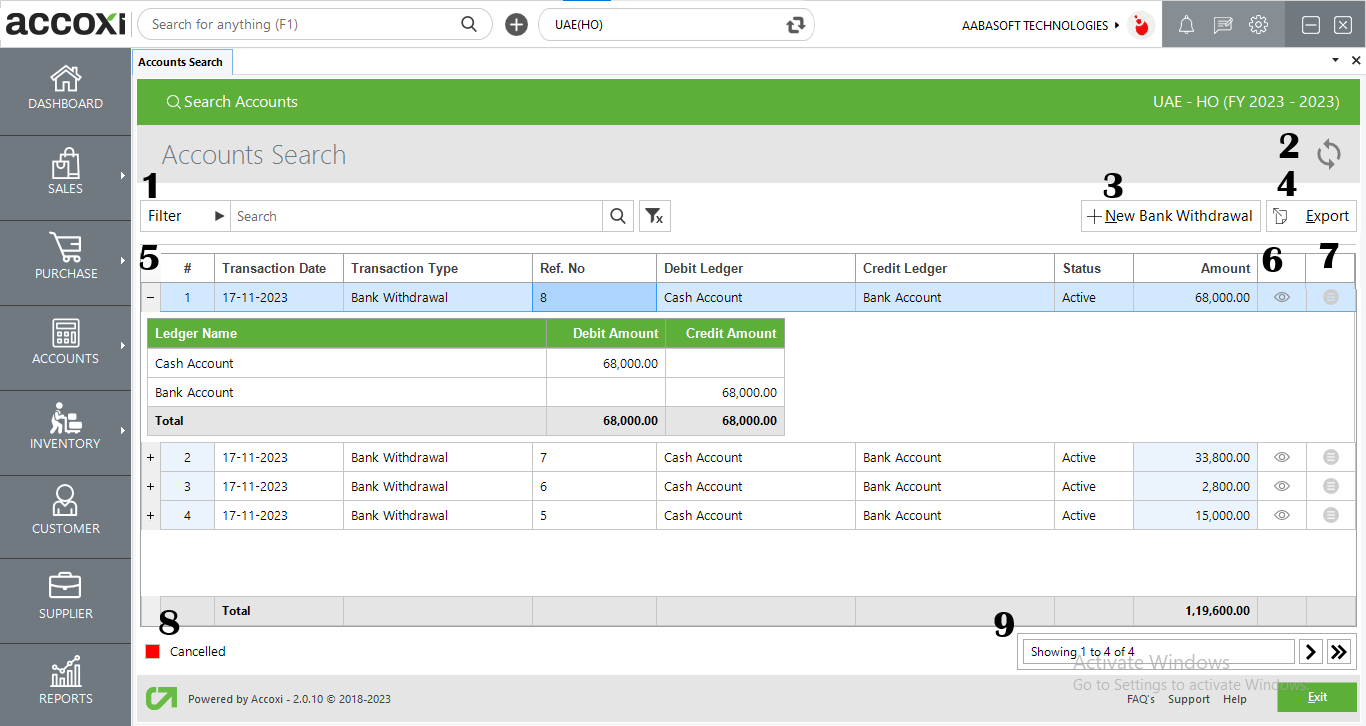
Menus available in Bank Withdrawal Search:
|
Field |
Description |
|
1. Filter |
There are two methods to filter transactions: you can either input the transaction type directly into the search bar near the filter option, or you can use the filter dropdown.
Users have the flexibility to filter data by transaction type, ledger name, reference number, cancellation status, or date. When filtering by date, users need to enter the starting date and the end date of the transactions. Transaction types available for filtering include sales invoices, purchase invoices, bills, debit notes, credit notes, and more. |
|
2. Refresh |
If the most recent data is not displayed, you can refresh the page by clicking on the refresh icon located at the top-left corner. This action fetches and updates the page with the latest data, ensuring that you have the most recent information available for viewing. |
|
3. +New Bank Withdrawal |
The functionality of '+New Bank Withdrawal' is intended for users to carry out bank withdrawals, directing them to the Bank Withdrawal Creation Window. |
|
4. Export |
To export the withdrawal list to Excel format, click on the "Export" button located at the top right corner, near the '+New Bank Withdrawal' button. Choose the file location and click 'Save' to store the file in Excel format. |
|
5. Ledger View |
Withdrawals made can be viewed in ledger format, presenting the ledger accounts associated with the transaction. This ledger format provides a detailed display of the accounts involved in the withdrawn transactions. |
|
6. View |
The "View" menu allows the user to access and view the withdrawal contra invoice that has already been created. This menu likely provides options or functionality to review and examine details of the specific withdrawal contra invoice. |
|
7. More Options |
This menu incorporates an edit function, allowing users to modify the created form. By selecting the edit option, the invoice form will appear on the screen, enabling users to make necessary adjustments to the content. |
|
8. Cancelled Withdrawal Invoice |
Cancelled bank withdrawals will be highlighted in red, providing a visual cue to easily distinguish them from active or completed withdrawals. This color-coding helps users quickly identify and differentiate transactions based on their cancellation status. |
|
9. Pagination Control |
This feature manages both page navigation and page size. Users can customize the page size to 10, 20, 50, or 100 entries. To navigate to a specific page, input the page number in the designated box and click the "Go" button, facilitating quick access to the desired page. |
|
Field |
Description |
|
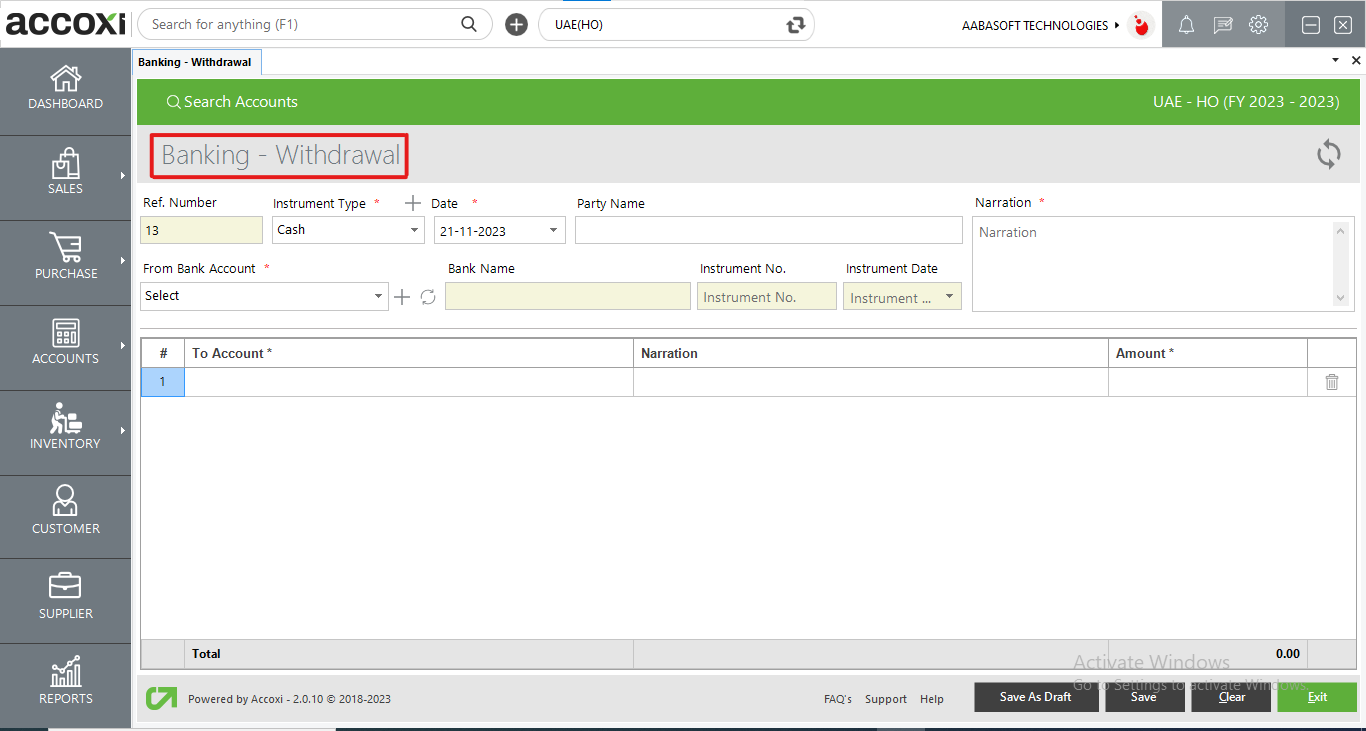
Reference Number |
The reference number serves as a unique identifier for withdrawals in records. It automatically appears on the withdrawal voucher, and users cannot edit this reference number. This feature ensures a standardized and unalterable reference for easy identification and tracking of withdrawal transactions. |
|
Instrument Type |
The user is required to choose the instrument type used for bank withdrawal, which may include options such as cash, bank transfer, or cheque. For instrument-type payments other than cash, the user must input the instrument number, instrument date, and bank name corresponding to each instrument type. This ensures comprehensive recording of transaction details, especially for non-cash payments. |
|
Party Name |
The user can utilize this field to input the party name associated with the transaction. |
|
From Bank Account |
In this field, the user has the option to choose a bank account. If the user wishes to create a new bank, they can do so by clicking the "+" icon and providing a name for the new bank. This functionality allows for flexibility in managing bank accounts within the system. |
|
Bank Name |
If the user selects "Cash" as the instrument type, there is no requirement to enter the bank name. However, if any other instrument type is chosen, the user can add the relevant bank details. This conditional logic streamlines the data entry process by adapting to the specific requirements based on the chosen instrument type. |
|
Instrument Number |
The user has the option to add the instrument number, providing a specific identifier for the financial instrument associated with the bank withdrawal. |
|
Instrument Date |
The user can choose the instrument date, specifying the date associated with the financial instrument used in the bank withdrawal transaction. |
|
Narration |
In this section, the user can provide additional details or explanations related to the transaction. This allows for the inclusion of supplementary information for better context or clarification. |
|
To Account |
The user is required to choose the ledger name in this field. This selection helps in associating the bank withdrawal transaction with the appropriate ledger account. |
|
Amount |
Input the withdrawal amount in the designated field provided for the transaction. This ensures accurate recording of the amount associated with the bank withdrawal. |
|
Save As Draft |
Once the withdrawal details are entered, the user has the option to save the withdrawal voucher as a draft. Choosing the draft format allows the user to access it from the accounts transactions, enabling verification or editing before finalizing and saving it as a voucher. This feature provides flexibility in reviewing and modifying transaction details before they are officially recorded. |
|
Save |
The user can save the created withdrawal form as a voucher by selecting the "Save" option from the menu. This action finalizes and officially records the withdrawal transaction in the system. |
|
Clear |
The "Clear" menu is designed to remove or clear all the data entered by the user, effectively wiping out the entire set of information. |
|
Exit |
The "Exit" menu is utilized to navigate back to the previous page without saving the information entered in the payment form. Choosing this option allows users to leave the form without committing any changes. |
|
Field |
Description |
|
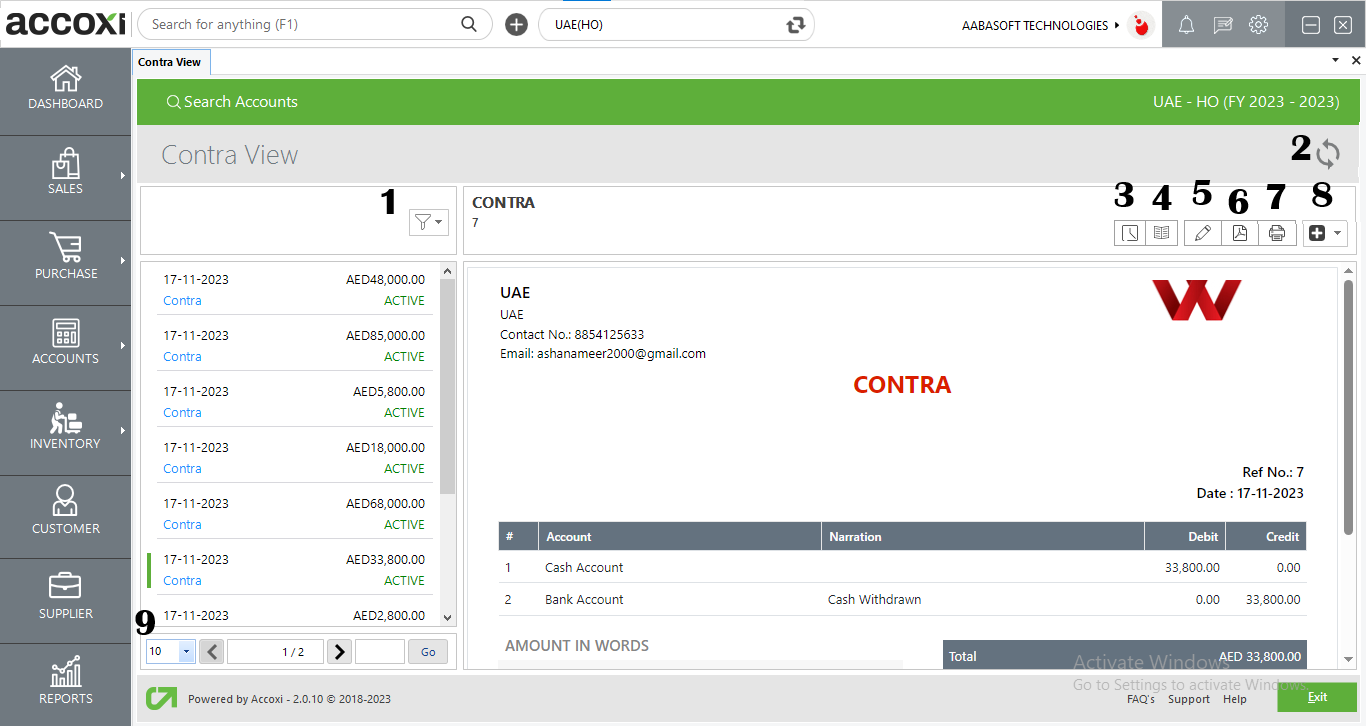
1. Filter |
Users can filter withdrawals based on their status, such as active, cancelled, or drafts. This functionality allows for the convenient categorization and sorting of withdrawals according to their current state, aiding in effective management and analysis of financial data. |
|
2. Refresh |
If the most recent data is not displayed, you can click on the refresh icon located at the top left corner of the page. This action will fetch and update the page with the latest data, ensuring that you have the most recent information available for viewing. |
|
3. History |
This menu allows the user to access the history details of the bank withdrawal.
OPTIONS AVAILABLE IN THE HISTORY WINDOW:
"Comments and History" displays all the edits and alterations made to the withdrawal. The date of changes is included, and users can input comments related to the withdrawals, providing additional context or notes about the transaction history. |
|
4. View journal |
This menu provides a journal view of the transaction, displaying both the debit and credit aspects of the amount. The journal view offers a comprehensive perspective on the financial entries associated with the transaction, detailing the movement of funds between accounts. |
|
5. Edit |
The "Edit" menu assists the user in making edits or corrections to the details entered in the withdrawal. This functionality enables users to update and modify information as needed, ensuring the accuracy of the recorded withdrawal details. |
|
6. Export To PDF |
If the user wishes to convert the withdrawal to PDF format, they can utilize the "Export to PDF" option. After clicking on "Export to PDF," a "Save As" directory prompt will appear, allowing the user to choose the location for saving the PDF file. This functionality facilitates the generation of a PDF document containing the withdrawal details for further use or sharing. |
|
7. Print |
The "Print" menu assists the user in printing the withdrawal if necessary. Clicking the "Print" button will redirect to print options, enabling the user to select the printer and specify details such as the number of copies to be printed. This feature streamlines the process of generating a hard copy of the withdrawal information. |
|
8. More Features |
In the "More Features" option, users have the capability to cancel the withdrawal. Clicking on "Cancel" triggers a validation message to pop up. Users can then choose to proceed by clicking "YES" to cancel the withdrawal, or click "NO" to cancel and close the option without confirming the cancellation. This feature provides a step-by-step process for users to confirm their decision to cancel a withdrawal transaction. |
|
9. Pagination Control |
This feature manages page navigation and size settings. Users can customize the page size to 10, 20, 50, or 100 entries. To navigate to a specific page, input the page number in the designated box and click the "Go" button, facilitating quick access to the desired page. |
After saving the withdrawal form, the Accounts Search page will be displayed on the screen. The saved form will appear in the Accounts Search, allowing the user to view or edit the created withdrawal form.
The Accounts Search page comprises various menus and displays a comprehensive overview of transaction details. It provides information such as the transaction date, transaction type, reference number, debit ledger, credit ledger, amount, and the status of each transaction. This layout facilitates easy navigation and management of different transaction records within the system.