Dive into the process of recording advances, and pending payments, and set off opening balances.

Payments made module in Accoxi conducts operations such as the supplier payments to pay pending invoices of purchases, supplier advance to pay specific advances to suppliers, and an opening set off to write off opening balances owed to the supplier.
Video Guide on using the payment made module in purchase for conducting functions like supplier payments, supplier advances, and supplier opening setoff.

Key Features of Payments made function
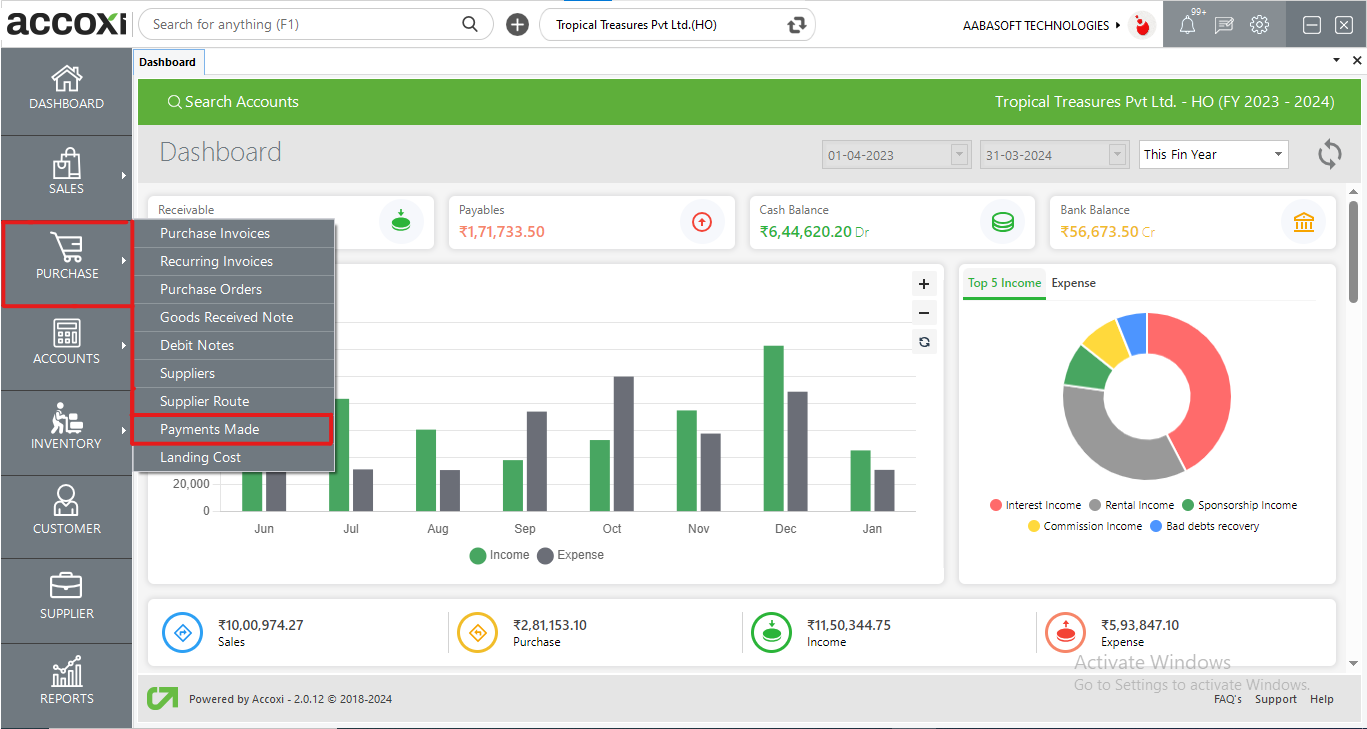
Click the Purchase Module and select the Payments Made option.
When the user clicks the Payments Made option, it opens to Payment Made Search.
Payment Made Search
The payment Made menu consists of various menus and the details of the payment list that the user already created.
Data Available in Payment Made Table
It shows the details of payments made by the user along with the date, type of payment, and the number of applied invoices.
|
Fields |
Description |
|
Date |
The payment date will be shown in this field. |
|
Reference Number |
Reference number helps the user to identify transactions in records and it will be the continuation of the previous payment form. |
|
Party Name |
This field shows the supplier name of a particular payment. |
|
Type |
It shows the type of payment, whether it is Advance payment, Supplier Payment, or Opening setoff. |
|
Applied Invoices |
This field shows the details of the amount paid in invoices. If any amount is paid to the supplier, the reference numbers of the paid invoices will be shown on the field and the user can take the payment history details by clicking in the appropriate field. To check the payment history of a supplier, click on the Applied Invoices field. While clicking on the field, the Applied Invoices tab will appear on the screen.
It shows the reference numbers of the paid invoices. Users can take the invoice details of the paid supplier if required. It can be done by clicking on the View icon on the right side of the tab. While clicking on the view icon, it will open to the Purchase View form. |
|
Amount Paid |
This field shows the details of the amount paid. If any amount is paid to the supplier, it will be shown in the field. |
|
Unused amount |
Users can identify the unused amount through this field that was not utilized to purchase anything after payment was made. |
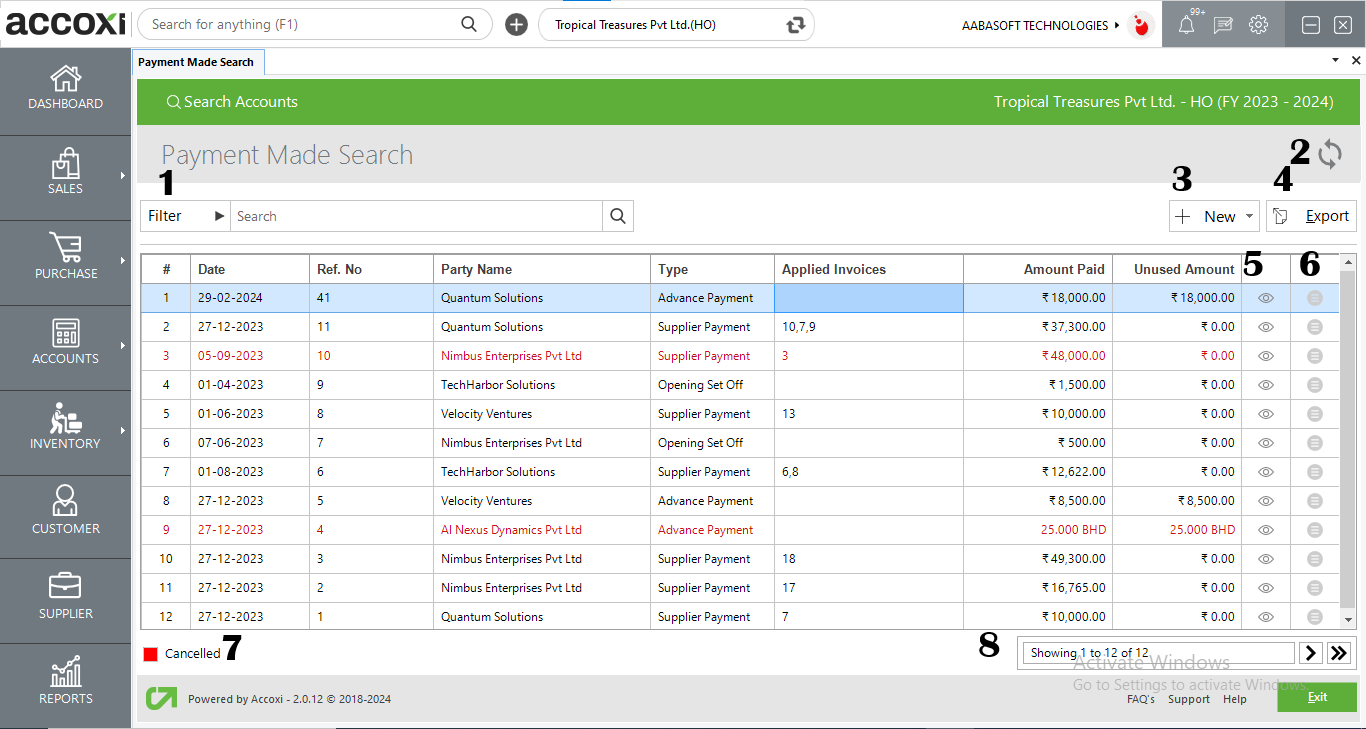
1. Filter
The filter of payments made can be done in two ways- either the user can directly enter the supplier name into the search bar near the filter option or by clicking the filter drop-down. The user can filter the data by invoice number, party name, date, or by status. If the user clicks on the By Date option, then starting date and end date need to be entered. Users can also filter the data by the status of the payment i.e. active and cancel payment.
2. Refresh
If the latest data is not displayed, click on the refresh icon on the top left corner of the page to retrieve new data.
3. Add New +
This menu is used for the purpose of making a new payment. By clicking the Add New menu, new window will open and the user needs to enter the details to the form to create a new payment.
Steps to Create New Payment
Three types of Payment options are available on the +New menu. They are Supplier Payments, Supplier Advance and Opening set off.
Supplier payment is to make payments to the supplier which are pending from invoices and bills. In this type of payment, the user can make the payment to the suppliers towards the purchase. By clicking the supplier payment option from Add New, a new form of payment will appear and the user needs to enter the supplier details in it.
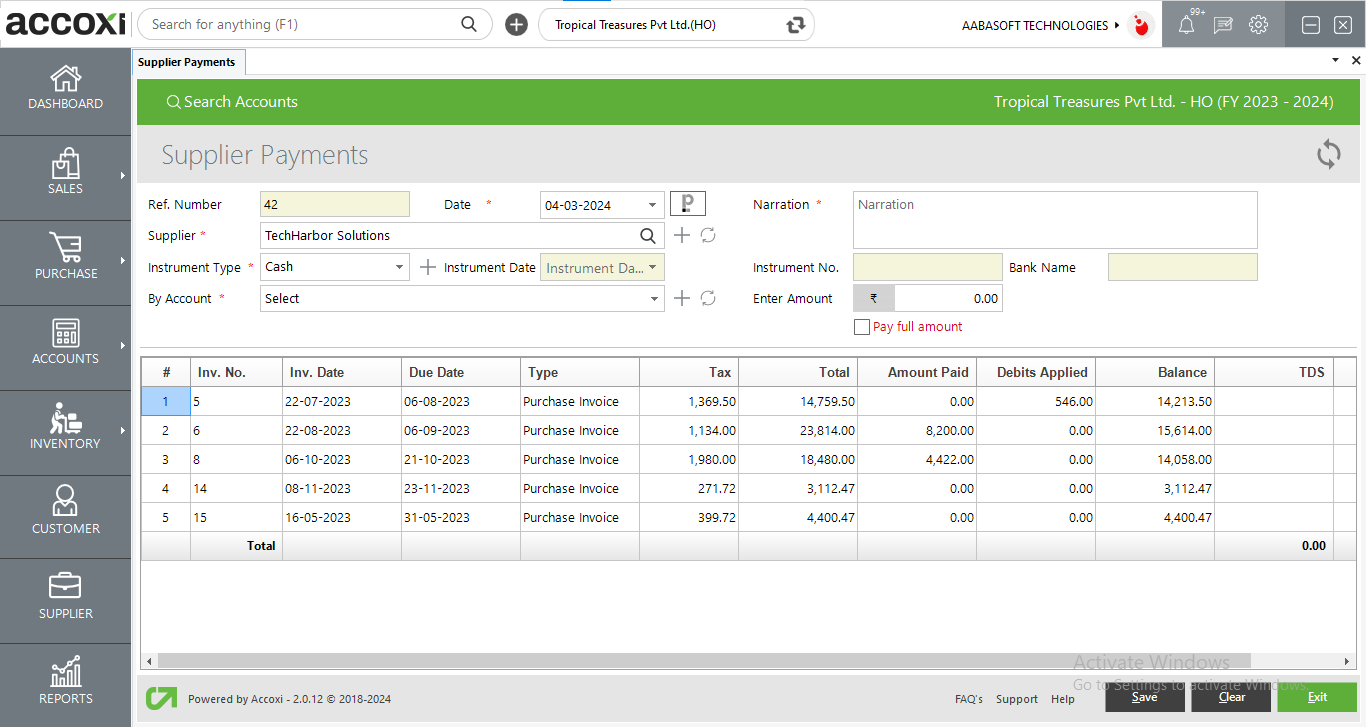
|
Field |
Description |
|
Reference Number |
Reference number helps the user to identify transactions in records. It auto-fills the form and the user can’t edit the reference number, as it will be the continuation of the previous payment form. |
|
Supplier |
Select the supplier that the user wants to make payment. By clicking on the select option, list of suppliers will appear from which the user can select. If the user wants to add a new supplier, it can be done by clicking on the + menu. |
|
Narration |
Here user can add additional explanations regarding the payment. |
|
Paperlez Icon |
This option allows users who have integrated paperlez in Accoxi to attach or associate documents to supplier payments. A tab will be opened showing all the documents uploaded in Paperlez and users can choose the required documents to be attached with the invoice by associating the document.
|
|
Date |
Date will automatically appear in the date field and it may be current day date. If the user wants to change the date, it can be done by clicking on the date menu and can select required date. |
|
By Account |
Here the user needs to select the account type for the payment i.e. by account or by cash. |
|
Instrument type |
User need to select the instrument type that using for making payment. It includes cash, bank transfer, cheque etc. The user needs to enter the instrument number, instrument date and bank name in the case of every instrument type payment excluding cash payment. |
|
Instrument number |
This field is to enter the instrument number of the payment instrument. If the user selects the instrument as cash, then the instrument number field will be block and not need to enter any number. User can enter the instrument number on this field excluding the case of cash payments. |
|
Instrument date |
This field is to set the date of the payment instrument. User can select or set the date on this field excluding the case of cash payment. |
|
Bank Name |
User can enter the Bank Name in this field excluding the case of cash payment. Bank name will depend on instrument type and this field will be blocked if the payment is made in cash. |
|
Invoice date |
Invoice date means the date that an invoice is issued by a party. When the user selects the supplier, invoice date will automatically appear in the field. |
|
Due date |
Due date is a date in which the payment is expected or due. When the user set the payment term of a supplier, then due date will automatically appear in the field. User can’t edit or delete the date in this field. |
|
Type |
This field shows the type of invoice whether it is purchase invoice or bill. |
|
Item total |
Total value of item without the tax will appear in this field. |
|
Tax |
This field shows the taxable value of the particular item. |
|
Total |
Total amount field shows the total value of the item i.e. item total with tax rate. |
|
Amounts paid |
If the user paid any amount to the supplier, it will appear in this field. |
|
Debits applied |
This field shows the number of debits applied. If the user opted debit not or any advances can be claimed or used. The amount will appear here. |
|
Balance |
This field shows the balance of payment amount that is owed to the supplier. |
|
TDS |
The user can enter the TDS amount in TDS field if required. |
|
Amount |
Enter the amount in the amount field that the user wants to pay to the supplier. |
|
Pay full amount |
It is the option that appears below the right side of the page, by referring which the user can make payment in full to the supplier. By marking Pay full amount menu, user can make full payment. |
|
Save |
Click on the Save menu to save the details that were entered and to create payment. |
|
Clear |
Clear menu is for clear or removing the entire data entered by the user. |
|
Exit |
Exit menu is used to go to the previous page without saving the payment made form. |
|
FIELDS |
DESCRIPTION |
|
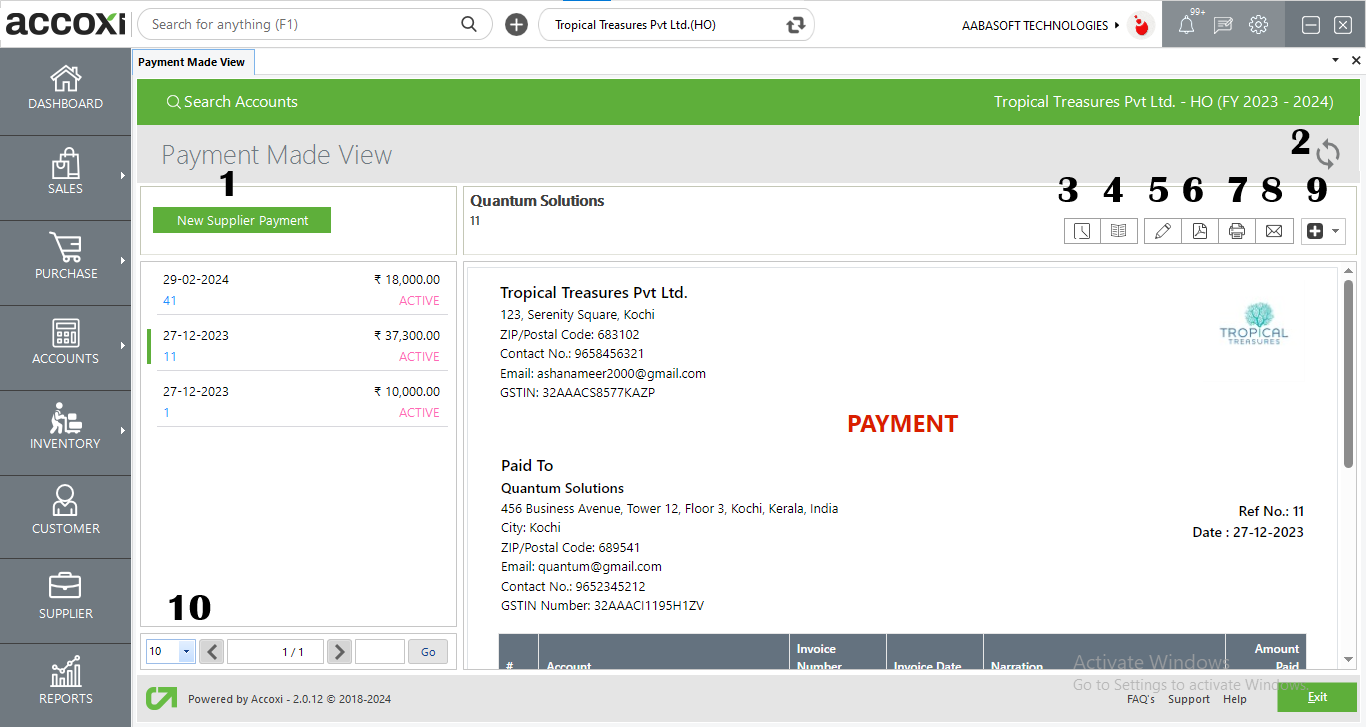
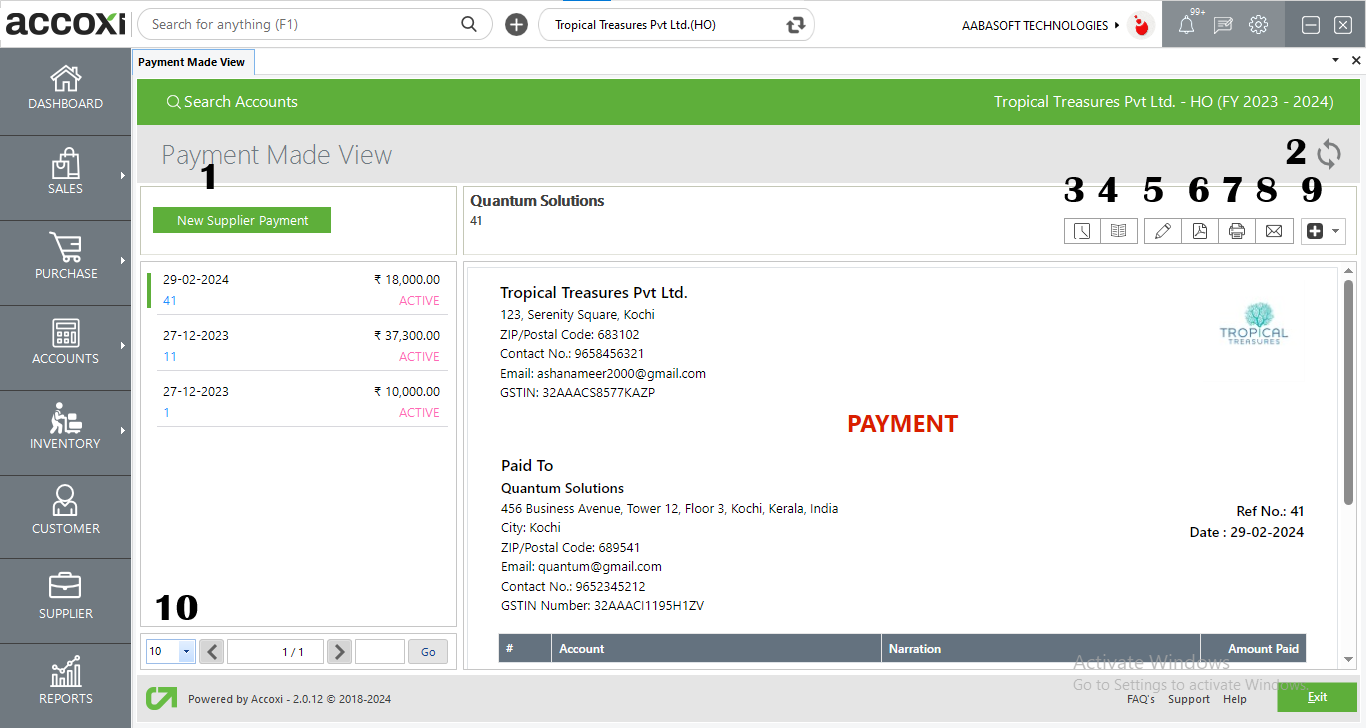
1. New Supplier payment |
A new Supplier payment redirects the user to Create New Customer payment window. |
|
2..Refresh |
If your latest data is not displayed, click on the refresh icon on the top left corner of the page to fetch the new data. |
|
3. History |
This menu helps the user to obtain the history details of the supplier payments. OPTIONS AVAILABLE IN THE HISTORY WINDOW
|
|
4. VIEW JOURNAL |
It is the menu that shows the journal view of the transaction. The Journal view shows both debit and credit aspects of the amount. |
|
5. Edit |
Edit menu helps the user to edit or correct the details that are entered in supplier payments |
|
6. Export to PDF |
If the user wants to convert the supplier payments to PDF format, then the export to PDF option is available. After clicking export to pdf, a save as directory option will appear and the user can opt the pdf file saving location |
|
7. Print |
Print menu helps the user to print the payments received if required. After clicking the print button it will redirect to print options where the user can select the printer, number of copies to take etc. |
|
8. EMAIL |
After saving the supplier Payments window, a send mail window will pop up. Here the user can send the mail to the customer (where ACCOXI fetches customer mail as a “TO” address by default) or any other person. |
|
9. More Features |
In the More features option user can cancel the payment. By clicking cancel, a validation message will pop up. Then click “YES” to cancel the payment and click “NO” to cancel and close the option. |
|
10. Pagination control |
It controls the page navigation and the page size. Page size can be set to 10, 20, 50 or 100. By giving the page number in the box and clicking on Go button, it jumps to the said page. |
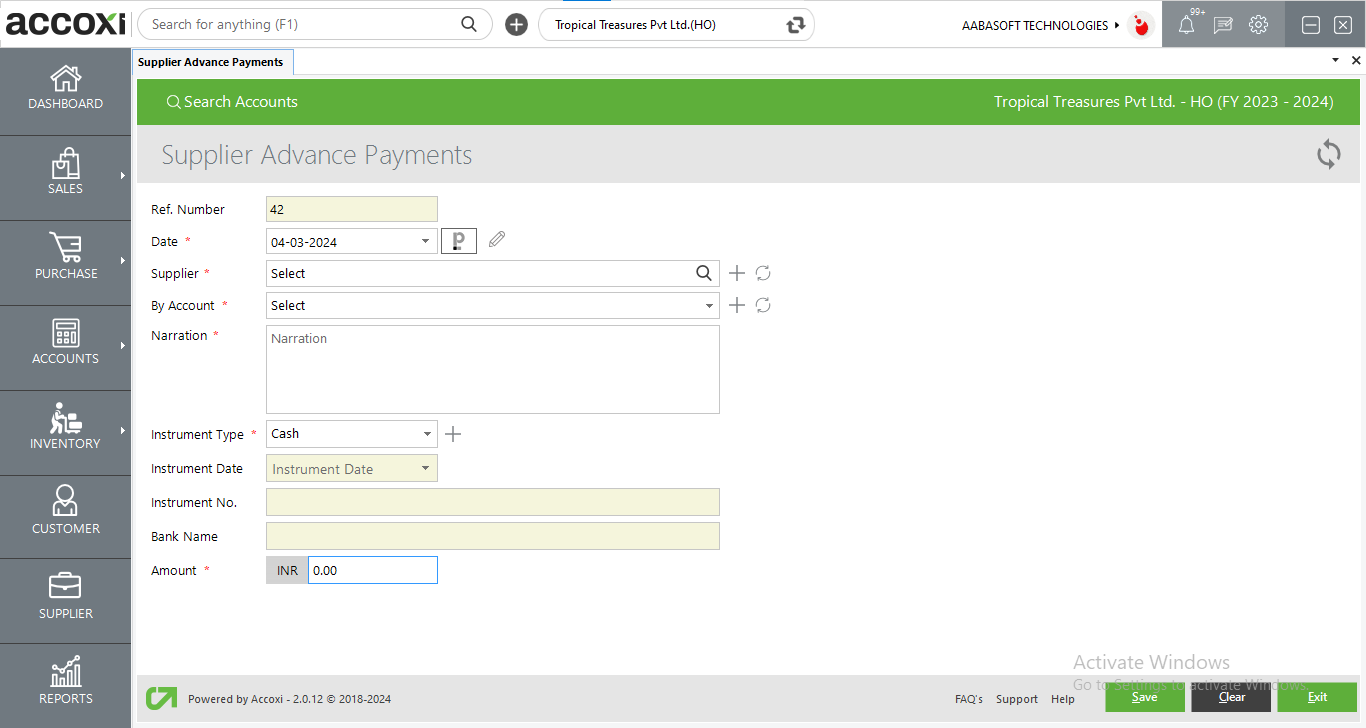
In the Supplier advance menu, the user can select a supplier and can pay a sum of the amount in advance without purchasing any item. Users can pay the amount as advance to the supplier and it can be adjusted on the purchase invoice.
|
Fields |
Description |
|
Reference number |
Reference number helps the user to identify transactions in records. It will automatically appear in the form and the user can’t edit the reference number, as it will be the continuation of the previous payment form. |
|
Supplier |
Select the supplier whom the user wants to pay the advance. By clicking on the select option, a list of suppliers will appear and the user can select the supplier. If the user wants to add a new supplier, it can be done by clicking on the + menu. |
|
By account |
Here the user needs to select the account type for the payment i. e. by account or by cash. |
|
Date |
The date will be auto-filled depending on the day. If the user want to change the date, it can be done by clicking on the date menu and select the required date |
|
Paperlez Icon |
This option allows users who have integrated paperlez in Accoxi to attach or associate documents to supplier payments. A tab will be opened showing all the documents uploaded in Paperlez and users can choose the required documents to be attached with the invoice by associating the document. |
|
Instrument type |
User need to select the instrument type that using for make payment. It includes cash, bank transfer, cheque etc. |
|
Bank name |
User can enter the Bank name in this field excluding cash payments. Bank name will be dependent on instrument type and this field will be blocked if the payment term is made by cash. |
|
Instrument number |
This field is to enter the instrument number of the payment instrument. If the user selects the instrument as cash, then the instrument number field will be blocked and user need not enter any number. User can enter the instrument number in this field excluding payments made in cash. |
|
Instrument date |
This field is to set the date of the payment of the instrument. User can select or set the date in this field excluding cash payments. |
|
Amount |
Enter the amount user has to pay the supplier in the amount field. |
|
Narration |
Here user can add additional explanation regarding the payment |
|
Save |
Click on the Save menu to save the details entered tasks user to the payment view |
|
Clear |
Clear menu is for clearing or removing the entire data entered by the user. |
|
Exit |
Click on the exist menu to close the page and redirect to previous page. |
|
FIELDS |
DESCRIPTION |
|
1. New Supplier payment |
A new Supplier payment redirects the user to Create New Customer payment window. |
|
2..Refresh |
If your latest data is not displayed, click on the refresh icon on the top left corner of the page to fetch the new data. |
|
3. History |
This menu helps the user to obtain the history details of the supplier Advance. OPTIONS AVAILABLE IN THE HISTORY WINDOW
|
|
4. VIEW JOURNAL |
It is the menu that shows the journal view of the transaction. The Journal view shows both debit and credit aspects of the amount. |
|
5. Edit |
Edit menu helps the user to edit or correct the details that are entered in supplier Advance |
|
6. Export to PDF |
If the user wants to convert the supplier advance to PDF format, then the export to PDF option is available. After clicking export to pdf, a save as directory option will appear and the user can opt the pdf file saving location |
|
7. Print |
Print menu helps the user to print the payments received if required. After clicking the print button it will redirect to print options where the user can select the printer, number of copies to take etc. |
|
8. EMAIL |
After saving the supplier Payments window, a send mail window will pop up. Here the user can send the mail to the customer (where ACCOXI fetches customer mail as a “TO” address by default) or any other person. |
|
9. More Features |
In the More features option user can cancel the payment. By clicking cancel, a validation message will pop up. Then click “YES” to cancel the payment and click “NO” to cancel and close the option. |
|
10. Pagination control |
It controls the page navigation and the page size. Page size can be set to 10, 20, 50 or 100. By giving the page number in the box and clicking on Go button, it jumps to the said page. |
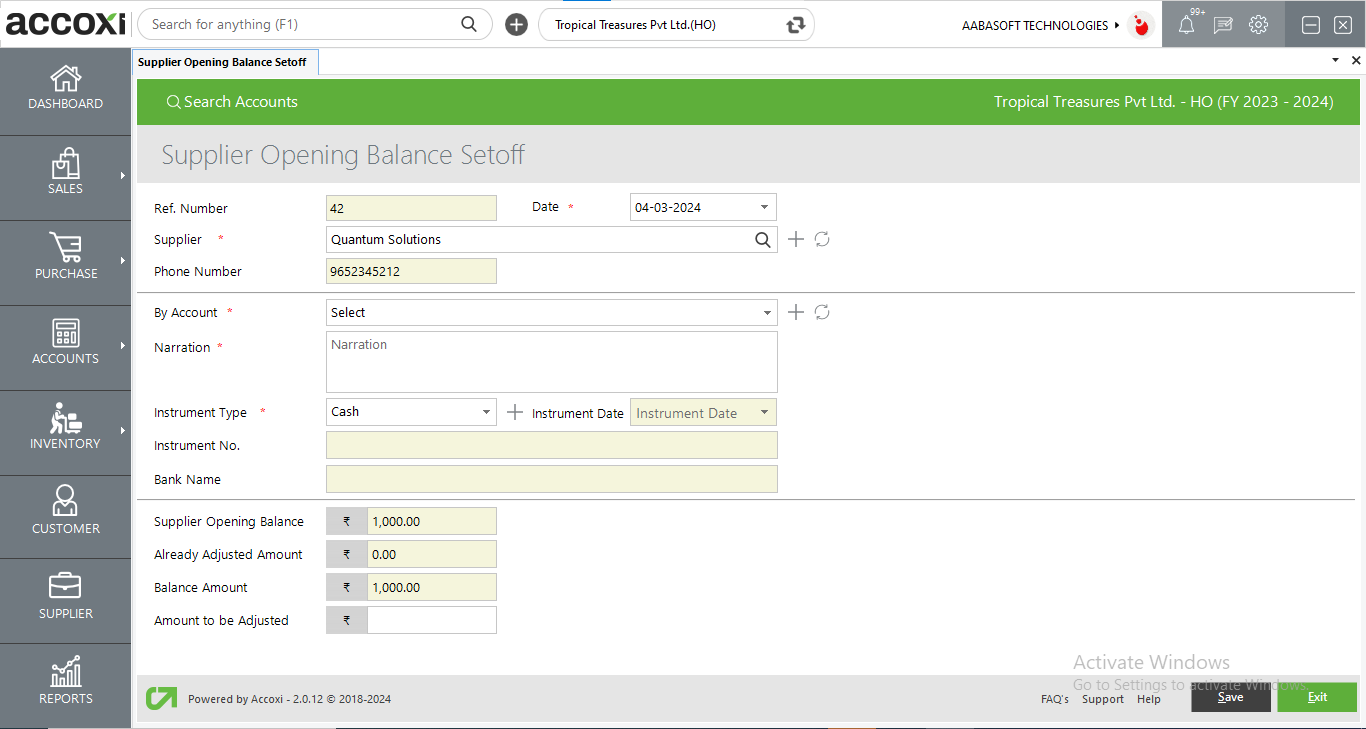
Opening setoff is the third type payment that is available in the Add New payment made option. This type of payment is using for Setting off the Supplier Opening balance. When the user selects a supplier, then it shows the details of that Supplier’s opening balance, already adjusted amount and the balance amount to setoff. User can enter the amount to be adjusted in the field to set off the balance amount.
|
Fields |
Description |
|
Reference number |
Reference number helps the user to identify transactions in records. It will automatically appear in the form and user can’t edit the reference number, as it will be the continuation of the previous payment form. |
|
Date |
The date will be auto-filled on the date field and it may be the current day date. If the user wants to change the date, it can be done by clicking on the date menu and then selecting a required date. |
|
Supplier |
Select the supplier that the user wants to set off the opening balance. By clicking on the select option, a list of suppliers will appear and user can select the supplier. If the user want to add a new supplier, it can be done by clicking on the + menu. |
|
Phone number |
When the user selects the supplier, the phone number details of the supplier will automatically appear in the field. |
|
By Account |
Here the user needs to select the account type for the payment i.e. by account or by cash. |
|
Narration |
Here user can add additional explanations regarding the payment |
|
Instrument type |
Users need to select the instrument type used to make payment. It includes cash, bank transfer, cheque,s etc. |
|
Instrument date |
This field is to set the date of the payment instrument. Users can select or set the date in this field excluding cash payments |
|
Instrument number |
This field is to enter the instrument number of the payment instrument. If the user selects the instrument as cash, then the instrument number field will be blocked. User can enter the instrument number in this field excluding the case of cash payments. |
|
Bank name |
Users can enter the Bank name in this field excluding the case of cash payment. The bank name will depend on instrument type and this field will be blocked if the payment term is by cash |
|
Supplier Opening balance |
When the user selects the supplier, then the Supplier Opening balance will automatically appear in the field. |
|
Already Adjusted amount |
It shows the amount that is already adjusted towards the supplier. |
|
Balance amount |
When the user selects a supplier, then the balance amount will be shown in the field. |
|
Amount to be adjusted |
Users can enter the amount for balance adjustment. |
|
Save |
Click on the Save menu to save the details entered and to create a payment. |
|
Exit |
Clear menu is for removing the entire data entered by the user. |
|
FIELDS |
DESCRIPTION |
|
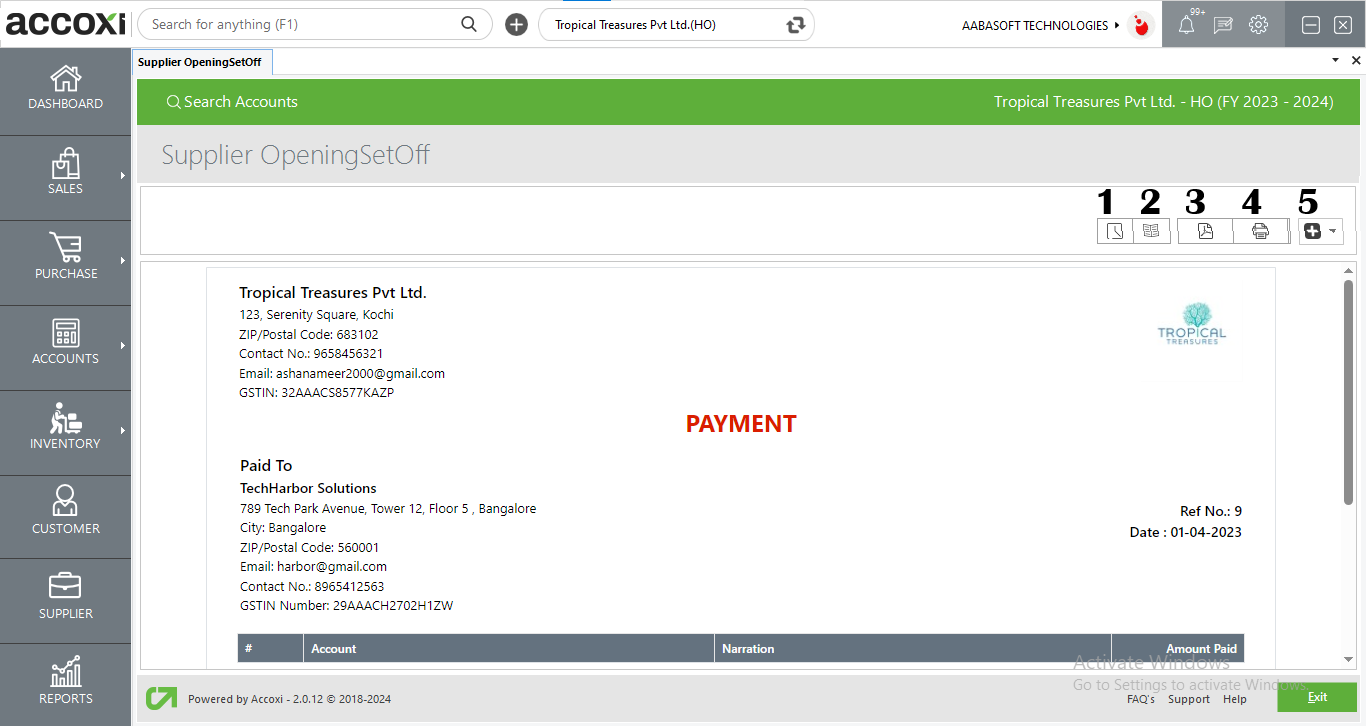
1. History |
This menu helps the user to obtain the history details of the supplier Advance. Comments and history shows all the edits and alterations of the supplier payment. With the date of changes made, the user can enter any comments regarding supplier advances. |
|
2. VIEW JOURNAL |
It is the menu that shows the journal view of the transaction. The Journal view shows both debit and credit aspects of the amount. |
|
3. Export to PDF |
If the user wants to convert the supplier advance to PDF format, then the export to PDF option is available. After clicking export to pdf, a save as directory option will appear and the user can opt the pdf file saving location |
|
4. Print |
Print menu helps the user to print the payments received if required. After clicking the print button it will redirect to print options where the user can select the printer, number of copies to take etc. |
|
5. More Features |
In the More features option user can cancel the payment. By clicking cancel, a validation message will pop up. Then click “YES” to cancel the payment and click “NO” to cancel and close the option. |
4. Export
The Payment made list can be exported to Excel format. Click the Export button at the top right corner near the +New button. Select the file location and click Save.
5. View
View menu enables the user to view the Payment made a form that has already been created.
6. More Settings
The settings menu enables the user to Edit the created payment made form, View, Export to PDF, and to Print the Payment made form.
7. Cancelled
Users can easily identify the canceled payments by using the color format. Canceled payments are indicated in red color.
8. Pagination Control
It controls the page navigation and the page size. Page size can be set to 10, 20, 50 or 100. By giving page number in the box and clicking on Go button, user can jump to the entered page.
In the Payment Made, there are three types of Payment options are available. By clicking on the +New menu, three type of payment options appear. They are Supplier Payments, Supplier Advance and Opening Set Off.
Yes. You can export the payment made form to Pdf format.
Yes. You can cancel the created payment by following steps.