A step-by-step guide on adding, creating, and editing suppliers in Accoxi

A person or organization that provides something needed such as a product or service can be termed as a Supplier.The role of a supplier in a business is to provide high-quality products from a manufacturer at a good price to a distributor or retailer for resale.
A person or organization that provides something needed such as a product or service can be termed as a Supplier. In this video, you will learn how to create, edit and manage a supplier in Accoxi.
In Accoxi, you can add vendors that you deal with in your business. For creating purchase transactions like bills, purchase orders and purchase invoices you’ll have to add suppliers.
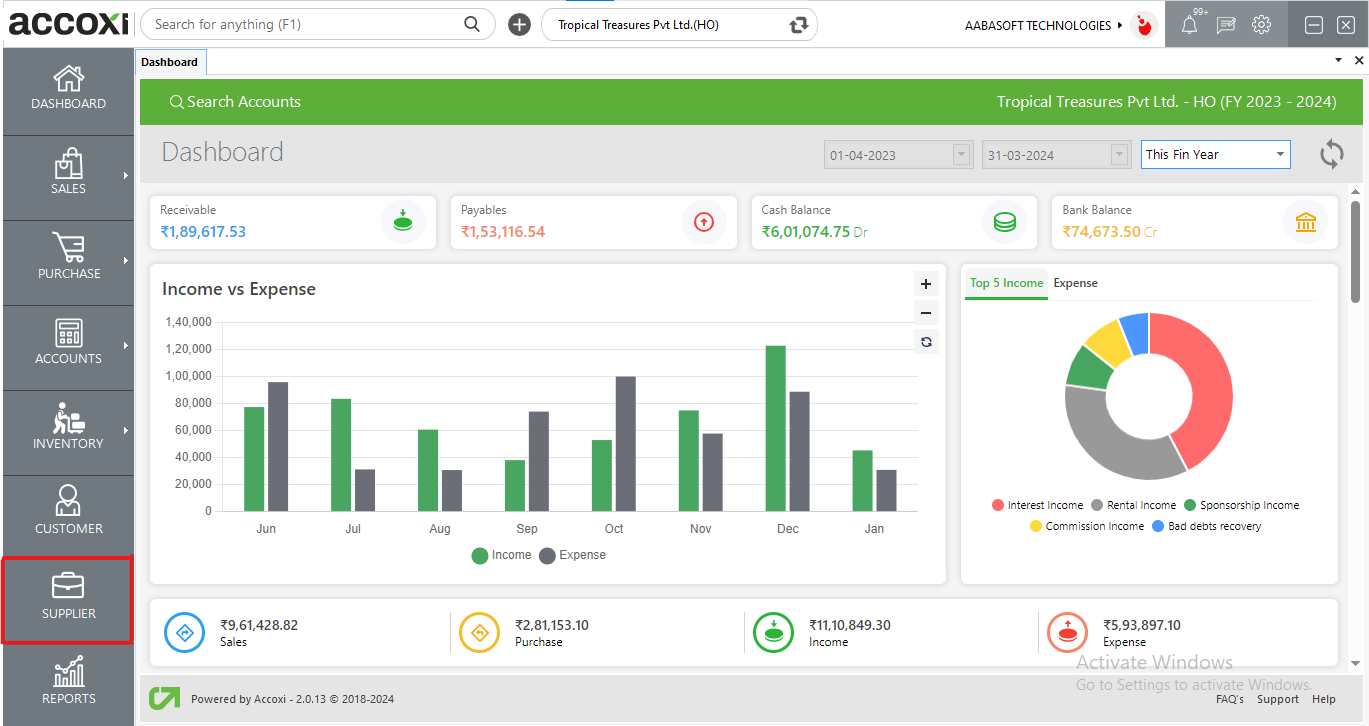
When we click on the Supplier Module it opens into Supplier Search.
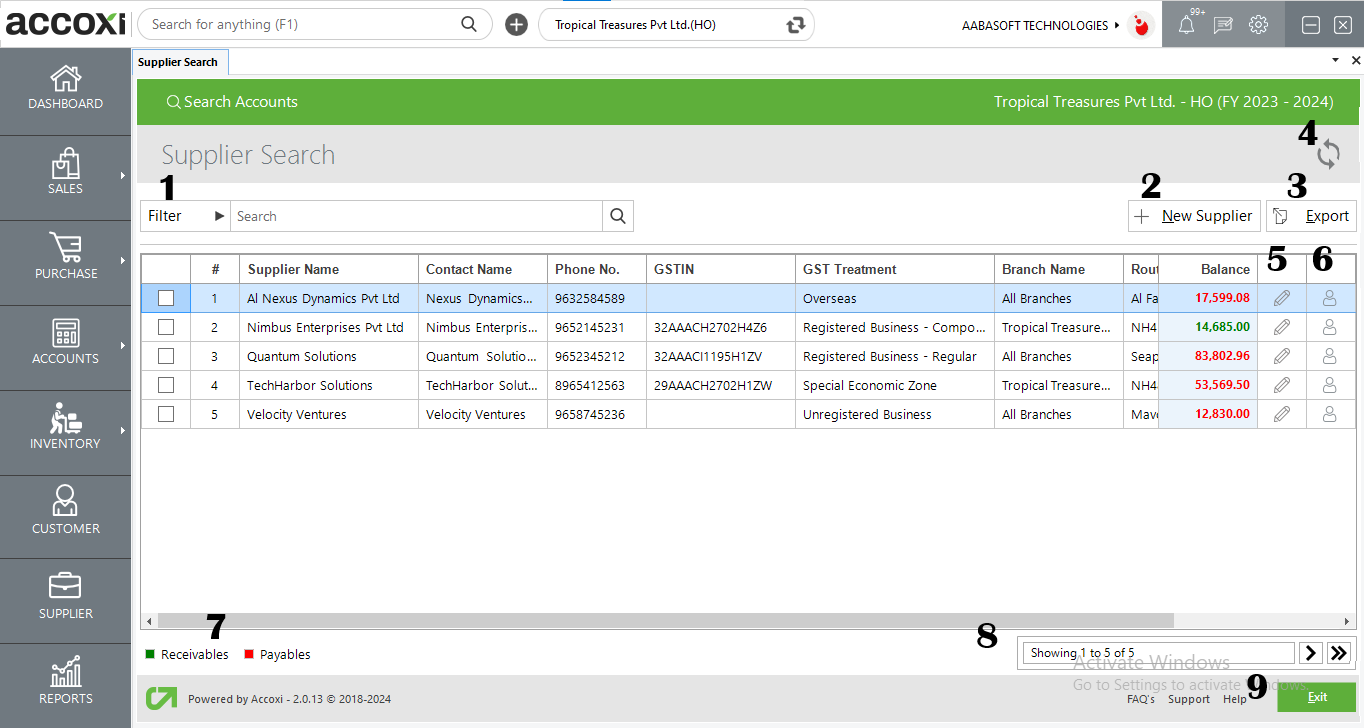
Supplier search consits of various menus and it displays the details of the vendor added to the business.
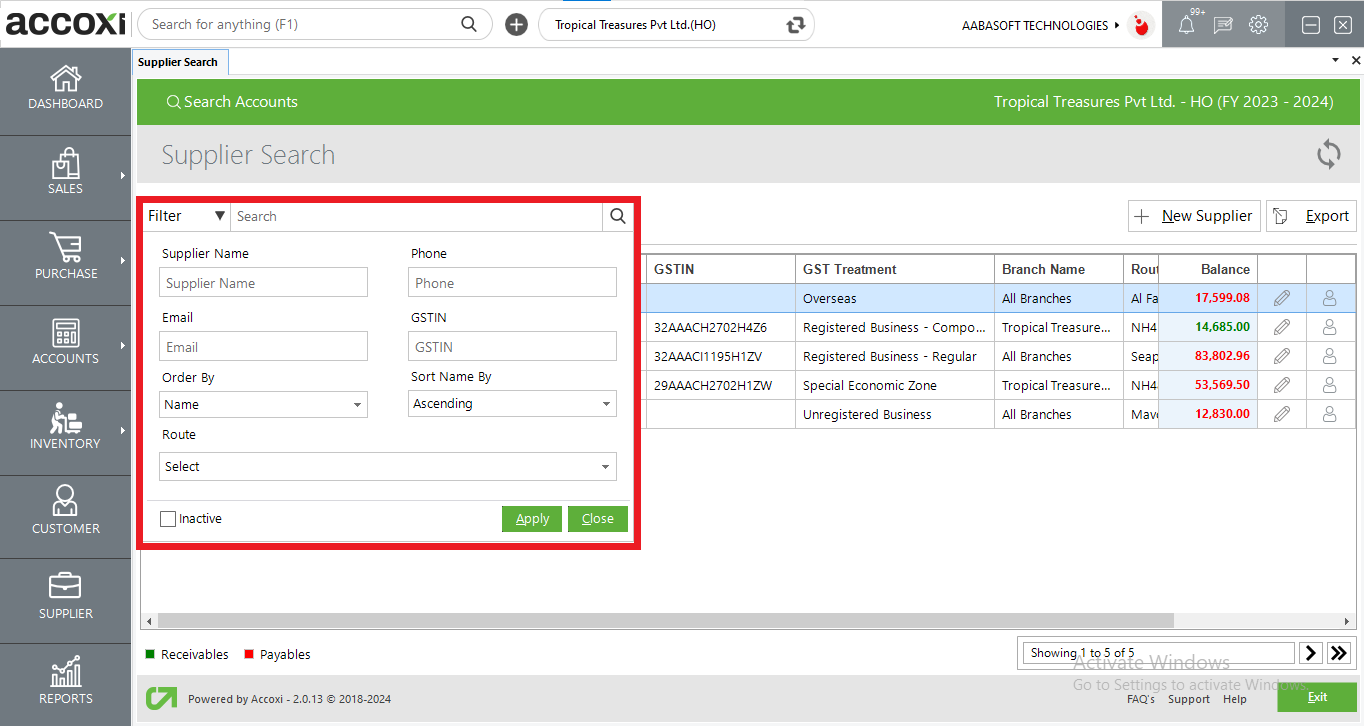
1. Filter option: a)Filter of supplier contact can be done in two ways-Either you can directly enter the supplier name, GSTIN, phone number into the search bar near filter option or by clicking the filter drop-down. You can filter the data by Supplier name, Phone No, Email, or GSTIN b)There is also a sorting option available. By selecting the Order By and Sort Order, the data can be sorted into ascending or descending order. Under the order by option we have Amount and Name and Sort order can be set as ascending or descending as per our requirement. c) By ticking the inactive dialogue box, It filters the inactive supplier details.
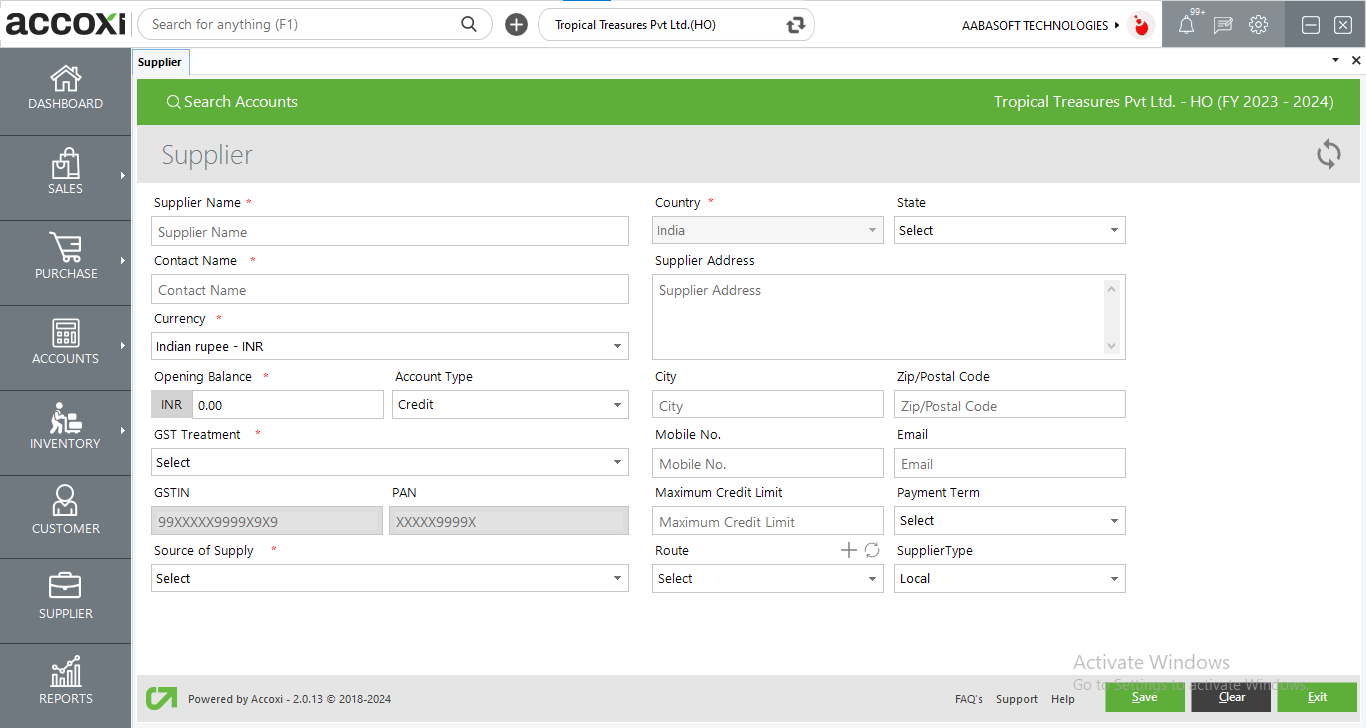
2. New Supplier: The new supplier button opens into supplier form where the user can add new Suppliers. Some fields are marked in red where the details are to be entered compulsorily.
Steps to create a new supplier
|
Field |
Description |
|
Supplier Name |
Enter The Name Of The Supplier |
|
Contact Name |
Enter The Contact person Name |
|
Currency |
User Can Select The Currency Of The Supplier As Per The Currency Used For Transaction |
|
Opening Balance |
You Can Add The Opening Balance Of The Supplier If Any. If There Is No Opening Balance Then You Can Give "0" |
|
Account Type
|
The Opening Balance Can Be Set As Credit Or Debit Amount. From The Drop Down Of Account Type, You Can Choose The Required Field. |
|
GST Treatment |
Select The GST Treatment From Drop Down Option |
|
GSTIN |
If The Supplier Is Registered Business Or under the Special Economic Zone, Enter The GSTIN Number For The Suppliers Whose, GST Treatment Is Overseas Or Unregistered Party The GSTIN Field Becomes Inactive.
|
|
PAN |
If The Supplier Is Registered Business Or under Special Economic Zone, Enter The PAN Number For The Suppliers Whose, GST Treatment Is Overseas Or Unregistered Party The PAN Field Becomes Inactive. |
|
Source of Supply |
Based On The Supplier GST Number This Field Automatically Identifies The State. In Case Of Suppliers Who Does Not Have GST No. Like Unregistered Party Or Overseas, You Have To Choose The State From The Drop Down List. |
|
Country |
Other Than Overseas GST Treatment, The Country Name Is Set As India. You Cannot Choose Any Other Country If GST Treatment Is Overseas, The Country Drop Down Option Becomes Active And You Can Choose The Required Country |
|
State |
Other Than Overseas GST Treatment Supplier, You Can Set The State From The Drop Down Option But The State Field Becomes Inactive For The Overseas Suppliers |
|
Supplier Address |
Enter the supplier address |
|
City |
Enter the city |
|
Pincode |
Enter Pincode/ Zip code |
|
Mobile No |
Enter The Mobile Number |
|
|
Enter The Email Id Of The Supplier |
|
Maximum Credit limit |
Here You Can Set The Maximum Credit Limit Allowed By Your Supplier. And If Your Purchases From This Particular Supplier Crosses This Limit, Warning Message Will Appear. |
|
Payment Term |
Here You Can Set The Payment Terms. And The Said Term Will Appear In The Purchase Invoice. Based On This Payment Term, The Status Of The Invoices Decided Like Overdue, Unpaid Etc. |
|
Route |
User Must Choose The Supplier Route Or Click On The Plus Sign On The Route Bar To Create New Supplier Route. |
|
Supplier Type |
User Can Create Supplier Globally Or Locally |
|
Import Taxable and import Exempt |
If The GST Treatment Is Overseas or SEZ, Additional Fields As Import Taxable And Import Exempt Comes. Using The Radio Button Choose Any One. |
3. Export
The supplier list can be exported to Excel format. Click on the Export button at the top right corner near the +New button. Select the file location and click on save. The fields that can be seen in export file are supplier name, contact name, phone no, GSTIN, GST treatment and balance.
4. Refresh
If your latest data is not displayed, click on the refresh icon on the top left corner of the page to fetch the new data.
5. Edit
You can edit the Supplier details if required using the edit icon. By clicking this icon the supplier form opens. You can see the entered details and you can update the details as per your requirement
6. Supplier Info
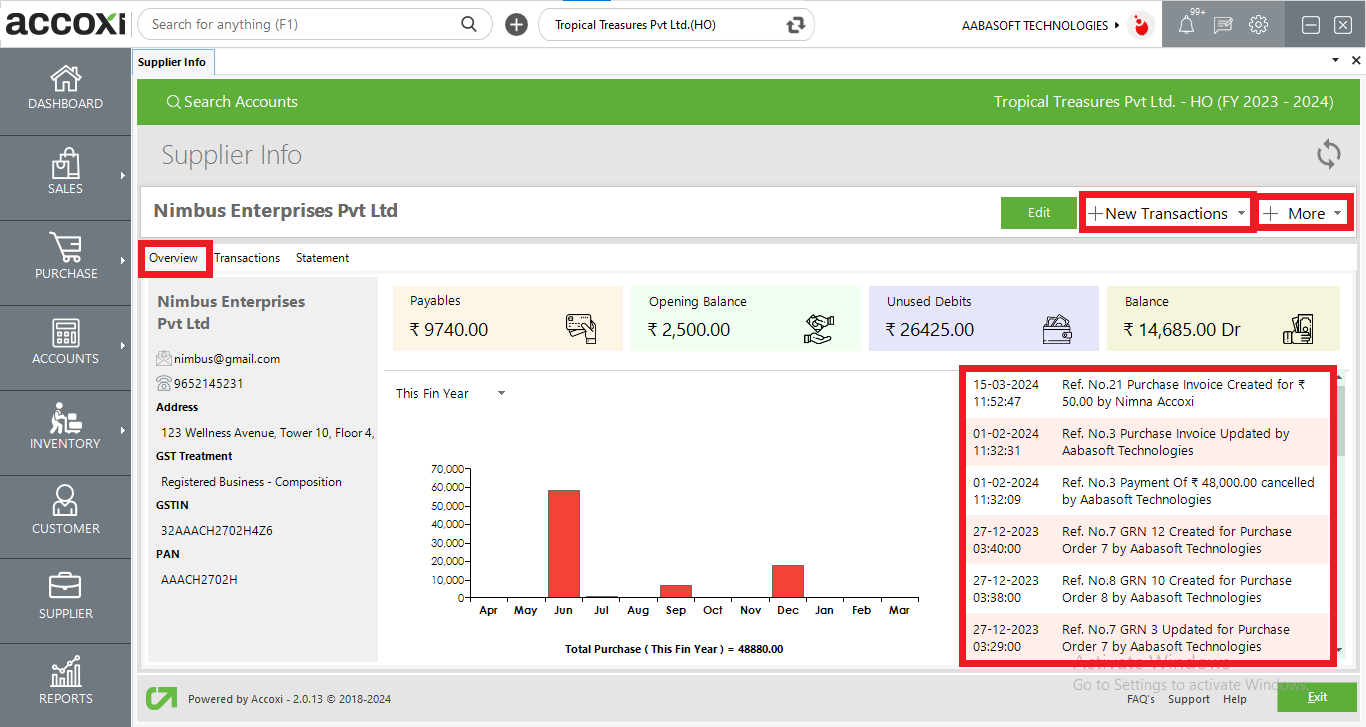
The Overview page shows an eagles view of the supplier’s basic information and activity. A mini dashboard displaying the supplier’s balances, unused debits and payables. A graph is present showing the sale activity of the supplier.
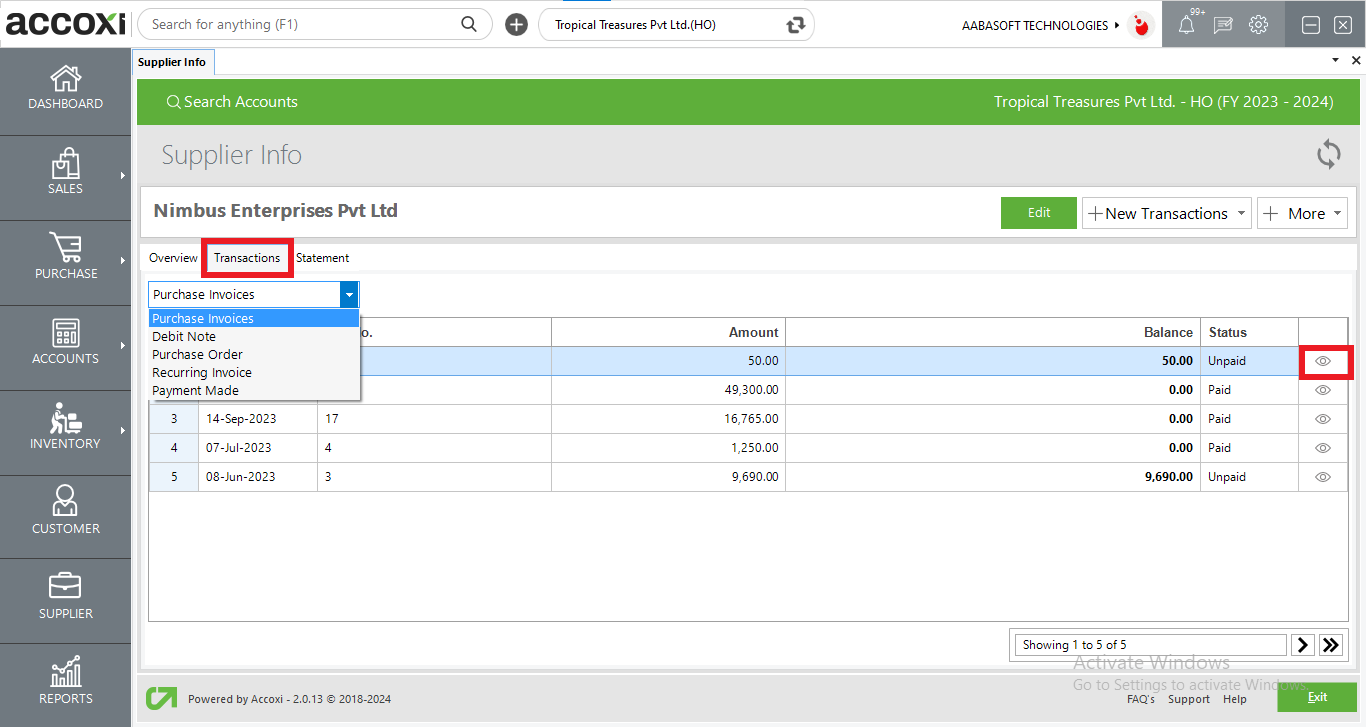
The Transaction tab displays a detailed list of transaction done to the supplier and the user can filter the transactions with the drop down option. User can also view the invoice from the view option.
The statement module produces a statement regarding the invoice and payment made to the supplier with date, transaction type, Details, Amount, Payments and balance. A statement is shown with the suppliers balance due after all transactions shown.
User can Filter the Statement based on timeframes and can email, print or save as PDF from the options present in the bottom left corner.
7. Colour Filter
The closing balance of the supplier is represented either in red or green to denote payable or receivable.
If the supplier is inactive, the supplier details are shown in red colour
8. Pagination Control
It controls the page navigation and the page size. Page size can be set to 10, 20, 50 or 100. And by giving page number in the box and clicking on Go button. It jumps to the said page.
9. Exit
Below the pagination control, there is exit button. If you want to exit the supplier search page click on exit button.
No, duplicate supplier with same display name is not allowed.
Filter option is available below the Customer Search page. Customers can be filtered based on:
Also if you click on the drop down icon on the Filter field, you can enter the details into the fields directly by selecting from the drop down options displayed.
In Supplier Details form, there is a field named Payment Term in which eight set of predetermined values like NET 7, NET 15, On Receipt, Specific Date etc. will be available. From the drop down option in Payment Term select the appropriate value and Save the supplier details.
Select the Supplier Module. At the right hand end of the each supplier there is a Pencil icon which indicates edit. Click on the icon to make required changes and select Save button.
No, supplier can only be edited not deleted.
Select the supplier module. The supplier search window opens. Click on the Export button at the top right corner near the New button. Select the file location and click on save.
While saving the Supplier, if you get a warning msg saying Please enter opening balance, In the opening balance column give the amount as Zero and then save the supplier data.
GST treatment decides how the transaction to be accounted for. Based on the GST treatment , the automated journal is created as Interstate,Intra state ,overseas etc.
Yes. If you modify your supplier address it will automatically change the address of all the invoices created against this supplier