
Creation and management of credit notes in Accoxi

A credit note or credit memo is a commercial document issued by a seller to a buyer. Credit notes act as a source document for the sales return journal. In other words the credit note is evidence of the reduction in sales. In accoxi, the user can create Credit notes and save the credit notes that already created. Credit notes act as a source document for the sales return journal.
Key Features of Credit Note
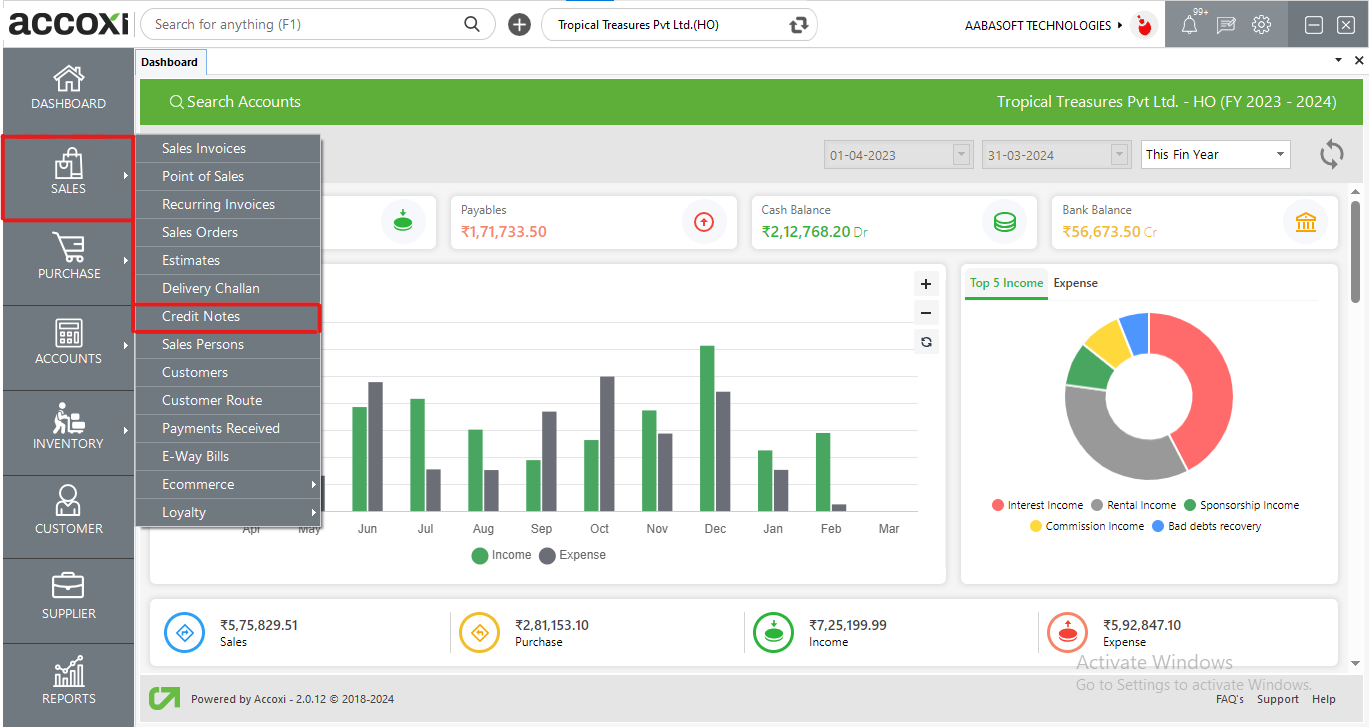
Click on the Sales module and select the option Credit Notes.
When the user clicks on the Credit Notes option, it opens to Credit Notes Search.
Credit Note Search
The credit Note search consists of various menus and it shows details of the credit notes that have already been created by the user. Users can identify the current status of the credit notes that were created, and it may be open or closed. The user can quickly identify canceled credit notes using the color format. Canceled credit notes are indicated in red color. It also shows the amount of total credit, using credit, and the balance credit amount of the Customer.
Menus Available in Credit Note Search
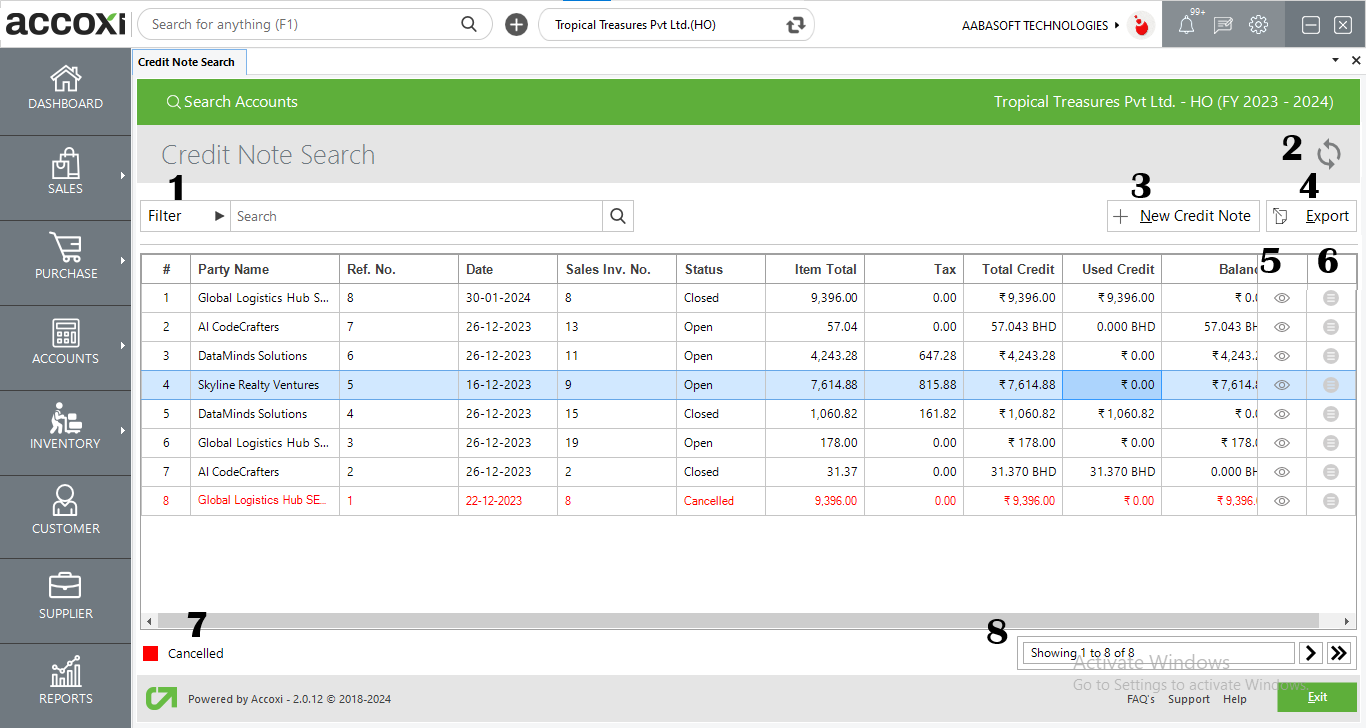
1.Filter
The filter of credit notes can be done in two ways-Either the user can directly enter the customer name into the search bar near the filter option or by clicking the filter drop-down. Users can filter the data by entering the Party name, reference number, by date or by status. The credit note data can filter by using the date format, need to enter the start date and the end date of the credit note. Data filter by status includes sorting of data on the basis of open, closed, and canceled.
2. Refresh
If the latest data is not displayed, click on the refresh icon on the top left corner of the page to fetch the new data.
3. Add new Credit note
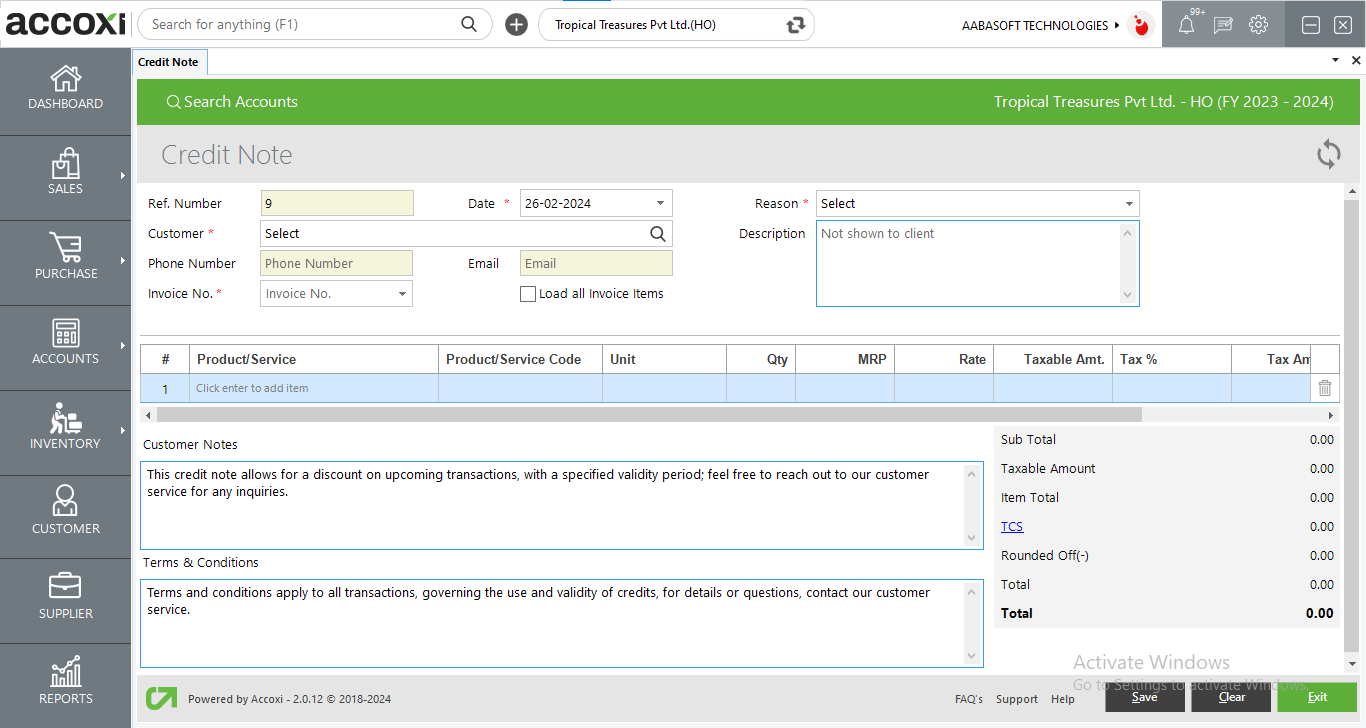
This menu is used for the purpose of creating a new Credit note. By clicking Add new + Credit Note, a new window opens with the new form of a Credit note.
Steps to create a new Credit Note
|
Fields |
Description |
|
Reference no |
Reference number helps the user to identify transactions in records. It will automatically appear on the form and user can’t edit the reference number, as it will be the continuation of the previous credit note. |
|
Date |
Date will automatically appear on the date field and it may be current day date. If the user want to change the date, it can be done by clicking on the date menu and can select required date. |
|
Reason |
Select the reason for applying credit note in this field. The reason may be sales return, correction in invoice, or others. |
|
Customer |
Select the customer for that the user wants to create a credit note. By clicking the select menu, list of customers will appear and user can select the required customer from the list. If the user want to create a new customer without the list, can create a new customer by clicking the menu + (add new). |
|
Phone number |
When the user selects the customer, the phone number details of the customer will automatically appear on the field. |
|
|
It shows the email id of the selected customer. User can’t enter anything on this field. |
|
Invoice number |
After selecting the Customer, the user needs to select the sales invoice number on this field. It shows all the sales invoice numbers of the selected Customer and the user can select the required one to create a credit note. |
|
Load all items |
If the user wants to select all the invoiced items of a particular customer, then it can be done by marking the menu Load all items. |
|
Description |
Users can add additional explanations if required. |
|
Product or Service |
Select the products that are wanted to be applied to the credit note. Before selecting the products, the user should select an invoice number on the invoice number field otherwise the user can’t select products. If the user marks the Load all items menu, it loads all the products and service from the invoice |
|
Product or service code |
It’s a blocked field and the user can’t enter anything on the field. The product code will automatically appear with the item. |
|
HSN/SAC |
It’s a blocked field and the user can’t enter anything on the field. HSN code will automatically appear with the item. |
|
Unit |
Unit will automatically appear on the field, user can’t enter on the field. |
|
Batch |
It’s a blocked field and the user can’t enter anything on the field. The batch name will automatically appear with the item. |
|
MRP |
MRP of the product will automatically appear on the field after selecting the product to make a Credit note. The user can’t edit the MRP of the product as it is already fixed. |
|
Taxable amount |
The taxable amount is the amount on which tax is to be charged. It will automatically appear after entering the rate details. |
|
Tax% |
This field automatically shows the tax rate of the Selling item. It may be 3%, 5%, 12%, 18%, 28%, nil rated, exempted or no GST. Users can’t edit or enter the rate on this field. |
|
Tax Amount |
The tax amount is the amount at which a business or person is taxed on the basis of tax type Inclusive or Exclusive. Users can’t edit or enter the rate on this field. |
|
CESS amount |
It is a form of tax charged/levied over and above the base tax liability of a taxpayer. Cess amount will automatically appear on this field and the field was blocked one. |
|
Item total |
It shows the total amount of the item after product rate, tax rate, etc. |
|
Delete item |
If the user wants to delete the item, it can be done by clicking on the delete symbol on the right side of the Item total column. |
|
Product Description |
Users can add additional explanations of the product/service if required. |
|
Quantity |
select the product/service, the quantity of the item will automatically appear with that. If the user want to enter or edit the quantity of the item, it can be done on this field. |
|
Rate |
Sales rate of the product will automatically appear on the field after select the product. User can edit the rate if require. |
|
Discount |
There are four types of discounts that available in the sales module. They are discount before tax, discount after tax, line discount and no discount. While creating the sales invoice User can set the discount type from the sales settings and can enter the discount. In credit note form, the discount settlements are shown on the right side of the page and it will automatically appear when selecting the Customer and invoices. |
|
Save |
Click on the Save menu to save the details that were entered. After clicking the Save menu, user will be redirected to credit not view page |
|
Clear |
Clear menu is for clearing or removing the entire data that entered by the user. |
|
Exit |
Exit menu is using for go to the previous page without saving the credit note form. |
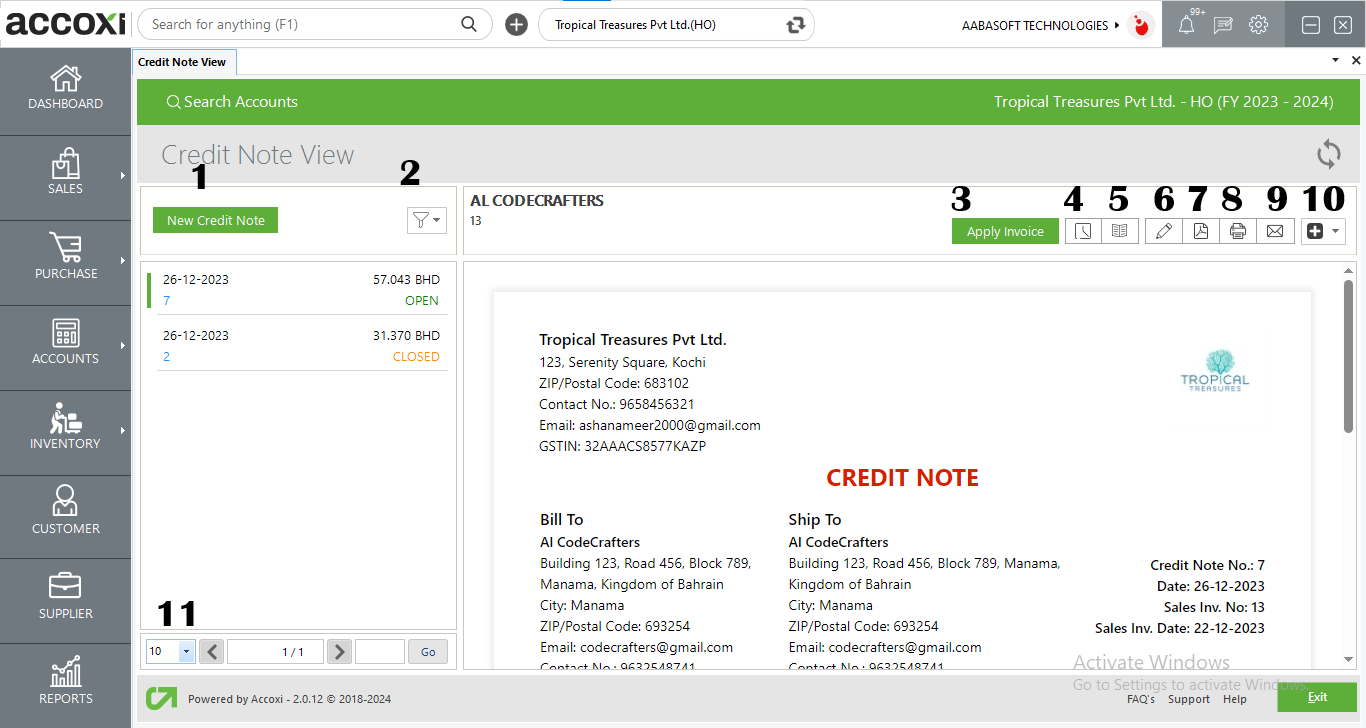
It is the menu option to create a new credit note. By clicking the New Credit Note menu, the user is redirected to the credit note creation page
The filter menu enables the user to filter the data and the data filter on the basis of credit note status, open, closed, or all.
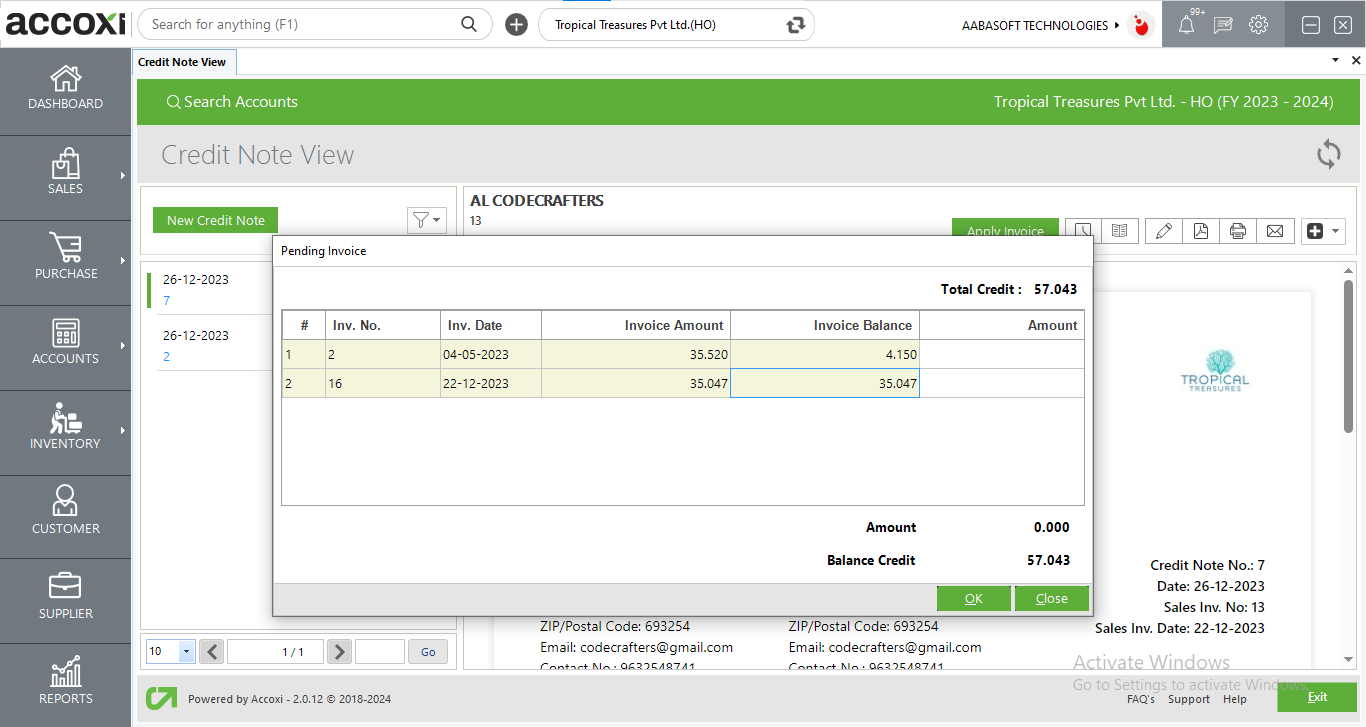
This menu enables the user to apply an invoice against the credit note. Users can convert the total credit amount into the pending invoice amount and can adjust the invoice balance by it. When the user clicks on the Apply Invoice menu, the pending invoice list will open and the user can select the invoice and set the amount towards the dealer. if the customer does not have any pending invoices it is not possible to use this option. If the credit amount is nil, then the user can’t use apply invoice option.
Shows all the edits and alterations of the credit note with the date of the changes made. Shows the details about the refunds applied in the credit note with the date refund number and amount. Details of the invoices that applied to the credit note are shown here with the date invoice number and amount.
journal view generates the credit note generation made as a journal view.
Edit menu helps the user to edit or correct the details that are entered in the credit note and can save again after it. When clicking on the edit menu, the screen will go to the previous window of the new credit note form.
This menu enables the user to export the Sales credit note form to PDF format and can save it in the system.
When the user clicks on the PDF menu, a new tab will appear to save the file. Then the user can select the location to save the file, can set a name, and click on the save button to save the file in PDF format.
If the user wants to take the printout of the created credit note form, it can be done by using the menu Print on the top right side of the credit note view. When the user clicks on the print menu, a new tab will appear on the screen and it contains the details regarding the print. User can set the page range, page height, and width and can enter the required number of copies here. By clicking on the Print button, the user gets the printout of the credit note form.
The email menu enables the user to send the Credit note form directly to the Customers.By clicking on the Email menu, a new tab will appear regarding the details of sending mail. It includes To, id, CC, subject, and content. When clicking on the mail option, the email id of the Customer will automatically appear on the TO field. If the user wants to change the email id then it can be done by removing the id and can enter a new one. Users can also enter CC if require and can add an additional description if required.
If the user wants to change the Email template, it can be done by Email template in Settings.
Need to mark the option attachment for sending the sales order form with Email. After clicking on the Send option, the mail will send to the selected customer.
This menu includes two options, Refund and Cancel.
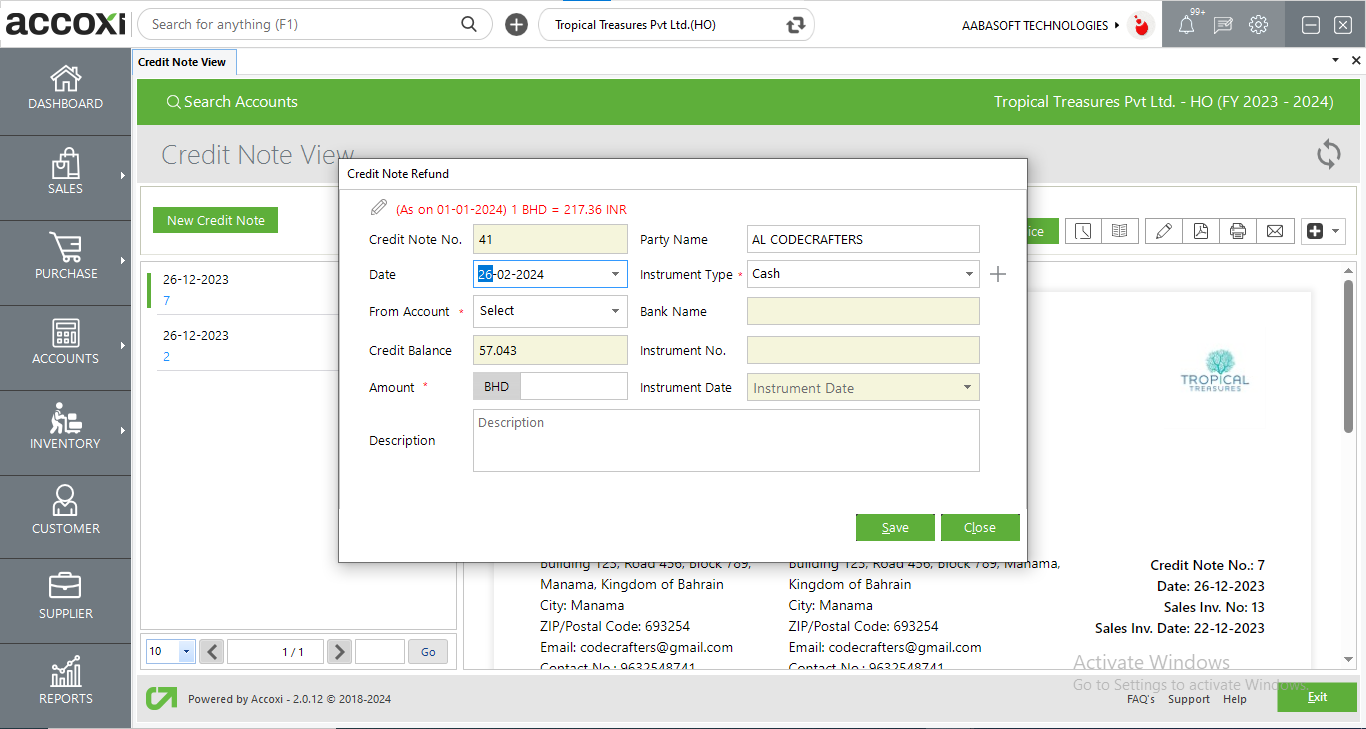
If the user wants to refund the credit amount, it can be done by clicking the refund menu. When clicking on the Refund menu, the credit note refund form will open and the user can enter the amount with payment details in it.
The cancel option enables the user to Cancel the prepared Credit note. When clicking on the Cancel menu, it shows customer details with the amount and the user needs to enter the reason for the Cancellation in it.
1. Refund option enables the user to refund the credit note amount to the customer.
By clicking on the refund option, a credit note refund form will appear.
2. Cancel option enables the user to cancel the Credit note.
When clicking on the Cancel menu, the Cancel form will appear on the screen and the user need to enter the details to process the cancellation.
In this form, the user gets the details of the Customer's name and the amount of the sale. If the user wants to cancel the credit note, needs to enter the reason on the Reason for Cancellation field and click on OK to Cancel the created credit note form.
It controls the page navigation and the page size. Page size can be set to 10, 20, 50, or 100. And by giving the page number in the box and clicking on the Go button. It jumps to the said page.
4.Export
The Credit note list can be export to Excel format. Click the Export button at the top right corner near the +New button. Select the file location and click on save.
5.View
View menu enable the user to view the Credit Note form that already created.
6.More Settings
This menu includes Edit, View, Apply to Invoice, Refund, Export to PDF and Print option.
Edit menu helps the user to edit or correct the details that entered in the credit note and can save again after it.
View menu enable the user to view the Credit Note form that already created.
Apply to Invoice menu enable the user to apply invoice against the credit note. User can convert the total credit amount in to pending invoice amount and can adjust the invoice balance by it. When the user click on the Apply Invoice menu, pending invoice list will open and user can select the invoice and set the amount towards the dealer. If the credit amount is nil, then user can’t use apply invoice option.
If the user wants to refund the credit amount, it can be done by clicking the Refund menu.
Export to PDF menu enables the user to convert the credit note form to PDF format.
Print menu helps the user to print the created credit note form if require.
7.Cancelled
User can easily identify the cancelled credit notes by using color format. Cancelled credit notes are indicates with red color.
8.Pagination Control
It controls the page navigation and the page size. Page size can be set to 10, 20, 50 or 100. And by giving page number in the box and clicking on Go button. It jumps to the said page
Steps to create new Credit Note