Creation and management of credit notes in Accoxi

A credit note or credit memo is a business document issued by a seller to a buyer. It serves as a source document for the sales return journal, providing evidence of a reduction in sales. In Accoxi, users have the ability to create and save credit notes, which function as important records in the sales return journal.
Key Features of Credit Note:
Provides a comprehensive view of previously created credit notes, including date, party name, total item amount, tax amount, and more.
Allows users to identify the current status of credit notes, whether they are open or closed.
Canceled credit notes are easily identifiable through a color format, with canceled entries displayed in red.
Displays the total credit amount, used credit, and the remaining balance credit amount for the customer.
If the customer account has a balance credit amount, users can initiate a refund or apply it to an invoice.
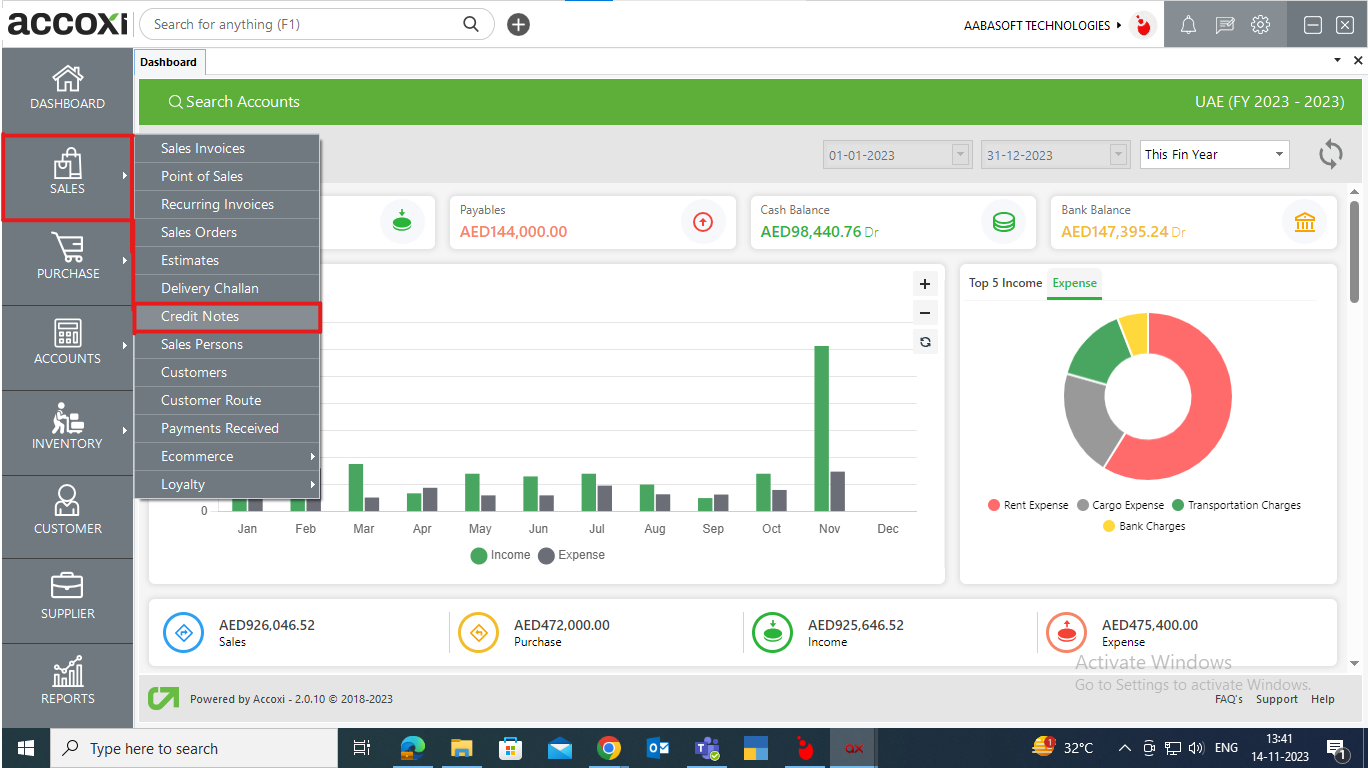
Navigate to the Sales module and choose the "Credit Notes" option. Upon selecting "Credit Notes," it opens the Credit Notes Search interface.
Credit Note Search
The Credit Note search menu encompasses various sections, displaying details of credit notes previously created by the user. Users can discern the current status of these credit notes, whether they are open or closed. Cancelled credit notes are readily identifiable through a color format, with entries marked in red. Additionally, the search interface provides information on the total credit amount, used credit, and the remaining balance credit amount for each customer.
Menu Available in Credit Note Search
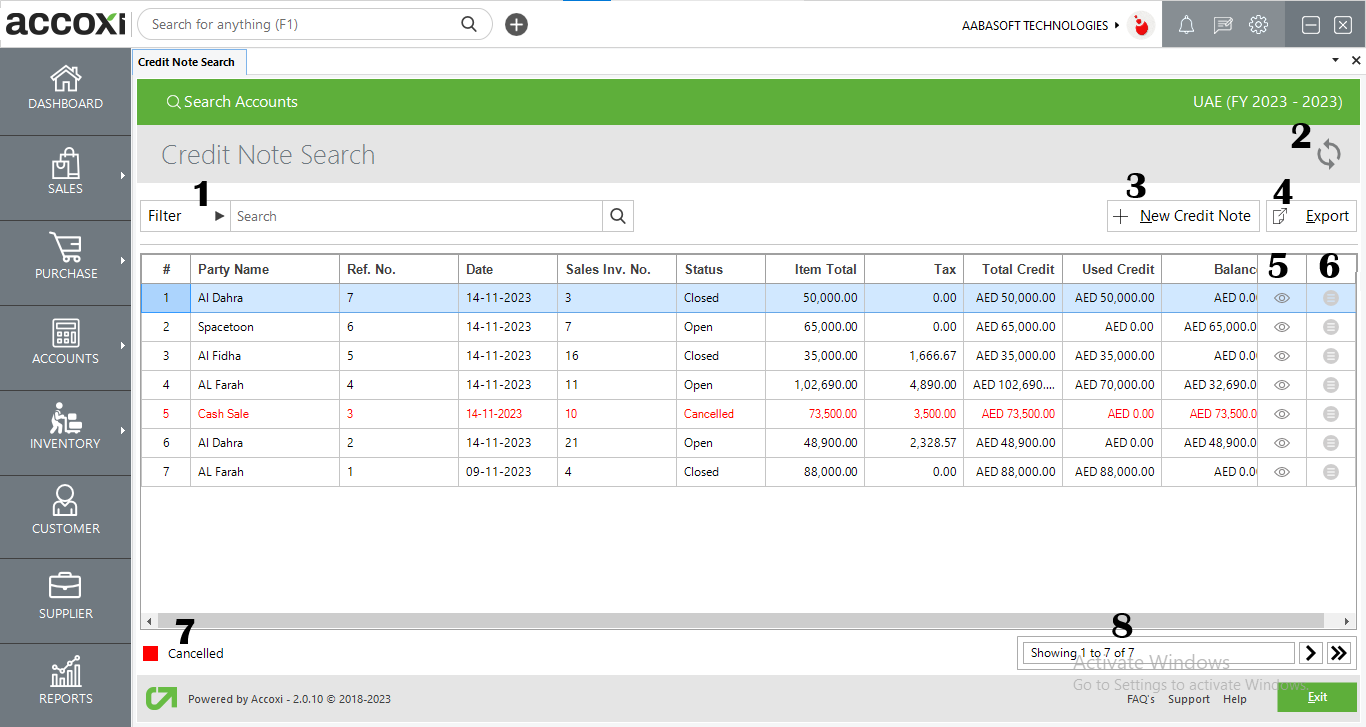
Credit note filtering can be accomplished in two ways. Users have the option to directly enter the customer name into the search bar located near the filter option. Alternatively, they can click the filter drop-down. The data can be filtered by entering the party name, reference number, date, or status. When filtering by date, users need to input the start date and end date of the credit note. Filtering by status includes sorting data based on open, closed, and cancelled statuses.
If the most recent data is not displayed, click on the refresh icon located at the top left corner of the page to fetch the new data.
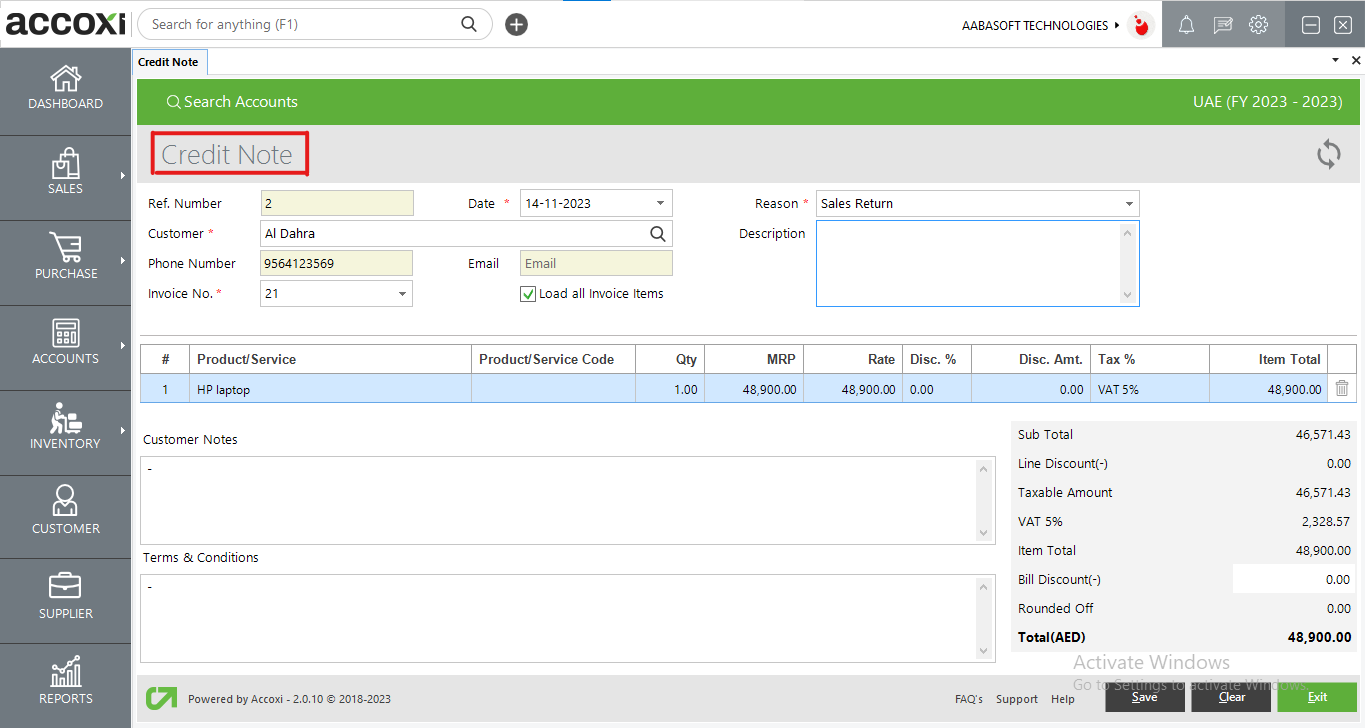
This menu is utilized to create a new Credit Note. By clicking on "Add New + Credit Note," a new window opens, presenting the user with a fresh Credit Note form.
To create a new Credit Note, follow these steps:
|
Field |
Description |
|
Reference No |
The Reference Number serves as a means for users to identify transactions in records. It automatically appears on the form, and users cannot edit the Reference Number, as it continues the sequence from the previous Credit Note. |
|
Date |
The date will automatically populate the date field, potentially reflecting the current day's date. If the user wishes to change the date, this can be accomplished by clicking on the date menu and selecting the desired date. |
|
Reason |
Choose the reason for applying the Credit Note in this field. The reason could be a Sales Return, correction in the invoice, or another specified reason. |
|
Customer |
Select the customer for whom the user wants to create a Credit Note. By clicking the "Select" menu, a list of customers will appear, and the user can choose the desired customer from the list. If the user wishes to create a new customer not present in the list, they can do so by clicking the menu "+ (Add New)." |
|
Phone Number |
Upon selecting the customer, the phone number details of the customer will automatically populate the corresponding field. |
|
|
It displays the email ID of the selected customer, and users cannot input any information in this field. |
|
Invoice Number |
After selecting the customer, the user must choose the sales invoice number in this field. It displays all the sales invoice numbers associated with the selected customer, and the user can then select the required one to create a Credit Note. |
|
Load All Items |
If the user wishes to select all the invoiced items of a particular customer, this can be achieved by marking the "Load All Items" option. |
|
Description |
Users have the option to add additional explanations if needed. |
|
Product Or Service |
Select the products that are intended to be applied to the Credit Note. Before choosing the products, the user must first select an invoice number in the Invoice Number field; otherwise, product selection is not possible. If the user marks the "Load All Items" option, it loads all the products and services from the selected invoice. |
|
Product Or Service Code |
The product code field is blocked, and users cannot input any information into it. The product code will automatically appear alongside the item. |
|
HSN/SAC |
The HSN code field is blocked, and users cannot input any information into it. The HSN code will automatically appear with the item. |
|
Unit |
The unit will automatically appear in the field, and users cannot input any information into it. |
|
Batch |
The batch name field is blocked, and users cannot input any information into it. The batch name will automatically appear with the item. |
|
MRP |
The MRP (Maximum Retail Price) of the product will automatically appear in the field after selecting the product to create a Credit Note. Users cannot edit the MRP of the product as it is already fixed. |
|
Taxable Amount |
The taxable amount is the amount on which tax is to be charged, and it will automatically appear after entering the rate details. |
|
Tax% |
This field automatically displays the tax rate of the selling item, and users cannot edit or enter the VAT% in this field. |
|
Tax Amount |
The tax amount is the amount at which a business or person is taxed based on the tax type, inclusive or exclusive. Users cannot edit or enter the rate in this field. |
|
Item Total |
It displays the total amount of the item, considering factors such as product rate, tax rate, etc. |
|
Delete Item |
If the user wishes to delete the item, they can do so by clicking on the delete symbol located on the right side of the item total column. |
|
Product Description |
Users have the option to add additional explanations of the product/service if required. |
|
Quantity |
When selecting the product/service, the quantity of the item will automatically appear. If the user wishes to enter or edit the quantity of the item, it can be done in this field. |
|
Rate |
The sales rate of the product will automatically appear in the field after selecting the product. Users have the option to edit the rate if required. |
|
Discount |
In the Sales module, there are four types of discounts available: Discount Before Tax, Discount After Tax, Line Discount, and No Discount. When creating a Sales Invoice, the user can set the discount type from the Sales Settings and enter the discount.
In the Credit Note form, the discount settlements are displayed on the right side of the page, and they will automatically appear when selecting the customer and invoices. |
|
Save |
Click on the "Save" menu to save the details that were entered. After clicking the "Save" menu, the user will be redirected to the Credit Note View page. |
|
Clear |
The "Clear" menu is used for clearing or removing the entire data that has been entered by the user. |
|
Exit |
The "Exit" menu is used to go to the previous page without saving the Credit Note form. |
Menu Available in Credit Note view
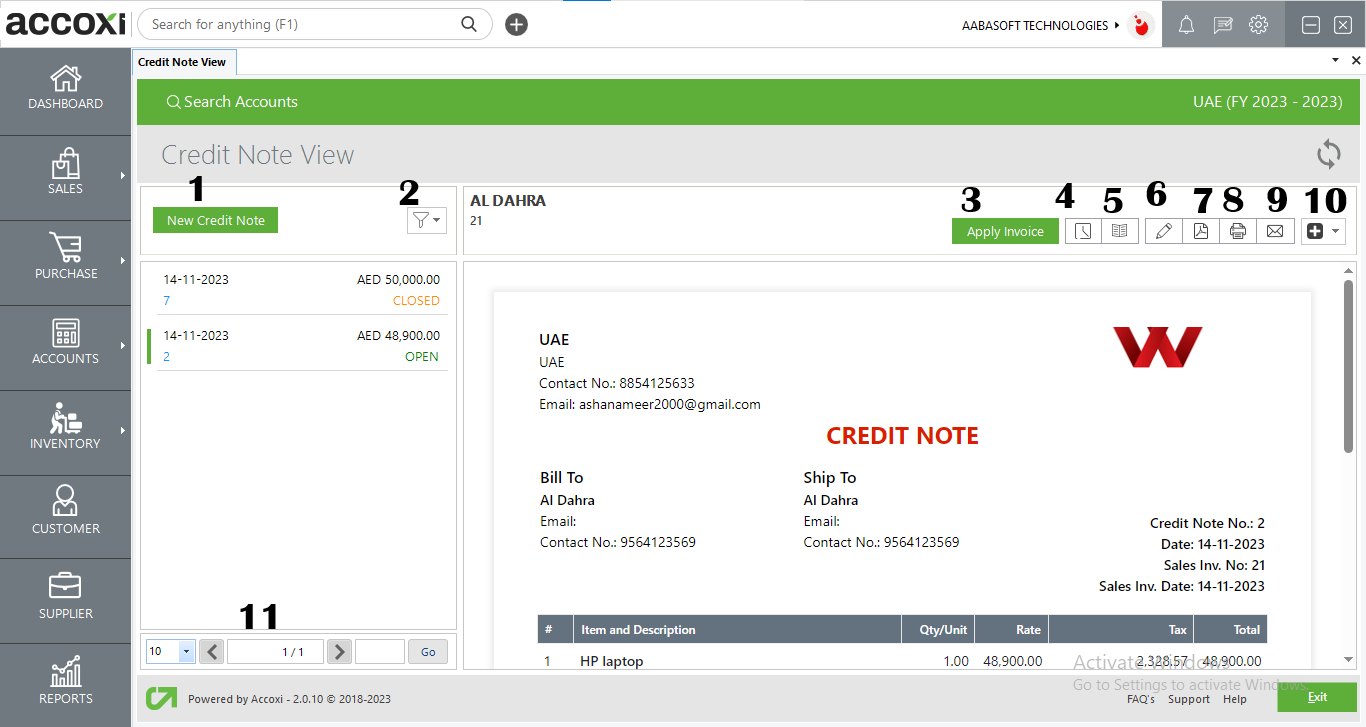
The "New Credit Note" menu option is used to create a new credit note. By clicking on the "New Credit Note" menu, the user is redirected to the credit note creation page.
The "Filter" menu enables the user to filter the data based on credit note status, such as open, closed, or all.
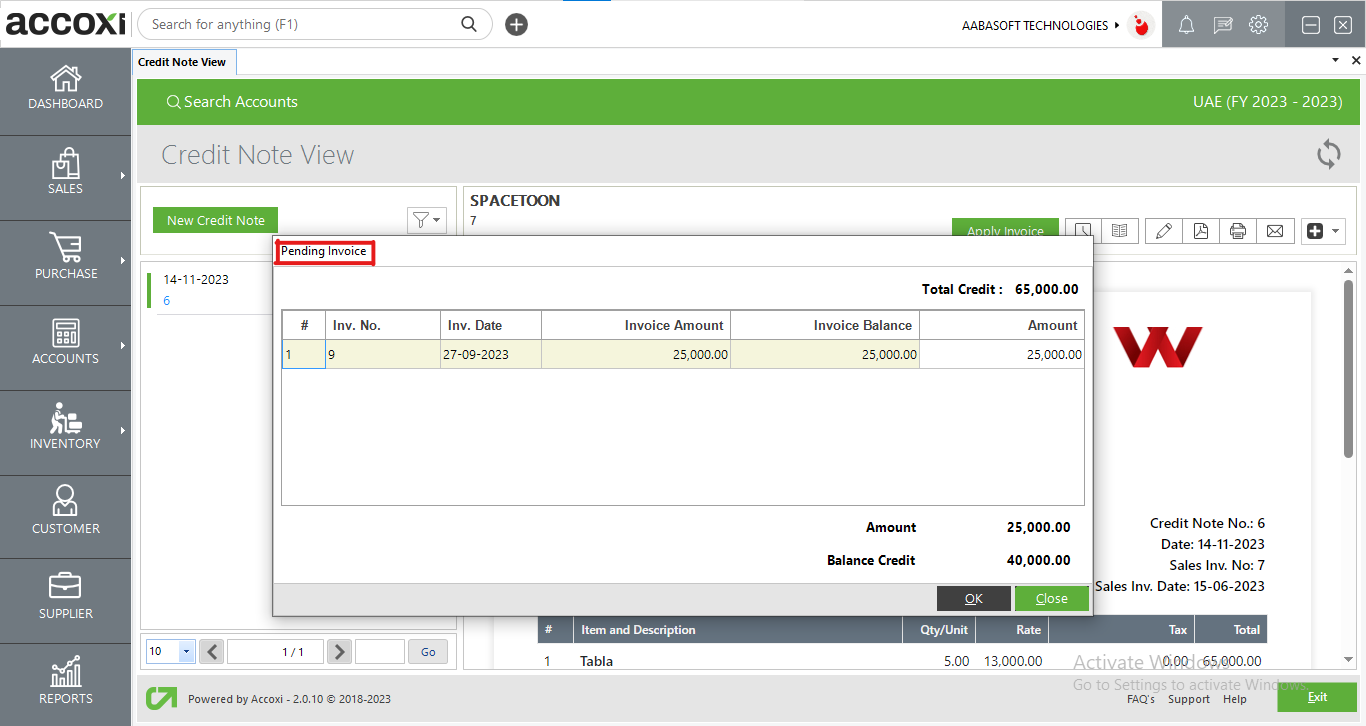
The "Apply Invoice" option enables users to link an invoice with the credit note, facilitating the conversion of the overall credit amount into a pending invoice amount and adjusting the invoice balance. Upon selecting the "Apply Invoice" menu, the pending invoice list will be revealed, allowing the user to choose an invoice and allocate the amount to the dealer. It's important to note that this option is not available if the customer has no pending invoices. Additionally, if the credit amount is nil, the user won't be able to utilize the Apply Invoice option.
After entering the amount, click on the "Ok" menu to process the adjustment.
This section displays all the edits and modifications made to the credit note, including the date of each change. It also provides information about any refunds applied in the credit note, indicating the date, refund number, and corresponding amount. Additionally, details of the invoices applied to the credit note are presented, featuring the date, invoice number, and associated amount.
The journal view generates a comprehensive overview of credit note generation activities.
The "Edit" menu assists the user in modifying or correcting the details entered in the credit note. After clicking on the "Edit" menu, the screen will revert to the previous window of the new credit note form, allowing for necessary adjustments before saving the changes.
The "PDF" menu allows the user to export the Sales credit note form to PDF format and save it in the system. Upon clicking the "PDF" menu, a new tab will emerge, prompting the user to save the file. The user can then choose the location to save the file, assign a name, and click on the save button to store the file in PDF format.
If the user wishes to print the created credit note form, they can do so using the "Print" menu located on the top right side of the credit note view. Upon clicking the "Print" menu, a new tab will emerge on the screen, providing options for print details. The user can set the page range, page height and width, and enter the desired number of copies. Clicking the "Print" button will generate a printout of the credit note form.
The "Email" menu allows the user to directly send the Credit Note form to customers. Clicking on the "Email" menu opens a new tab for details related to sending the email. It includes fields for "To," "CC," "Subject," and "Content."
When selecting the email option, the customer's email ID automatically appears in the "TO" field. If the user wishes to change the email ID, it can be done by removing the existing one and entering a new email address. Users can also include CC if required and add additional description if needed.
If the user wants to modify the Email template, it can be done in the Settings under Email templates. Ensure the "attachment" option is marked if the Sales Order form needs to be sent with the email. After clicking on the "Send" option, the email will be sent to the selected customer.
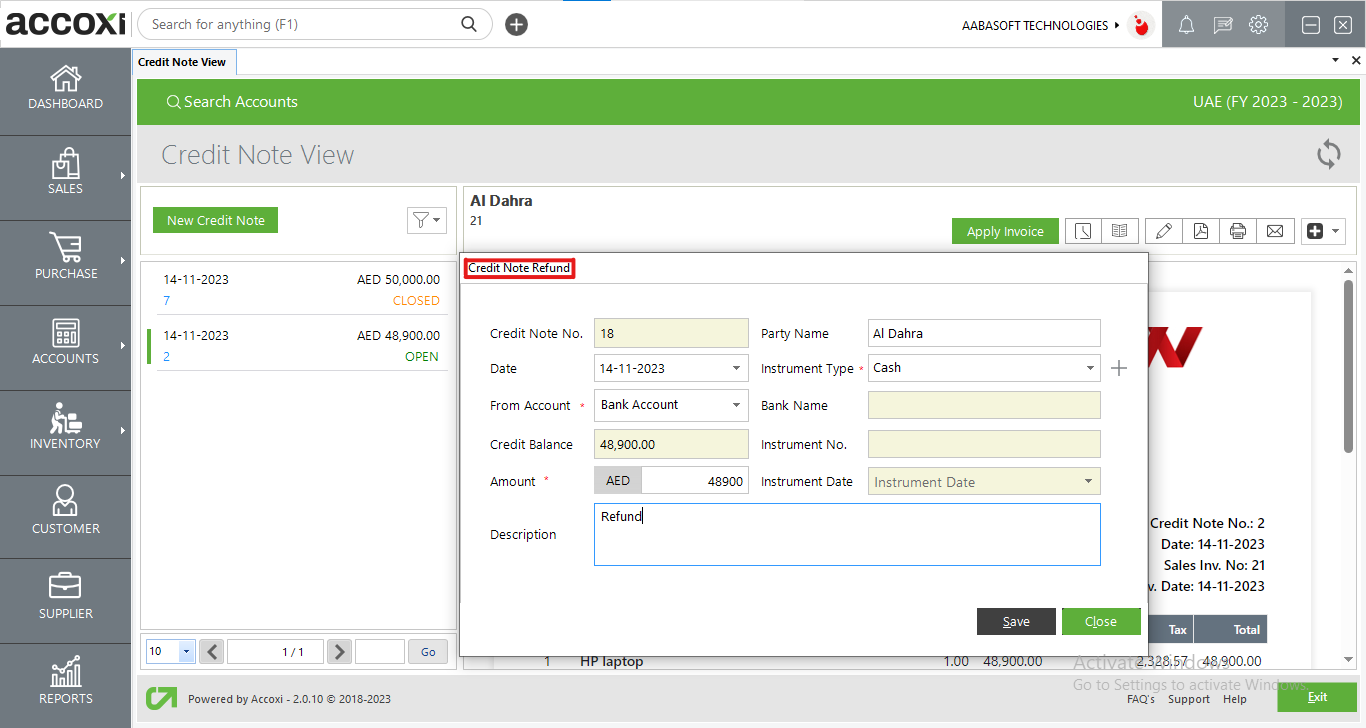
The menu offers two options: Refund and Cancel.
Refund: If the user intends to refund the credit amount, they can achieve this by selecting the "Refund" menu. Clicking on the Refund option opens the credit note refund form, allowing the user to input the amount along with payment details.
Cancel: The Cancel option permits the user to cancel the prepared credit note. Upon selecting the Cancel menu, customer details, along with the amount, are displayed, and the user is required to enter the reason for the cancellation.
The Cancel option allows the user to cancel the Credit note.
This feature manages page navigation and size within the system. The user can set the page size to 10, 20, 50, or 100. By entering the desired page number in the designated box and clicking the "Go" button, the system will navigate to the specified page.
4.Export
The Credit note list can be exported to Excel format by clicking the "Export" button located at the top right corner near the "+New" button. After clicking "Export," select the desired file location and click on "Save" to save the exported data in Excel format.
5.View
The "View" menu enables the user to access and view the Credit Note form that has already been created.
6.More Settings
This menu offers several options:
Enables the user to edit or correct the details entered in the credit note, allowing for saving after modifications.
Allows the user to view the already created Credit Note form.
Permits the user to apply an invoice against the credit note, converting the total credit amount into a pending invoice amount and adjusting the invoice balance. If the credit amount is nil, the Apply Invoice option cannot be used.
Facilitates the process of refunding the credit amount by clicking on the Refund menu.
Enables the user to convert the credit note form into PDF format.
Assists the user in printing the created credit note form, if required.
7.Cancelled
User can easily identify the cancelled credit notes by using color format. Cancelled credit notes are indicating with red color.
8. Pagination Control
This functionality manages both page navigation and size within the system. The user has the option to set the page size to 10, 20, 50, or 100. By entering the desired page number in the designated box and clicking the "Go" button, the system navigates to the specified page.