Manual guide on the Goods Received Note in Accoxi.

A Goods Received Note (GRN) is a crucial document in the realm of inventory management and supply chain logistics. It serves as an acknowledgment and record of the physical receipt of goods by a business or organization. Typically generated by the receiving department, the GRN details essential information such as the quantity, description, and condition of the received items. This document plays a pivotal role in cross-verifying deliveries against purchase orders, helping to ensure accuracy and transparency in inventory control. The GRN is an integral part of the procurement process, facilitating efficient communication between various departments and aiding in the seamless tracking of goods throughout the supply chain.
In Accoxi, users possess the ability to seamlessly manage the transition from purchase orders to Goods Received Notes (GRNs), creating new GRNs as needed. Additionally, users can convert these GRNs into purchase invoices. Typically initiated by the receiving department, the GRN encompasses vital details, including information on the quantity, description, and condition of the received items. This integrated functionality streamlines the procurement process and ensures comprehensive documentation within the Accoxi platform.

Key Features of GRN:
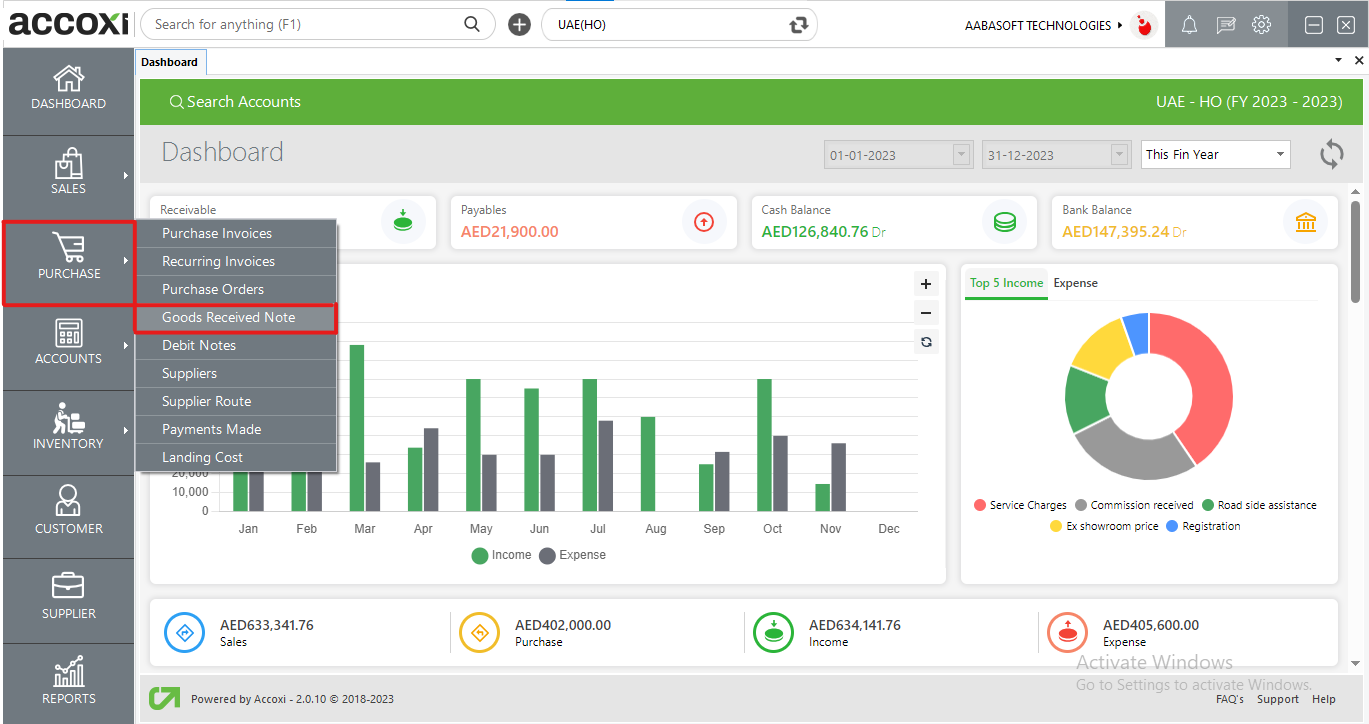
Steps to create GRN:
Settings > Preference > Purchase Order > Then click on the check box to enable GRN
Note: If you enabled GRN, you can convert Purchase Order to Purchase Invoice only through GRN module.
The GRN search section incorporates various menus, offering a thorough overview of all the Goods Received Notes (GRNs) created by the user.
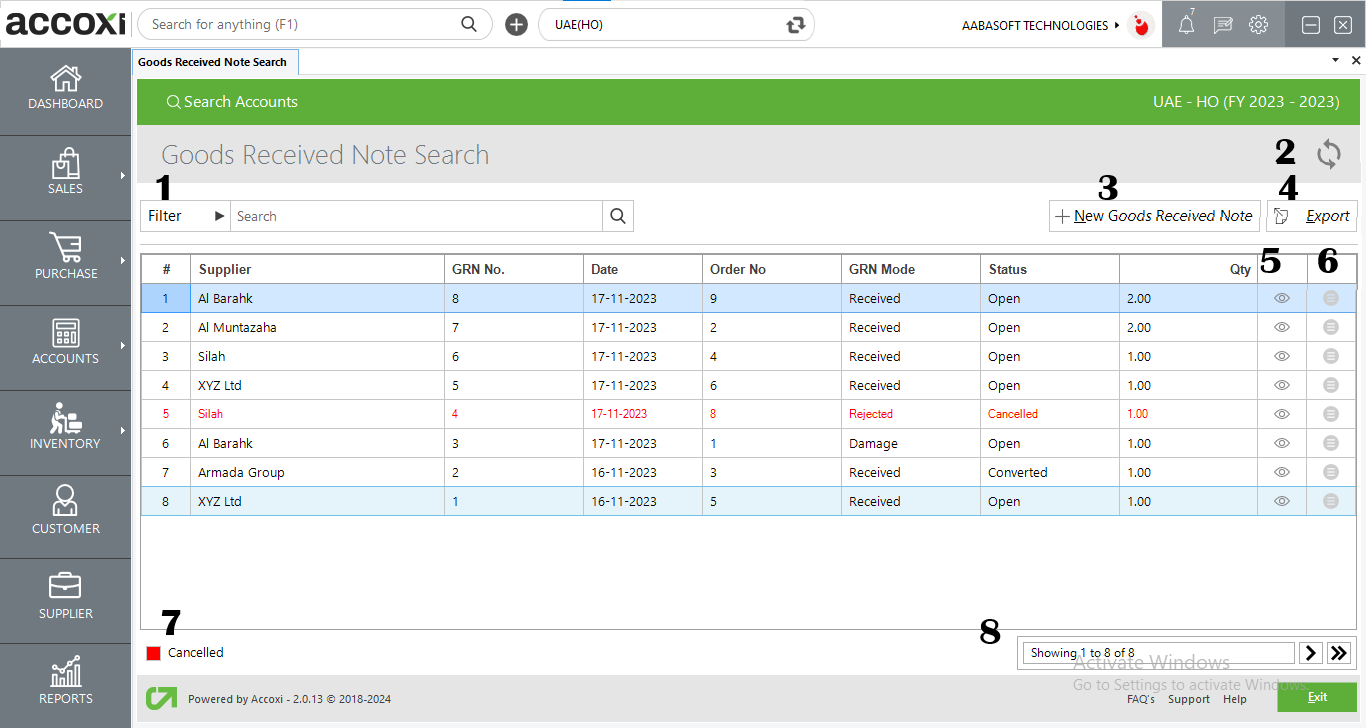
1. Filter:
The GRN filter provides users with two methods for efficient searching. Users can either directly enter the supplier name in the search bar located near the filter option or utilize the filter drop-down. The filter options encompass Reference number, supplier name, status, date, or mode.
For date-based filtering, users can specify the starting date and end date of the Goods Received Note (GRN). Additionally, status-based filtering classifies data into categories such as open, cancelled, and converted, facilitating users in quickly identifying and managing GRNs based on their status.
2. Refresh:
If the most recent data is not visible, users can click on the refresh icon located in the top-left corner of the page to retrieve the latest information.
3. Add New GRN:
This feature is employed to initiate the creation of a new Goods Received Note (GRN). By choosing "Add New + Goods Received Note," a new window will appear, presenting the GRN form for completion.
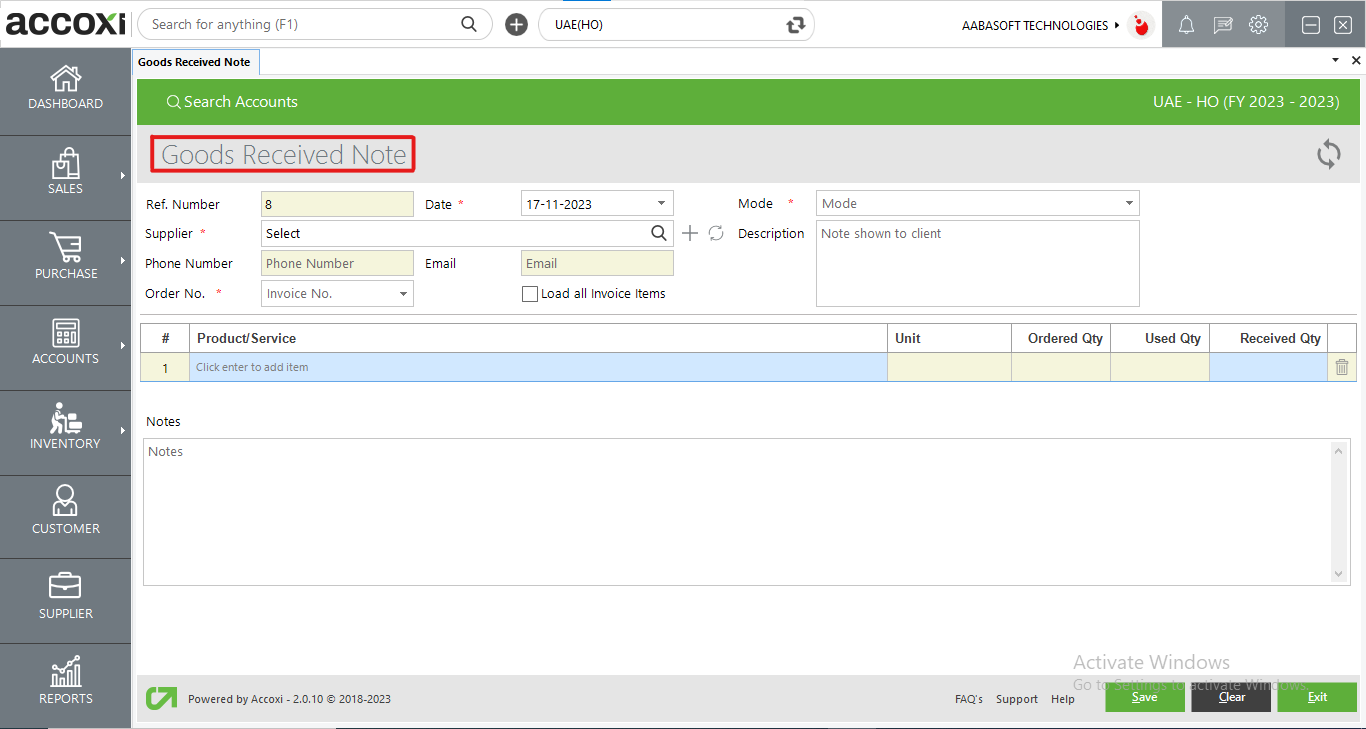
Steps to Create a GRN:
|
Field |
Description |
|
Ref number |
The reference number serves as a unique identifier for transactions in records. It is automatically generated and displayed on the GRN form. Users cannot edit the reference number, as it follows the sequence from the previous GRN. |
|
Date |
The Date field is automatically filled with the current date. If the user wishes to modify the date, they can do so by clicking on the Date menu, where a dropdown calendar will appear, allowing the user to select the desired date for the GRN transaction. |
|
Supplier |
In the Supplier field, the user can select the supplier from the list by clicking the "Select" menu. A dropdown list of suppliers will appear, and the user can choose the desired supplier from the options. |
|
Phone number |
Upon selecting the supplier, the phone number details of the chosen supplier will be automatically populated in the corresponding field. |
|
|
The email ID of the chosen supplier is visible in the display. Users are unable to input any data into this field. |
|
Order number |
In the "Order No" dropdown, the purchase order numbers corresponding to the selected supplier will be displayed. Users can then choose the relevant order number to initiate the conversion of the order into a Goods Received Note (GRN). |
|
Load all Invoice Items |
Enabling the checkbox labelled "Load All Invoice Items" results in the listing of items from the selected purchase order in the grid. |
|
Mode |
In the Mode dropdown, users are presented with options such as Received, In Transit, Damaged, or Rejected. Users can choose the mode that is most appropriate for the Goods Received Note (GRN) they are processing. |
|
Description |
Users have the flexibility to enter any transaction-specific description as additional information. It's important to note that this description will not be visible to the supplier. |
|
# |
The '#' symbol indicates the line or item number in a list |
|
Product/Service |
Within the product/service grid, you will find a comprehensive list of all items from the selected purchase order. This grid provides a detailed overview of the products or services associated with the specific order. |
|
Unit |
The "Unit" field displays the predefined unit of measurement for the respective items in the grid. |
|
Ordered Qty |
The "Quantity Order" field displays the quantity of items that were ordered in the original purchase order. This information allows users to compare the ordered quantity with the received quantity in the Goods Received Note (GRN) for accurate tracking and documentation. |
|
Used Qty |
The "Used Qty" field displays the quantity that has been previously received or utilized. This information provides users with a quick reference to the quantity of items that have already been received or consumed in previous transactions. |
|
Received Qty |
In the "Received Qty" field, users have the capability to input the quantity of items that are currently being received in the Goods Received Note (GRN). This allows for accurate recording of the quantity received for each item in the purchase order. |
|
Delete Icon |
To remove an item from the Goods Received Note (GRN) transaction, you can utilize the delete icon. |
|
Notes |
In this field, you have the option to input any additional notes related to the transaction. |
|
Save |
Once all the details have been entered, click on the "Save" option to create a new GRN |
|
Clear |
The "Clear" option is used to erase or remove all the data entered by the user, clearing the entire input. |
|
Exit |
The "Exit" option is utilized to navigate to the previous page without saving the GRN form. |
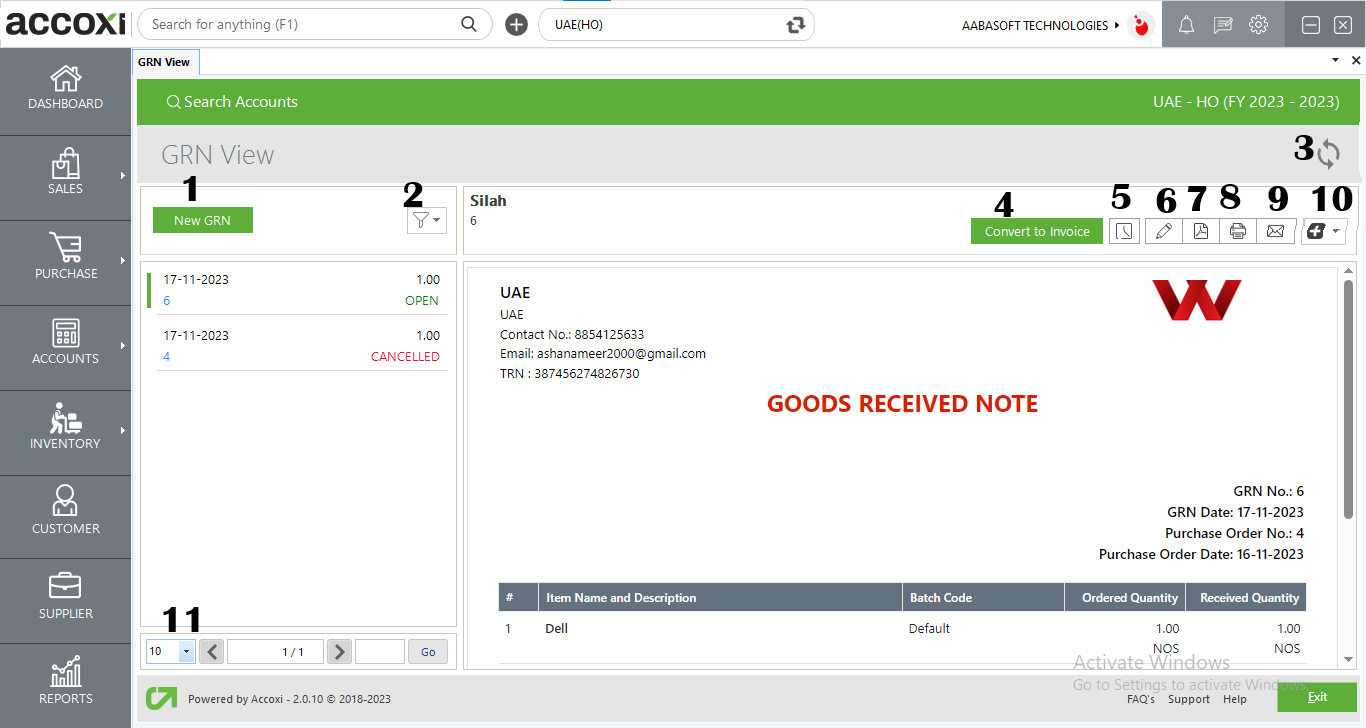
Menus available in the GRN view
|
Field |
Description |
|
1. New GRN |
The "New GRN" menu option is used to initiate the creation of a new GRN. By clicking on "New GRN," the user is presented with a new form to fill out and generate a fresh GRN. |
|
2. Filter |
The "Filter" menu allows the user to sort and filter the data based on order status, such as open, cancelled, closed. |
|
3. Refresh |
If the most recent data is not visible, click on the refresh icon located at the top left corner of the page to retrieve the updated information. |
|
4. Convert To Invoice |
Selecting the "Convert to Invoice" menu will direct you to the Purchase Invoice page, which encompasses all the details, including the purchase order date and number. The user is required to enter the invoice number to generate a purchase invoice. Once the GRN is converted into an invoice, the GRN status will transition from "Open" to "Converted." |
|
5. History |
This menu provides users with access to the history details of the Goods Received Note (GRN), encompassing three tabs:
|
|
6. Edit |
The "Edit" menu facilitates users in modifying or correcting details entered in the GRN. Upon selecting the "Edit" menu, the screen will revert to the previous window of the new GRN form, allowing users to make changes and save the updated information. |
|
7. Export To PDF |
The "PDF" menu empowers the user to export the GRN form to a PDF format and save it on their system.
Upon clicking the "PDF" menu, a new tab will appear for saving the file. The user can choose the location, set a name for the file, and then click the "Save" button to save the GRN form in PDF format. |
|
8. Print |
To obtain a printout of the created GRN form, users can utilize the "Print" menu located on the top right side of the order view.
Upon clicking the "Print" menu, a new tab will appear on the screen containing details for the print settings. Users can configure the page range, page height, and width, as well as input the desired number of copies. By clicking the "Print" button, users can obtain a printout of the GRN form. |
|
9. Email |
The "Email" menu allows users to send the GRN form directly to the suppliers.
Upon clicking the "Email" menu, a new tab will appear with details for sending the email. This includes fields for To, CC, Subject, and Content.
In the "To" field, the email ID of the supplier will automatically appear when clicking on the main menu. Users can change the email ID by removing the existing one and entering a new one. Users can enter CC if needed and add additional description as required. If users wish to change the email template, it can be done through the Email Template in Settings. It is necessary to mark the "Attachment" option to send the GRN form with the email. After marking the options, clicking on the "Send" option will send the email to the selected supplier. |
|
10. More Options |
The "More Options" menu, situated on the top right side of the screen, provides additional functionality of cancelling GRN. |
|
11. Pagination Control |
This feature manages page navigation and page size. Users can set the page size to 10, 20, 50, or 100. By entering the desired page number in the box and clicking the "Go" button, the user is directed to the specified page. |
4. Export:
The GRN list is exportable to Excel format. Click the Export button located at the top right corner, near the +New button. Choose the file location and click on save.
5. View:
The View menu allows users to access and review previously created GRN forms.
6. More Settings:
This menu offers additional functionalities such as editing, viewing, exporting to PDF, and printing the GRN.
a. Edit: The Edit menu assists users in modifying or correcting details entered in the GRN. Clicking on the edit menu takes the user back to the previous window of the new GRN form.
b. View: View menu functionality allows users to access and review GRN forms that have already been created.
c. Export to PDF: This menu facilitates the export of the GRN form to PDF format, allowing users to save it on their system.
d. Print: To obtain a printout of the created GRN form, users can use the Print menu located at the top right side of the order view.
7. Cancelled GRN:
Easily identify cancelled GRN using a color format; cancelled GRNs are highlighted in red.
8. Pagination Control:
This feature manages page navigation and size. Page size options include 10, 20, 50, or 100. Enter a page number in the designated box and click the Go button to navigate to the specified page.