Look into the payments module of Accoxi

Payment can be made in the form of cash, check, wire transfer, credit or debit card, etc.Payments in ACCOXI deals with small amount of Payments to the business. The huge amounts from the suppliers are normally entered in the purchase module => and payments made
Tired of managing payments in your firm? This video shows you how Accoxi enables users to record or create Payments easily. Key Features:- • Eliminates the need for bigger forms like payments made for small payment transactions. • Can keep a separate form for petty cash payments • Automatic reference number is kept for easy identification • Can enter details of bank instruments used
Key Features:-
|
Fields |
Description |
|
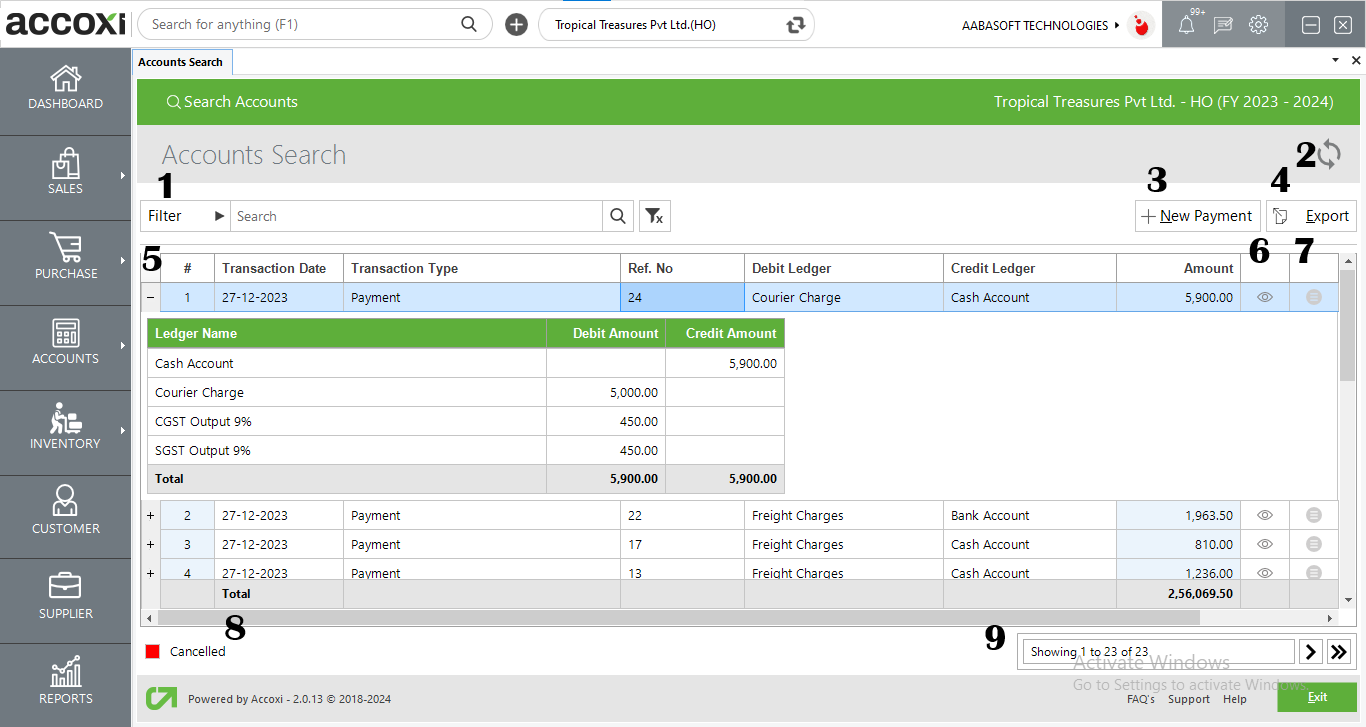
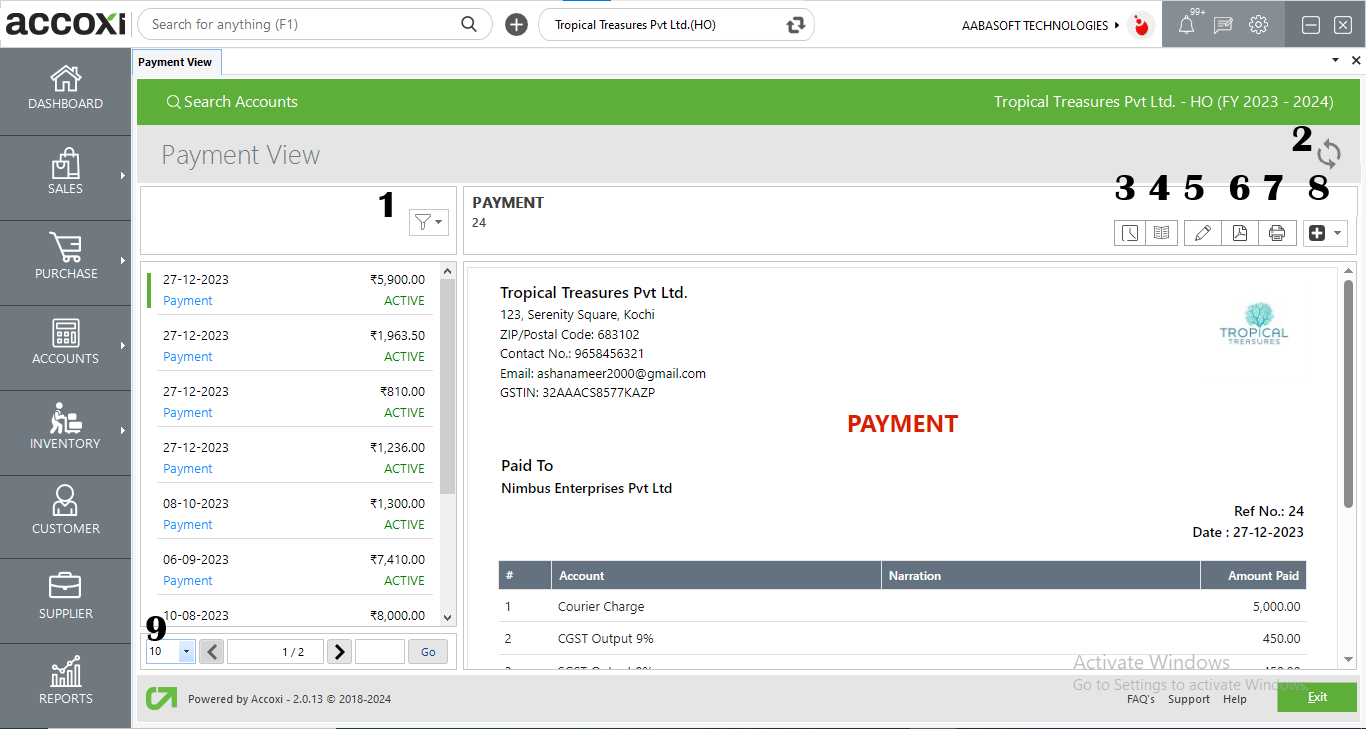
1. Filter |
The filter of transactions can be done in two ways-Either you can directly enter the transaction type into the search bar near the filter option or by clicking the filter dropdown. Users can filter the data by transaction type, ledger name, ref no, canceled, or date. If the transaction data can filter by using the date format, need to enter the starting date and the end date of the transactions. Data filter by transaction type include sales invoices, purchase invoices, bills, debit notes, credit notes, etc.
|
|
2. Refresh |
If the latest data is not displayed, click on the refresh icon on the top left corner of the page to fetch the new data.
|
|
3. +New Payment |
The +new payment is for users to conduct payments and takes the user to the payment creation window
|
|
4. Export |
The payment list can be exported to Excel format. Click the Export button at the top right corner near the +New payment button. Select the file location and click on save.
|
|
5. ledger View |
the payment can be viewed in ledger format displaying the ledger accounts present in the transaction |
|
6. View |
The view menu enables the user to view the payment invoice that has already been created. |
|
7. More options |
This Menu Includes An Edit Function And If The User Wants To Edit The Created Form, It Can Be Done By Using This Menu. After Clicking The Edit Option, The Invoice Form Will Appear On The Screen. |
|
8. Cancelled Payments |
The canceled payments are to be shown in red |
|
9. Pagination Control |
It Controls The Page Navigation And The Page Size. Page Size Can Be Set To 10, 20, 50, Or 100. And By Giving The Page Number In The Box And Clicking On The Go Button. It Jumps To The Said Page. |
STEPS TO ENTER A NEW PAYMENT
|
FIELDS |
DESCRIPTION |
|
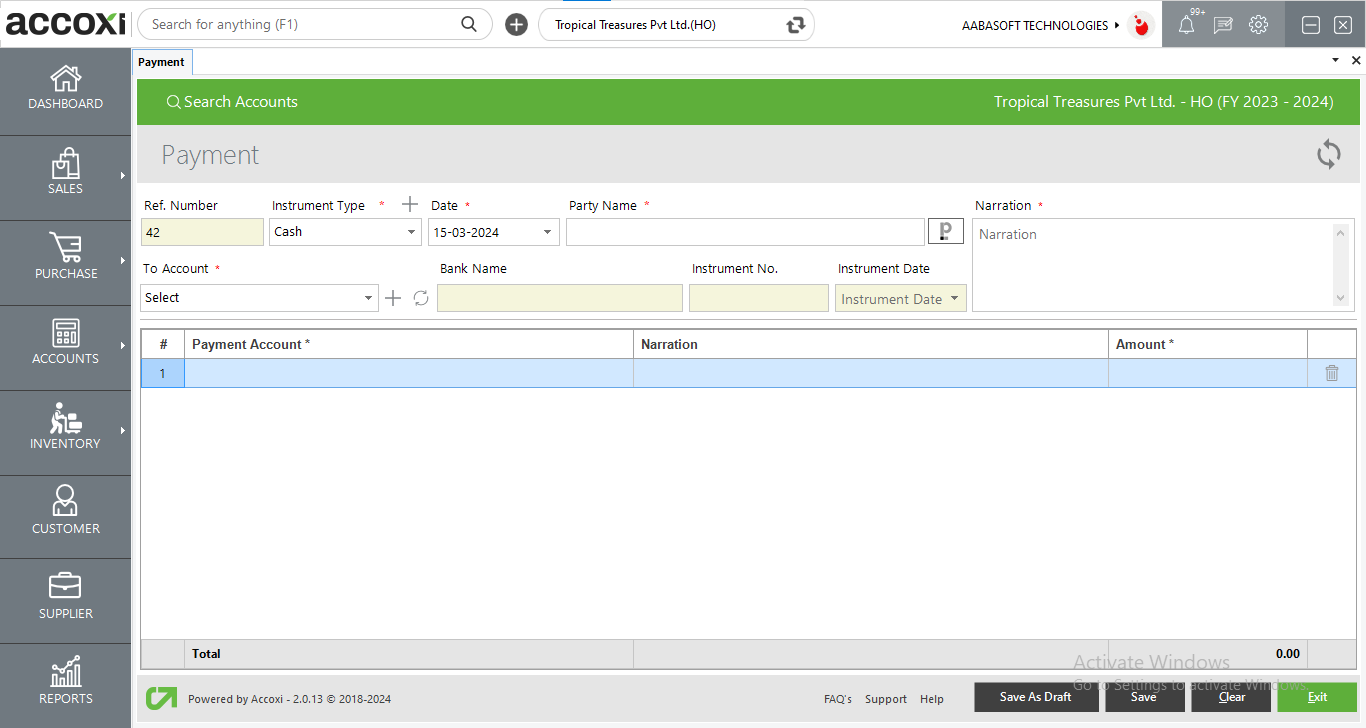
Rf. number |
Reference number is automatically generated by the ACCOXI for easy identification of payments |
|
Instrument type |
User should select the type of instrument used for the payments If the instrument is cash the next columns like instrument number, date and bank name will be blocked. |
|
Date |
User can enter the date of the journal entry By default the date of entering the transaction will be appeared. |
|
Party name |
The name of the recipient is entered in here |
|
Paperlez integration |
This Option Allows Users Who Have Integrated Paperlez In Accoxi To Attach Or Associate Documents To payment invoices. A Tab Will Be Opened Showing All The Documents Uploaded In Paperlez And Users Can Choose The Required Documents To Be Attached With The Invoice By Associating The Document. |
|
To account |
Users should select the mode of an account which is accounts like cash or through the bank. The + button can be used to add a new ledger account from this window itself it ill redirect the user to new ledger window. The refresh button helps the user to refresh the by account drop down list and to view the changes made in the list |
|
Bank name |
Enter the name of the bank through the payment is being made |
|
Instrument no. |
Enter the instrument number if the payment is made through bank instruments other than cash |
|
Instrument date |
Enter the instrument date if the payment is made through bank instruments other than cash |
|
Narration |
The narration for the transaction can be entered here |
|
# |
Serial number of table content |
|
Account |
The user can enter the account of the recipient from the drop-down menu. |
|
Narration |
The user can enter narration to the corresponding account
|
|
Amount |
Then user can enter payment amount |
|
Delete |
This option can be used to delete the entries. |
|
Total |
The total receipt amount is shown in this column. |
|
Amount in words |
Shows the amount entered in words |
|
Save as draft
|
Users can save the payments as drafts for further alterations and can convert them to vouchers later |
|
Save |
By clicking save, the payments entered by the user will be saved and a validation message will pop. It will be visible in transaction menu. User can track the payments using the reference number of the transaction
|
|
Clear |
To clear the data entered in the window of the payment this option can be used |
|
Refresh |
If your latest data is not displayed, click on the refresh icon on the top left corner of the page to fetch the new data.
|
|
Exit |
To close the window of the payment without saving. Users can click the exit button. |
|
FIELDS |
DESCRIPTION |
|
1. Filter |
can filter out the payments based on active, canceled and drafts |
|
2..Refresh |
If your latest data is not displayed, click on the refresh icon on the top left corner of the page to fetch the new data. |
|
3. History |
This menu helps the user to obtain the history details of the payments. OPTIONS AVAILABLE IN THE HISTORY WINDOW
|
|
4. VIEW JOURNAL |
It is the menu that shows the journal view of the transaction. The Journal view shows both debit and credit aspects of the amount. |
|
5. Edit |
Edit menu helps the user to edit or correct the details that are entered in the payment. |
|
6. Export to PDF |
If the user wants to convert the payment to PDF format, then the export to PDF option is available. After clicking export to pdf, a save as directory option will appear and the user can opt the pdf file saving location |
|
7. Print |
The print menu helps the user to print the payment if required. After clicking the print button it will redirect to print options where the user can select the printer, number of copies to take etc. |
|
8. More Features |
In the More features option user can cancel the payment. By clicking cancel, a validation message will pop up. Then click “YES” to cancel the payment and click “NO” to cancel and close the option. |
|
9. Pagination control |
It controls the page navigation and the page size. Page size can be set to 10, 20, 50 or 100. By giving the page number in the box and clicking on Go button, it jumps to the said page.
|
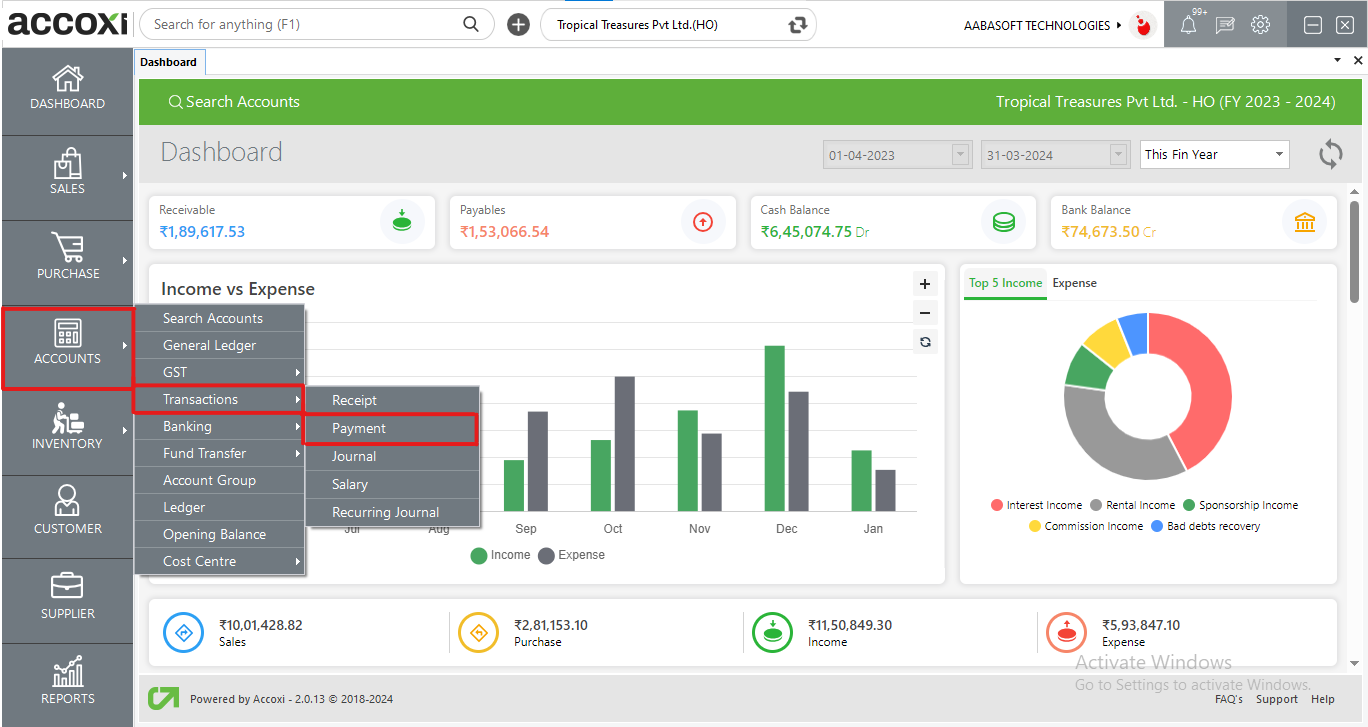
Go to Accounts module => transactions. The payment vouchers can be viewed under transactions menu