Item Creation In Accoxi
Item of business means any tangible or intangible, visible or invisible 'thing. An item may be of product or service that is offered for sale. It can be physical or in virtual or cyber form. Every item is purchased or made at a cost and sold for a price.
Item is one of an important function in Accoxi. It includes product or service that is used for trading and enables the user to create multiple product and service for the purpose of business transaction.
Accoxi is the intuitive accounting software that assumes the properties of outstanding inventory management software as well. It provides self-learnable interface on ‘How to set up inventory?’ Inventory management that encompasses various functionalities like adding items or understanding how to set up inventory so as to meet the supply and demand requirements is well carried out by Accoxi.
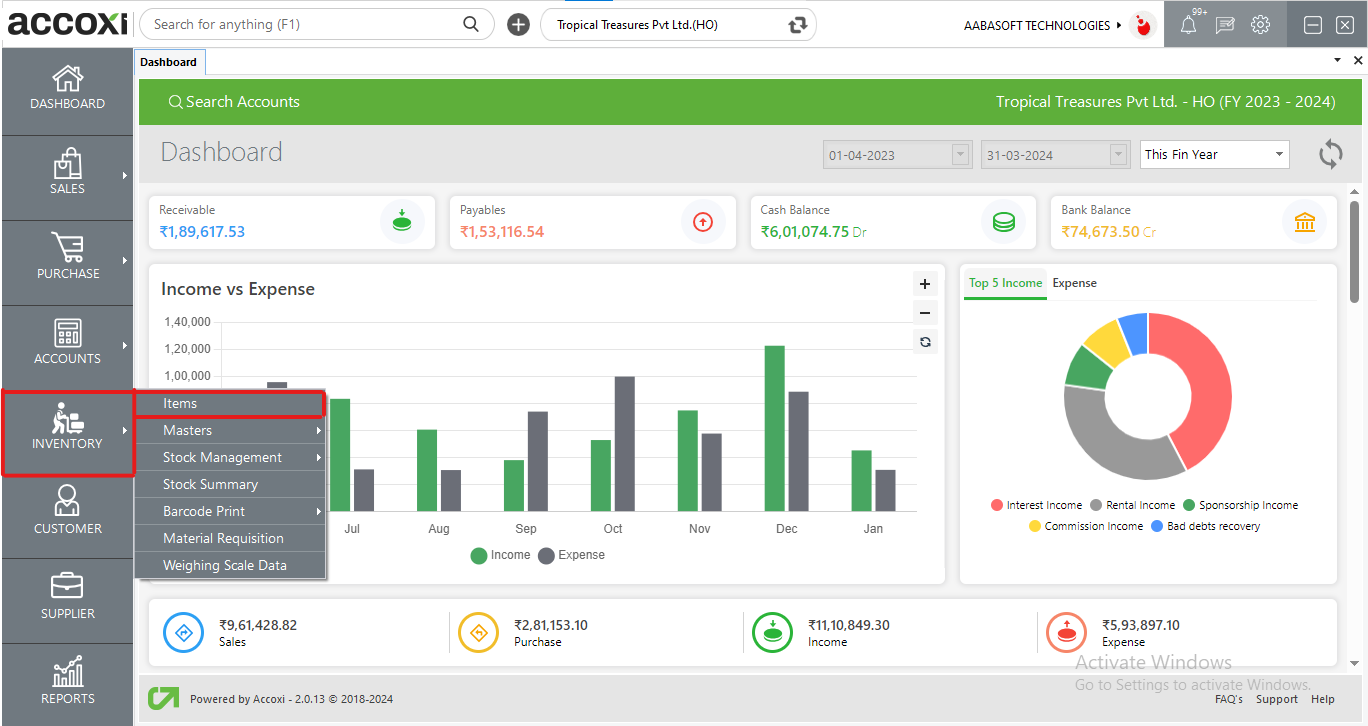
Click on the Inventory Module and select Items. On clicking Items, the Items page opens.
Items consist of various menus and it displays the details of all the items that are entered into the business. Items can be set up under different categories, subcategories, groups, and brand-wise product management and user can use these options while creating products. Users can add multiple numbers of images of the products by using multiple image functionality and it also enables the user to manage batch-wise stock, shelf, rack management, etc.
|
Fields |
Description |
|
Product/Service name |
This field shows the name of the product/service of the particular item. |
|
Product Code |
The Product Code Associated With The Item Will Be Displayed. |
|
HSN/SAC |
Every product has an HSN code and the Service has a SAC code. This field shows the HSN/SAC code of the created item. |
|
Type |
Type of item will be shown in this field i. e. Product or Service. |
|
Tax Category |
It shows the tax category of the particular item. Tax category defines how products are to be taxed on the basis of the nature of the product. It includes Taxable, Nil Rated, Exempted or Non- GST. |
|
Closing Stock |
Closing stock displays the total remaining stock of items |
|
Reserved Stock |
The stock is reserved for delivery challans, sales orders, stock transfers etc. |
|
Available Stock |
It shows the current number of the available stock of the item. Users can identify the available stock of each item from this field. |
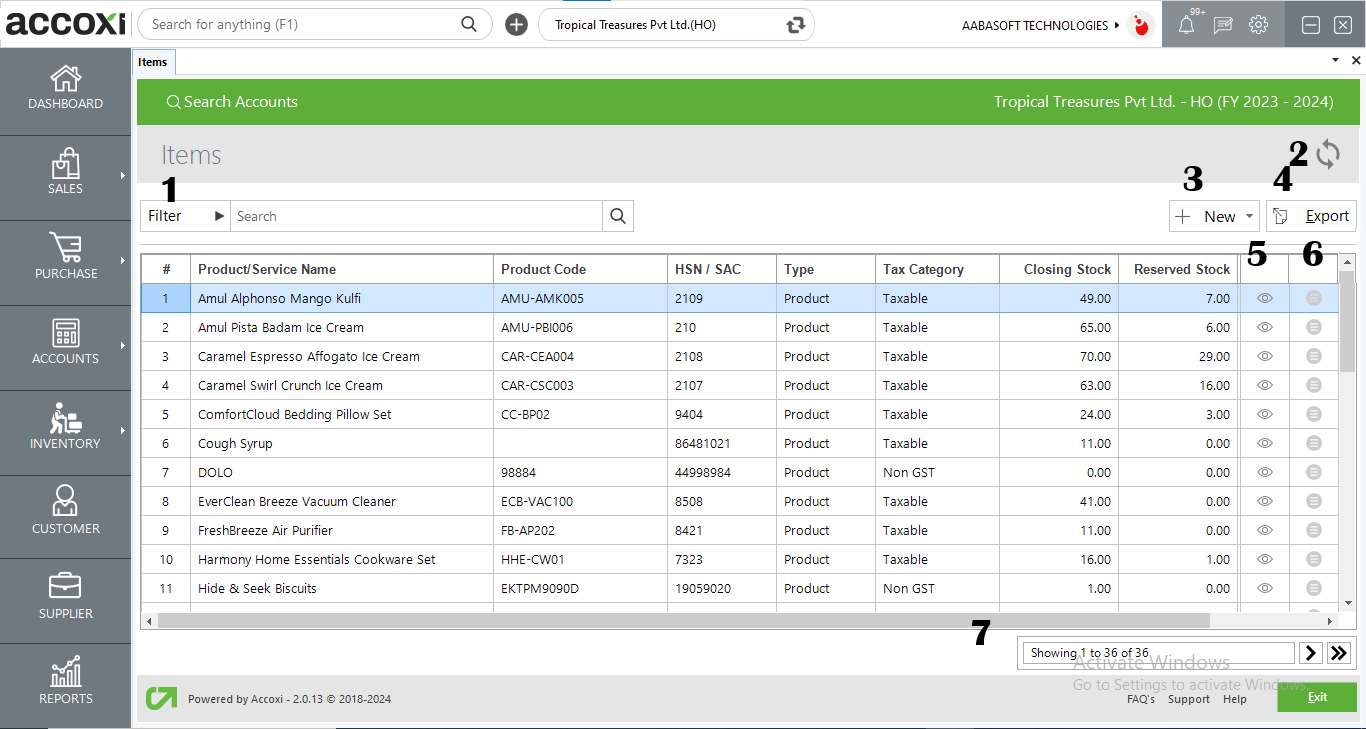
1. Filter
The filter of items can be done in two ways-either by directly entering the item name into the search bar near the filter option or by clicking the filter drop-down menu. The user can filter the data by Product/Service Code, Product/Service Name, and HSN/SAC.
2. Refresh
If the latest data is not displayed, click on the refresh icon on the top right corner of the page to fetch the new data.
3.+New
The +New two options, Product and Service. This menu is used for the purpose of creating a new product or creating a new Service.
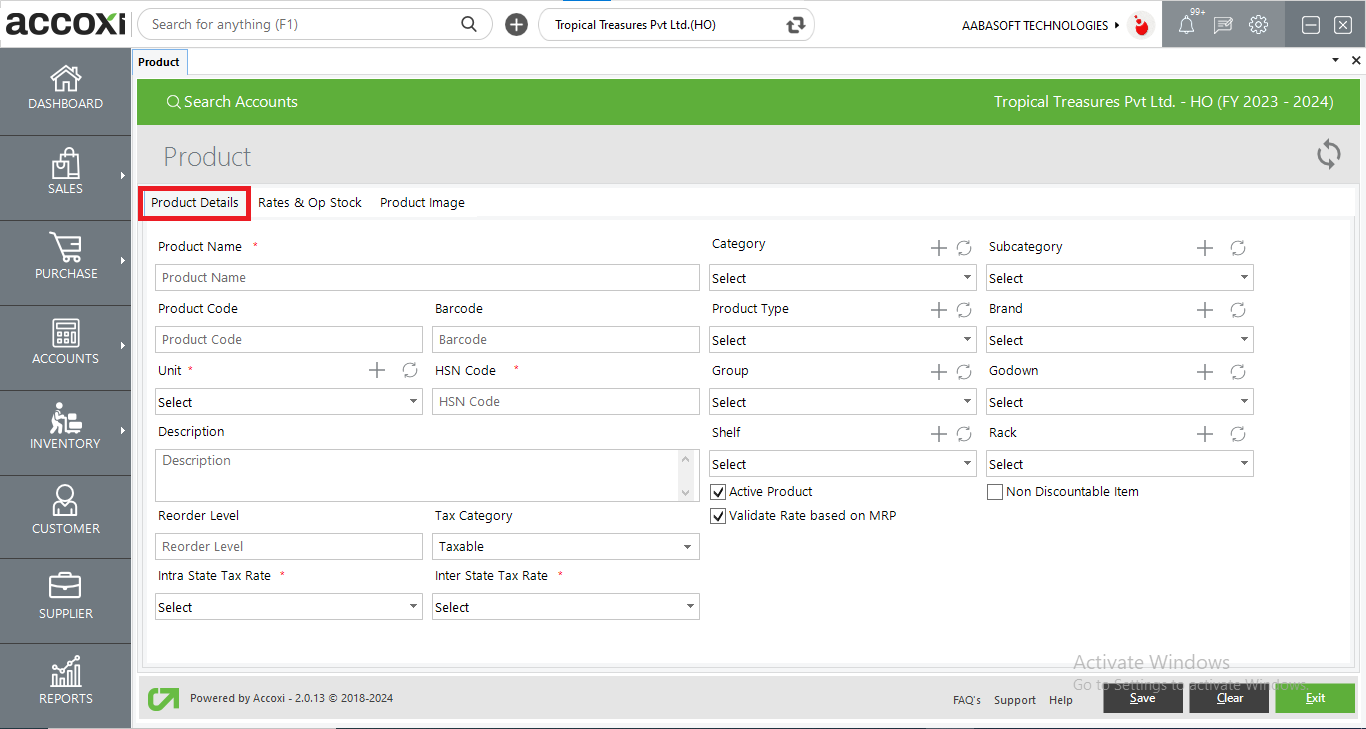
It is the menu option to create a new Product. A Product is an object or system made available for consumer use. By clicking on the Product menu, a new form will appear and the user needs to enter the details on the appropriate field to create a Product.
Batch-wise inventory can be enabled from Settings->Preference-> Inventory
|
Fields |
Description |
|
Product name |
Every product has its own name and the user is required to enter the name of the product in this field. |
|
Product Code |
Every Product Is Given A Distinctive Code, And Users Are Instructed To Enter The Product Code In This Field. |
|
Barcode
|
In This Field, Users Can Input The Barcode Number Associated With The Product. |
|
Unit |
A standard amount of physical quantity such as NOS, KGs, TON, etc is termed as a unit. Users can select the Unit of the product on this field. By clicking the select menu, a list of Units will appear and the user can select the required unit from the list. If the user wants to create a new Unit for the Product that is without the list, can create a new one by clicking the menu + (add new).
|
|
HSN code |
Users can enter the HSN code of the product on this field. |
|
Description |
User can add additional explanation regarding the Product on this field. |
|
Tax category |
Tax category defines how products are to be taxed on the basis of nature of the product. It include Taxable, Nil rated, Exempted or Non- GST. In the case of GST Inclusive rate, Tax category will be fixed as Taxable only. User can’t make any change or can’t edit the field. In the case of GST Exclusive rate, user can select the Tax category as Taxable, Nil rated, Exempted or Non- GST on the basis of the Product nature.
|
|
Tax rate |
In the case of Taxable product, user can select appropriate tax rate of the product on this field. By clicking on the select option, five types of GST rate list will appear and can select the required one. Tax rate field will be block in the case of no taxable product. That is, if the user select the Tax category as Nil rated, exempted or Non GST, then can’t enter anything on this field. |
|
Reorder level |
Reorder level means the level of inventory which triggers an action to replenish that particular inventory stock. It is a minimum amount of an item which a firm holds in stock, such that, when stock falls to this amount, the item must be reordered. User can enter the Reorder level number on this field. |
|
Category |
Product categories are created by the firm to Organize the Products. User can select the category of the Product on this field. If the user want to create a new Category for the Product that without the list, can create a new one by clicking the menu + (add new).
|
|
Sub category |
Sub categories of products are created by the firm to organize the Products. After select the category of the product, user can select the Sub category on this field. If the user want to create a new Sub category for the Product that without the list, can create a new one by clicking the menu + (add new).
|
|
Product type |
Product type is a set of common specific characteristics in products or goods. User can select the Product type of the Product on this field. If the user want to create a new Product type without the list, can create a new one by clicking the menu + (add new). |
|
Brand |
User can group the products by its brand wise and can select the Brand of the Product on this field. If the user want to create a new Brand for the product that without the list, can create a new one by clicking the menu + (add new). |
|
Group |
A product group is a high-level grouping of products. User can select the Group of the Product on this field. If the user want to create a new Group for the Product that without the list, can create a new one by clicking the menu + (add new).
|
|
Godown |
Godown or warehouse is the place to store products or goods before moving them to another location. User can select the Godown of the Product on this field. By clicking on the select option, list of available Godowns will appear and can select required one. If the user want to create a new Godown for the Product that without the list, can create a new one by clicking the menu + (add new).
|
|
Shelf |
User can select the godown Shelf name on this field. By clicking on the select option, list of available shelf name will appear and can select required one. If the user want to create a new Shelf for the Product that without the list, can create a new one by clicking the menu + (add new).
|
|
Rack |
User can select the godown Rack name on this field. By clicking on the select option, list of available Rack name will appear and can select required one. If the user want to create a new Rack for the Product that without the list, can create a new one by clicking the menu + (add new).
|
|
Active product |
Click on the Active option to save the product as Active product. If the Product not existing, then unmark the active button.
|
|
Non Discountable Item |
If The Item Is Non-Discountable, You Can Select This Checkbox. If A Discount Is Applicable, Unselect The Checkbox. |
|
Validate Rate Based On MRP |
If The Rate Should Be Validated Based On MRP, Select The Checkbox. |
|
Save |
After enter the whole details, click on the Save menu to create new Product or save the created form. |
|
Clear |
Clear menu is for clear or removing the entire data that entered by the user.
|
|
Exit |
Exit menu is using for go to the previous page without saving the Product form. |
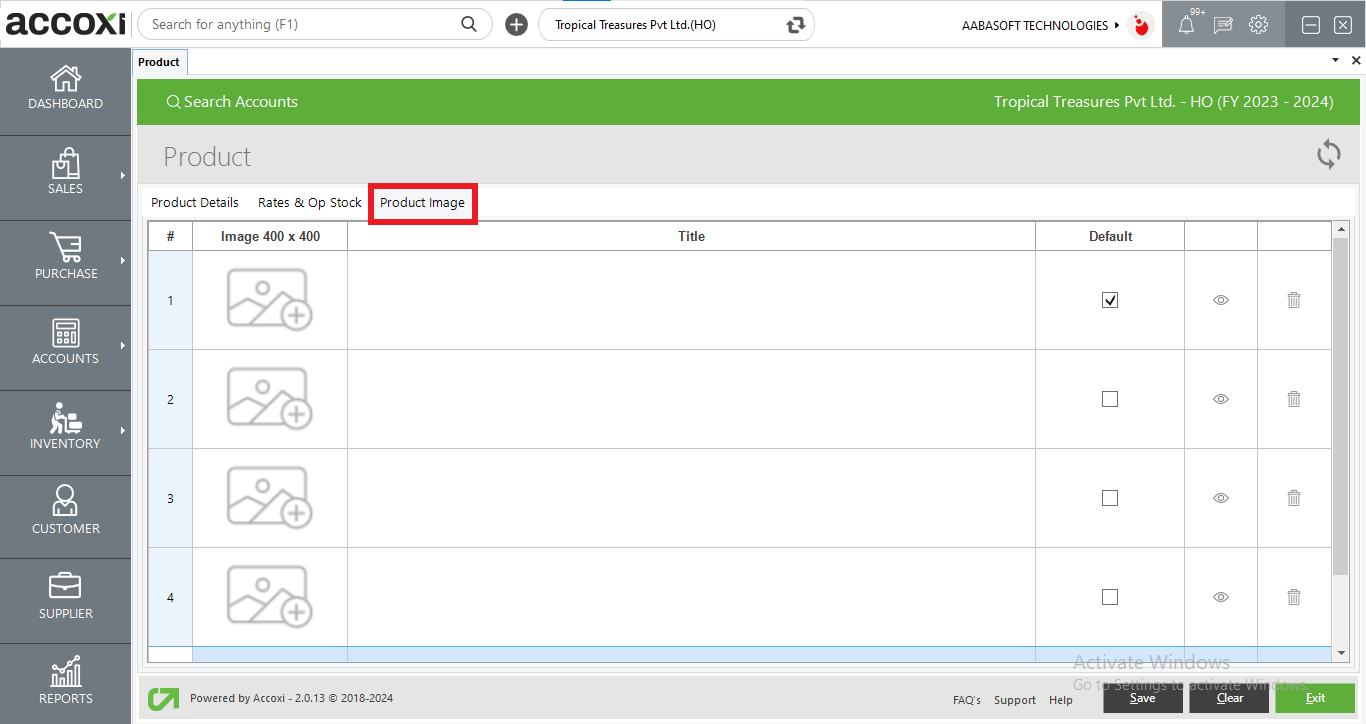
Product Image
This form is using for the purpose of add Images of the product. User can add multiple number of images for a product.
|
Fields |
Description |
|
Image |
User can upload the product images on this column. By clicking on the field, open folder will pop up and can select the image from the tab. |
|
Title |
In this field, user can enter the title regarding the product image. |
|
Default |
Select and click on the default option to set the product image as default image |
|
Preview |
Clicking On It Will Display A Preview Of The Image. |
|
Delete |
Delete icon is using for the purpose of delete unnecessary images after upload. |
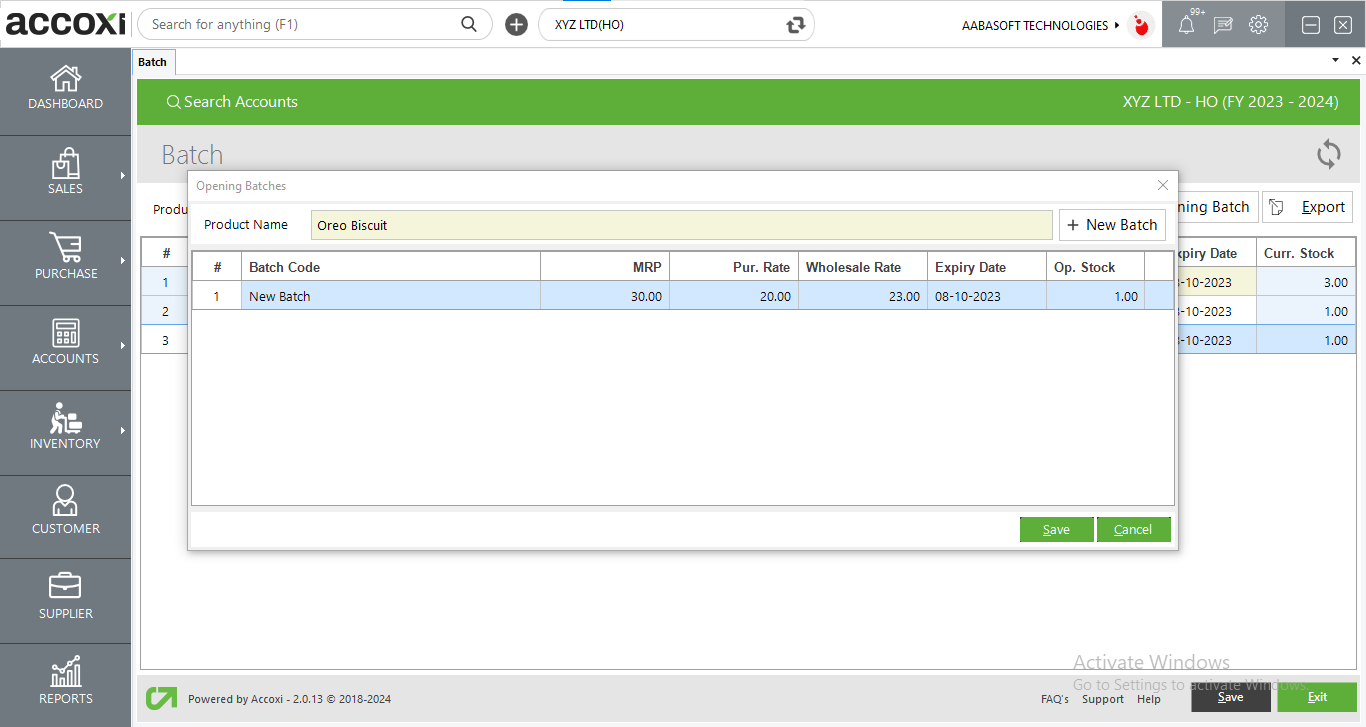
After creating a new product, the next step is to create a Batch for the product.
If the user wants to create a new Product, then he needs to make a batch that consists of MRP, Purchase Rate, Sales Rate, and Opening Stock of the product. While clicking on the Save option to create a new product, a new message will appear on the screen regarding the Product batch.
Click on the Yes option to create a new batch for a product. After selecting Yes, the new batch form will appear on the screen.
|
Fields |
Description |
|
Product name |
Product name will be automatically appearing in the field. |
|
+New Batch |
This menu is using for the purpose of adding new batch for existing/same product. |
|
Batch code |
User can add Batch code of the product in this field. |
|
Expiry date |
This field refers the expiry date of the Product and user can set the expiry date in this field. |
|
MRP |
In this field, user can add the Maximum Retail Price (MRP) of the product. |
|
Purchase rate |
User can add the Purchase Rate of the product. |
|
Sales rate |
In this field, user can add the Sales Rate of the product. |
|
Opening stock |
Opening stock is the value of stock that is available for sale or used at the beginning of an accounting period. Users can add opening stock in this field, |
|
Save |
After entering the whole details, click on the Save menu to create a new Product batch or save the created form. |
|
Exit |
The exit menu is used to go to the previous page without saving the Product form. |
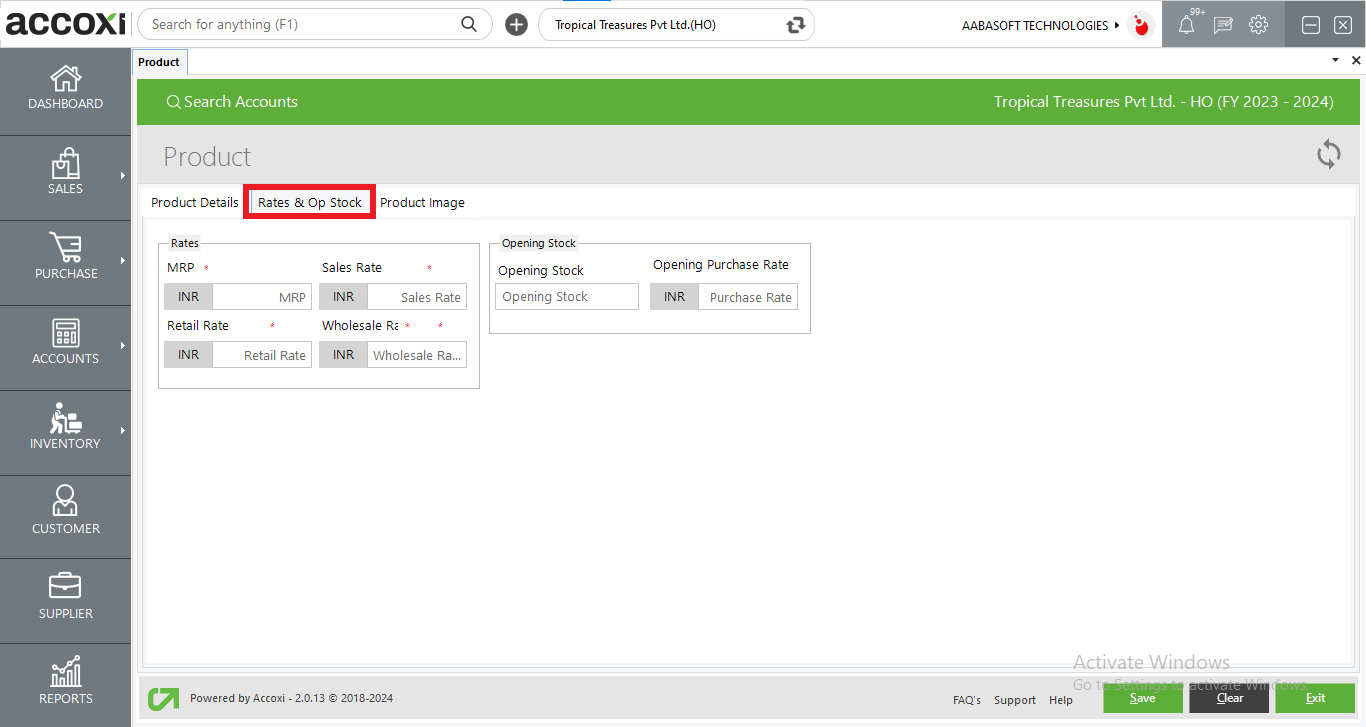
During product Creation, A new tab known as Rates and Op stock is introduced for creating items without opting for batch-wise inventory
|
Fields |
Description |
|
MRP |
Enter the MRP of the product to determine the price of the product |
|
Sales rate |
The Rate at which the product is being sold is determined here. |
|
Opening Stock |
Enter the current opening stock of the product |
|
Opening Purchase rate |
Enter the rate at which the product is purchased from suppliers |
|
Save |
After entering the whole details, click on the Save menu to create a new Product or save the created form. |
|
Clear |
The clear menu is for clearing or removing the entire data entered by the user.
|
|
Exit |
Exit menu is using for go to the previous page without saving the Product form. |
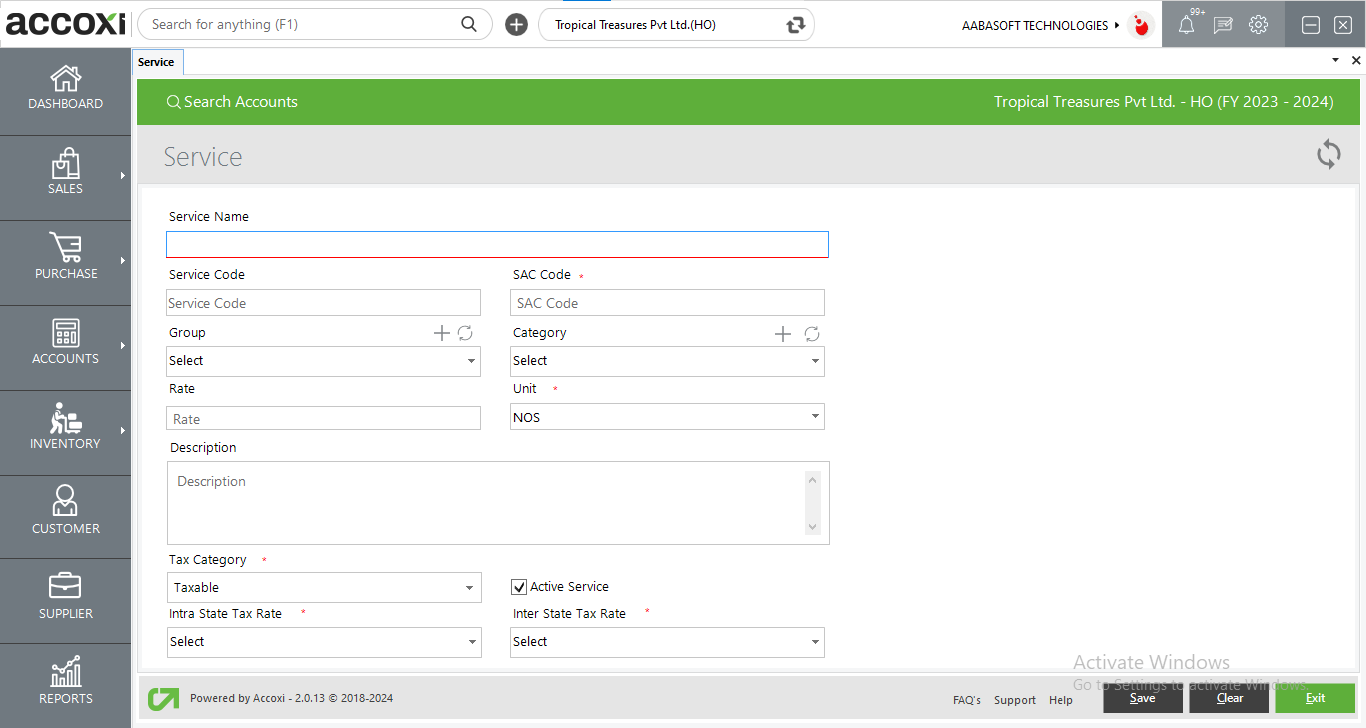
It is the menu option to create a new service. By clicking on the Service menu, a new form will appear and the user needs to enter the details on the appropriate field to create a Service.
|
Fields |
Description |
|
Service name |
Every service has its own name and user needs to enter the name of the service in this field. |
|
Service code |
User can enter the service code in this field. |
|
SAC code |
User can enter the SAC code of the service in this field. |
|
Unit |
A standard amount of physical quantity such as NOS, KGS, TON etc. is termed as Unit. User can select Unit in this field. By clicking the select menu, list of Unit will be appears and user can select required unit from the list. If the user wants to create a new Unit for the Product that without the list, can create a new one by clicking the menu + (Add New).
|
|
Category |
Service categories are created by the firm to Organize the service with Products. User can select the category of the service in this field. If the user wants to create a new Category for the Service which is not in the list, it can be created by clicking the menu + (Add New). |
|
Group |
A service group is a high-level grouping of service or products. User can select the Group of the Service in this field. |
|
Rate |
User can add the appropriate rate of the service in this field. |
|
Tax Category |
Tax category defines how services are to be taxed on the basis of nature of the service. It includes Taxable, Nil Rated, Exempted or Non- GST. In the case of GST Inclusive Rate, Tax category will be fixed as Taxable Only. User can’t make any change or edit the field. In the case of GST Exclusive rate, user can select the Tax category as Taxable, Nil Rated, Exempted or Non- GST on the basis of the service. |
|
Tax Rate |
In the case of Taxable service, user can select appropriate tax rate in this field. By clicking on Select, five types of GST rate list will appear and user can select the required one. Tax rate field will be blocked in the case of Non-Taxable service. That is, if the user select the Tax category as Nil rated, Exempted or Non GST, then user can’t enter anything in this field. |
|
Description |
User can add additional explanation regarding the service in this field. |
|
Status |
To Save The Service As An Active Service, Click On The Checkbox Next To The "Active" Option. Unselect The Checkbox For The "Active" Button To Deactivate The Service. |
|
Save |
After enter the whole details, click on the Save menu to create new service or save the created form. |
|
Clear |
Clear menu is for clear or removing the entire data that entered by the user. |
|
Exit |
Exit menu is using for go to the previous page without saving the service form. |
4. Export
The list of items can be exported to Excel format. Click the Export button at the top right corner, near the +New button. Select the file location and click Save.
5. View
This menu option helps the user to view the created item format by clicking the view sign.
6. More options
The more options menu includes additional options they are Edit, Show Batch, delete and rate update.
=>Edit
This menu enables the user to make edits to the created item. A form of the selected item will appear by clicking on the menu.
=>Show Batch
The show Batch menu enables the user to get the batch of the created product. A batch of the selected product will appear on the screen by clicking on the Show Batch option.
=>Delete
If the user wants to delete an item that has already been created, it can be done using Delete.
=> Rate Update
Users can update the rate of stock from this option.
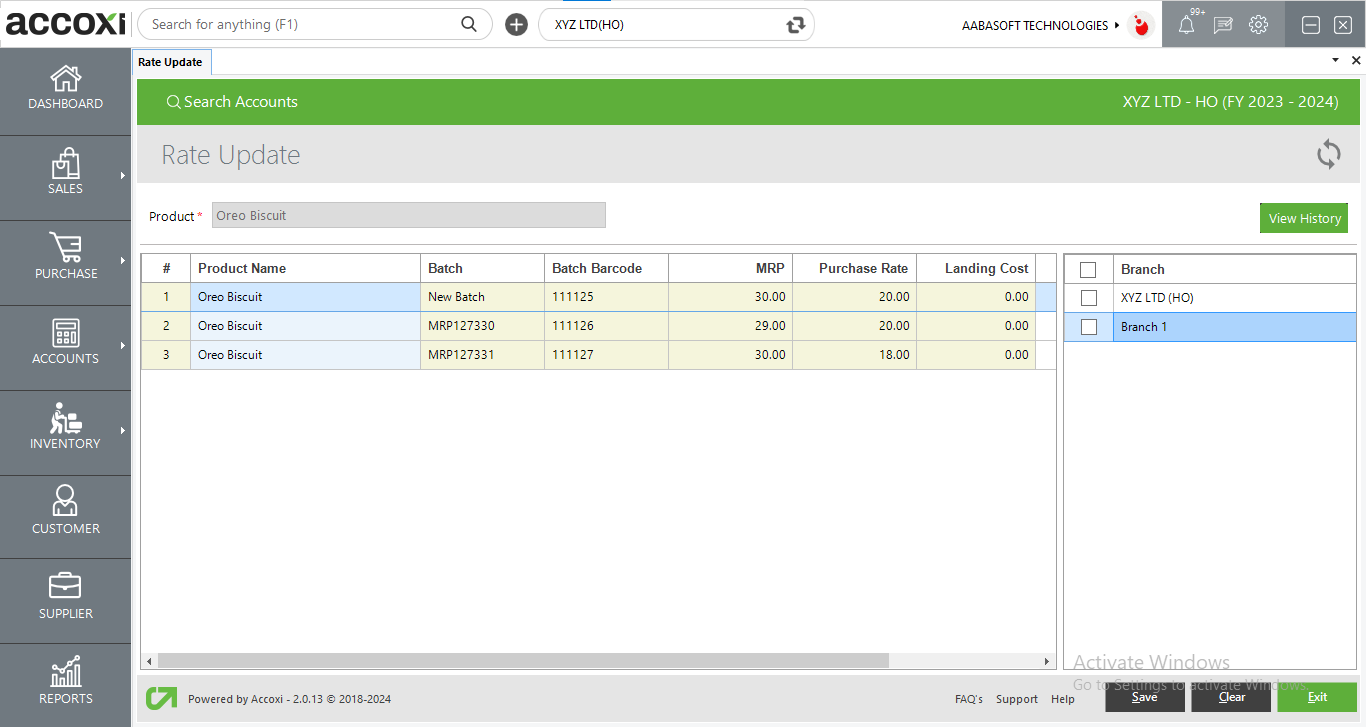
This is the rate update form. Users can update the stock rate by double-clicking the sales rate and modifying the rate.
1. View History
View history Shows previous rate updates made to stock by the user.
2. Branch Allocation
user can select the branch to which the rate updates shall apply to.
7. Pagination Control
It controls the Page Navigation and the Page Size. Page Size can be set to 10, 20, 50 or 100, by giving the page number in the box. When the user clicks the Go button, the intended page will appear.
Yes, user can upload a maximum of four images for a single item. Following are the steps involved:
Yes, the inventory can be maintained batch-wise. After saving the product form, a message appears asking whether or not the user wants to create a batch? Click on Yes button and enter the details in the Batch Form.
No. You can’t delete once created item. Either it can be set as an in active product or you can edit your items.
After creating an item in Accoxi, update Batch Details and this will help you track your inventory.
Click on Inventory module. The module window opens and on the right hand side there is a column named Available Stock that displays the stock count.
Sales rate other than the rate given in the inventory module can be set.
While raising the invoice you can enter the sales rate manually. The only criteria is that you cannot give a sales rate more than MRP