Recurring Purchase invoices- A guide
A recurring invoice is essentially an invoice sent to the same customer at regular intervals, containing identical invoice details. Setting up a recurring invoice can enhance efficiency, enabling automated and hassle-free delivery of invoices to customers.
Key features:
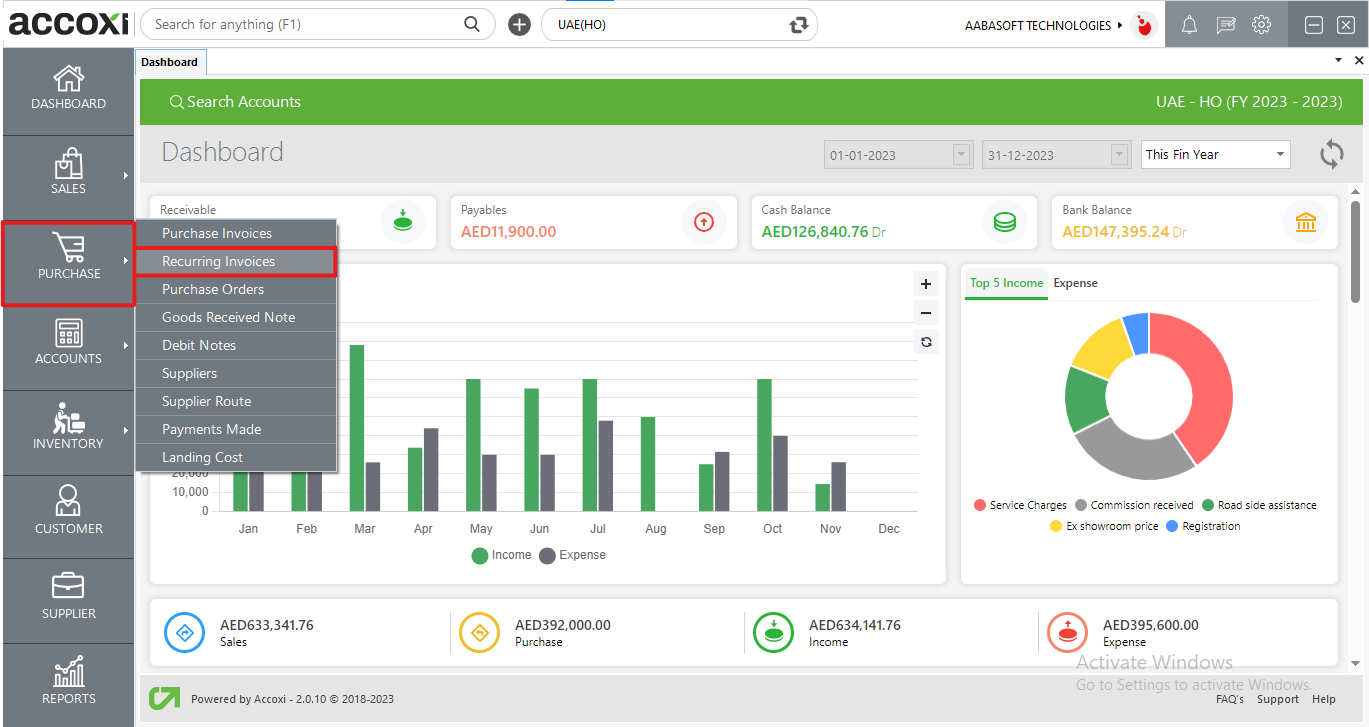
To access Recurring Invoices:
This action will lead you to the Recurring Purchase/Bills Search page.
The Recurring Purchase or Bills search window provides the user with information regarding all recurring purchases within the business.
Menus available in Recurring purchase or bills search:
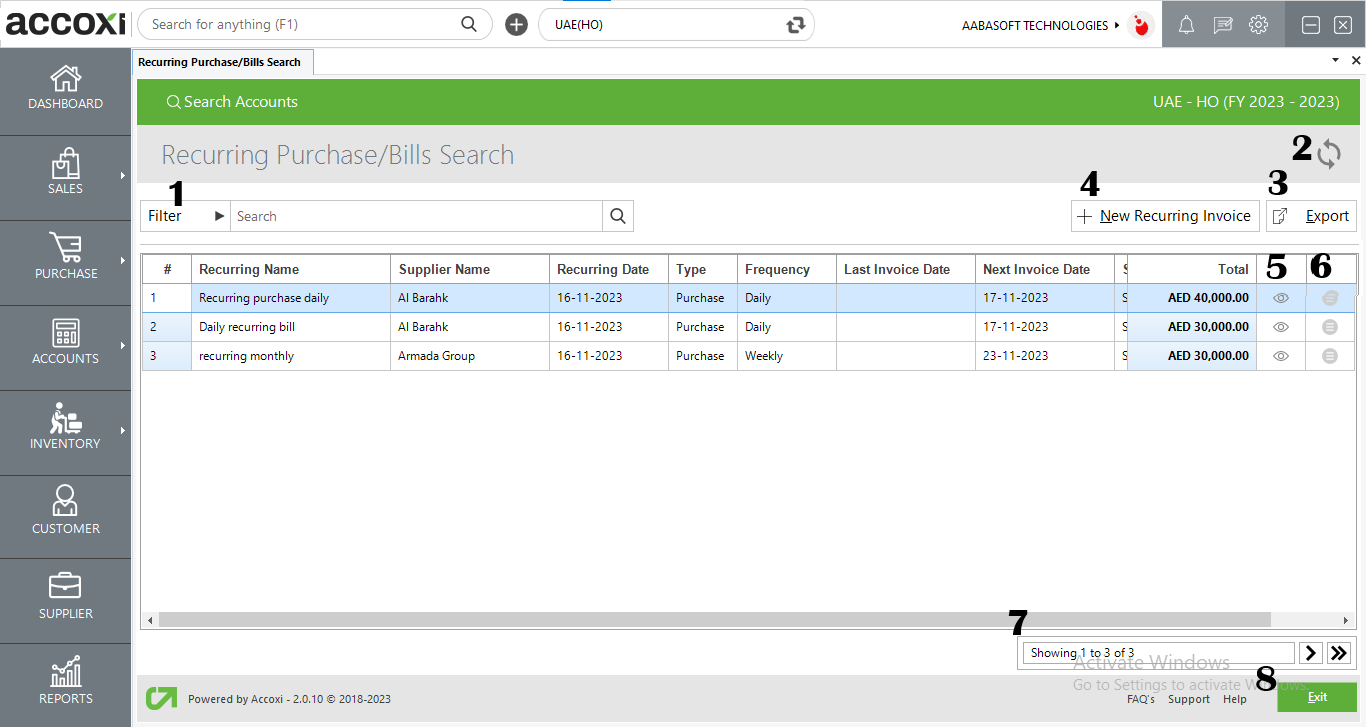
If the most recent data is not displayed, click on the refresh icon located at the top left corner of the page to retrieve the updated data.
The purchase invoice list can be exported to Excel format. Click on the Export button located at the top right corner, near the +New button. Choose the file location and click Save to complete the export process.
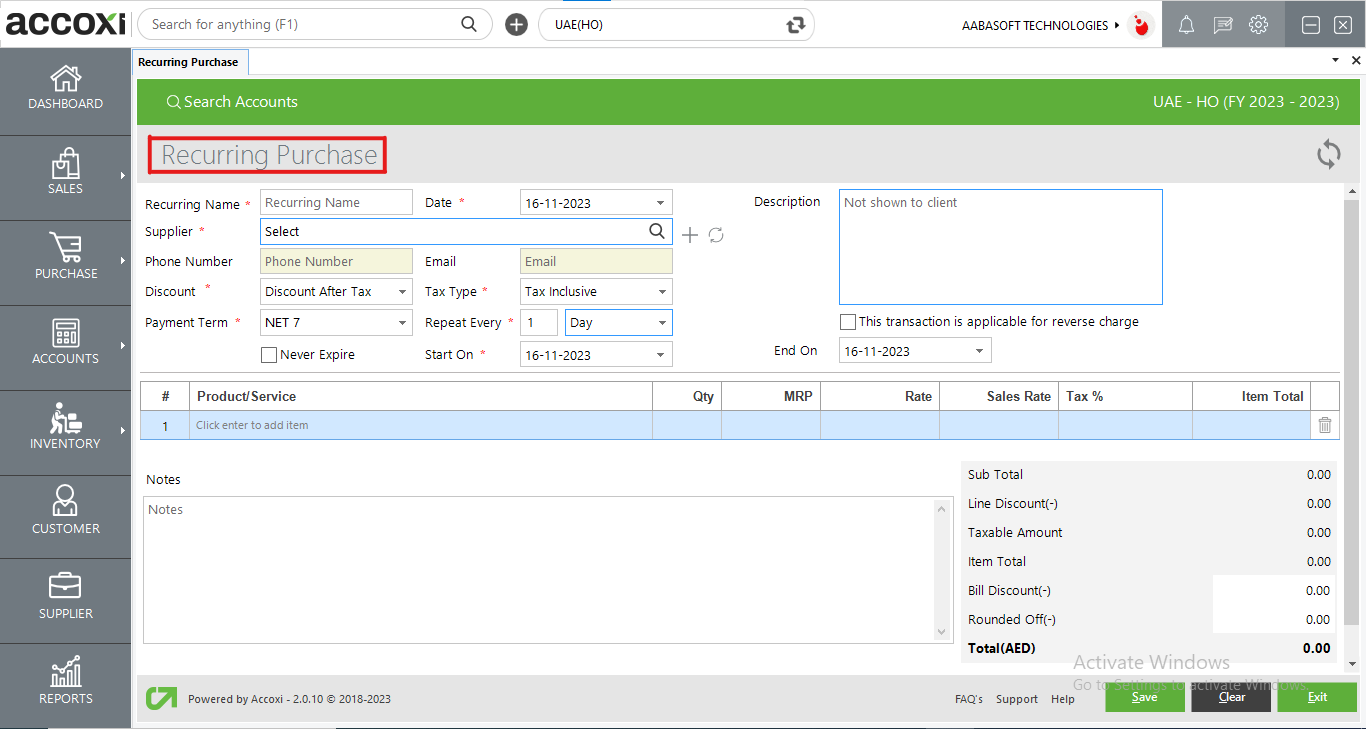
Steps to Add a Recurring Purchase:
|
Field |
Description |
|
Recurring Name |
input the name of the recurring purchase. |
|
Date |
enter the date of the recurring invoice. However, by default, the date will be set as the current date |
|
Supplier |
Choose the supplier from the drop-down menu. |
|
Phone Number |
It will be automatically filled when we select the supplier. |
|
Description |
input the description if there is any. |
|
Payment Term |
The payment term, which is already set with the supplier, will be displayed here. You can change the term if you want. |
|
|
It will be automatically filled when we select the supplier. |
|
Tax Type |
Select Tax Type – Tax Exclusive or Tax Inclusive |
|
Repeat Every |
enter the number of recurring intervals for "Repeat Every" day, week, month, or year. |
|
Never Expire |
It provides an option to apply "Never Expiry" for never-ending invoices. |
|
Start On/End On |
Provides access to select a start date and end date for the recurring purchase. |
|
Discount |
Choose the type of discount as either "After Tax" or "Before Tax." |
|
Product Or Service |
Enter the product here. By pressing the Enter key, it will provide you with the details of all products that you entered. |
|
Batch |
Select the batch of the product by clicking on the "Batches" column. |
|
QTY |
enter the quantity of the products. |
|
Discount |
The user can activate the discount allowed on the recurring invoices in this column. These discounts may be either after tax or before tax. |
|
Round Off |
This column is for rounding off small amounts, and the round-off may be downward, upward, or nearest. This is selected in the Preferences menu => Organization Settings. |
|
Save |
By clicking save, the recurring invoice is created, and the user will be redirected to the recurring invoice view window. |
|
Clear |
This option enables the user to clear the data entered in the new recurring invoice window. |
|
Exit |
Users can exit from the invoice window by clicking this button. |
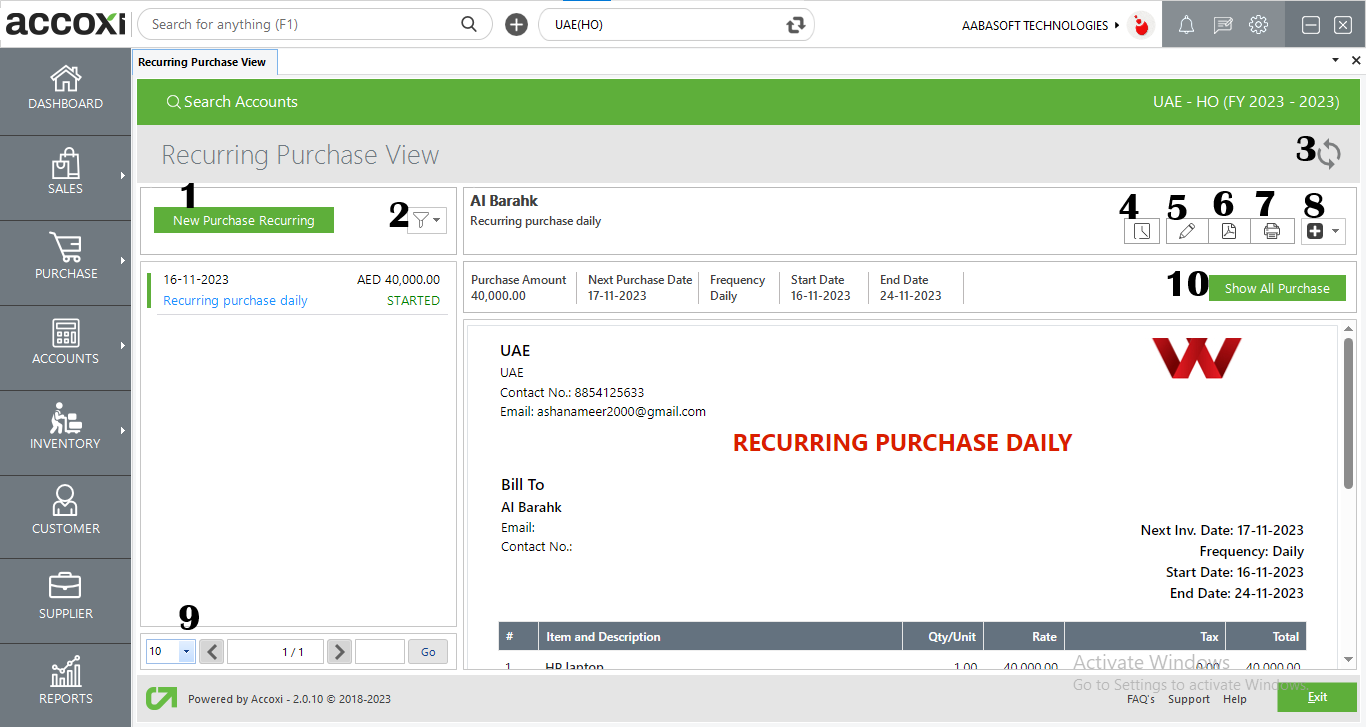
Menu available in Recurring purchase view
|
Field |
Description |
|
1. New Purchase Recurring |
The "New Purchase Recurring" button redirects to the Create New Recurring Purchase window. |
|
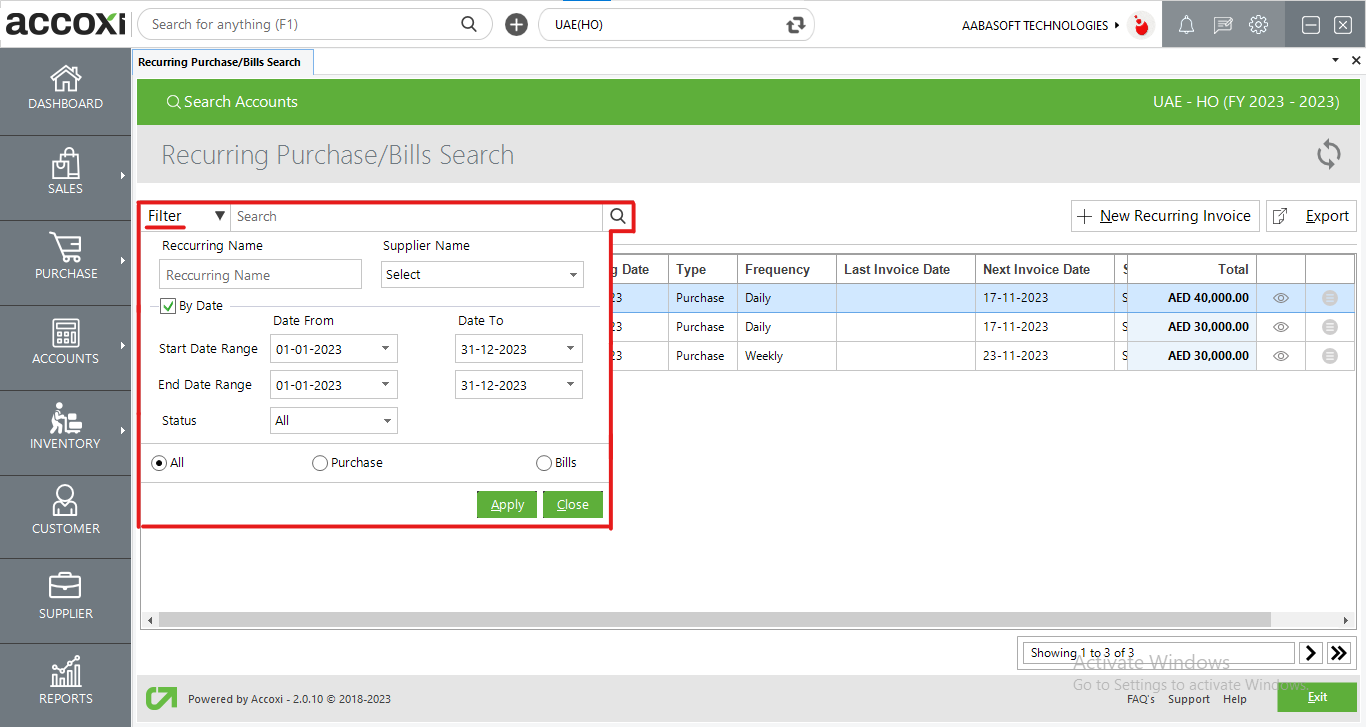
2. Filter |
The "Filter" option filters the recurring invoices of the supplier you just dealt with, according to "All," "Started," "Expired," and "Cancelled." |
|
3. Refresh |
If your latest data is not displayed, click on the refresh icon at the top left corner of the page to fetch the new data. |
|
4. History |
The recurring invoice shows the history/comments of the transactions made. It displays all the edits and alterations of the recurring invoice with the date of the changes made. |
|
5. Edit |
An option provides the user with permission to edit the invoice if needed. |
|
6. Export To Pdf |
If the user wants to convert the recurring invoice to PDF format, the "Export to PDF" option is available. After clicking "Export to PDF," a "Save As" directory option will appear, and the user can choose the PDF file saving location. |
|
7. Print |
The "Print" menu helps the user to print the created recurring invoice if required. After clicking the "Print" button, it will redirect to print options where the user can select the printer, number of copies to take, etc. |
|
8. More Options |
· Create Duplicate: This function is an easy tool to copy invoices. It will redirect you to the recurring purchase invoice window with the same data that you entered previously.
· Cancel Invoice: This option is to cancel the invoice that you created. The cancel window will open, redirecting the users. |
|
9. Pagination Control |
It controls the page navigation and the page size. Page size can be set to 10, 20, 50, or 100. By entering the page number in the box and clicking on the "Go" button, it jumps to the said page. |
|
10. Show All Purchase |
After setting and activating the recurring invoices, it will be saved as a draft (if stated). Then, we can convert this draft to an invoice. As it is a recurring theme, the purchases made at regular intervals are shown in the 'Show all Purchases.' |
This icon redirects the user to the invoice view window.
You can edit, view, export to PDF, and print the recurring invoice details if required using the more icon.
It controls the page navigation and the page size. Page size can be set to 10, 20, 50, or 100. By entering the page number in the box and clicking the "Go" button, it jumps to the said page.
Below the pagination control, there is an exit button. If you want to exit the supplier search page, click on the exit button.