Manual guide on the Purchase order in Accoxi.

A purchase order (PO) is a legal document that is created by a buyer and sent to a seller to confirm their intention to purchase products and/or services. The PO document tracks important information related to what the buyer wants to purchase. It includes the quantity and type of items required, as well as payment terms and delivery details.
In Accoxi the user can create or save purchase orders and also can convert the purchase orders into purchase invoices. A purchase order, or PO, is an official document issued by a buyer committing to pay the seller for the sale of specific products or services to be delivered in the future.

A purchase order is a commercial document and the first official offer issued by a buyer to a seller indicating types, quantities, and agreed prices for products or services. It is used to control the purchasing of products and services from external suppliers. This video tutorial shall guide you seamlessly in understanding how a purchase order is being generated.
Key Features of Purchase Order:-
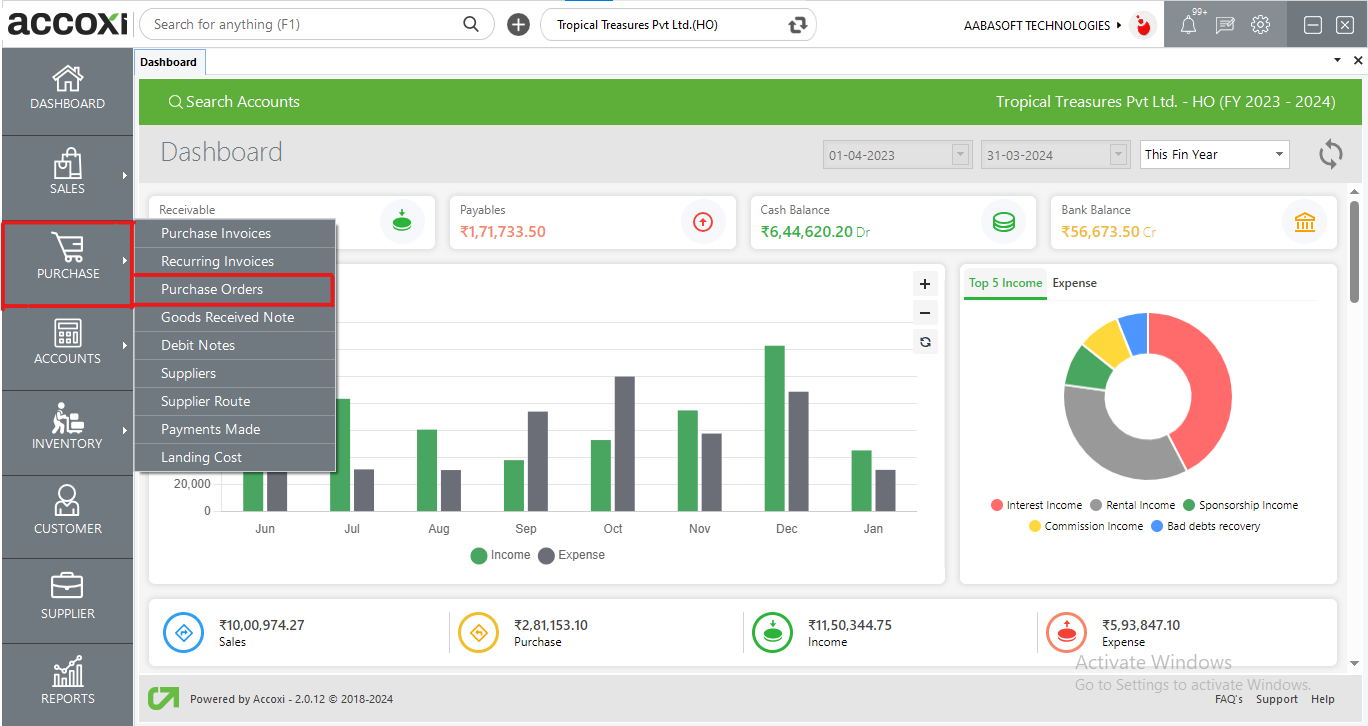
Click the Purchase module and select Purchase Order.
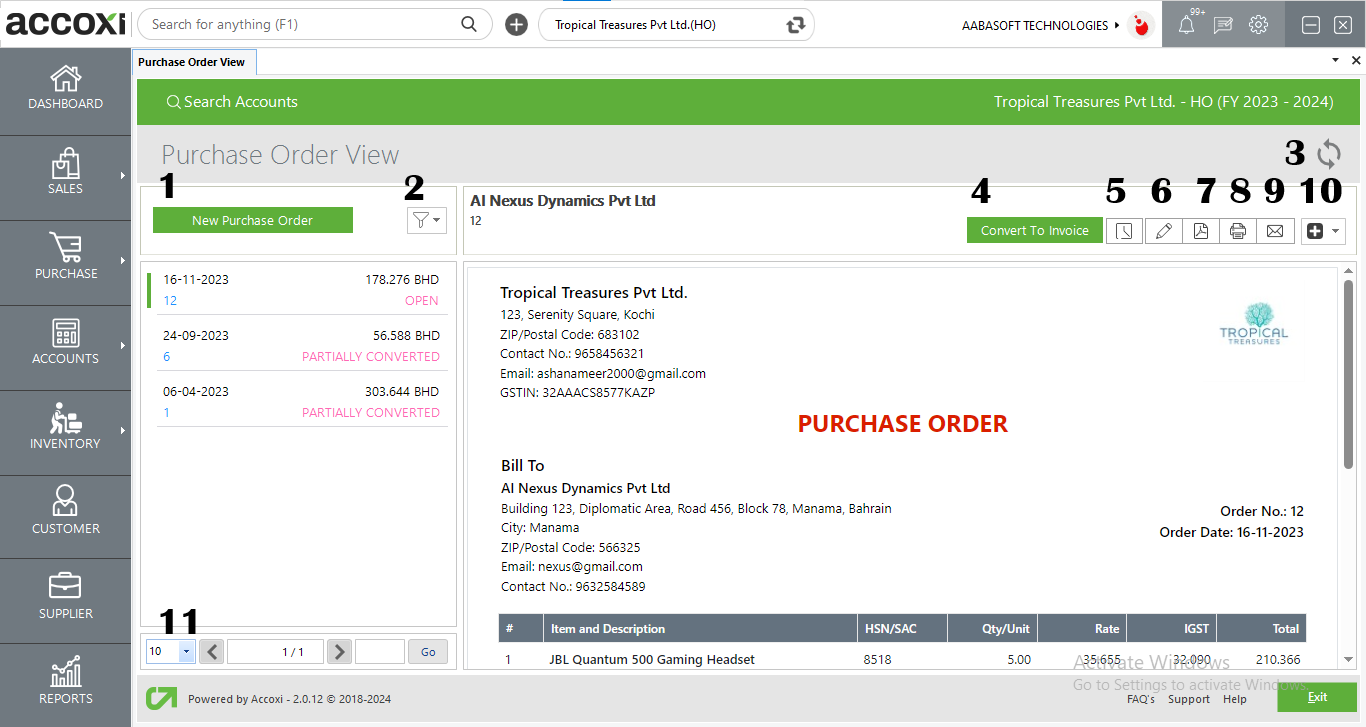
When we click on the Purchase Order menu, it opens to Purchase order search.
Purchase order search consists of various menus and it shows the details of all the purchase orders that created by the user.
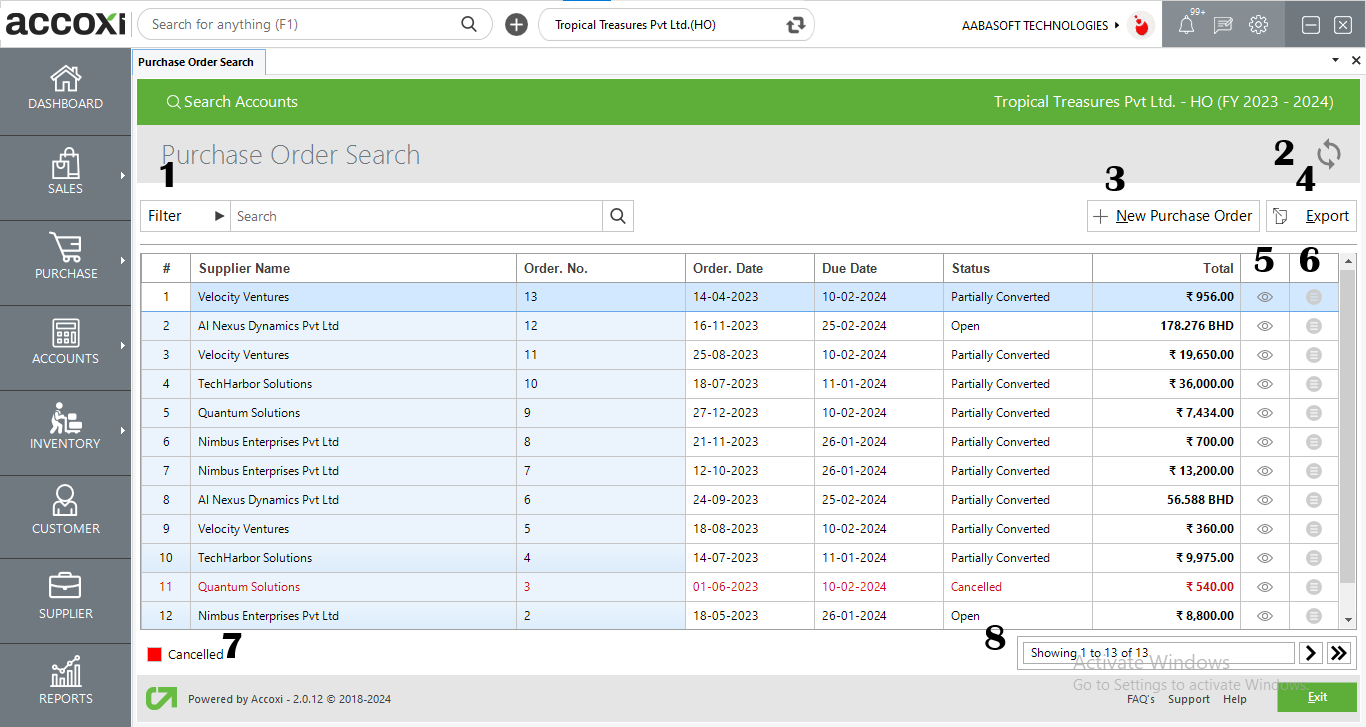
1. Filter
The filter of a purchase order can be done in two ways-Either you can directly enter the supplier name into the search bar near the filter option or by clicking the filter drop-down. Users can filter the data by an order number, supplier name, status or date. The order data can filter by using the date format, need to enter the starting date and the end date of the purchase order. Data filter by status includes sorting of data on the basis of an open order, canceled, invoiced, or all.
2. Refresh
If the latest data is not displayed, click on the refresh icon on the top left corner of the page to fetch the new data.
3. Add New Purchase Order
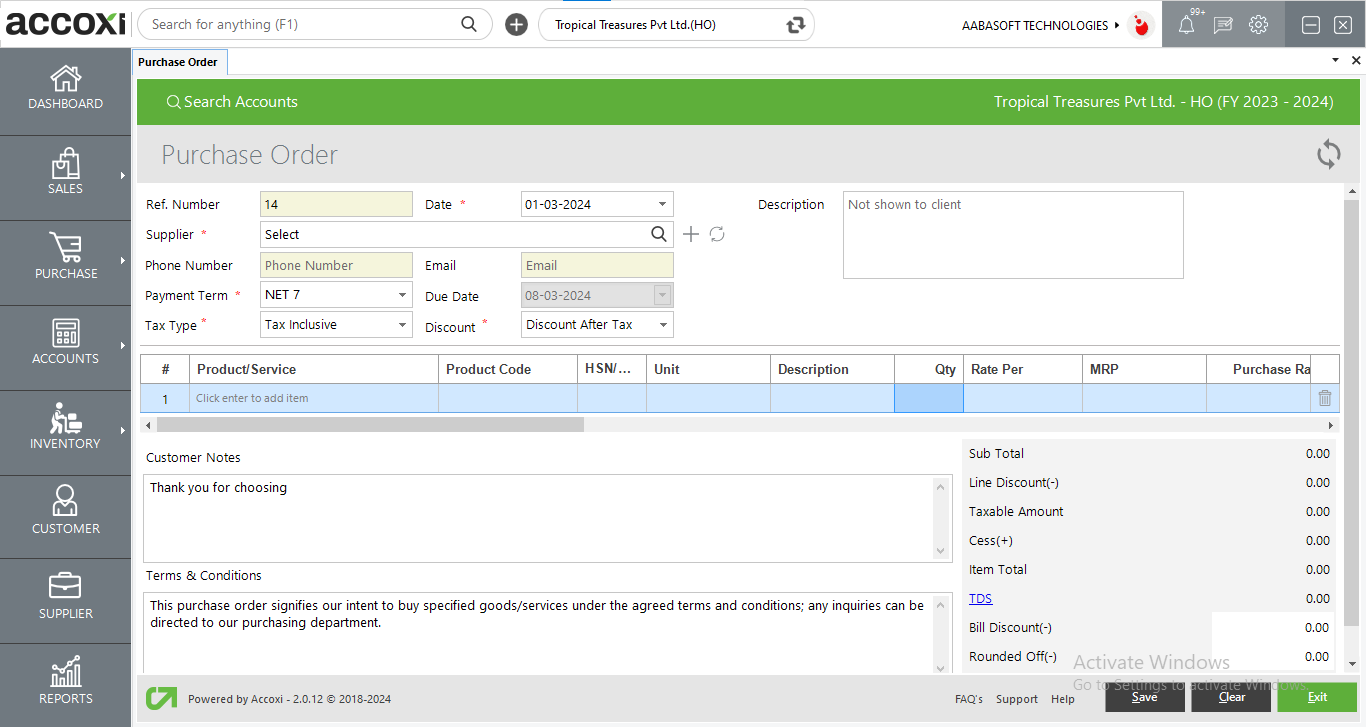
This menu is used for the purpose of creating a new purchase order that the user requires. By clicking add new + purchase order, a new window opens with the new form of the purchase order.
Steps to create New Purchase Order
|
Fields |
Description |
|
Reference no |
Reference number helps the user to identify transactions in records. It will automatically appear on the Purchase order form and the user can’t edit the reference number, as it will be the continuation of the previous order. |
|
Date |
The date will automatically appear on the date field and it may be the current day date. If the user wants to change the date, it can be done by clicking on the date menu and can select the required date.
|
|
Supplier |
Select the supplier that the user wants to purchase the products or services. By clicking the select menu, a list of suppliers will appear and the user can select the required supplier from the list. If the user wants to create a new supplier without the list, can create a new supplier by clicking the menu + (add new). When the user selects a supplier, then the fields of the phone number, and email, get auto filled |
|
Phone number |
When the user selects the supplier, the phone number details of the supplier will automatically appear on the field. |
|
Payment term |
Select the payment term here and in some cases, it will appear automatically on the field. It's because of when the user creates a supplier account, can also save the payment term option. So when the user selects the supplier, the payment term will also appear along with that (can edit if require). |
|
Due date |
The due date is the date on which the payment is expected or due. When the user sets the payment term of a supplier, the due date will automatically appear on the field. The user can’t edit or delete the date on this field. |
|
Tax type |
There are two types of tax Inclusive and Exclusive. When the user selects the supplier, the tax type field will automatically appear with the appropriate tax type. The user can’t edit or select this field. But in the case of registered suppliers or regular dealers, the user can select the tax type as inclusive or exclusive. |
|
|
It shows the email id of the selected supplier. The user can’t enter anything on this field. |
|
Description |
Users can add an additional explanation if required. |
|
Discount |
Two types of discounts are available in the discount menu. Discount before tax and Discount after tax. Users can select the required discount type from the menu. If the user selects discount before tax type, the discount will be deducted from Sub total amount and then only calculates the tax amount. Here user can enter the discount rate in percentage. If the user selects discount after tax type, the discount will be deducted after calculating the tax amount. Here users need to enter the discount rate in rupees.
|
|
Product/Service |
Select the product or service here, that need to create a purchase order. When the user enters the product name, needs to press Enter and then the batch will appear on the product and enter the batch also. After entering the product and batch, the rate and other details will appear on the field. |
|
Unit |
The unit of the product will automatically appear on the field only after selecting or entering the product. Users can’t enter or edit the unit on the field. |
|
Product/service description |
Users can enter additional explanations regarding the product if required. |
|
Quantity |
Need to enter the quantity of the product on this field. |
|
MRP |
MRP of the product will automatically appear on the field after selecting the product for a make a purchase order. The user can’t edit the MRP of the product as it is already fixed. |
|
Purchase rate |
The purchase rate of the product will automatically appear on the field after selecting the product. Users can edit the rate on the field if required. |
|
Sales rate |
The sales rate of the product will automatically appear on the field after selecting the product. Users can edit the rate on the field if required. |
|
Expiry date |
Users can set the expiry date of the product if required. |
|
Taxable amount |
The taxable amount is the amount on which tax is to be charged. It will automatically appear after entering the rate details. |
|
Tax rate |
This field automatically shows the tax rate of the purchasing item. It may be 3%, 5%, 12%, 18%, 28%, nil rated, exempted or no GST. Users can’t edit or enter the rate on this field. |
|
Eligible ITC |
A registered person will be eligible to claim Input Tax Credit (ITC). Users can select the option Eligible or Ineligible on the basis of GST treatment. |
|
Tax Amount |
The tax amount is the amount at which a business or person is taxed on the basis of tax type Inclusive or Exclusive. |
|
Item Total
|
After entering the details of the purchased item such as product rate, tax rate, etc, the user gets the gross amount of the item total. |
|
TDS
|
Tax Deducted at Source (TDS) is a system introduced by the Income Tax Department, where the person responsible for making specified payments such as salary, commission, professional fees, interest, rent, etc. is liable to deduct a certain percentage of tax before making payment in full to the receiver of the payment. The user can select the required type of TDS on the right side of the box. By clicking on the TDS select menu, the available rates of TDS will appear and if the user wants to create a new tax type, it can be done by TDS configuration from the settings.
|
|
Round off |
Rounding numbers make it simpler and easier to calculate values. Users can round off the total amount by using this field and the round-off may be downward, upward, and nearest. This can be selected from the preference menu in organization settings.
|
|
Save |
After entering the whole details, click on the Save menu to create a new purchase order or save the completed purchase order form. |
|
Clear |
The clear menu is for clearing or removing the entire data entered by the user. |
|
Exit |
The exit menu is used to go to the previous page without saving the purchase order form. |
Menus available in the Purchase Order view
|
Fields |
Description |
|
1. New Purchase order |
It is the menu option to create a new purchase order. By clicking the New Purchase order, the user gets a new form to create a new order. |
|
2. Filter |
The filter menu enables the user to filter the data and the data filter on the basis of Order status, open order, canceled, invoiced or all. |
|
3. Refresh |
If the latest data is not displayed, click on the refresh icon on the top left corner of the page to fetch the new data.
|
|
4. Convert to invoice |
When clicking on the Convert to Invoice menu, the Purchase invoice page will appear. It includes all the details including the purchase order date and number, the user needs to enter the invoice number to create a Purchase Invoice.
After converting the purchase order into an invoice, the purchase order status will change from Open to Invoiced. |
|
5. History |
This menu helps the user to obtain the history details of the purchase order.
There are two tabs in the Purchase order history. They are, Comments & history and Created Invoice. In comments & history, the tab shows the order of edits or correction work if any did with date wise and the user can add comments on the comment box if required.
Created Invoice shows the history details of Purchase invoices converted from Purchase orders. It shows the date, voucher no, and the amount details also.
|
|
6. Edit |
The Edit menu helps the user to edit or correct the details that are entered in the purchase order and can save again after it. When clicking on the edit menu, the screen will go to the previous window of the new purchase order form. |
|
7. Export to PDF |
This menu enables the user to export the purchase order form to PDF format and can save in the system.
When the user clicks on the PDF menu, a new tab will appear to save the file. Then the user can select the location to save the file, set a name, and click on the save button to save the file in PDF format.
|
|
8. Print |
If the user wants to take the printout of the created purchase order form, it can be done by using the menu Print on the top right side of the order view.
When the user clicks on the print menu, a new tab will appear on the screen and it contains the details regarding the print. Users can set the page range, page height, and width and can enter the required number of copies here. By clicking on the Print button, the user gets the printout of the purchase order form.
|
|
9. Email |
The email menu enables the user to send the Purchase order form directly to the suppliers.
By clicking on the Email menu, a new tab will appear that regarding the details of sending mail. It includes To id, CC, subject, and content.
When clicking on the main menu, the email id of the Supplier will automatically appear on the TO field. If the user wants to change the email id then it can be done by removing the id and can enter a new one. Users can also enter CC if required and can add an additional description if needed.
If the user wants to change the Email template, it can be done by Email template in Settings.
Need to mark the option attachment for sending the purchase order form with Email. After clicking on the Send option, the mail will send to the selected supplier.
|
|
10. More options |
More options menu is on the top right side of the screen, and it includes the options for creating duplicate and Canceling orders. If the user wants to create a duplicate copy of the purchase order, then it can be done by selecting the option of Create Duplicate from the More options menu. It takes the user to the purchase order creation If the user wants to cancel the created purchase order, then it can be done by selecting the cancel option from add new menu.
|
|
11. Pagination Control |
It Controls The Page Navigation And The Page Size. Page Size Can Be Set To 10, 20, 50 Or 100. By Giving the Page Number In The Box And Clicking On Go Button Launches The User To Said Page.
|
4. Export
The Purchase Order list can be exported to Excel format. Click the Export button at the top right corner near the +New button. Select the file location and click on save.
5. View
View menu enables the user to view the Purchase order form that has already been created.
6. More Settings
This menu includes editing, viewing, exporting to PDF, and printing the purchase order.
The Edit menu helps the user to edit or correct the details that are entered in the purchase order and can save again after it. When clicking on the edit menu, the screen will go to the previous window of the new purchase order form.
View menu enables the user to view the Purchase order form that has already been created.
This menu enables the user to export the purchase order form to PDF format and can save in the system.
If the user wants to take the printout of the created purchase order form, it can be done by using the menu Print on the top right side of the order view.
7. Cancelled Order
Users can easily identify the canceled purchase order by using the color format. Canceled orders are indicated with red color.
8. Pagination Control
It controls the page navigation and the page size. Page size can be set to 10, 20, 50 or 100. And by giving page number in the box and clicking on Go button. It jumps to the said page.
History menu helps you to obtain the history of the transactions details along with user details
Yes. You can send Email to the Supplier with the Purchase order.
You can edit the Purchase order in two ways. Either you can select the edit option from Purchase order search or you can select the edit option from Purchase order view page.
Yes. You can cancel the created Purchase order by following steps.