learn how to create and navigate through Sales orders in Accoxi

A sales order, often referred to as SO, is a directive issued by a business or individual trader to a customer for the purchase of products and/or services that have not been invoiced yet. In Accoxi, users have the capability to generate or record sales orders, and they can further convert these sales orders into sales invoices or transform them into purchase orders. This flexibility allows users to create sales orders for both products and services within the Accoxi platform.
Key Features of Sales Order
It exhibits the details of the sales order created by the user, including the order date, total amount, and the current status of the order.
Users can readily identify the current status of each order, which may be categorized as open, invoiced, delivered, or cancelled.
Cancelled sales orders are easily identifiable through a color format, with cancelled orders displayed in red.
Users have the ability to swiftly convert sales orders into sales invoices or transform them into purchase orders.
Sales orders created through Accoxi E-Commerce are seamlessly integrated and displayed in the sales order section.
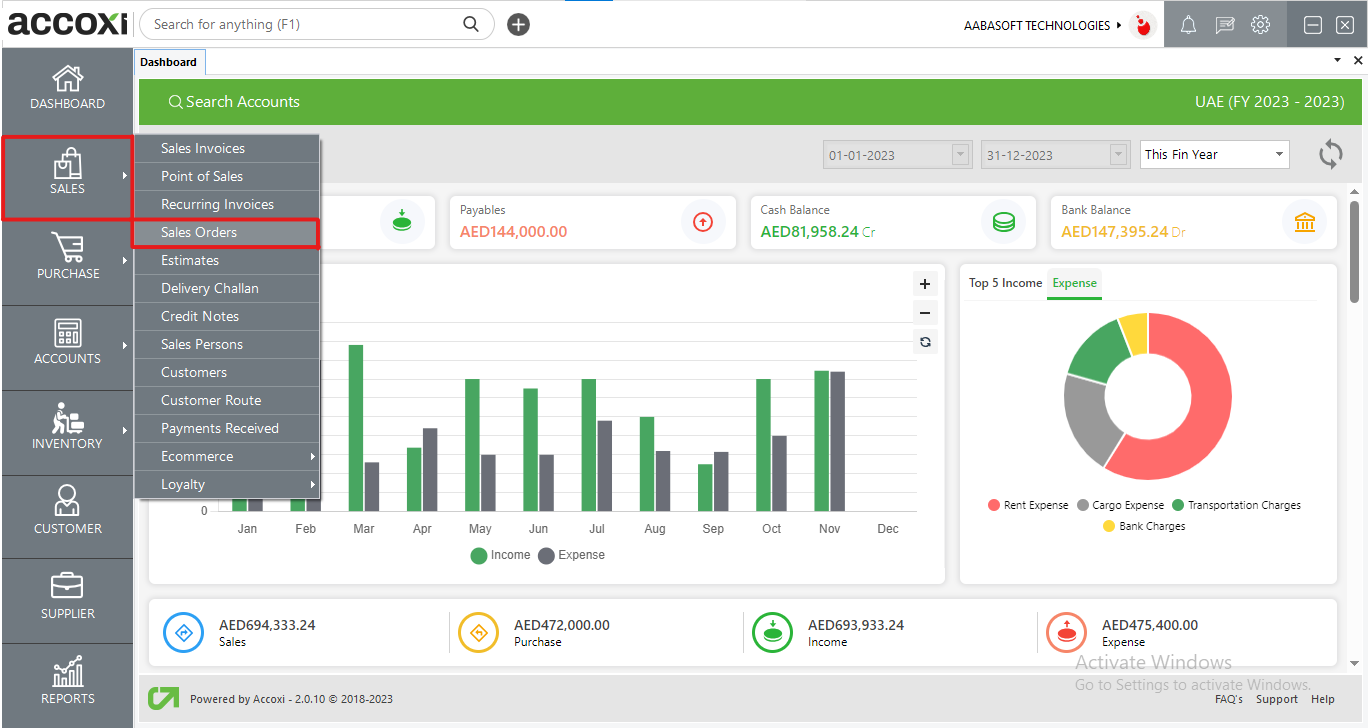
Click on the Sales module and then select Sales Order. Upon clicking the Sales Order menu, it opens into the Sales Order search.
Sales Order Search
The Sales Order search includes various menus and displays details of all the Sales orders created by the user.
MENU AVAILABLE IN SALES ORDER SEARCH
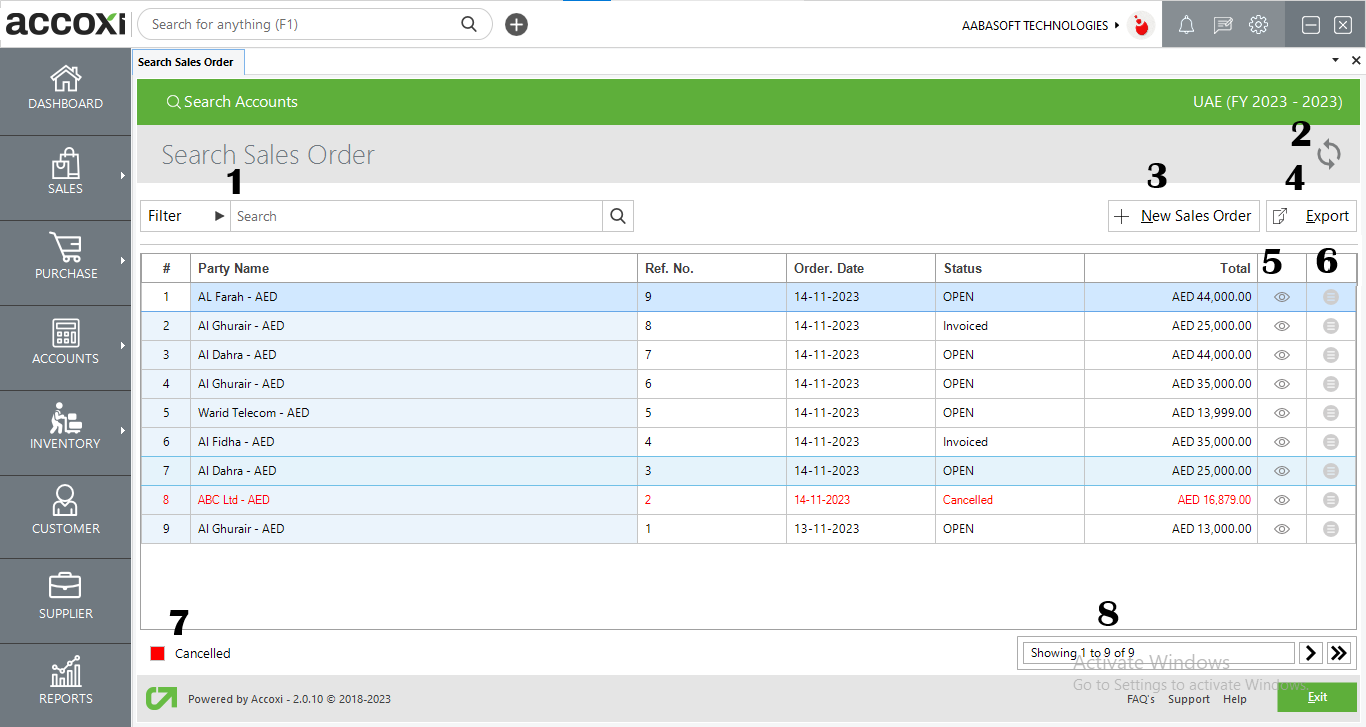
1. Filter
The sales order filter option facilitates easy identification of user-specific orders through various methods. This includes inputting either the reference number or the party name linked to the sales order. Users can also utilize time frames by selecting date intervals. Furthermore, the filtering extends to the status of invoices, allowing users to categorize orders as "All," "Invoiced," "Open," or "Cancelled."
2. Refresh
To view the most recent data, click on the refresh icon located in the top left corner of the page to update and retrieve the latest information.
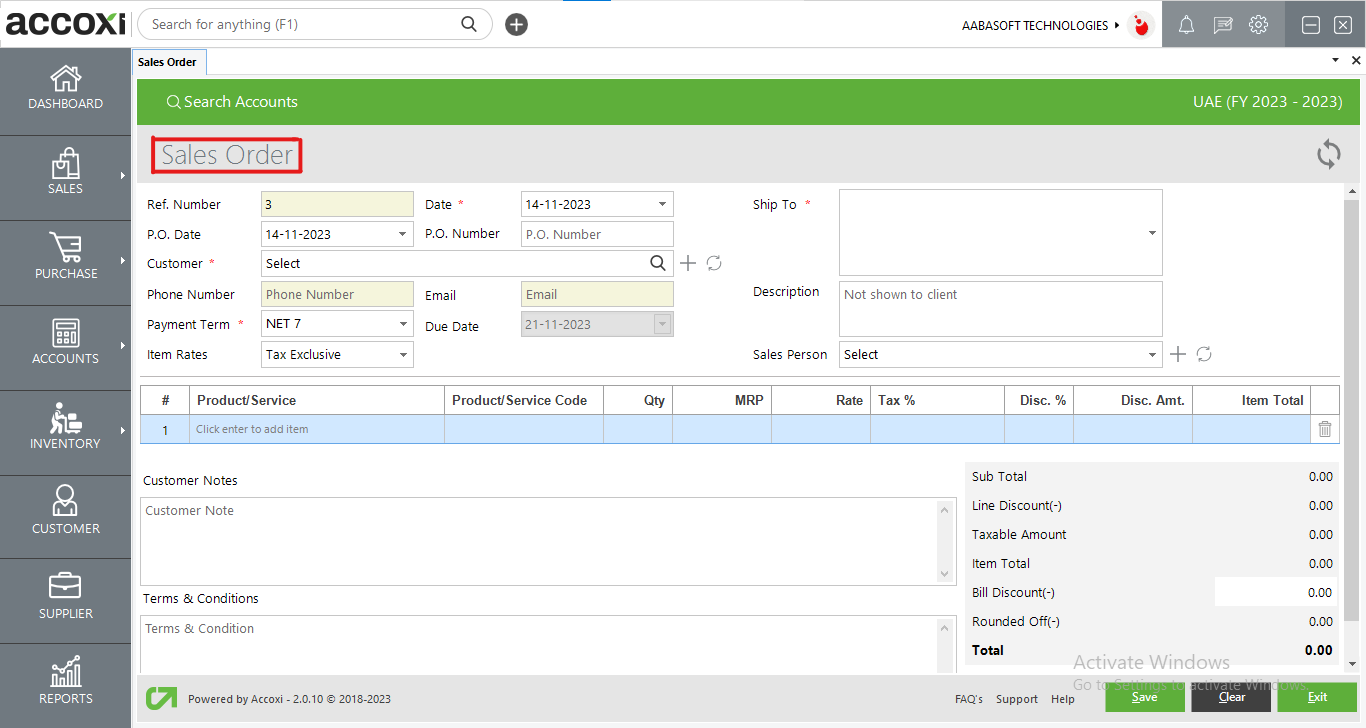
3. Add New Sales Order
This menu is employed to initiate the creation of a fresh Sales order. Upon selecting "Add new + Sales order," a new window will appear, presenting the new form of sale order.
To generate a new Sales Order, follow these steps:
Once all the information is entered, click on the Save button.
|
Field |
Description |
|
Reference Number |
The Reference Number serves as a means for users to identify transactions in records. It is automatically displayed on the Sales Order form, and users are unable to edit the Reference Number, as it is designed to continue the sequence from the previous order. |
|
Date |
The Date field will be automatically populated, usually with the current date. If the user wishes to modify the date, they can do so by clicking on the Date menu and selecting the desired date. |
|
Customer |
Choose the customer to whom the user intends to sell products or services. By clicking the Select menu, a list of customers will be displayed, allowing the user to pick the desired customer. If the user prefers to create a new customer not listed, they can do so by clicking the + (Add New) menu. Upon selecting a customer, the fields for phone number, email are automatically populated. |
|
Phone Number |
Upon selecting the customer, the phone number details of the customer will be automatically populated in this field. |
|
|
The email ID of the selected customer is displayed in this field, and the user is unable to enter any information into it. |
|
Description |
If necessary, users can provide additional explanations. |
|
Payment Term |
Choose the payment term in this section, and in certain instances, it may automatically appear in the field. This is because when the user creates a customer account, the payment term option can be saved. Therefore, when the user selects the customer, the payment term will also be displayed, and it can be edited if necessary. |
|
Due Date |
The Due Date represents the date by which the payment is expected or due. When the user sets the payment term for a customer, the Due Date will automatically populate in the field. It's important to note that users cannot edit or delete the date in this field. |
|
Product/Service |
Choose the product or service that you want to include in the sales order in this section. Upon selecting an item, its rate, MRP, tax amount, HSN code, and unit details will automatically be populated. Users have the option to edit the rate if necessary and can input the quantity of the item. |
|
Product Or Service Code |
Following the selection of the product, the code assigned to the chosen product will be displayed in this field. |
|
HSN/SAC |
The HSN/SAC code will be displayed after entering the product and batch details in the product field. |
|
Unit |
The unit of the product will automatically appear in the field only after selecting or entering the product. It's important to note that the user cannot manually enter or edit the unit in this field. |
|
Batch |
You have the option to select the batch of the product by clicking on the "Batches" column. The available batches will be listed, allowing you to make a selection. |
|
Description |
Any product description, if applicable, can be entered in this section. |
|
Quantity |
Enter the quantity of the product in this field. |
|
MRP |
The MRP (Maximum Retail Price) of the product will automatically appear in the field after selecting the product for creating a sales order. It's important to note that the user cannot edit the MRP of the product as it is already fixed |
|
Rate |
The sales rate of the product will automatically appear in the field after selecting the product. |
|
Tax % |
The VAT percentage for the product will be displayed. |
|
Taxable Amount |
The taxable amount, which represents the amount on which tax is to be charged, will automatically appear after entering the rate details. |
|
Tax Amount |
The tax amount is the sum on which a business or individual is taxed, determined by the tax type (inclusive or exclusive). |
|
Item Total |
After entering the details of the sale item, such as the product rate, tax rate, etc., the user obtains the gross amount, representing the total cost of the item. |
|
Item Rates |
This menu incorporates both inclusive and exclusive tax rates. Users have the option to select either of the tax rates, and the tax for the product/service will be calculated based on the chosen tax rate. |
|
Sales Person |
To assign a salesperson to the relevant product or service, users can utilize the "Salesperson" menu. Clicking on this menu will display a list of salespersons, and the user can select the appropriate one. Additionally, if the user wishes to create a new salesperson, they can do so on the same page by clicking the + (Add New) menu. |
|
Discount |
Users have the option to enter the discount rate on the right side of the page. Within the sales module, there are four types of discounts: Discount Before Tax, Discount After Tax, Line Discount, and No Discount. Users can configure the discount type from the sales settings and input the corresponding discount. |
|
Round Off |
Rounding numbers facilitates simplicity and ease of use. Users can round off the total amount using this field, and the rounding can be configured to be downward, upward, or to the nearest value. The preferred rounding method can be selected from the Preference menu in Organization Settings. |
|
Customer Note |
Users have the option to enter a note for the customer in this field. |
|
Terms And Conditions |
Here is where you can include the terms and conditions for the sales order. |
|
Save |
Select the "Save" option to store the entered details and generate a sales order. |
|
Clear |
The "Clear" menu is designed to eliminate or remove all the data entered by the user, providing a reset for the information. |
|
Exit |
Users can exit the order window by clicking on this button. |
|
Field |
Description |
|
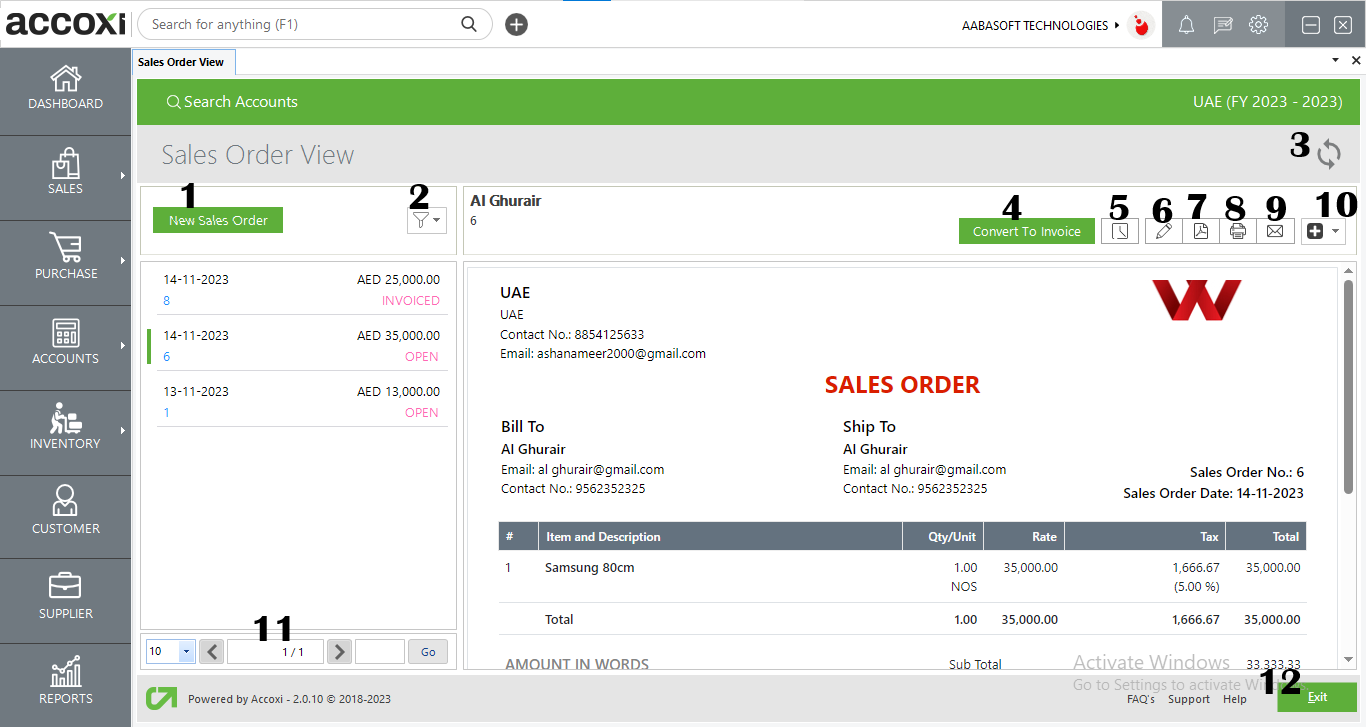
1. New Sales Order |
Selecting the "New Sales Order" option initiates the creation of a fresh sales order. Clicking on this option provides the user with a new form for generating a new order. |
|
2. Filter |
The "Filter" menu empowers the user to refine the data based on order status, such as Open Order, Canceled, Invoiced, or display All orders. |
|
3. Refresh Option |
To ensure the display of the most recent data, click on the Refresh button to fetch new information. |
|
4. Convert To Invoice |
Once the sales order is created, users can promptly convert it into an invoice by clicking on the 'Convert To Invoice' option located on the top right side of the window. This action will redirect the user to the Sales Invoice window.
In the Sales Invoice window, all the data from the sales order is automatically populated, and the user simply needs to click the Save option to generate the invoice.
Following the conversion of the sales order into an invoice, the status of the sales order will change from Open to Invoiced. |
|
5. History |
This menu facilitates the user in retrieving the historical details of the sales order.
The Sales Order History consists of two tabs:
· Comments & History: This tab chronologically displays the edits made in the sales order, such as updates to products, rates, etc. Additionally, users can add comments in the comment box if needed.
· Created Invoice: This tab provides historical details of sales invoices that were generated from sales orders. It includes information such as the date, voucher number, and amount details. |
|
6. Edit |
The "Edit" menu allows users to modify or correct the details entered in the sales order, and they can save the changes afterward. Clicking on the "Edit" menu will navigate the screen back to the previous window of the new sales order form. |
|
7. Export To PDF |
This menu allows users to export the sales order form to PDF format and save it in the system.
Clicking on the "PDF" menu initiates a new tab where the user can choose the location to save the file, set a name, and then click the "Save" button to save the file in PDF format. |
|
8. Print |
To obtain a printout of the created sales order form, users can utilize the "Print" menu located on the top right side of the order view. Upon clicking the "Print" menu, a new tab will appear on the screen containing print details. Users can set the page range, page height, width, and enter the required number of copies. By clicking the "Print" button, the user can obtain a printout of the sales order form. |
|
9. Email |
The "Email" menu provides users with the capability to directly send the sales order form to the customer.
Upon clicking the "Email" menu, a new tab will appear, providing details for sending the email. It includes fields for the recipient's email (TO), CC, subject, and content.
Clicking the "Email" menu automatically populates the TO field with the customer's email ID. Users can modify the email ID by removing the existing one and entering a new address. If necessary, users can also input CC details and additional descriptions.
Changing the email template is possible through the Email Template in Settings.
To send the sales order form via email, users need to mark the "Attachment" option. After selecting "Send," the email will be dispatched to the chosen customer. |
|
10. More Options |
The "More Options" menu, situated at the top right of the screen, provides choices for converting to a purchase order, creating a duplicate, and cancelling the order.
If the user wishes to generate a duplicate copy of the sales order, they can select the "Create Duplicate" option from the More Options menu. Users also have the ability to convert the sales order into a purchase order. Additionally, if there is a need to cancel the created order, this can also be accomplished through the More Options menu. |
|
11. Pagination Control |
This menu governs page navigation and page size. The page size can be configured to 10, 20, 50, or 100. Users can specify the desired page number in the designated box and click on the "Go" button to navigate directly to the indicated page. |
|
12. Exit |
To exit from the current page, click on the "Exit" option. |
4. Export
The sales order list can be exported to Excel format. Click the Export button at the top right corner near the +New button. Select the file location and click on save
5. View
The "View" menu allows the user to access and view the sales order form that has already been created.
6. More Settings
This menu provides options for editing, viewing, exporting to PDF, and printing the sales order.
7. Cancelled Order
Cancelled sales orders are easily identifiable through a color format, with such orders being highlighted in red.
8. Pagination Control
This feature manages page navigation and page size. The page size can be adjusted to 10, 20, 50, or 100. By entering the page number in the designated box and clicking on the "Go" button, the system will navigate to the specified page.