Receive Fund

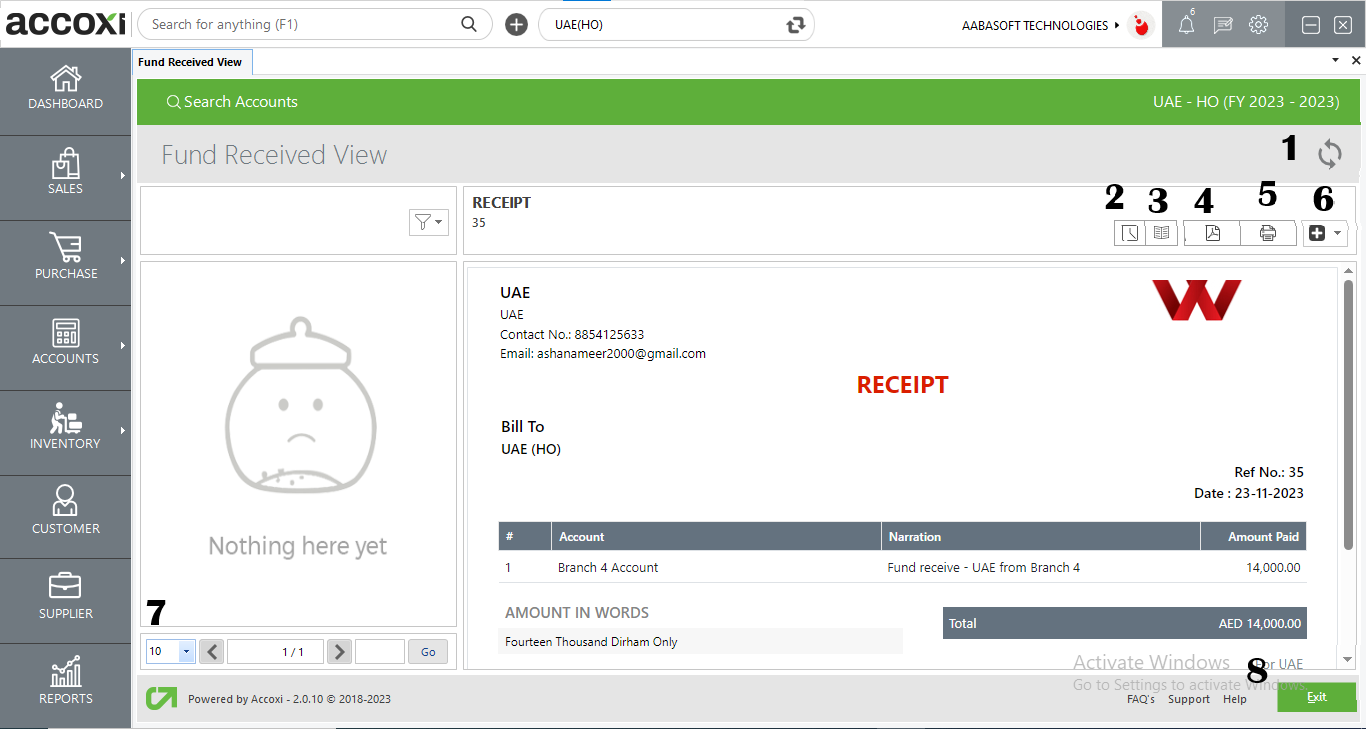
Receive Fund is the form where the user can record as Approve/Reject the transferred fund. The Receive fund forms can be accessed from HO and Branch.

Receive Fund (1)

RECEIVE FUND IN ACCOXI

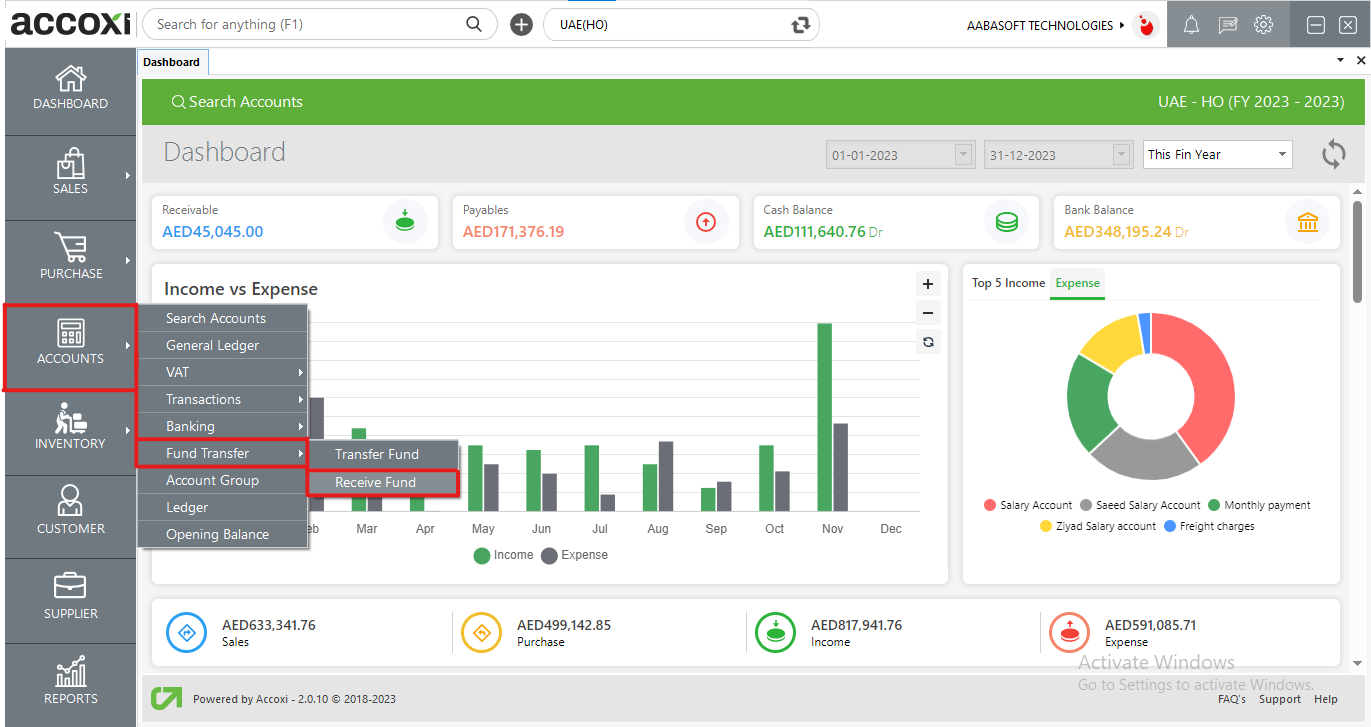
The "Receive Fund" option, found within the Fund Transfer menu, enables users to mark transferred funds as either 'Reject' or 'Approve.' This option allows users to record their decision for each transfer. Upon selecting the "Receive Fund" menu, users are redirected to the "Receive Fund Search" page, displaying a list of received fund details originating from the HO/Branch.

Key Features of the "Receive Transfer" Option:

  • Facilitates fund acceptance between head office, branches, or among branches.
  • Different transaction types of received funds are clearly identified on the "Receive Fund Search" page.
  • Easy understanding of the origin (Head Office or specific Branch) of received funds.
  • Detailed display of previously recorded received funds on the "Receive Fund Search" page.
  • User-friendly identification of cancelled transactions; cancelled transactions are highlighted in red for quick recognition.

Receive Fund

RECEIVE FUND SEARCH PAGE

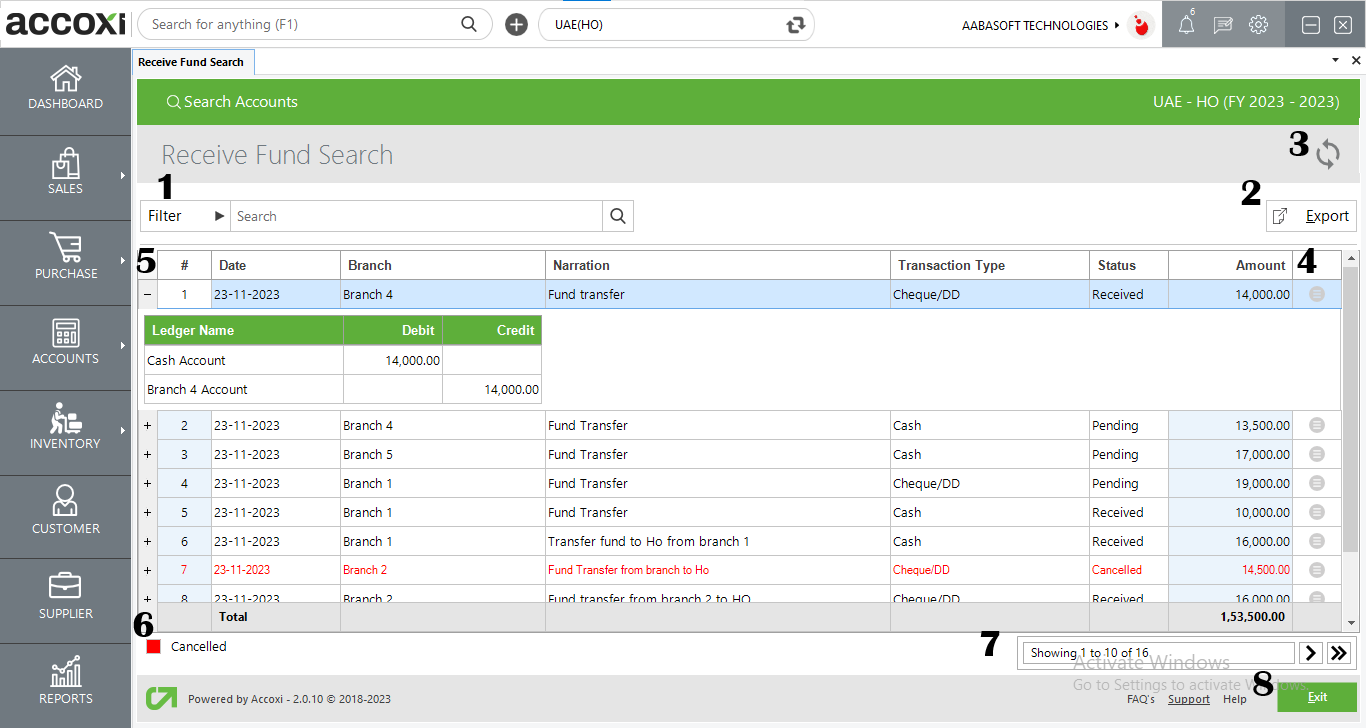
The "Receive Fund Search" page displays comprehensive details of various received funds, providing an overview of the incoming funds from different sources or transactions.

DATA AVAILABLE IN RECEIVE FUND SEARCH PAGE

Field

Description

#

Serial Number

Date

The Fund Received Date is displayed in this field, representing the date when the payment is received from the branch.

Branch

This field displays the name of the branch from which the fund is transferred.

Narration

This field presents the narration or description related to the received fund.

Transaction Type

This column displays the transaction type or instrument type of the transferred fund.

Status

In this column, the user can view the current status of the receiving fund, which may be categorized as Pending, Cancelled, or Received.

Amount

This column displays the total amount of a specific fund transfer.

Total

The cumulative total amount of all received fund transactions is presented at the bottom of the table.

MENUS AVAILABLE IN RECEIVE FUND SEARCH PAGE

Menus Available In Receive Fund Search Screen
  1. Filter Option:
  • Users can filter receive fund details in two ways: directly entering details in the search bar near the Filter Option or by clicking the Filter menu. The filter tab opens with options to filter data by selecting From branch or By date and choosing a specific status. After selecting or entering filter details, the user needs to click the Apply button to filter the data.
  1. Export Option:
  • Fund Received data can be exported to Excel format. Click on the Export button at the top right corner, select the file location, and click Save.
  1. Refresh Option:
  • Click on the refresh option if the latest data is not displayed.
  1. More Options:
  • More options include two additional features: Receive and Cancel. Users can approve received funds using the Receive option and reject them using the Cancel option.
  1. Journal View Icon (+):
  • A + icon is provided on the left side of the data table, enabling users to access the journal view of a specific receive fund transaction. Clicking on the icon opens a new tab displaying ledger, debit, and credit amount details for that transaction.
  1. Cancelled:
  • Cancelled receive fund details are displayed in color format, with red indicating cancelled transfers.
  1. Pagination Control:
  • It manages page navigation and page size. Users can set the page size to 10, 20, 50, or 100. By entering the page number and clicking the Go button, users can navigate to the intended page.
  1. Exit Option:
  • If the user wishes to exit from the current page, they can click on the "exit" option, redirecting them to the previous page.

Steps to Accept/Cancel New Received Fund:

  1. Click on the "Accounts" menu and choose "Fund Transfer."
  2. Select the "Receive Fund" menu under Fund Transfer.
  3. This action redirects to the Receive Fund Search page.
  4. Click on "More options" on the right side of the data table.
  5. Two options, "Receive" and "Cancel," will be displayed.
  6. After clicking on "Receive," it redirects to the Fund Received View page.


MENUS AVAILABLE IN RECEIVE FUND VIEW PAGE

Menus Available In Fund Received View Screen
  1. Refresh: If the most recent data is not visible, simply click on the refresh icon located at the top left corner of the page to fetch the updated information.
  2. History: The "Comments" And "History" sections display all edits and modifications made to the receipt, along with the respective dates of changes. Users have the option to input comments related to the transfers made.
  3. Journal View: This menu displays the journal view of the transaction. The journal view provides a comprehensive overview, showcasing both the debit and credit aspects along with their corresponding amounts.
  4. Export to PDF: If the user wishes to convert the fund receive form to pdf format, they can utilize the "export to pdf" option. Upon clicking on "export to pdf," a "save as" directory option will appear, allowing the user to choose the location for saving the pdf file.
  5. Print: In the transfer view, the print menu is accessible, allowing the user to obtain a printout of the fund receive form.
  6. More Option: In the 'more features' section, users have the ability to cancel a receive transaction. By selecting 'cancel,' a validation message will appear. Choose 'yes' to cancel the transfer or 'no' to cancel and exit the option.
  7. Pagination: This function manages page navigation and page size. You can set the page size to 10, 20, 50, or 100. Enter the desired page number in the box and click the 'go' button to navigate directly to that page.
  8. Exit: To exit from the current window.
Are you sure,
You want to log out ?