Create and manage the use of Purchase bills in Accoxi
Purchase Bill is the receipt received by the customer for the product he has purchased. This bill is called Sales Bill by the vendor as he is selling the product and the same is termed as Purchase Bill by the customer as he is purchasing some items from the vendor. In Accoxi, the user can generate the bills to track the payments owed to the suppliers and also can create recurring bills for purchases that happen at regular intervals.
In this video tutorial, you will learn about the creation of purchase bills. Purchase bills are different from purchase invoices as purchase bills involve payment of expenditures incurred by the company that is of revenue expenditure.

Key Features:
Bills Search
Bills search consists of various menus and it shows the details of purchase bills that are entered into the business. It shows the details of all the bills that the user created along with the supplier name, current status, the balance of the amount to pay, etc. It allows users to return and cancel their bills. Users can easily identify both by using the color format. The blue color indicates the purchase return and the red color indicates the canceled returns. It shows the details of payments made and the user can access the complete history of payments of each transaction.
Data Available in Bills Table
It shows the details of all the bills that the user created along with the supplier name, reference number, status, balance of amount to pay etc.
|
Fields |
Description |
|
Supplier Name |
This field shows the supplier name of a particular bill. |
|
Invoice number |
This field will have the invoice number of every bill created by the user |
|
Reference number |
Reference number helps the user to identify transactions in records and it will be the continuation of the previous bill. |
|
Invoice date |
The date when the invoice is created is shown here |
|
Due date |
This field shows the due date of the particular bill. |
|
Type |
The type of invoice will show in this field, whether it is a Purchase invoice or Bill. |
|
Total |
It shows the sum total amount of the bill. |
|
Amount paid |
This field shows the details of the amount paid. If there is any amount paid to the supplier, it will be shown in this field. Users can take the payment history details by clicking in the field. To check the payment history of a bill, click on the Amount Paid field. While selecting the field, Amount paid tab will appear on the screen.
It shows the complete details of the payment made along with the reference number, type of payment and the paid amount. User can delete the payment details if require. It can be done by clicking on the Delete icon on the right side of the tab.
|
|
Balance |
This field shows the balance of the payment amount that is owed to the supplier. |
|
Status |
It shows the current status of the bill invoice. It may be partially paid, unpaid, overdue, paid, canceled, and un-settled. |
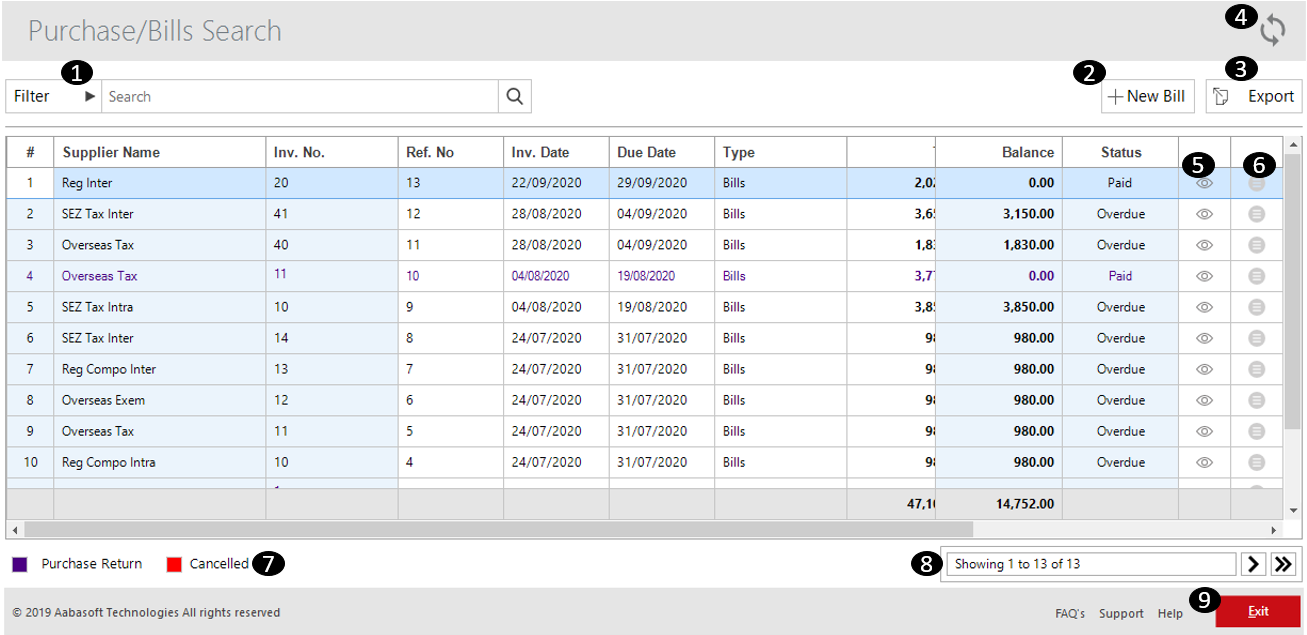
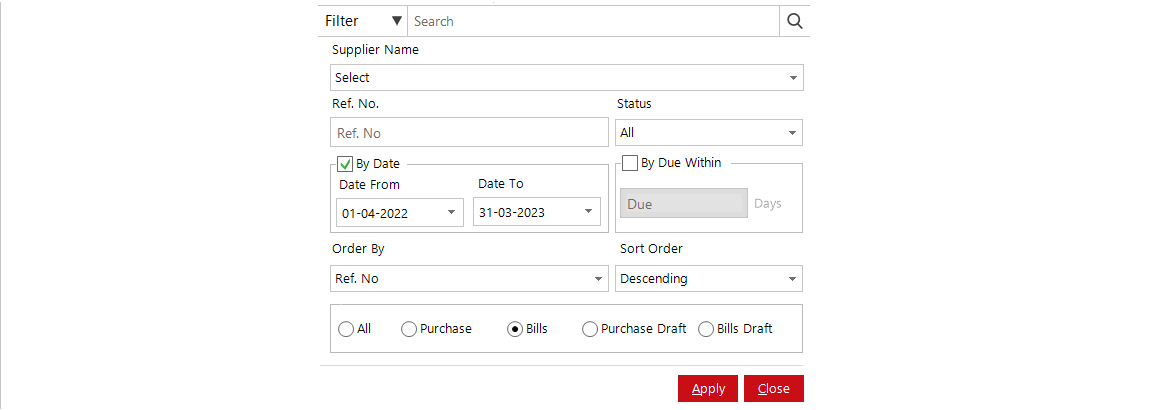
1. Filter Option
2. New Bill
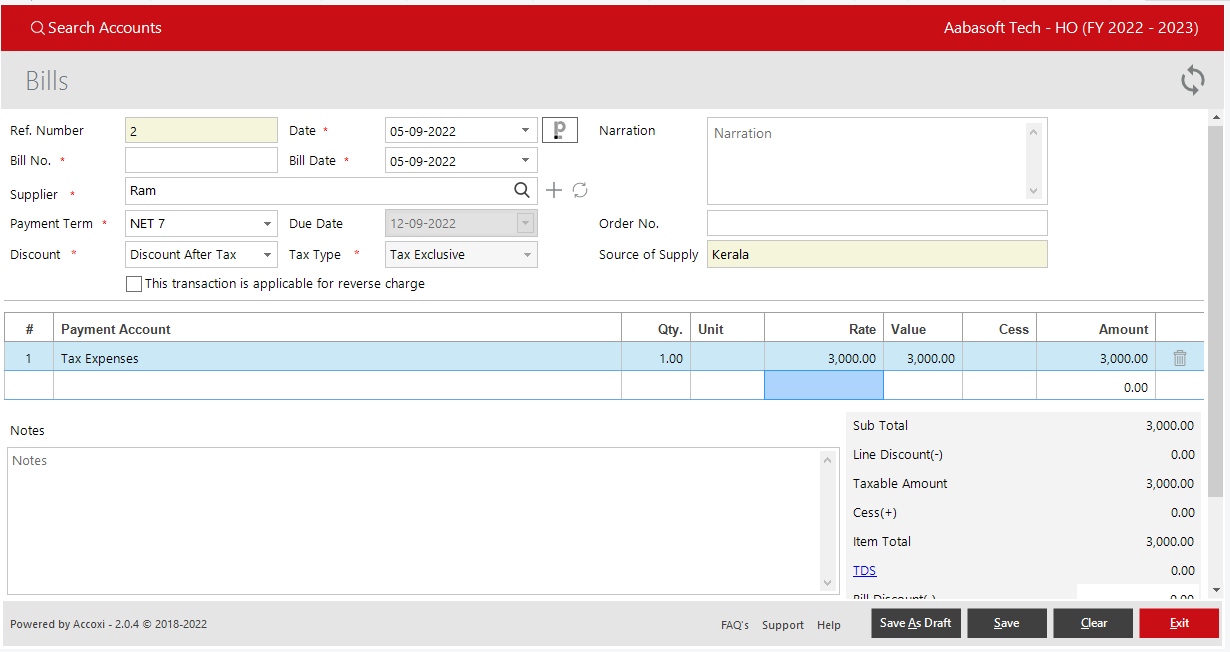
The new bill menu opens in to purchase bill form where the user can create a new purchase bill. To create a new purchase bill, the user needs to enter the details into the form.
Steps to create a new bill
|
Fields |
Description |
|
Ref number |
Reference number helps the user to identify transactions in records. It will automatically appear in the bill form and the user can’t edit the reference number, as it will be the continuation of the previous bill. |
|
Date |
The date will automatically appear on the date field and it may be the current day date. If the user wants to change the date, it can be done by clicking on the date menu and can select the required date. |
|
Paperlez icon |
This Option Allows Users Who Have Integrated Paperlez In Accoxi To Attach Or Associate Documents To Purchase Bills. A Tab Will Be Opened Showing All The Documents Uploaded In Paperlez And Users Can Choose The Required Documents To Be Attached With The Invoice By Associating The Document. |
|
Supplier |
Select the supplier from the list of suppliers, where the goods or service was purchased. If the user need to create a new supplier, then it can be created by adding a new supplier by clicking the menu + (add new). |
|
Refresh |
If the latest data is not displayed, click on the refresh icon on the top right corner of the page to fetch the new data.
|
|
Narration |
Users can add a brief explanation in the narration box if required. |
|
Bill No |
The bill number is a unique identification number of every bill assigned by the online billing system. There must be a bill number for every bill and the user need to enter the accurate bill number in the field. |
|
Order no |
Users can add order numbers in the field if required |
|
Bill date |
Bill date means the date that a bill is issued by a Party. Bill date will automatically appear in the field and it may be the current day date. If the user wants to change the date, it can be done by clicking on the bill date menu and can select the required date. |
|
Payment term |
Select the payment term here and the selected date will appear in the bill invoice. Based on the payment term, the statuses of the invoices are decided like overdue, unpaid etc. In some cases, it will appear automatically in the field. It is because when the user creates a supplier account, it can also save the payment term option. So when the user selects the supplier, the payment term will also appear along with that (can edit if required). |
|
Due date |
The due date is the date on which the payment is expected or due. When the user set the payment term of a supplier, the due date will automatically appear in the field. User can’t edit or delete the date in this field. |
|
Source of supply |
Based on the supplier GST number this field automatically identifies the state. In case of suppliers who do not have GST registration or are Overseas, the user needs to enter the source of supply. |
|
Reverse charge |
A reverse charge is a mechanism where the recipient of the goods and/or services is liable to pay GST instead of the supplier. If the user wants to apply reverse charge mechanism, it can be done by ticking the reverse charge option on the left side of the tax type field.
|
|
Tax type |
Generally, there are two types of tax, Inclusive and Exclusive tax. In the case of Registered (regular dealers) suppliers, user can select any of the tax type i.e. inclusive or exclusive. In the case of all the other suppliers (Unregistered, Registered composition, SEZ, Overseas) only exclusive tax type will be available. |
|
Discount |
User can select the type of discount and there are two types of discounts in the discount tab. They Are Discount before the tax and Discount after the tax. |
|
Payment account |
This is the field to select the item that was purchased from the supplier. Click below the payment account field, then User can select the items from the list. If the user wants to create a new item that is not included in the list, then select the Ledger option from the listed menu from Accoxi settings. In the ledger window, the user can add a new ledger by clicking + (add new). |
|
Qty |
Enter the quantity of the item in this field. |
|
Unit |
Select the unit of the item. User can select the appropriate unit from the list of unit field. |
|
Rate |
Enter the rate of the purchased item here. |
|
Tax % |
This field is to enter the tax rate of the purchasing item as 3%, 5%, 12%, 18%, 28%, nil rated, exempted or no GST. |
|
Eligible for ITC |
A registered person will be eligible to claim Input Tax Credit (ITC). User can select the option Eligible or Ineligible on the basis of GST treatment. |
|
Value |
The value of the product will automatically appear after enter the product rate, tax rate and quantity of the purchased item. |
|
Taxable amount |
The taxable amount is the amount on which tax is to be charged. It will automatically appear after entering the rate details. |
|
Tax Amount |
The tax amount is the amount at which a business or person is taxed on the basis of tax type i.e. Inclusive or Exclusive. |
|
CESS |
It is a form of tax charged/levied over and above the base tax liability of a taxpayer. User need to enter the cess amount in this field. |
|
Amount |
After entering the details of the purchased item that as product rate, tax rate, and CESS etc. user get the gross amount of item total. |
|
TDS, Round Off & Discount
|
Tax Deducted at Source (TDS) is a system introduced by the Income Tax Department, where the person responsible for making specified payments such as salary, commission, professional fees, interest, rent, etc. is liable to deduct a certain percentage of tax before making payment in full to the receiver of the payment.
On the right side of the box, user can select the required type of TDS. By clicking on TDS select menu, the available rates of TDS will appear and if the user wants to create a new tax type, it can be done by TDS configuration from the settings.
Rounding numbers make it simpler and easier to use. User can round off the total amount by using this field and the round off may be down ward, upward or nearest. This can be selected from preference menu in organization settings. Discount feature gives users the quirk to apply discounts on the supplies as mentioned by the supplier. |
|
Save as Draft |
The Save as Draft feature allows users to save drafts of created bill that they are editing in order to return later to finalize changes. If the user clicks the Save as draft option, then the invoice will be save as Invoice draft. User can take duplicate or recurring invoice of the draft and can convert it to Invoice when required. |
|
Save
|
After entering the whole details, click on the Save menu to create new bill or save the created bill form. |
|
Clear |
Clear menu is for removing the entire data entered by the user.
|
|
Exit |
Exit menu is using for going to the previous page without saving the payment made form. |
3.Export
The bills list can be export to Excel format. Click the Export button at the top right corner near the +New button. Select the file location and click Save.
4.Refresh
If your latest data is not displayed, click on the refresh icon on the top right corner of the page to fetch the new data.
5.View
This menu option helps the user to view the created bill format by clicking the view sign.
It consists of various menus and it shows the form of created purchase bill.
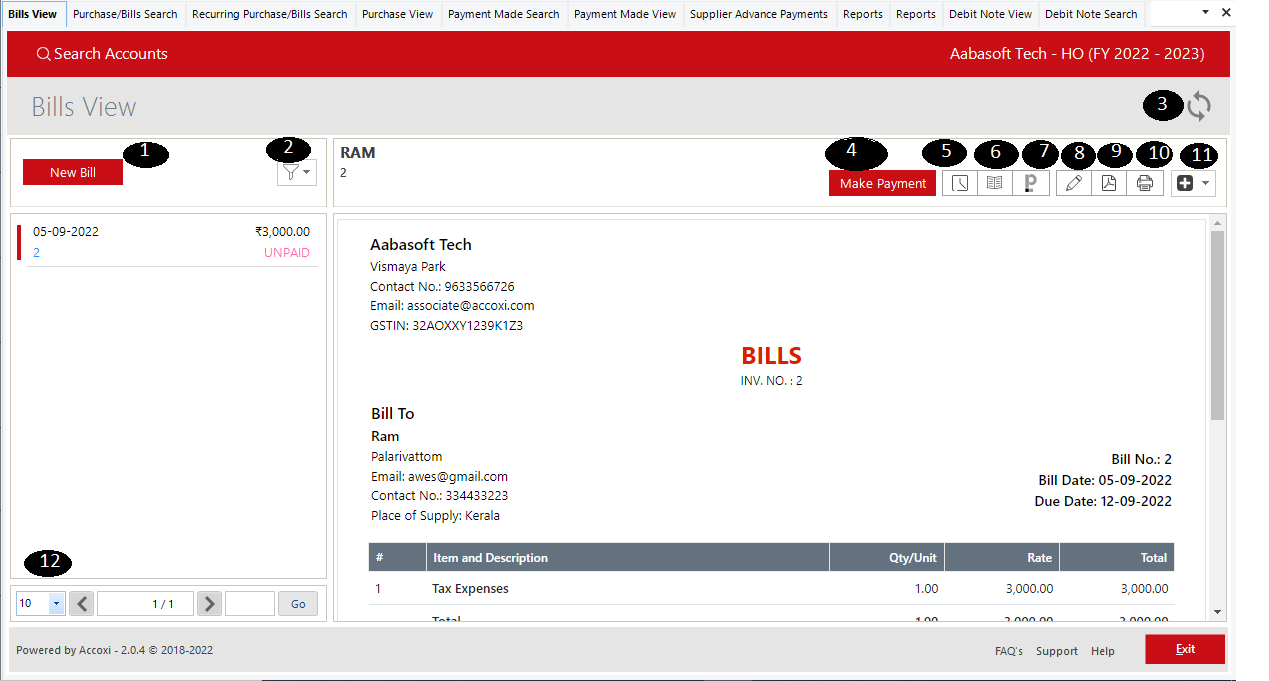
If the user wants to create a new bill from the bills view option, choose the menu option to create a new purchase bill. Users can create a new bill form by clicking the new bill option.
By clicking the filter menu, the user can filter the data in terms of partially paid, unpaid, overdue, paid, and canceled.
If the latest data is not displayed, it can be done by clicking on the refresh icon on the top right corner of the page to fetch the new data.
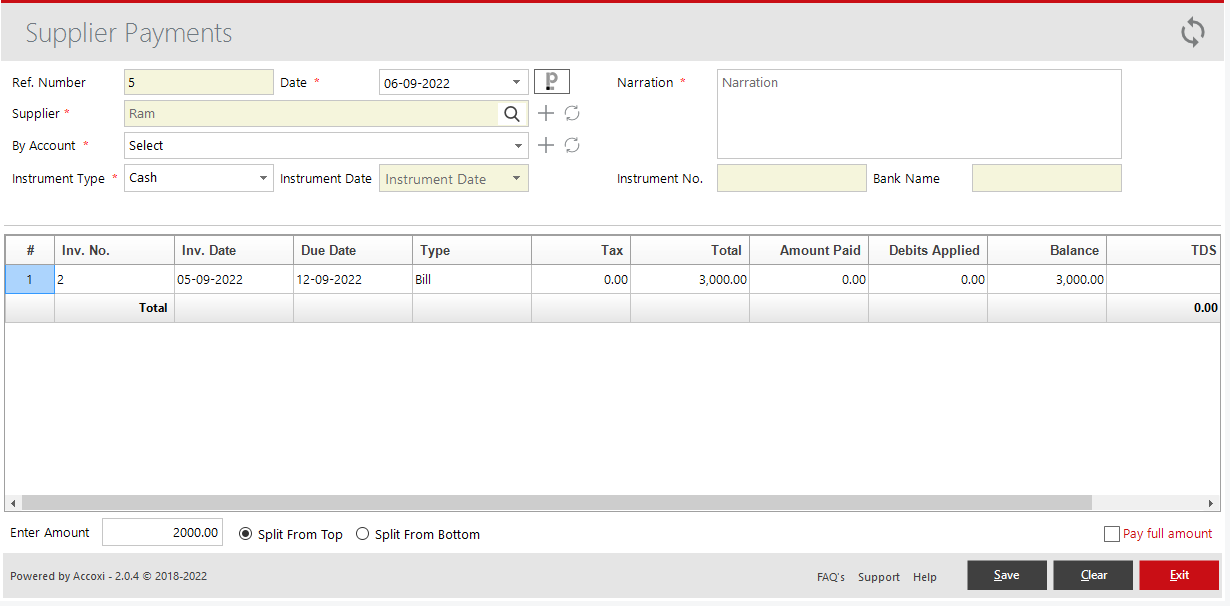
This menu is used for making payments to the supplier. By clicking on making payment, the user opens the supplier payments form.
Steps for making payment.
|
FIELDS |
DESCRIPTION |
|
Ref Number |
Will Be Automatically Filled When We Select Make Payment From Bills View
|
|
Date |
Enter The Date Of The Payment |
|
Paperlez Icon |
This Icon Is Available For Paperlez App Users And This Is The Option To Search Paperlez Documents From Paperlez Tab. While Clicking On The Paperlez Icon, It Opens To Paperlez Documents Page And The User Can Search The Associated Documents From The Page. |
|
Supplier |
Will Be Automatically Filled When We Select Make Payment From Bill View
|
|
Narration |
Enter The Narration Of The Payment |
|
By Account |
Select From Which Account Amount Is To Be Paid From |
|
Instrument Type |
Select The Type Of Instrument To Be Used To Pay The Supplier If The User Selects Cash Account The Instrument Number, Date And Bank Name Column Will Be Blocked. |
|
Instrument Number |
Enter The Instrument Number |
|
Instrument Date |
Enter The Instrument Date |
|
Bank Name |
Enter The Name Of The Bank |
|
TDS |
Enter The TDS Amount On This Field |
|
Amount Column |
Enter The Amount To Be Paid You Can Also Pay Partially |
|
Pay Full Amount Option |
By Clicking It The Amount Will Be Paid Fully |
|
Save |
Click On The Save Button To Save The Details That Is Entered. After Clicking Save, Payment Made View Will Appear. |
|
Clear |
Clear Menu Is For Clearing Or Removing The Entire Data Entered By The User. |
|
Exit |
Exit Menu Is Used To Exit From The Payment Window Without Saving The Supplier Payment Form |
This menu helps the user to obtain the history details of the purchase bill as similar to the purchase invoice. There are two tabs in the Bill history i.e.
Comments & history, Payments and Debits applied
It is the menu that shows the journal view of the purchase bill made. While clicking on the menu, the journal view tab will pop up on the screen.
As we mentioned in the purchase invoice, paperlez Icon option allows users who have integrated paperlez in Accoxi to attach or associate documents to purchase bills. A tab will be opened showing all the documents uploaded in Paperlez and users can choose the required documents to be attached with the bill by associating the document.
The Edit menu helps the user to edit or correct the details that are entered in the bill and can save again after it. On clicking the edit menu, the screen will go to the previous window of the new bill form. Users can edit the price, change accounts, suppliers, etc, and once saved or updated, an updated bill will be generated.
If the user wants to convert the purchase bill to PDF format, then the export to PDF option is available. After clicking export to pdf, a save as directory option will appear and the user can opt for the PDF file saving location
The print menu helps the user to print the created purchase Bill if required. After clicking the print button it will redirect to print options where the user can select the printer, the number of copies to be taken, etc.
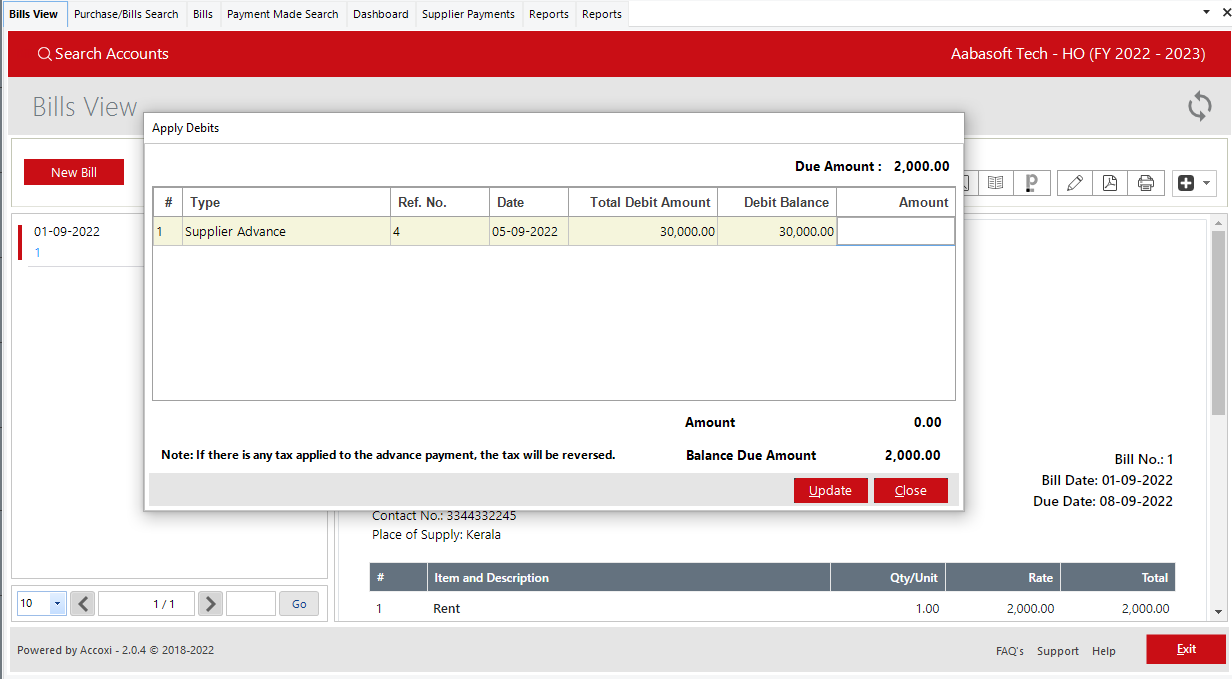
More options menu consists of various options for the user. It includes Apply Debits, Balance adjustments, Creating duplicates, Creating Bill Recurring, Creating debit notes,s and Canceling bills.

A. Apply Debits
This option helps the user to adjust any advances made to the supplier or amounts pending from purchase returns
Steps to apply debits:-
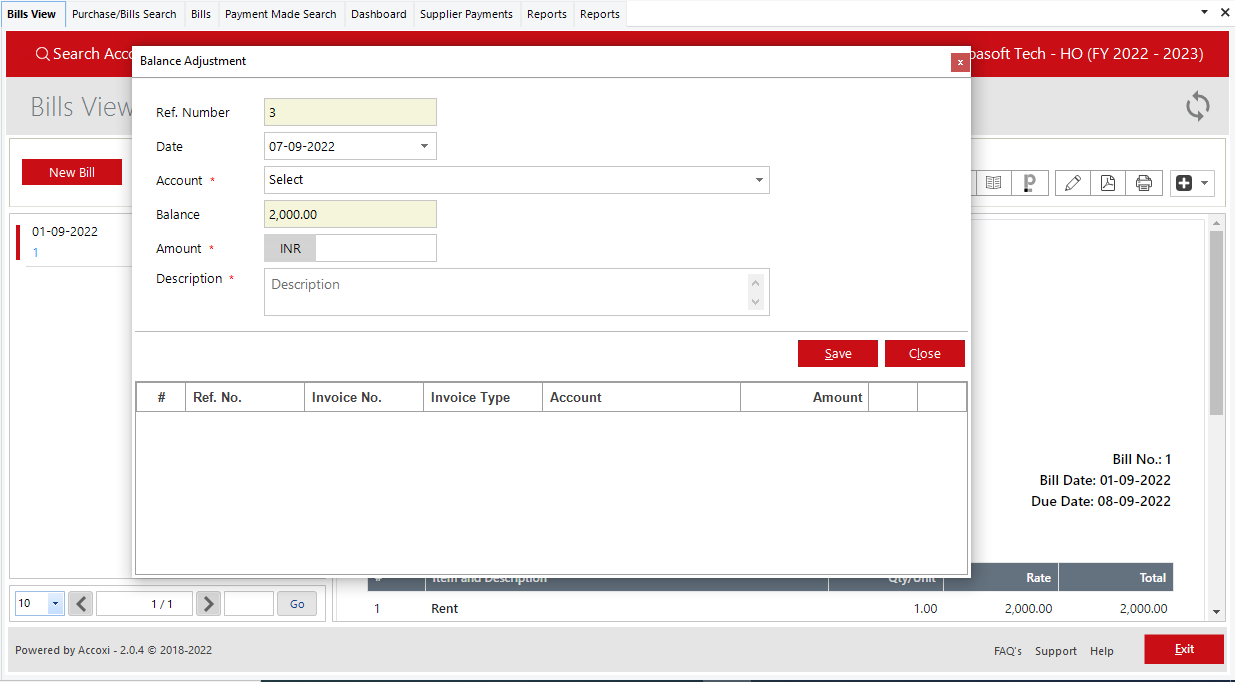
B. Balance adjustment: this function is used to adjust any balances paid to the supplier. If the supplier gives you any allowances or extra discount you can adjust the amount in this function.
Steps to use Balance adjustment:
D. Create Duplicate
The user has the option to create a duplicate bill of the existing or created bill.
Steps;-
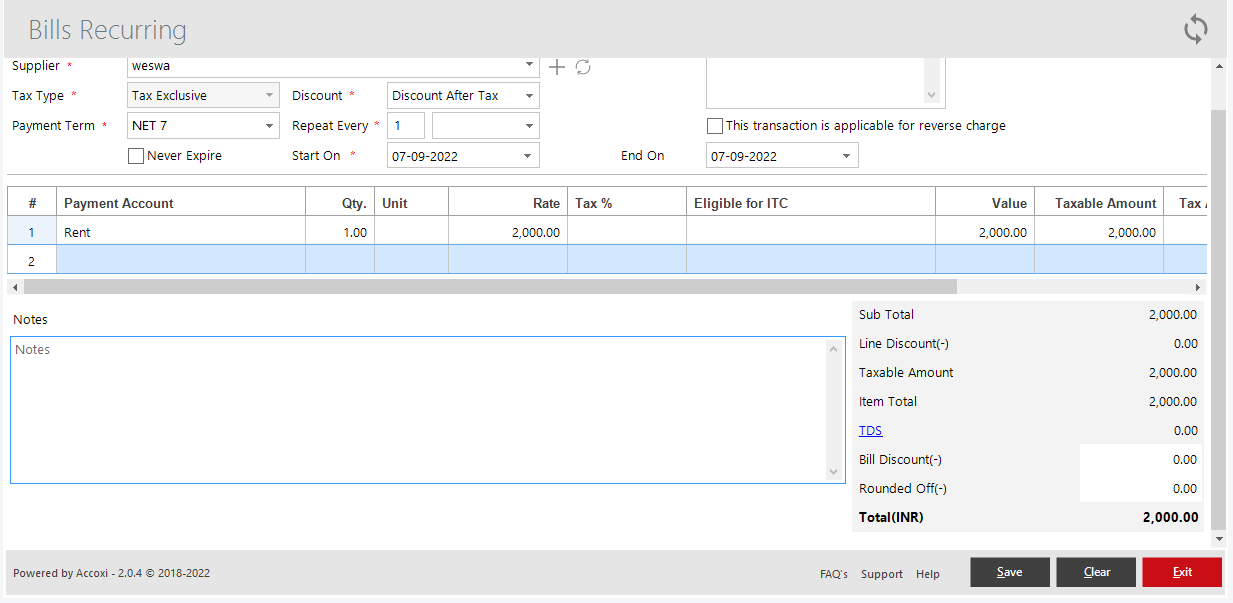
E. Create Bill Recurring
If the purchase of the same is recurring in nature user can create a recurring bill by clicking create recurring option. This will redirect the user to a recurring bill window.
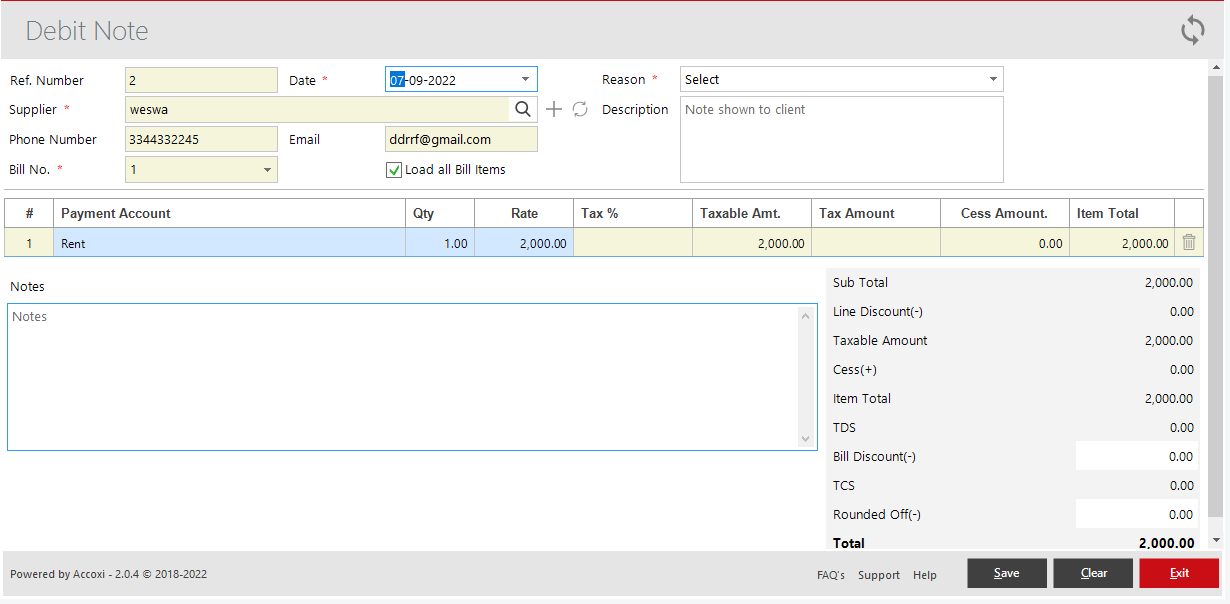
F. Create Debit Note
It is the option to create debit note for the purpose of returning the purchased product to the supplier.
Steps;-
G. Cancel Bill
This menu helps the user to cancel the created bill. By clicking on the cancel menu, the cancel form will appear on the screen. It shows the details of the Supplier name, Invoice number, and Bill amount and user need to enter the reason for cancellation in the provided space.
It controls the page navigation and the page size. Page size can be set to 10, 20, 50 or 100. And by giving page number in the box and clicking on Go button. It jumps to the said page.
The settings menu enables the user to edit the created bill, view the bill form, make the payment, export to PDF and to print the bill.
Users can easily identify the canceled bills and the purchase return by using the color format. Blue color indicates the purchase return and the red color indicates the canceled.
It controls the page navigation and the page size. Page size can be set to 10, 20, 50 or 100. And by giving page number in the box and clicking on Go button. It jumps to the said page.
Below the pagination control, there is an exit button. If you want to exit the Bills search page click on the exit button.
In Accoxi day to day expenses are recorded using Bill Voucher. Apply Debit Note option in Bills helps you to adjust a Purchase return balance to another invoice of the same supplier. It helps to avoid refund and can adjust the same to another invoice balance. Apply debit note option is clubbed under More Options in Bills view.
Yes. You can set advance adjustment of bills in the following steps.
Balance Write-off form is used to write-off Bad debt if any against Vouchers.
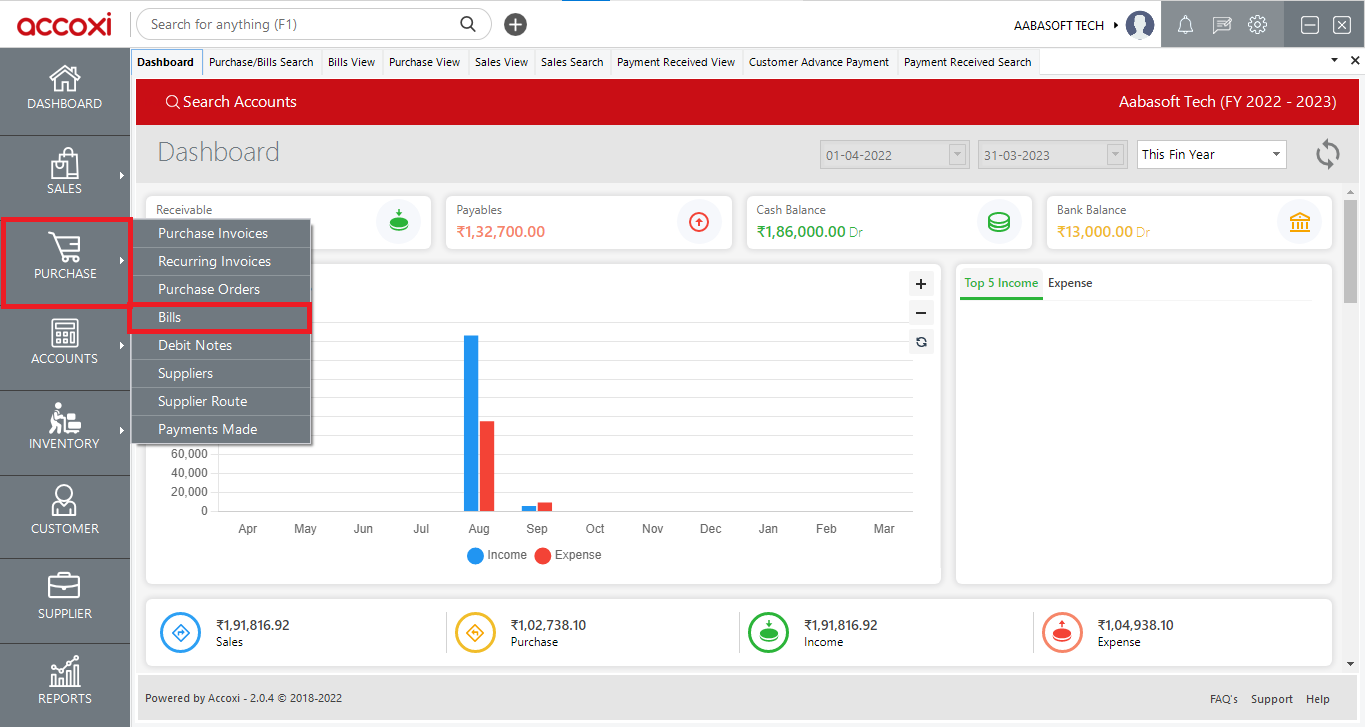
Click on the Purchase module and select the option Bills. It opens to bills search page and it displays all the bill created till date, including purchase return or cancelled bills. You can easily identify both by using color format. Blue color indicates the purchase return and the red color indicates the cancelled bills.