From here, you can learn to create Sales invoices for your customers

A sales invoice serves as an accounting record documenting a business transaction, specifically detailing the services and product rendered to a customer, the date of transaction, and the amount owed by the customer to the business. In ACCOXI, you have the capability to generate sales invoices for transactions with your customers.
Key Features: -
Access to view invoices within the context of journal entries.
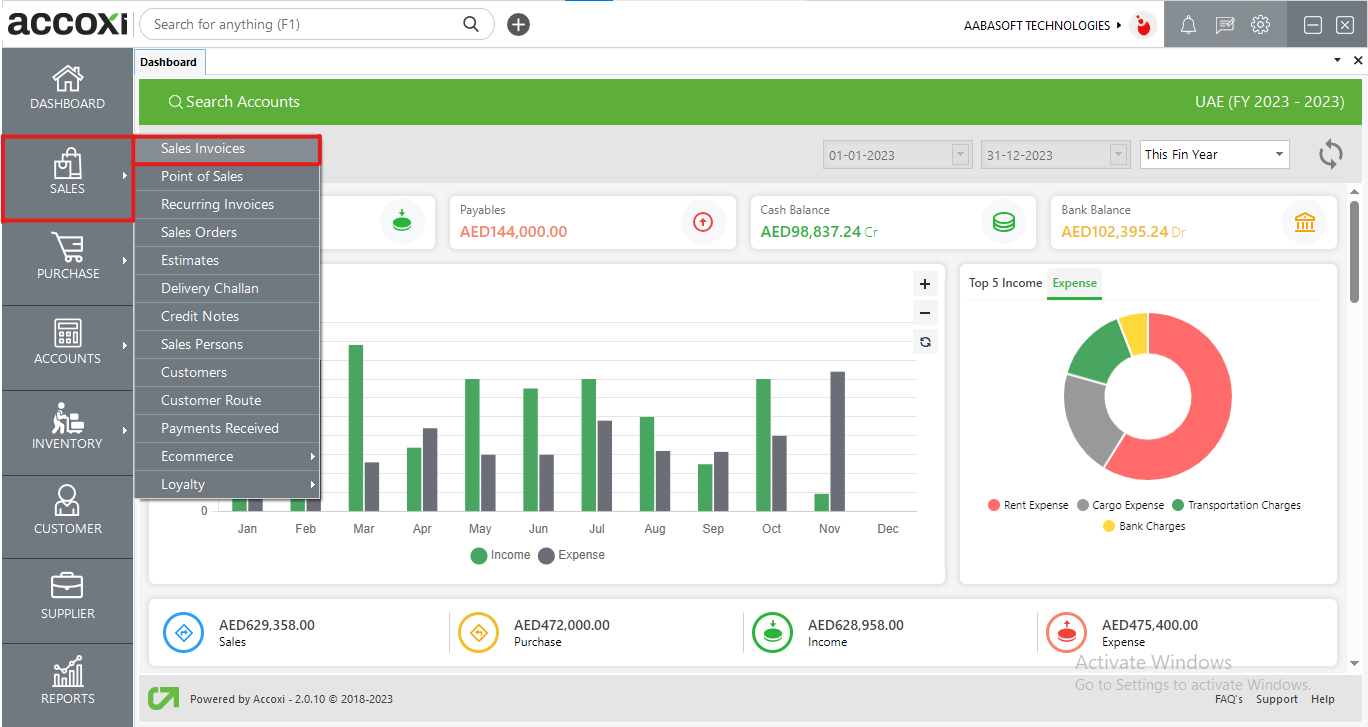
Clicking on the sales module provides users with access to a range of sales-related functions, beginning with the sales invoices and extending to various sales invoice functions.
The sales search feature displays a list of the business's sales invoices, allowing users to easily access and review these records.
|
Field |
Description |
|
# |
Denotes the sequential number assigned to the data entries in the table. |
|
Party Name |
Displays the customer's name for the transaction. |
|
Ref. No. |
The "Ref. No." or "Reference Number" field in a sales invoice typically displays a unique identifier or number associated with that specific sales invoice. |
|
Invoice Date |
Indicates the date when the transaction's invoice was issued. |
|
Due Date |
Indicates the deadline by which the invoice payment is expected. |
|
Total |
The sum of the transaction is presented in this column. |
|
Amount Paid |
The column shows the payment made towards the invoice. Clicking on the amount paid provides the user with the customer's payment history. |
|
Balance |
The remaining balance to be received after all adjustments will be visible in this section. |
|
Status |
The invoice status is presented as "Paid," "Overdue," "Partially Paid," and so on. |
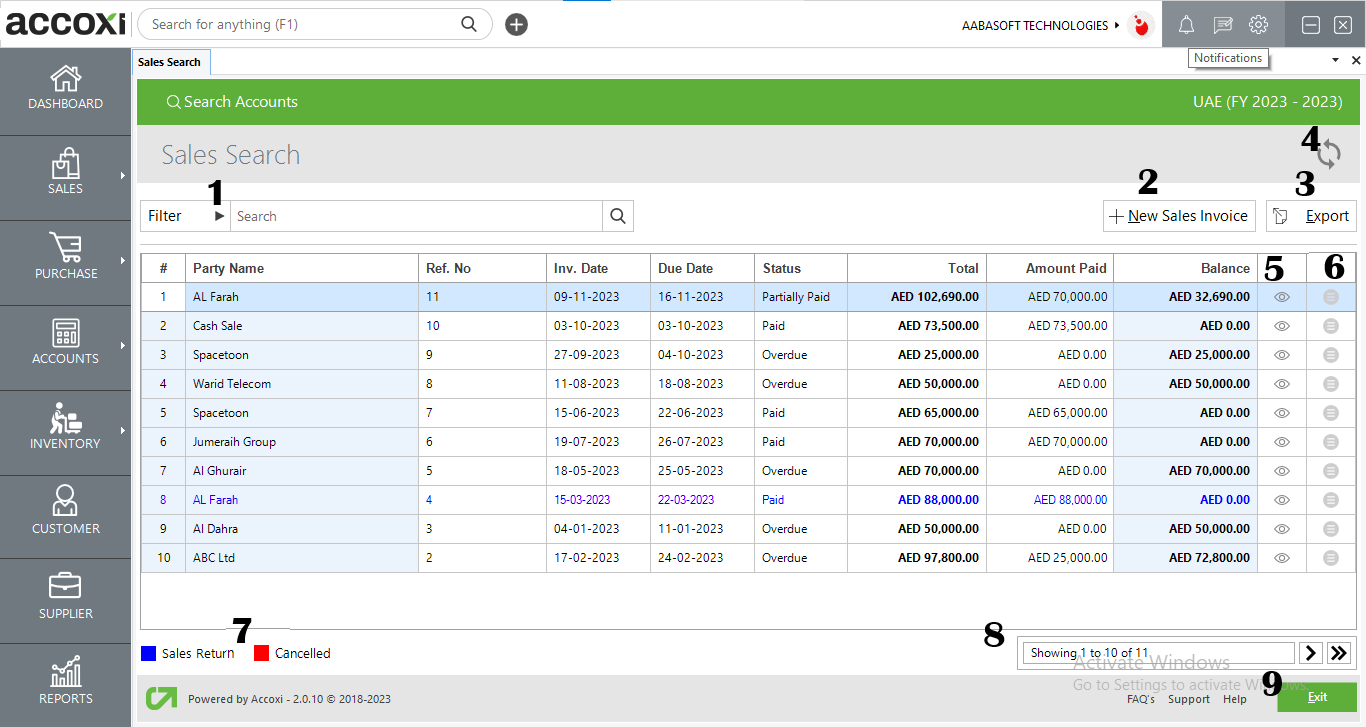
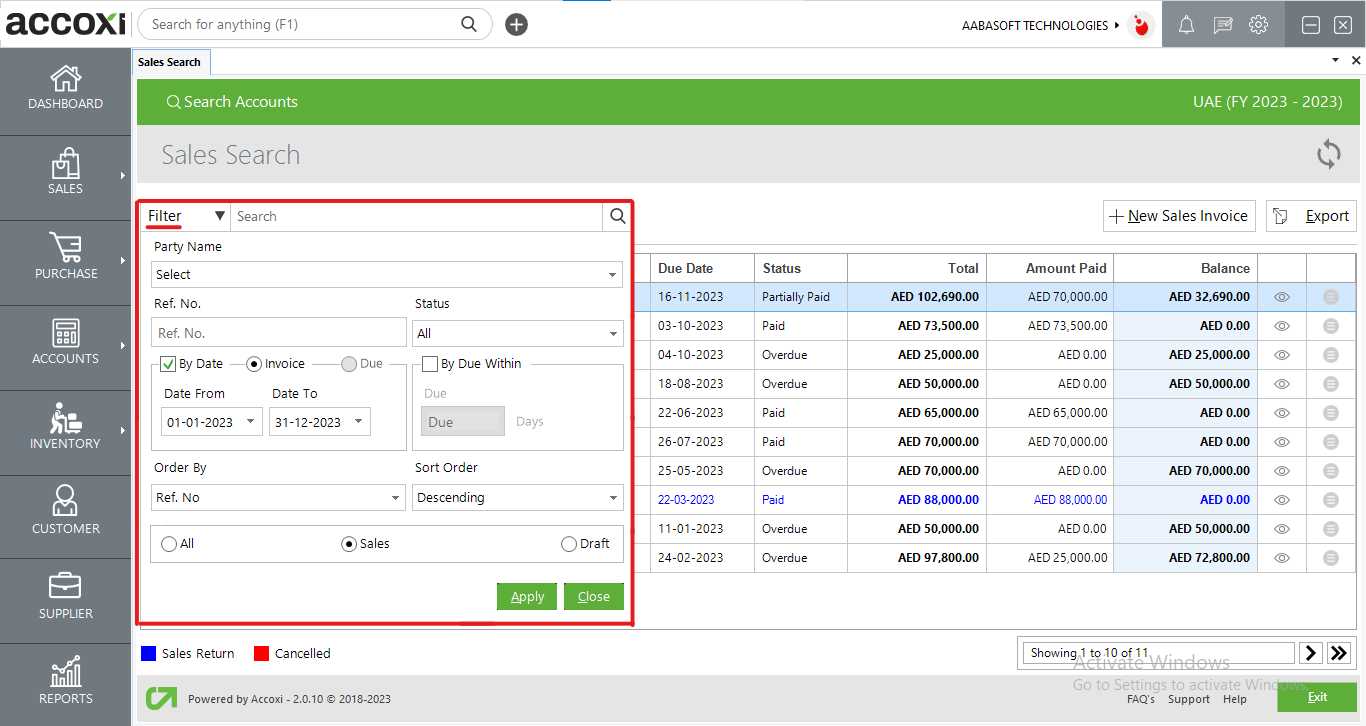
1. Filter option
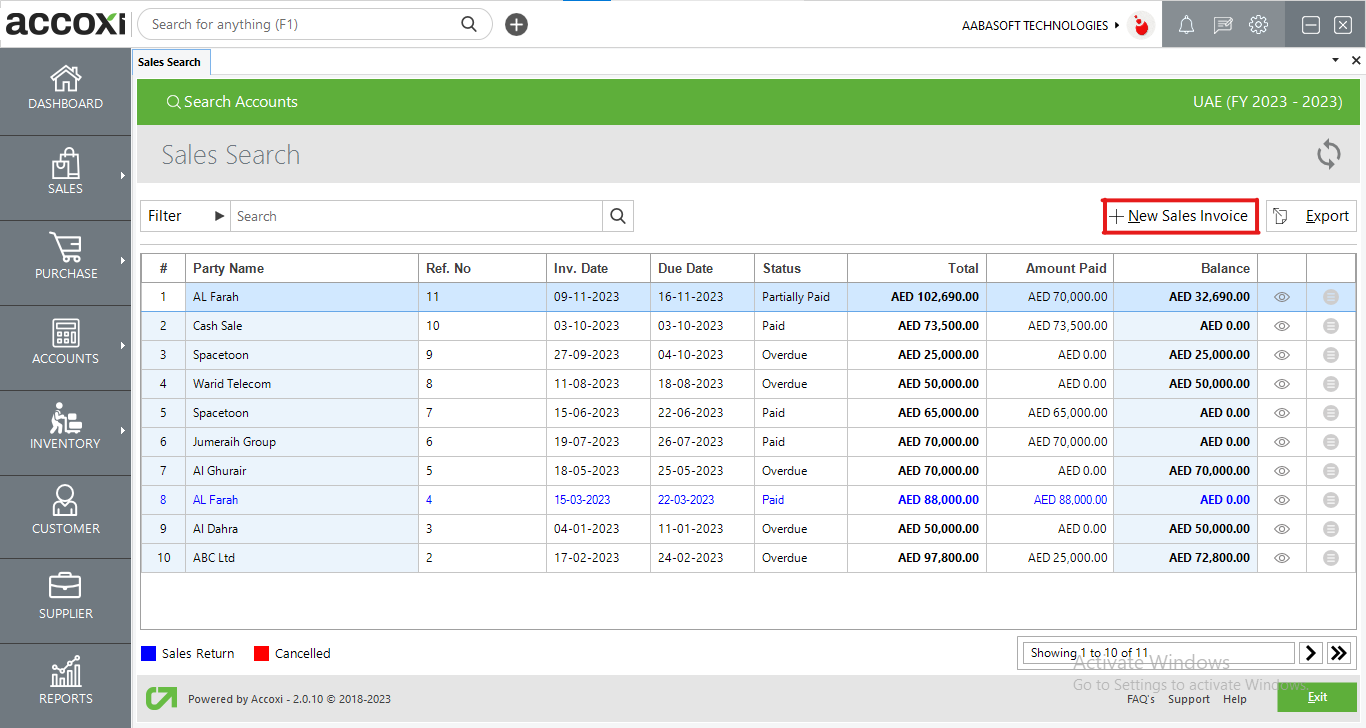
2. New sales Invoice
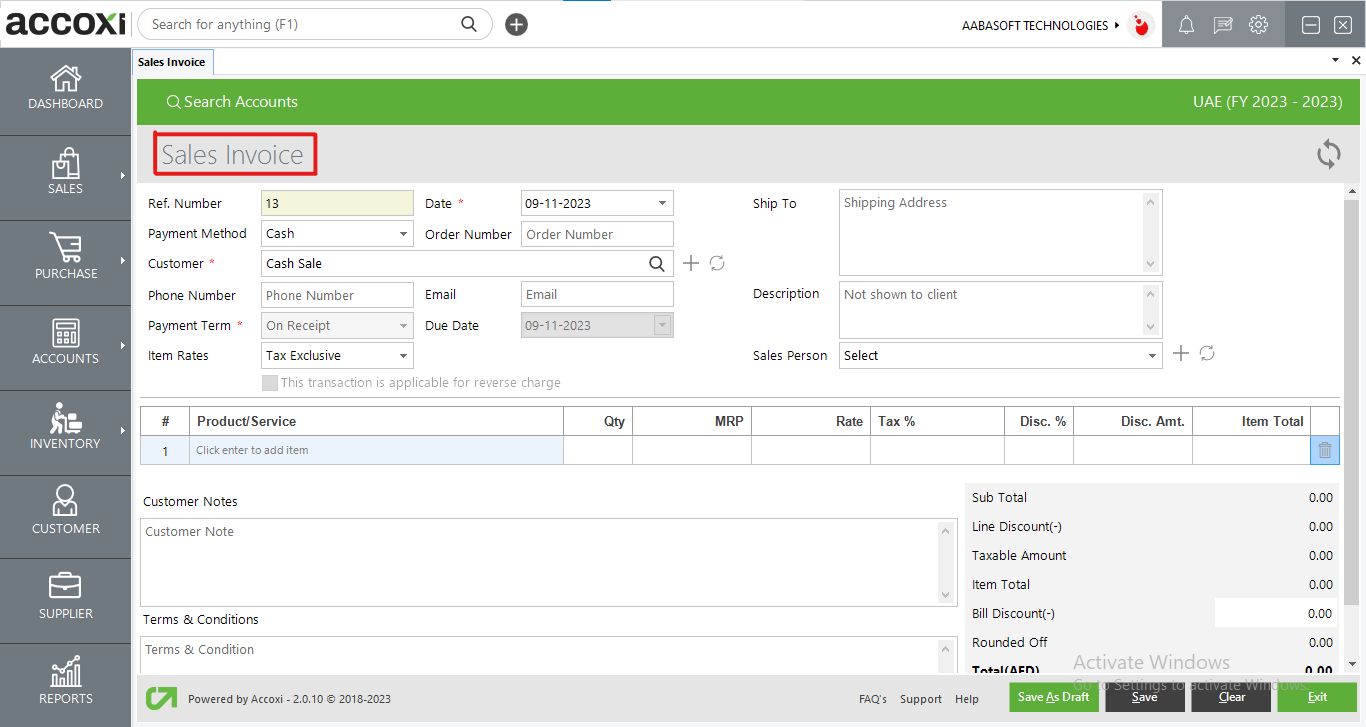
The "New Sales Invoice" button opens a Sales Invoice form, allowing the user to create a new invoice. Fields highlighted in red must be completed by the user as they are mandatory.
Here are the steps to create a new sales invoice:
Once you've filled in all the necessary information, click the "Save" button to create the new sales invoice.
|
Fields |
Description |
|
Ref Number |
The sales invoice's reference number will be generated automatically. |
|
Date |
You can input the date of the sales invoice, and by default, the system will set it to the current date. |
|
Payment Method |
You can choose the payment method, which includes options for cash or credit.
Users have the option to configure a default payment method for sales invoices in the "Settings -> Preferences -> Sales Invoice" section. |
|
Customer |
You can choose the customer either by searching for an existing customer in the customer search or create a new customer by clicking the "+" icon. |
|
Mobile |
The information will be automatically updated when the user selects the customer.
In the case of a cash sale, the user can also enter the phone number. |
|
Description |
You have the option to input a description regarding the transaction |
|
Reverse Charge Applicability |
If the recipient of the goods or services is responsible for paying the tax, rather than the provider of the goods and services, the user can activate this option. |
|
Order Number |
You can input the purchase order number in this field. |
|
|
The information will be automatically updated when the user selects the customer.
In the case of a cash sale, the user can also enter the email address. |
|
Due Date |
The due dates will be automatically updated based on the payment terms defined during the creation of the new customer, as well as any changes made to the payment terms in the New Sales Invoice menu. |
|
Item Rates |
Item rates may be either inclusive or exclusive of taxes. |
|
Payment Term |
It will be automatically chosen when the user selects the customer because it has already been defined during the creation of a new customer.
If the user wishes to modify the payment terms, they can do so, and this change will be reflected in the due date column. |
|
Ship To |
Users have the option to define multiple shipping addresses for the customer when creating new customer profiles. These available shipping addresses will be accessible in the drop-down menu for selecting the shipping address. |
|
Salesperson |
Choose the salesperson who is responsible for the sale. |
|
Product Or Service |
You can enter the product or service here. By pressing the Enter key, it will provide you with details for all the products and services you have created. |
|
Batch |
You can select the batch of the product by clicking on the "Batches" column. The defined batches will be listed here for you to choose from. |
|
QTY |
You can enter the quantity of the products. |
|
Rate |
The defined sales rate for the item will be automatically filled, but you also have the option to manually change the sales rate if needed. |
|
Discount |
The user has the option to enable discounts on sales in this column.
These discounts can take various forms, including discounts applied after tax, before tax, or at the item level. The user can also restrict discounts if desired.
To configure these discount options, the user should enable them in the "Settings -> Preferences -> Sales Invoice -> Do You Give Discounts" section. |
|
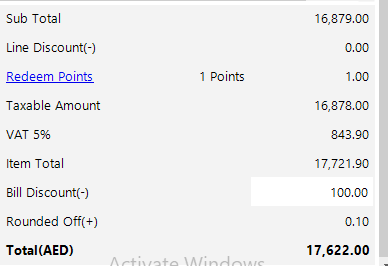
Redeem Points |
This feature is exclusively available for loyal customers participating in the loyalty scheme. It allows loyal customers to redeem points from their loyalty cards to receive discounts. |
|
Customer Notes |
You can input customer notes in this column. |
|
Terms And Conditions |
You can specify the invoice terms and conditions in this column. |
|
Save As Draft |
Users have the option to create a draft sales invoice by selecting "Save As Draft." This draft will not be saved as a finalized invoice, allowing the user to make changes to it at a later time. |
|
Save |
By clicking "Save Sales," the invoice is generated, and the user will be redirected to the Sales Invoice View window. |
|
Clear |
This option allows the user to clear the data entered in the New Sales Invoice window. |
|
Exit |
Users can exit from the invoice window by clicking this button. |
MENU AVAILABLE IN SALES INVOICE VIEW
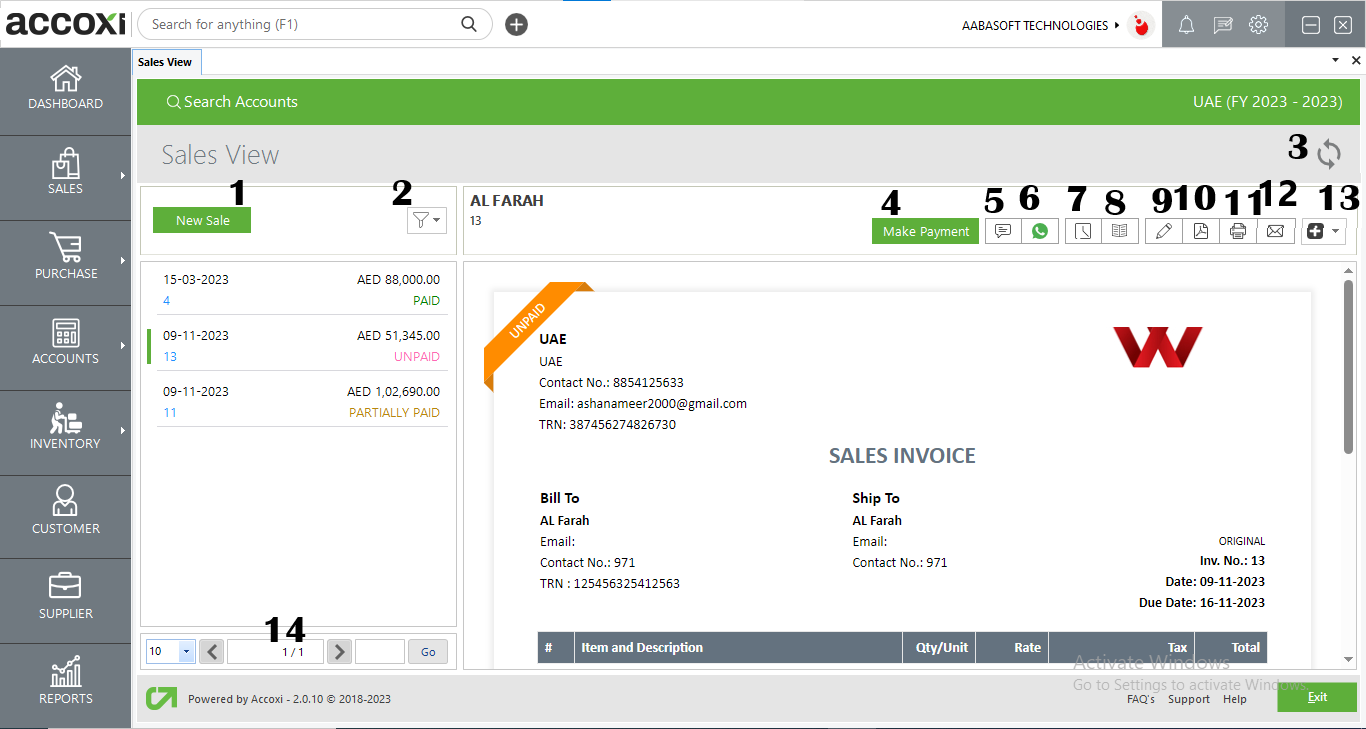
The "New Sale" button directs the user to the "Create New Sale" window.
The filter menu allows the user to sort and filter the sales invoice data based on various criteria, including partially paid, unpaid, overdue, overdue by today, canceled, and draft.
If the most recent data is not visible, you can click on the refresh icon located in the top left corner of the page to retrieve the updated information.
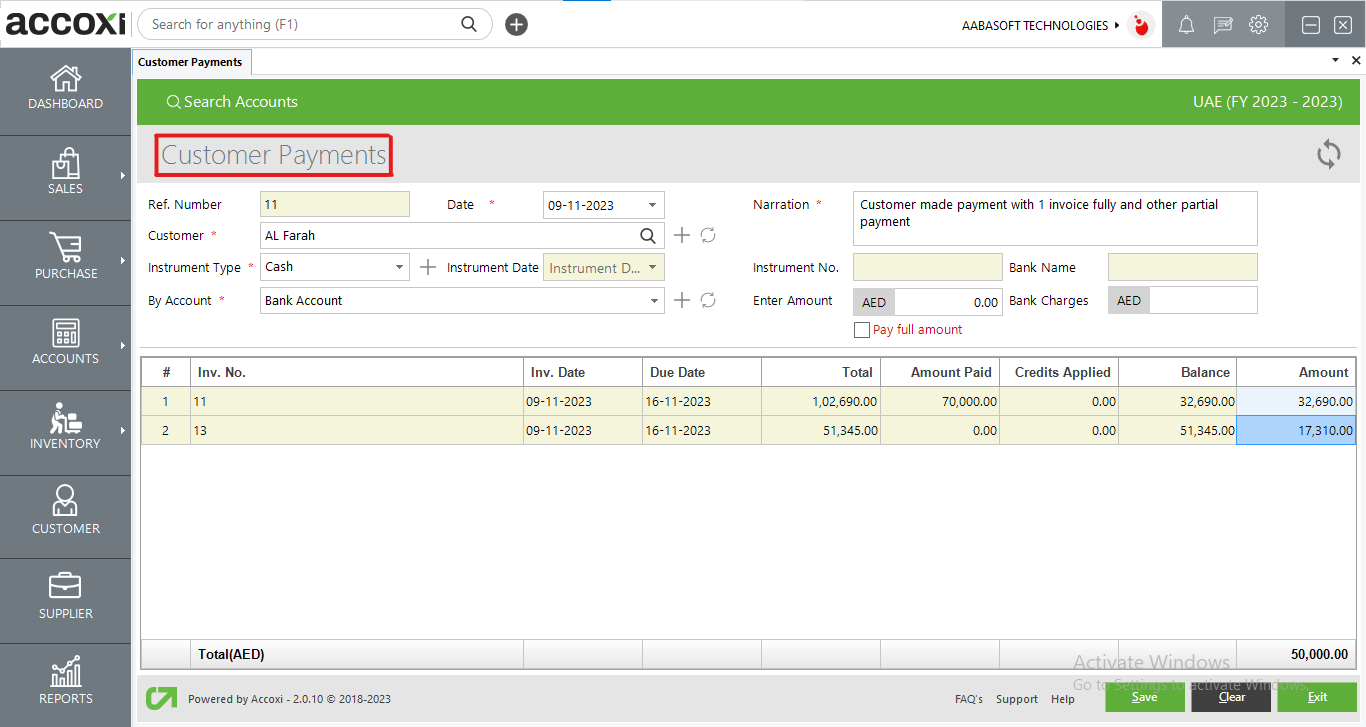
This is used to record payments received from a customer, and it will direct the user to the payment received screen.
Here are the steps to make a payment and record it:
|
Fields |
Description |
|
Ref Number |
The reference number will be automatically populated when choosing 'Make Payment' from the invoice view, ensuring its uniqueness. |
|
Date |
You have the option to input the payment date, and by default, it will display the current date. |
|
Customer |
This field will be automatically populated when you select 'Make Payment' from the invoice view. |
|
Narration |
You have the option to input a narration for the payment transaction. |
|
By Account |
Choose the account from which the payment should be debited. |
|
Instrument Type |
Pick the type of instrument that was used for receiving the payment. |
|
Instrument Number |
You can input the instrument number if it is applicable. |
|
Instrument Date |
You can enter the instrument date if it is applicable. |
|
Bank Name |
Input the name of the bank if it's relevant to the payment. |
|
Amount Column |
You can enter the received amount, and if needed, you have the option to make a partial payment. |
|
Bank Charges |
You can specify any bank charges incurred during the transaction. |
|
Pay Full Amount Option |
By clicking it, the entire amount will be paid in full. |
|
Save |
Click on the "Save" button to save the entered details. After saving, an option for sending a payment received email will be available. |
|
Clear |
The "Clear" menu is used for erasing or removing the data entered by the user. |
|
Exit |
The "Exit" menu is employed to leave the customer payment window without saving the customer payment form. |
5. SMS
Users have the option to send the invoice to the customer via SMS. Clicking the SMS icon will present a draft SMS message, allowing the user to edit and send it to the customer.
6. WhatsApp Integration
Users can send invoice messages through WhatsApp using this feature. Users simply need to log in to WhatsApp and can easily send the invoice message.
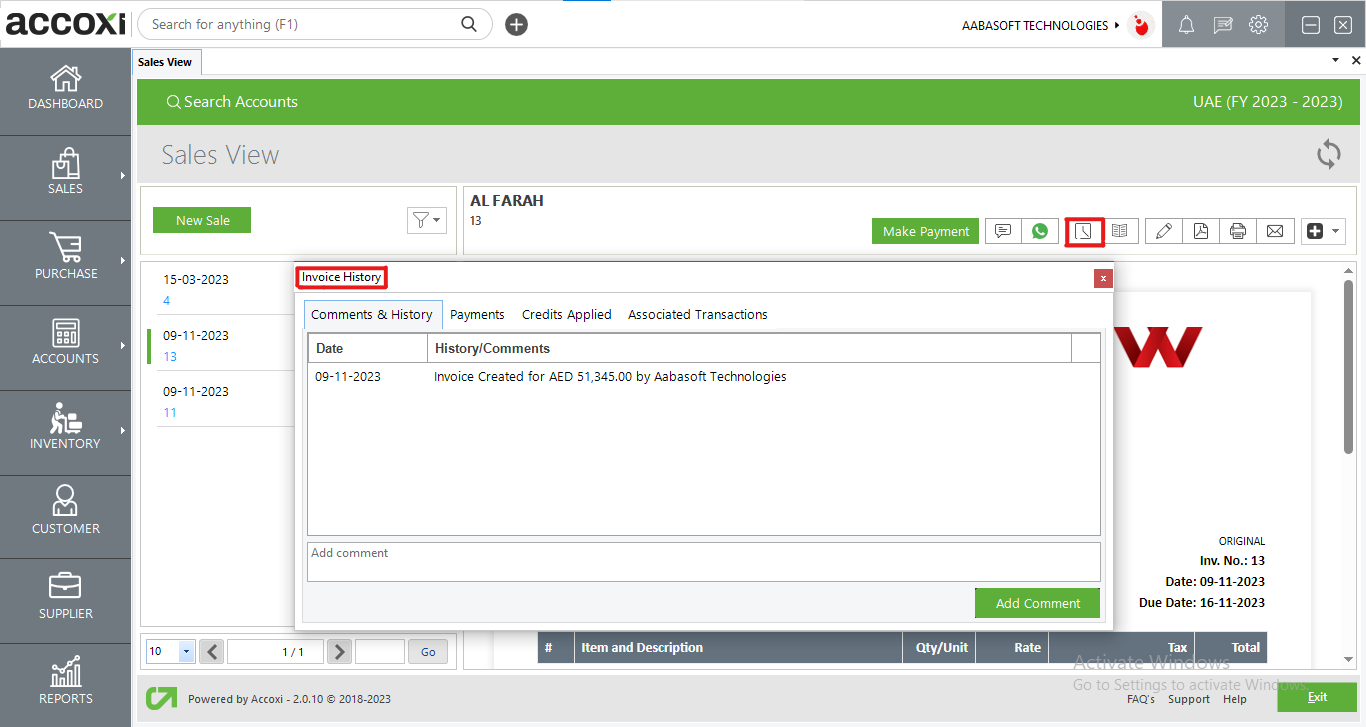
7. History
This menu is intended to help users access the past information pertaining to the sales invoice.
Features provided in the history window:
Displays all modifications and revisions made to the sales invoice along with the respective dates of the changes.
Provides information regarding the payments made, including the date of payment, reference number, payment number, payment mode, and the amount.
This section displays information about the credits applied using the credit note, including the date of the credit note, the credit note number, and the credits that have been applied.
8. View Journal
This menu displays the journal view of the transaction, which presents both the debit and credit aspects along with the corresponding amounts.

9. Edit
The "Edit" menu allows the user to make adjustments or corrections to the details entered in the sales invoice, and the changes can be saved again.
10. Export To PDF
To convert the sales invoice into PDF format, the "Export to PDF" option is provided.
After selecting "Export to PDF," a "Save As" directory option will appear, allowing the user to choose the location for saving the PDF file.
11. Print
The "Print" menu enables the user to print the created sales invoice when necessary.
Upon clicking the "Print" button, it will direct the user to the print options, where they can choose the printer, specify the number of copies to be printed, and configure other print settings as needed.
12. Email
Users can choose to send the invoice to the customer via email. By clicking the Email icon, a draft email content will be displayed, enabling the user to make edits and then send it to the customer.
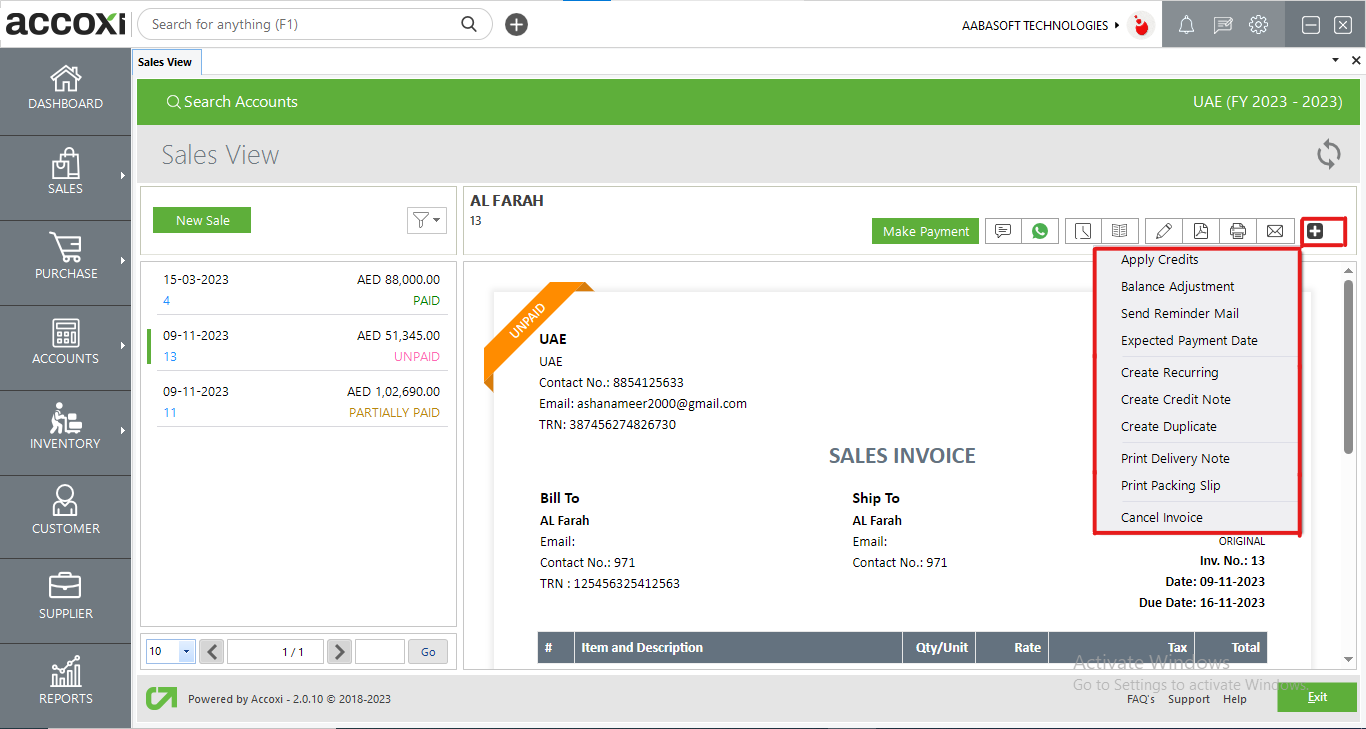
13. More features option
Provides access to additional features related to invoices, including the ability to apply a credit note, adjust customer advances, write off balances, send reminder emails, specify expected payment dates, create recurring invoices, generate credit notes, duplicate invoices, print delivery notes, print packing slips, and cancel the invoice.
a. Apply credits:
The "Apply Credits" function enables customers to utilize their credits from customer advances and credit notes, which they can apply to offset the amount on their invoice.
Here are the steps to apply credit:

|
Fields |
Description |
|
Amount |
You can input the amount that needs to be adjusted. |
|
Update |
The "Update" button is used to save the changes. |
|
Close |
The "Close" button is used to close the Apply Credit Note window. |
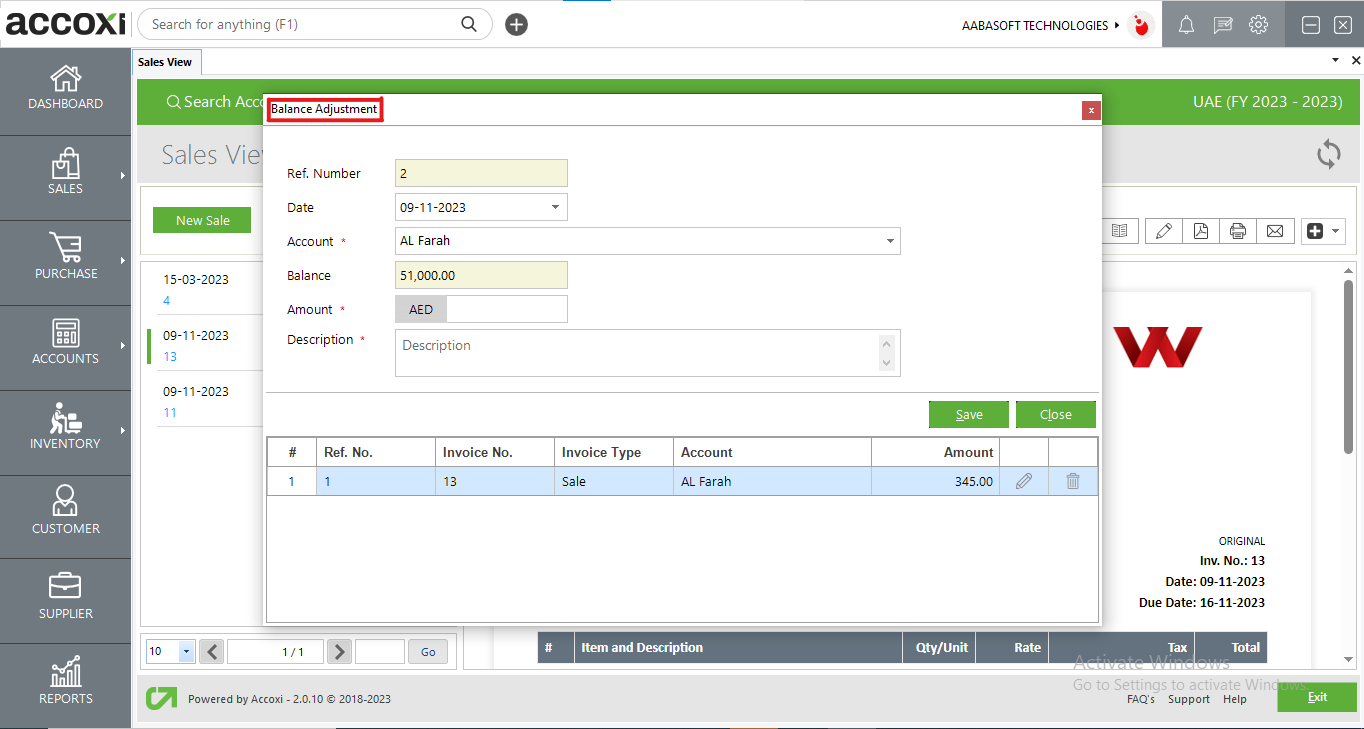
b. Balance adjustment:
This function is employed to make adjustments to balances that are to be received from customers. If you provide any allowances or additional discounts to the customer, you can make adjustments to the amount using this function.
Here are the steps to perform a balance adjustment:
|
Fields |
Description |
|
Ref. Number |
The reference number of the adjustment is automatically populated. |
|
Date |
You have the option to input the adjustment date, and by default, it will display the current date. |
|
Account |
Choose the account for the adjustment. |
|
Balance |
The remaining balance to be received from the customer will automatically appear. |
|
Amount |
You can input the amount that needs to be adjusted. |
|
Description |
You can provide a description for the adjustment. |
|
Save |
Click on the "Save" button to save the changes. |
|
Close |
This action closes the Customer Balance Write-Off window. |
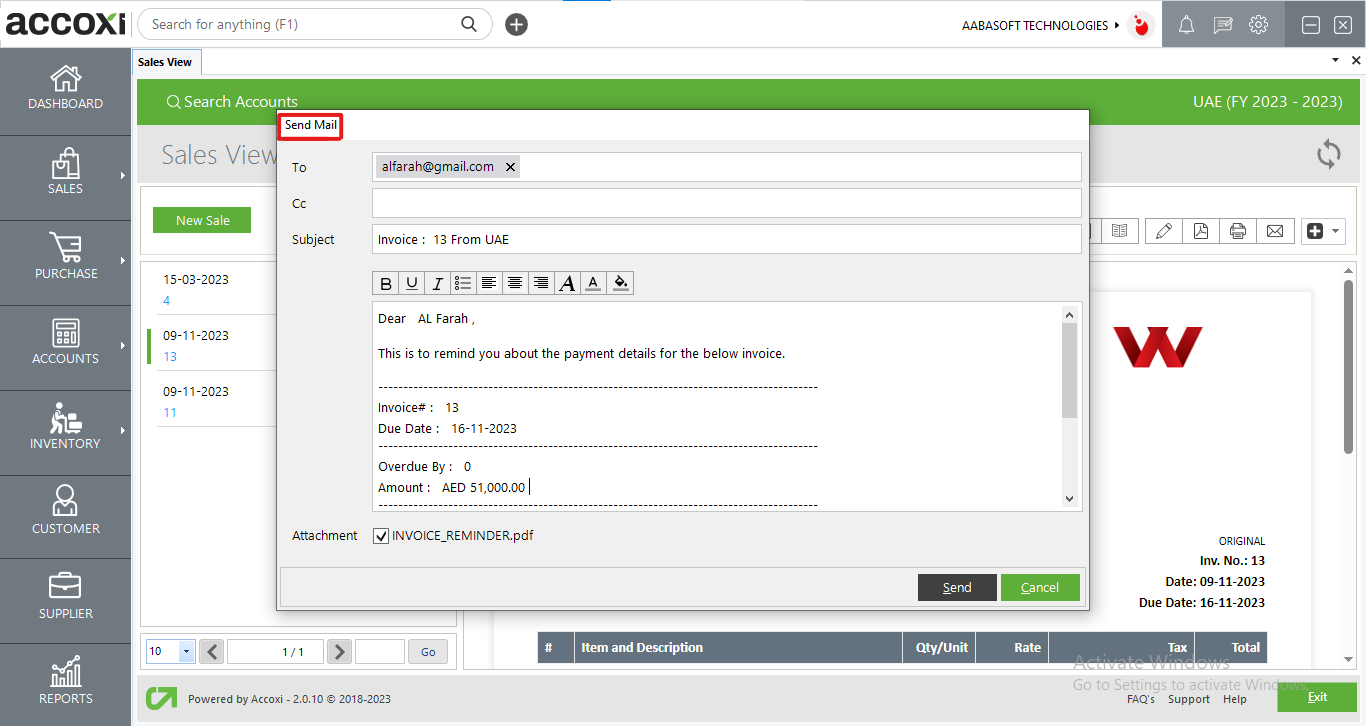
c. Send reminder mail:
This option is used to send a reminder email to the customer, reminding them of the outstanding amount owed to the business.
|
Fields |
Description |
|
To |
The recipient's default customer email address will be displayed. |
|
CC |
To create a carbon copy of the email and send it to different recipients. |
|
Subject |
This field will be automatically populated with the details of the invoice number and the name of the organization. |
|
Content |
The content of the reminder mail follows a predefined format, but the user has the option to modify it in the Email Templates Settings. |
|
Font And Paragraph Edit |
To customize the font and paragraphs, you can utilize these features. |
|
Attachment |
Users have the option to attach PDF files to the email. |
|
Send |
Click the "Send" button to transmit the email. |
|
Cancel |
Click the "Cancel" button to close the window without saving any changes. |
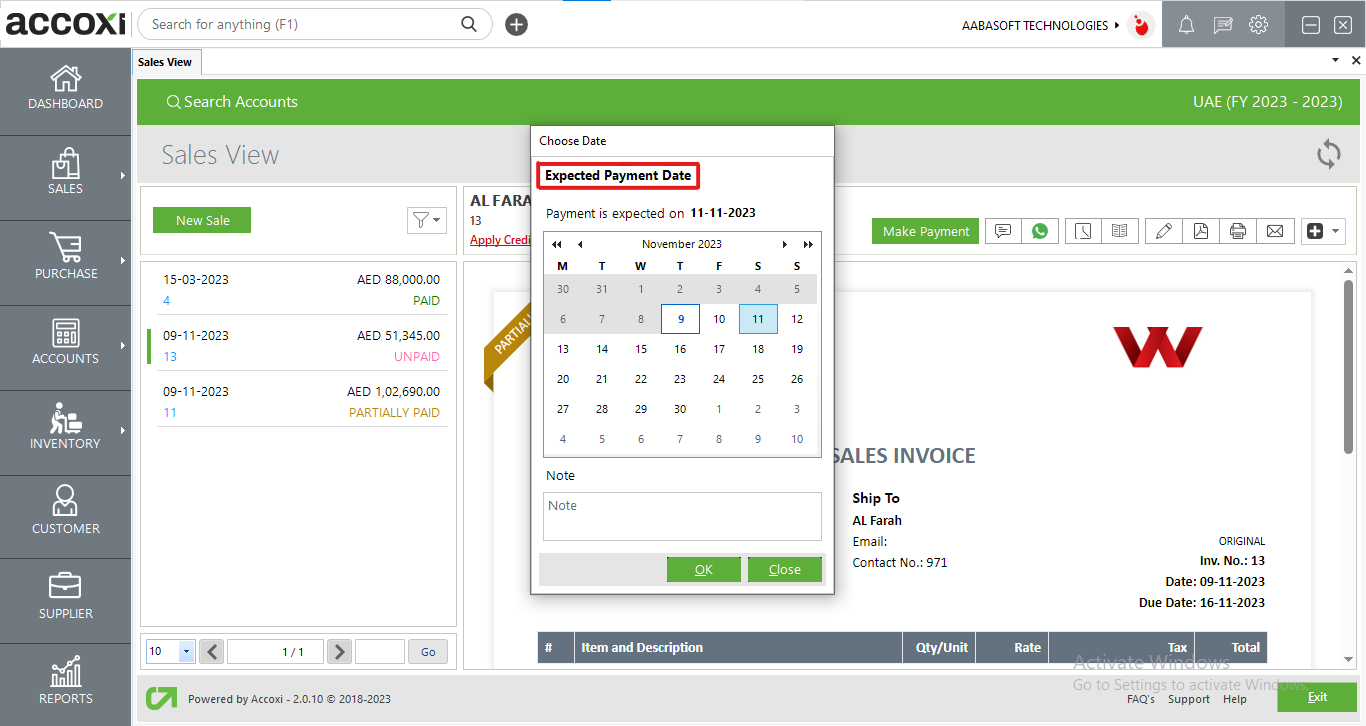
d. Expected payment date:
This function is used to specify the expected payment date from the customer, and a notification will be triggered on that particular date.
|
Fields |
Description |
|
Date |
The user can choose the expected payment date from the customer. |
|
Notes |
The user can also include notes or additional information for the selected date. |
|
Ok |
Click "OK" to save the changes. |
|
Close |
Click "Close" to exit the window without saving any modifications. |
e. Create recurring:
If the sale is recurring in nature, the user can create a recurring invoice by selecting the "Create Recurring" option. This action will direct the user to a recurring sales window.
f. Create credit note:
The "Create Credit Note" function is conveniently accessible within the invoice view. Clicking on "Create Credit Note" will direct the user to the credit note window, where they can create a sales return against the selected invoice.
g. Create duplicate:
This function serves as a handy tool for duplicating invoices. It will guide the user to the sales invoice window with the same data that was previously entered, making the process of creating similar invoices more efficient.
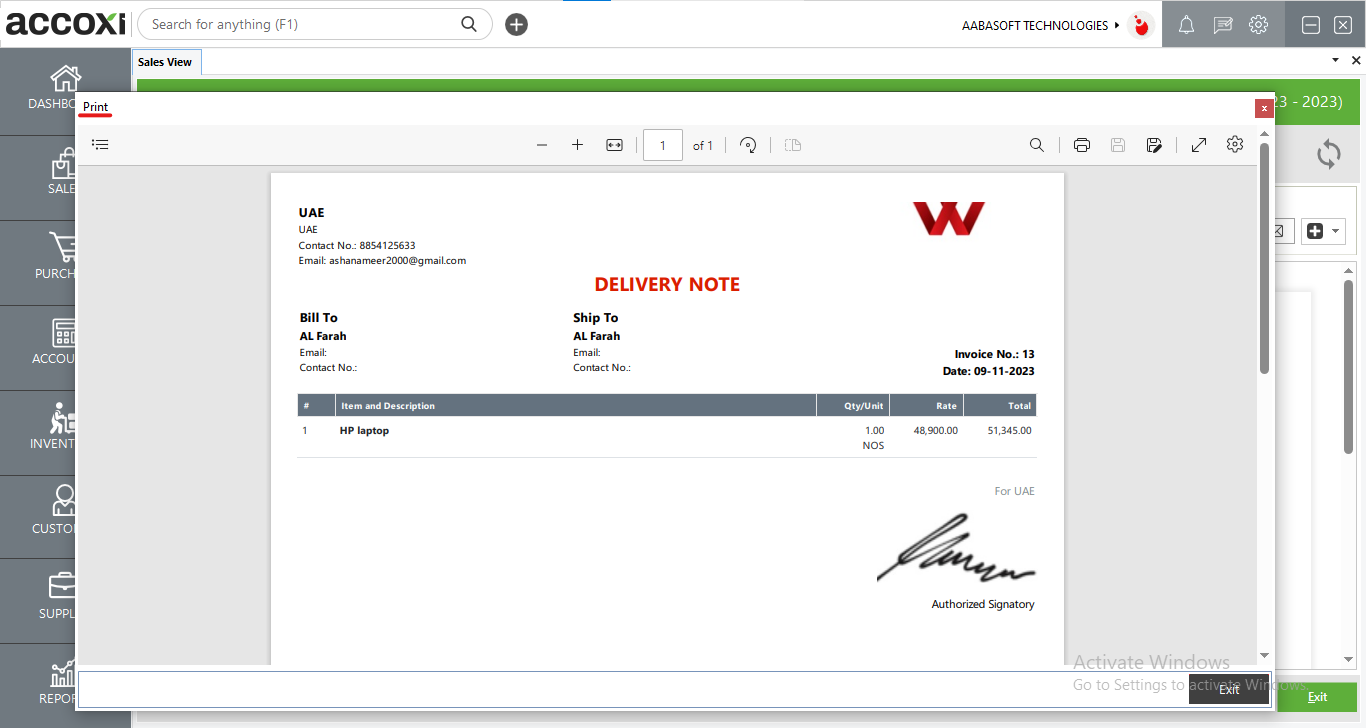
h. Print delivery note:
This option is used to print the details of the delivery of products or services to the customer. You can customize the paper size, and there's also an option to export it to a PDF file.
i. Print packing slip:
This option is used to print the details of the packing of products or services for the customer. You can customize the paper size, and there is also an option to export it to a PDF file.

j. Cancel invoice:
This option allows you to cancel the invoice you have created.
14. Pagination control
This feature manages page navigation and page size. You can set the page size to 10, 20, 50, or 100. Additionally, by inputting the page number in the box and clicking the "Go" button, you can directly navigate to the specified page.
3. Export
You have the option to export the sales invoice list to an Excel format. To do this, simply click the "Export" button located in the upper right corner near the "+New" button. After that, choose the destination for the file and click "Save."
4. Refresh
If you don't see the most recent data, simply click on the refresh icon located in the upper left corner of the page to retrieve the latest information.
5. View icon
Clicking on this icon will take you to the invoice view window.
6. More option
Using the "More" icon, you have several options for managing the invoice details:
These options provide flexibility and control over your sales invoice management.
7. Colour Filter
To signify sales returns and cancelled invoices, violet and red colors are used, respectively.
8. Pagination Control
This feature manages both page navigation and page size. Users have the flexibility to set the page size to 10, 20, 50, or 100 entries per page. They can also navigate to a specific page by entering the page number in the designated box and clicking the "Go" button.
9. Exit
The option to exit the sales search page can be accessed by clicking the "Exit" button located below the pagination controls.