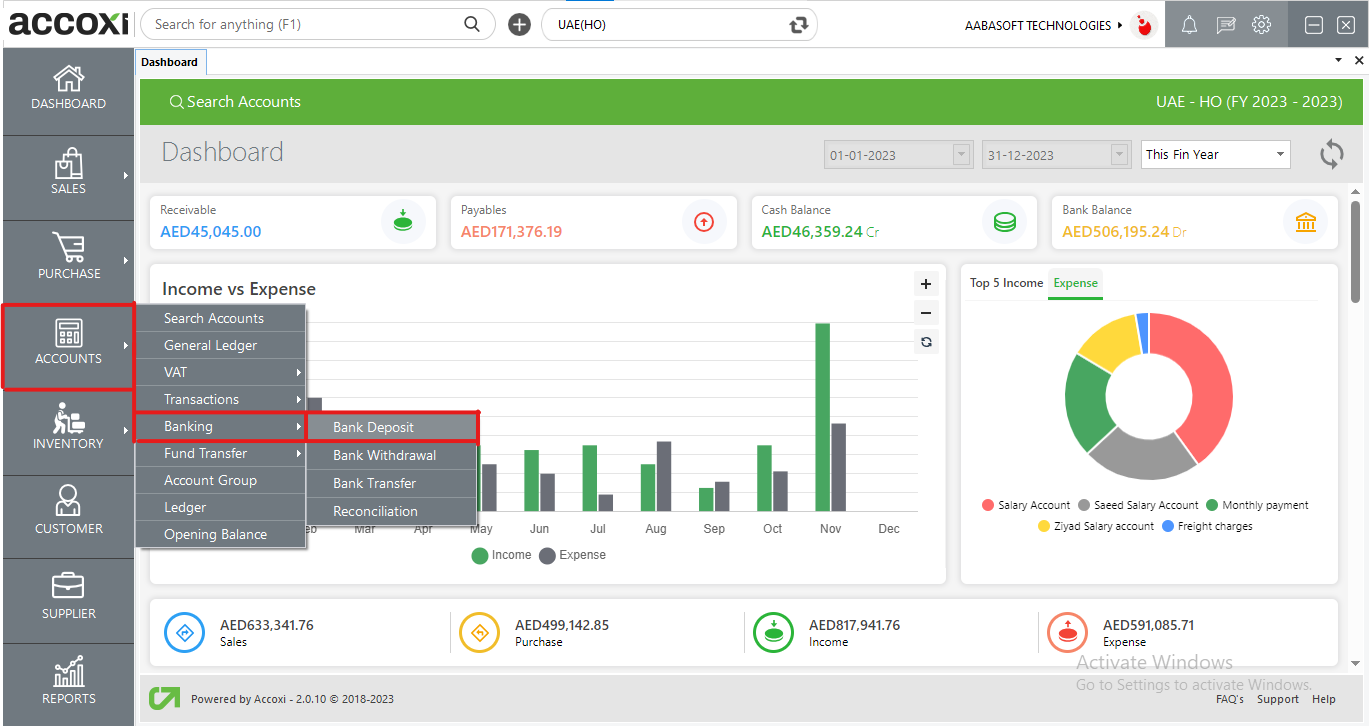
The bank deposit in Accoxi functions for entering deposits in bank.

A deposit account refers to a bank account managed by a financial institution, enabling customers to both deposit and withdraw funds. These accounts may take various forms, such as savings accounts, current accounts, or other specialized account types. Within ACCOXI, the bank deposit functionality serves the purpose of recording and documenting deposited funds into the bank.
Key Features:
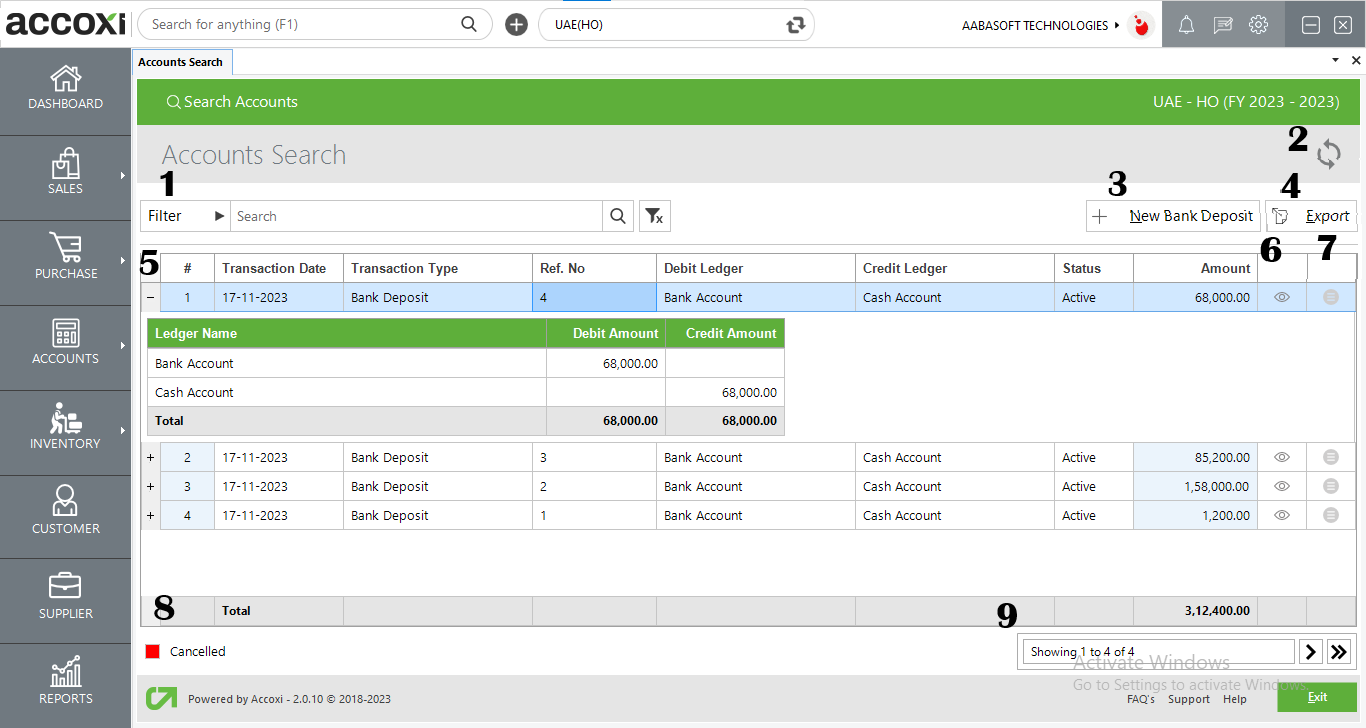
Menus available in Bank Deposit Search :
|
Field |
Description |
|
1. Filter |
There are two methods for filtering transactions: you can either input the transaction type directly into the search bar adjacent to the filter option, or you can utilize the filter dropdown by clicking on it. Users have the flexibility to filter data based on transaction type, ledger name, reference number, cancellation status, or date. When filtering by date, users must input both the starting and ending dates of the transactions. Transaction types available for filtering include sales invoices, purchase invoices, bills, debit notes, credit notes, and more. |
|
2. Refresh |
To ensure the display of the most recent data, click on the refresh icon located at the top-left corner of the page. This action will fetch and update the page with the latest information. |
|
3. +New Bank Deposit |
The "+New Bank Deposit" function is designed for users to initiate and manage bank deposits. Clicking on this option directs the user to the Bank Deposit Creation Window, where they can input the necessary details and information related to the bank deposit transaction. |
|
4. Export |
To export the deposit list to Excel format, click the "Export" button located at the top right corner near the "+New Bank Deposit" button. Choose the file location and click "Save" to complete the process. |
|
5. Ledger View |
The deposits made can be viewed in ledger format, showcasing the ledger accounts associated with the transaction. This ledger format provides a detailed display of the accounts involved in the deposited transactions. |
|
6. View |
The "View" menu allows the user to access and view the deposit invoice that has already been created. This menu likely provides options or functionality to review and examine details of the specific deposit invoice. |
|
7. More Options |
This menu features an "Edit" function, allowing users to make changes to the created form. Upon selecting the "Edit" option, the invoice form will be displayed on the screen, enabling users to modify and update the information as needed. |
|
8. Cancelled Deposits |
Cancelled deposits will be highlighted in red, providing a visual indication of their status. This color-coding helps users easily identify and distinguish cancelled deposits from active or completed ones. |
|
9. Pagination Control |
This feature manages page navigation and page size within the system. Users can set the page size to 10, 20, 50, or 100 entries. To navigate to a specific page, enter the page number in the designated box and click the "Go" button. This allows users to quickly jump to the desired page within the dataset. |
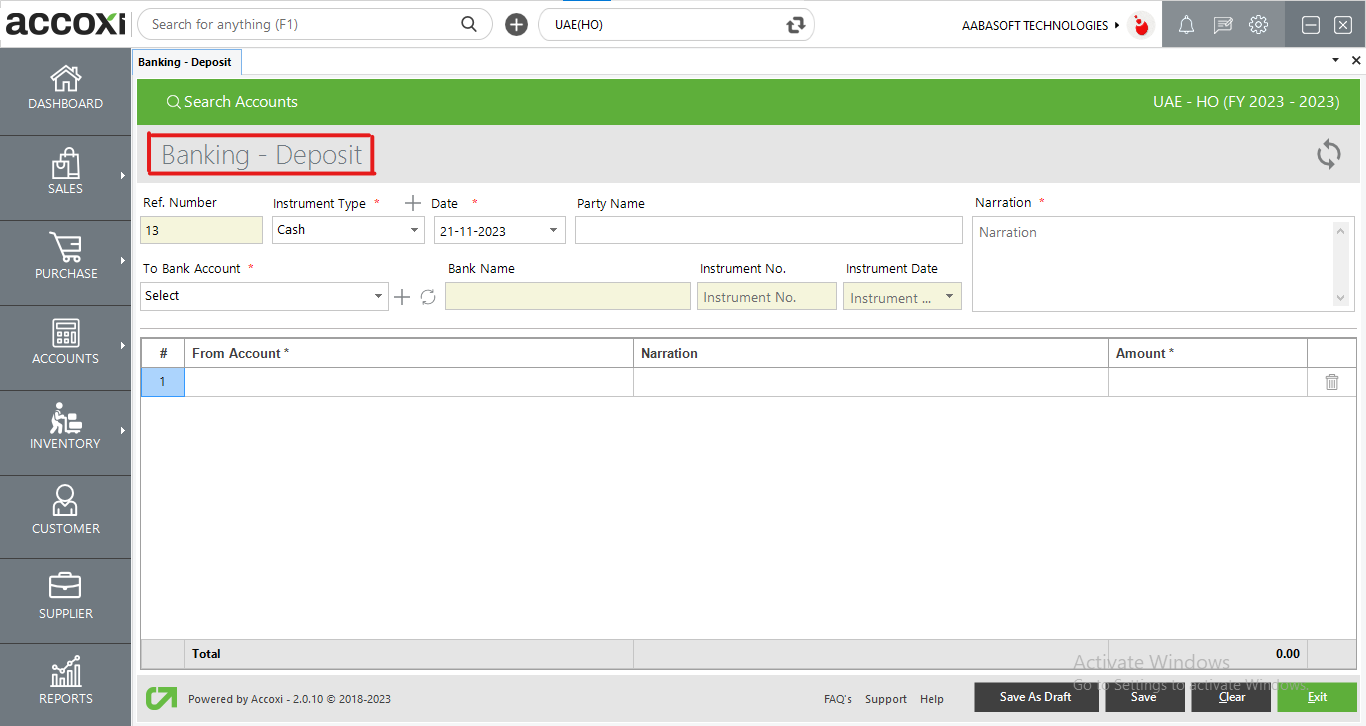
Steps to Enter Banking Deposit:
By following these steps, you can accurately record and document the details of the banking deposit, ensuring a comprehensive record of the transaction.
|
Field |
Description |
|
Ref Number |
The system automatically generates the reference number for bank deposits. This automated process eliminates the need for users to manually assign reference numbers, streamlining the creation of bank deposit records. |
|
Instrument Type |
Users are required to input the instrument type, such as "Cheque," "Cash," "DD" (Demand Draft), etc., when recording a bank deposit. This information helps categorize and specify the method or instrument used for the deposit transaction. |
|
Date |
Users need to enter the date when recording a bank deposit. This date represents the specific day on which the deposit transaction occurred. It is a crucial piece of information for accurate financial record-keeping. |
|
Party Name |
When recording a bank deposit, users are typically required to enter the party name. The party name refers to the entity or individual associated with the deposit transaction. This information helps in identifying and documenting the source or destination of the funds. |
|
To Bank Account |
When making a bank deposit, users need to specify the destination by selecting the bank account. This involves choosing the particular bank account to which the deposit will be credited. This information is crucial for accurately recording the transaction and updating the relevant financial records. |
|
Bank Name |
Users are usually required to enter the bank name when recording a bank deposit. This information specifies the financial institution associated with the deposit transaction and is important for maintaining accurate records. |
|
Instrument No |
When recording a bank deposit, users are typically required to enter the instrument number, especially if the deposit involves a check, demand draft, or another financial instrument. The instrument number uniquely identifies the specific transaction and helps in tracking and reconciling the deposit. |
|
Instrument Date |
Users need to enter the date of the instrument when recording a bank deposit, especially if the deposit involves a check, demand draft, or another financial instrument. This date represents the day on which the financial instrument was issued or created. It is essential for accurate record-keeping and financial reconciliation. |
|
Narration |
When recording a bank deposit, users are typically required to enter a narration. The narration is a brief description or note that provides additional details or context about the deposit transaction. It allows users to include any relevant information or comments that can aid in understanding the purpose or nature of the deposit. |
|
From Account |
When recording a bank deposit, users are typically required to specify the account from which the cash is being deposited. This information helps in accurately tracking the source of funds and maintaining proper accounting records. Users may need to enter details such as the account name or number associated with the origin of the deposited cash. |
|
Narration |
Enter a brief description or comment, known as a narration, when making a bank deposit. This provides additional information about the transaction's purpose or any relevant details. |
|
Amount |
Users need to specify the amount to be deposited when recording a bank deposit. This involves entering the numerical value representing the funds being added to the bank account. Providing the accurate deposit amount is crucial for financial accuracy and record-keeping. |
|
Save As Draft |
The information entered for a bank deposit can often be saved as a draft before finalizing the transaction. This allows users to store their progress and make any necessary adjustments before officially confirming and completing the deposit entry. |
|
Save |
Upon clicking "Save," you have the ability to store the information as a voucher. |
|
Clear |
To Clear The Data Entered |
|
Refresh |
To update or reload the window. |
|
Exit |
To close or exit from the window. |
|
Field |
Description |
|
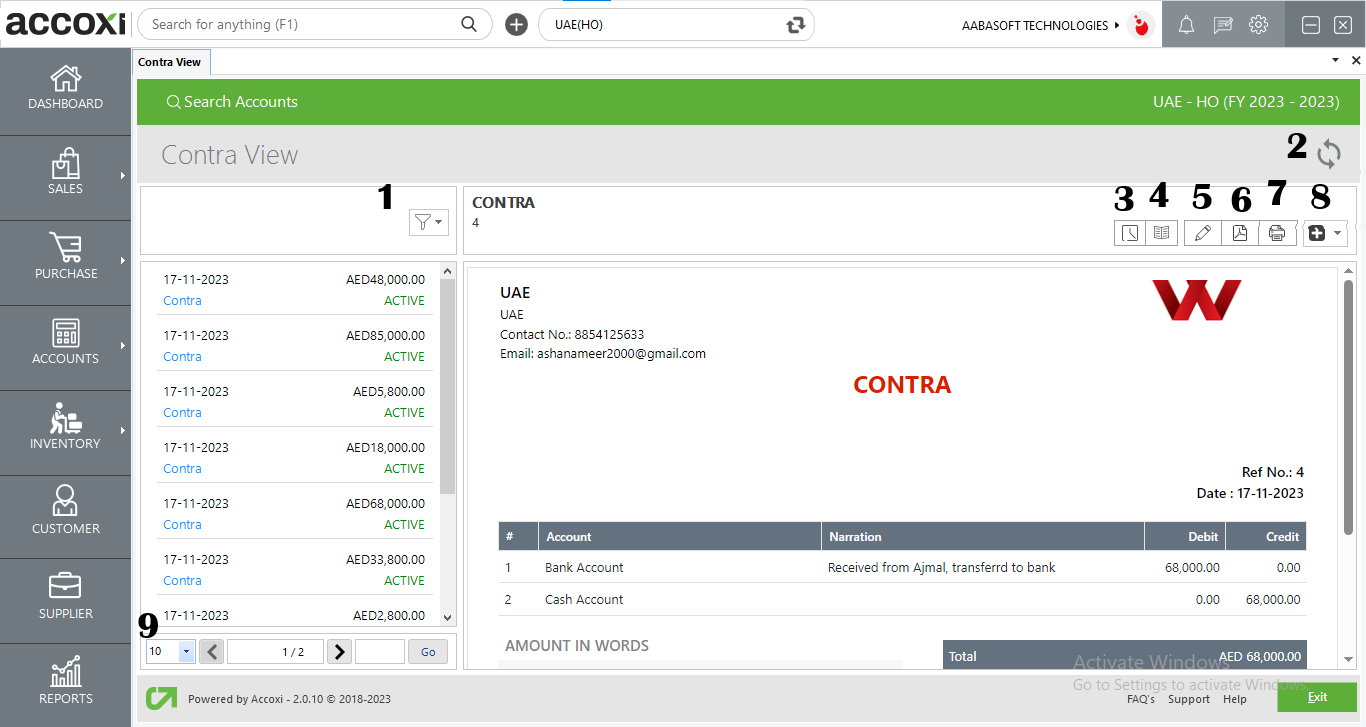
1. Filter |
Users can filter deposits based on their status, such as active, cancelled, or drafts. This functionality allows for the convenient segregation of deposits according to their current state, making it easier to manage and analyse financial data. |
|
2. Refresh |
If the most recent data is not visible, you can click on the refresh icon located at the top left corner of the page to retrieve the updated information. This action ensures that you have the latest data displayed on the page. |
|
3. History |
This menu facilitates users in accessing the historical details of the deposit.
OPTIONS AVAILABLE IN THE HISTORY WINDOW
· The "Comments and History" section displays all edits and alterations made to the deposit, along with the respective dates of changes. Users can also input comments related to the deposits made, providing additional context or notes about the transaction history. |
|
4. View journal |
This menu provides a journal view of the transaction, displaying both the debit and credit aspects of the amount. The journal view offers a comprehensive perspective on the financial entries associated with the transaction, detailing the movement of funds between accounts. |
|
5. Edit |
The Edit menu assists the user in making edits or corrections to the details entered in the deposit. This functionality enables users to update and modify information as needed, ensuring the accuracy of the recorded deposit details. |
|
6. Export To PDF |
If the user wishes to convert the deposit into PDF format, they can utilize the "Export to PDF" option. Upon selecting this option, a "Save As" directory prompt will appear, allowing the user to choose the location for saving the PDF file. This functionality facilitates the generation of a PDF document containing the deposit details for further use or sharing. |
|
7. Print |
The Print menu facilitates users in printing the deposit if needed. Clicking the Print button will redirect to print options, allowing the user to select the printer, specify the number of copies, and configure other print settings as necessary. This feature streamlines the process of generating a hard copy of the deposit information. |
|
8. More Features |
In the "More Features" option, users have the capability to cancel the deposit. Clicking on "Cancel" triggers a validation message to pop up. Users can then choose to proceed by clicking "YES" to cancel the deposit, or click "NO" to cancel and close the option without confirming the cancellation. This feature provides a step-by-step process for users to confirm their decision to cancel a deposit transaction |
|
9. Pagination Control |
This feature manages page navigation and size settings. Users can customize the page size to 10, 20, 50, or 100 entries. To navigate to a specific page, simply input the page number in the designated box and click the "Go" button, allowing for quick access to the desired page. |