step-by-step guide in the creation and management of customers in Accoxi

A customer, whether an individual or a business entity, is someone who acquires the goods or services provided by another company. The significance of customers lies in their role as revenue generators; businesses depend on their patronage, as without customers, there would be no demand for the products or services a company offers.
In ACCOXI, you have the capability to add and establish customers who engage with your business. This is particularly useful for creating various sales transactions such as invoices, sales orders, and more.

Key Features:
These features collectively enhance the user's ability to manage and monitor customer-related transactions efficiently, promoting financial control and streamlined business operations in ACCOXI.
When accessing the Customer Module, it directs to the Customer Search interface.
Customers Search:
Customer Search encompasses various menus and presents the details of customers added to the business.
Data available in customer search table:
|
Field |
Description |
|
# |
Serial Number |
|
Customer Name |
The column displays the name of the created customer. |
|
Contact Name |
In this column, the contact name of the created customer is displayed. |
|
Phone No. |
In this column, the phone number of the created customer is displayed. |
|
TRN |
In this column, the TRN (Tax Registration Number) of the created customer is displayed. |
|
Tax Treatment |
In this column, the tax treatment of the created customer is displayed. |
|
Branch Name |
This section displays the branch name where the customer is created. |
|
Route |
The customer route taken by the organization is displayed here. |
|
Balance |
The balance amount of the customer, which could be either receivable or payable, is shown here. The closing balance of the customer is indicated either in red or green to denote payable or receivable, respectively. |
Menus available in customer search
CUSTOMER SEARCH
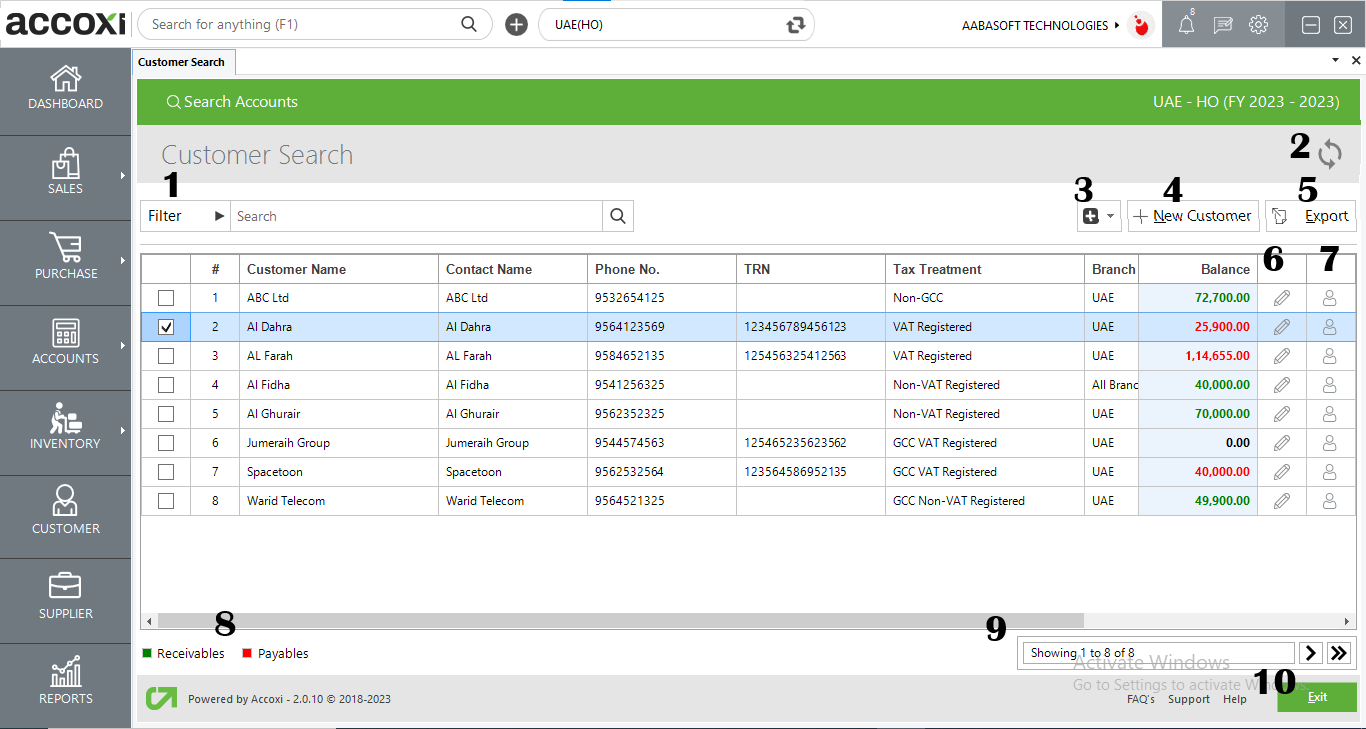
The Customer Search provides a versatile filter option for customer contact in two ways. Users can either directly input the Customer name, or Phone Number into the search bar adjacent to the filter option. Alternatively, clicking the filter drop-down offers additional filtering parameters, allowing users to filter data by Customer name, Phone Number, or Email.
The sorting option is available to organize data efficiently. Users can select "Order By" and choose the "Sort Order" to arrange data in ascending or descending order. Under the "Sort By" option, two criteria are available: Amount and Name.
Users can filter inactive customers by ticking the "Inactive" option. This feature streamlines the search process by excluding inactive customer entries from the displayed results.
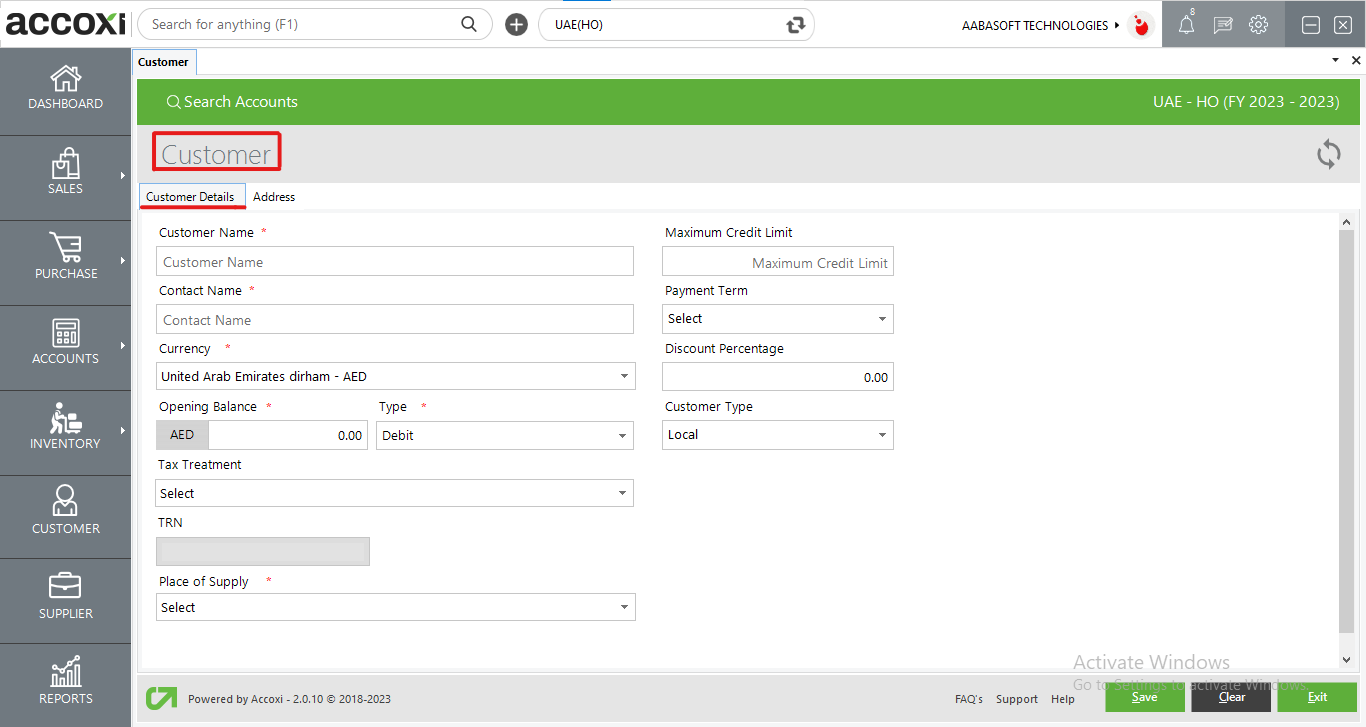
The "New Customer" button initiates the Customer Form, providing users with the capability to add new customers. Mandatory fields are highlighted in red for clarity.
Steps to create a new Customer:
|
Field |
Description |
|
Customer Name |
Provide the name of the customer. |
|
Contact Name |
Input the name of the contact person. |
|
Currency |
The user can choose the currency for the customer based on the currency used for transactions. |
|
Opening Balance |
You can input the opening balance for the customer, if applicable. If no opening balance is provided, the default value will be set to '0'. |
|
Type |
The opening balance can be specified as a credit or debit amount. From the dropdown menu of the Type, you can select the appropriate field. |
|
Tax Treatment |
Choose the tax treatment from the dropdown menu. Options include VAT Registered, Non-VAT Registered, GCC VAT Registered, GCC Non-VAT Registered, and Non-GCC. |
|
TRN |
If the customer is VAT Registered or GCC VAT Registered, enter the TRN (Tax Registration Number). For customers with Tax treatment as Non-VAT Registered, GCC Non-VAT Registered, or Non-GCC, the TRN field becomes inactive. |
|
Place Of Supply |
For VAT registered and Non-VAT registered customers, you can select the place of supply from the dropdown menu. |
|
Maximum Credit Limit |
In this section, you have the option to define the maximum credit limit permitted for your customer. If your sales to this specific customer exceed this limit, a warning message will be triggered. |
|
Payment Term |
In this section, you can configure the payment terms, and these terms will be reflected in the sales invoice. The status of the invoices, such as overdue or unpaid, is determined based on these payment terms. |
|
Discount % |
In this field, you can specify the applicable discount percentage for the particular customer. |
|
Price List |
The Price List feature allows the user to assign a different sales rate for a customer based on business requirements. Price lists can be modified in Settings => Preferences => Sale Invoice. |
|
Customer Type |
In this option, you can allocate the customer type. Users can differentiate customers as global or local. Global implies that the customer will be accessible in all branches, while local indicates availability in that specific branch only. |
|
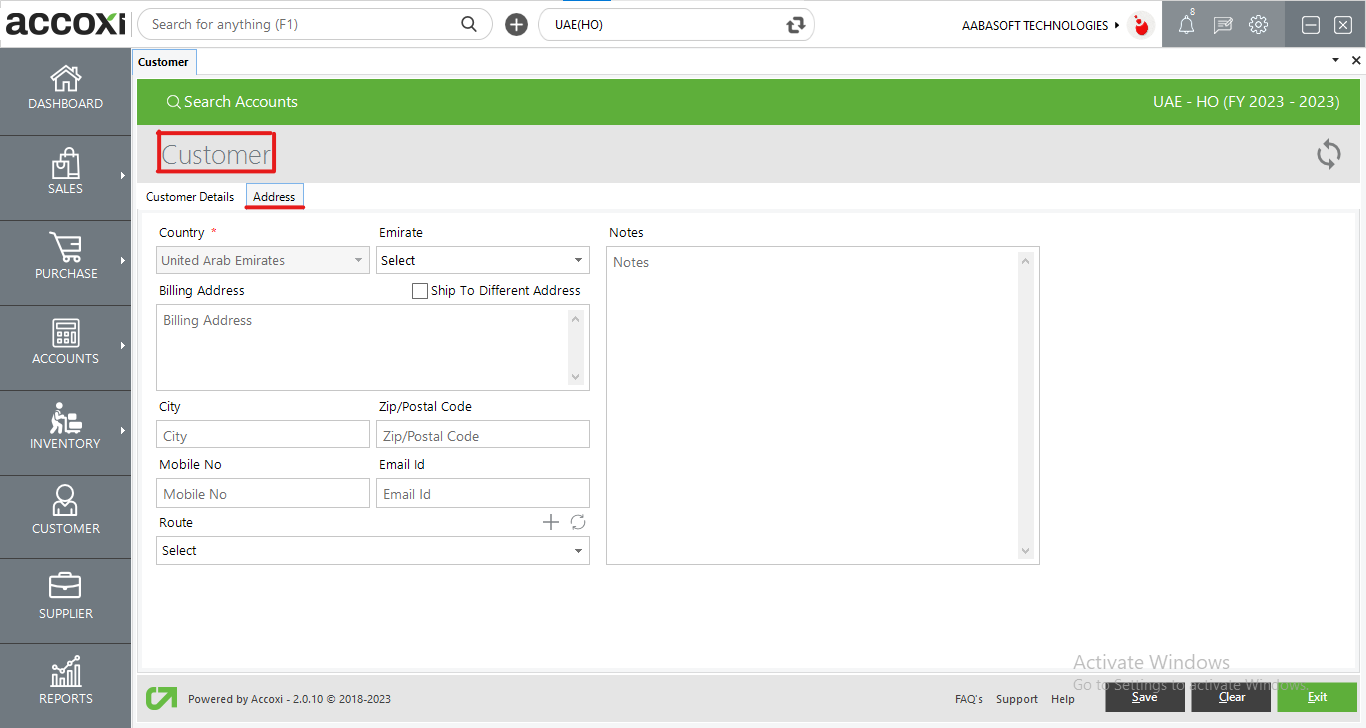
Country |
For customers registered for VAT and those not registered for VAT, the country is fixed as UAE, and no other country can be selected. However, if the tax treatment is GCC Registered, GCC Non-VAT Registered, or Non-GCC, the country dropdown option becomes active, allowing you to choose the required country. |
|
Emirate |
For VAT registered and non-VAT registered customers, you can choose the emirates from the dropdown menu. |
|
Billing Address |
Input the customer's address. Users have the option to add different customer addresses to the data by selecting the "Ship To Different Address" option. |
|
City |
Provide the city of the customer. |
|
Zip/Postal Code |
Input the pin code/ZIP code of the customer's locality. |
|
Mobile No |
Provide the mobile number. |
|
Email Id |
Enter the email ID of the customer. |
|
Route |
The user must select the customer route or click on the plus sign on the route bar to create a new customer route. |
|
Notes |
You can input any additional details of the customer in this field. |
|
Refresh |
If the most recent data is not displayed, simply click on the refresh icon located at the top right corner of the page to fetch the updated information. |
|
Save |
Clicking the save button enables you to finalize the transaction. |
|
Clear |
This option allows the user to clear the data entered in the New customer creation window. |
|
Exit |
Users can exit from the invoice window by clicking this button. |
The Customer list can be exported to Excel format. Click the Export button located at the top right corner, near the +New button. Choose the file location and click Save. The exported file includes fields such as Customer Name, Contact Name, Phone Number, TRN no, Tax Treatment, and Balance.
If your latest data is not displayed, click on the refresh icon at the top left corner of the page to fetch the new data.
You can edit customer details if necessary using the Edit icon. Clicking this icon opens the Customer Form, where you can view the entered details and update them as per your requirements.
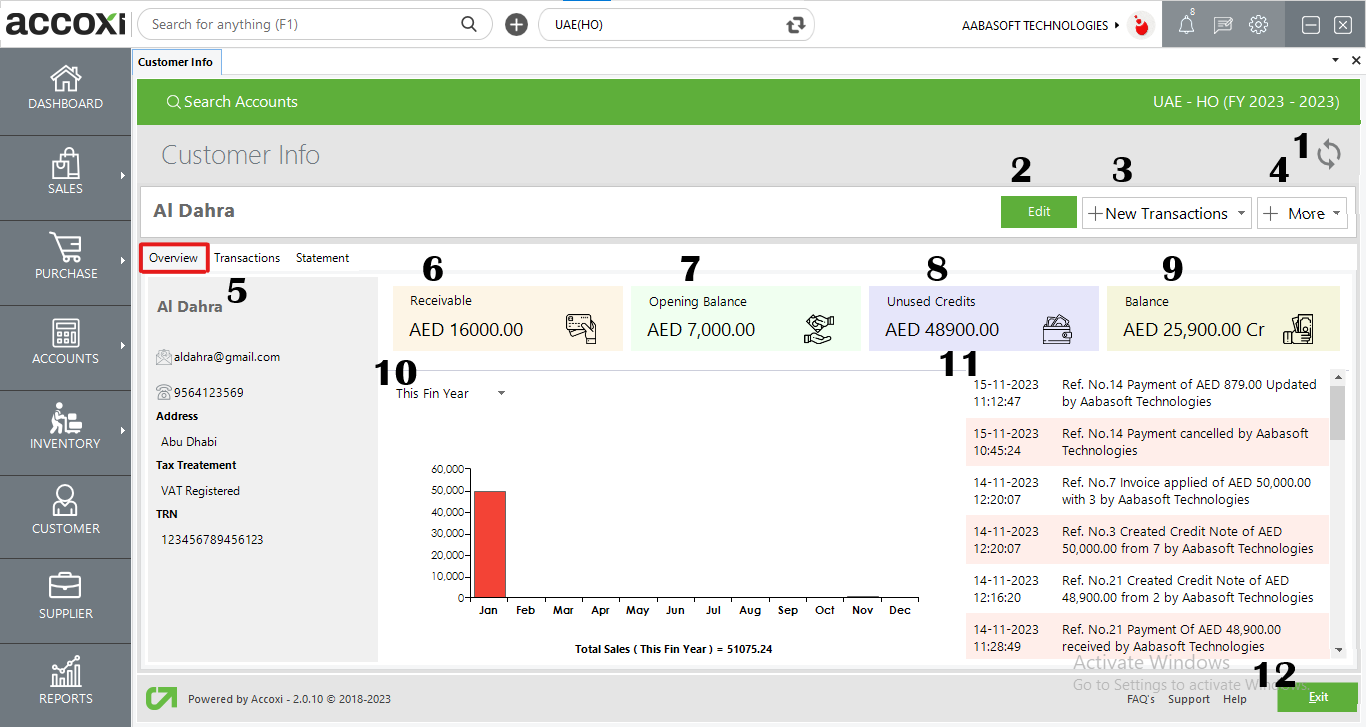
The Customer Info feature in Accoxi offers a comprehensive analytical report for the specified customer selected by the user. It provides a concise trail of all transactions conducted between the customer and the organization. This option displays the customer's transactions, balances, and statements.
The Overview page provides a bird's-eye view of the customer's basic information and activities. A mini dashboard showcases the customer's balances, unused credits, and receivables, along with a graph depicting the sales activity.
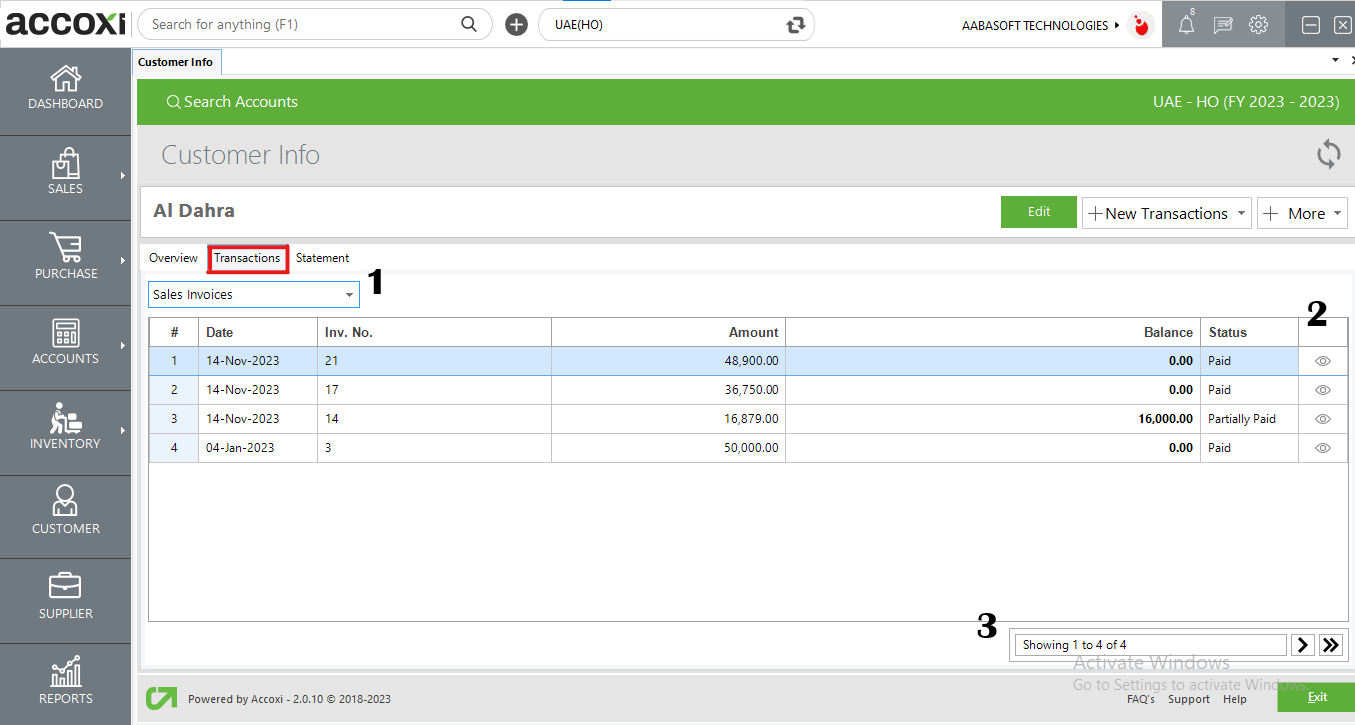
The Transaction tab presents a comprehensive list of transactions conducted by the customer, and users can filter these transactions using the dropdown option. Additionally, users can view individual invoices by selecting the "View" option.
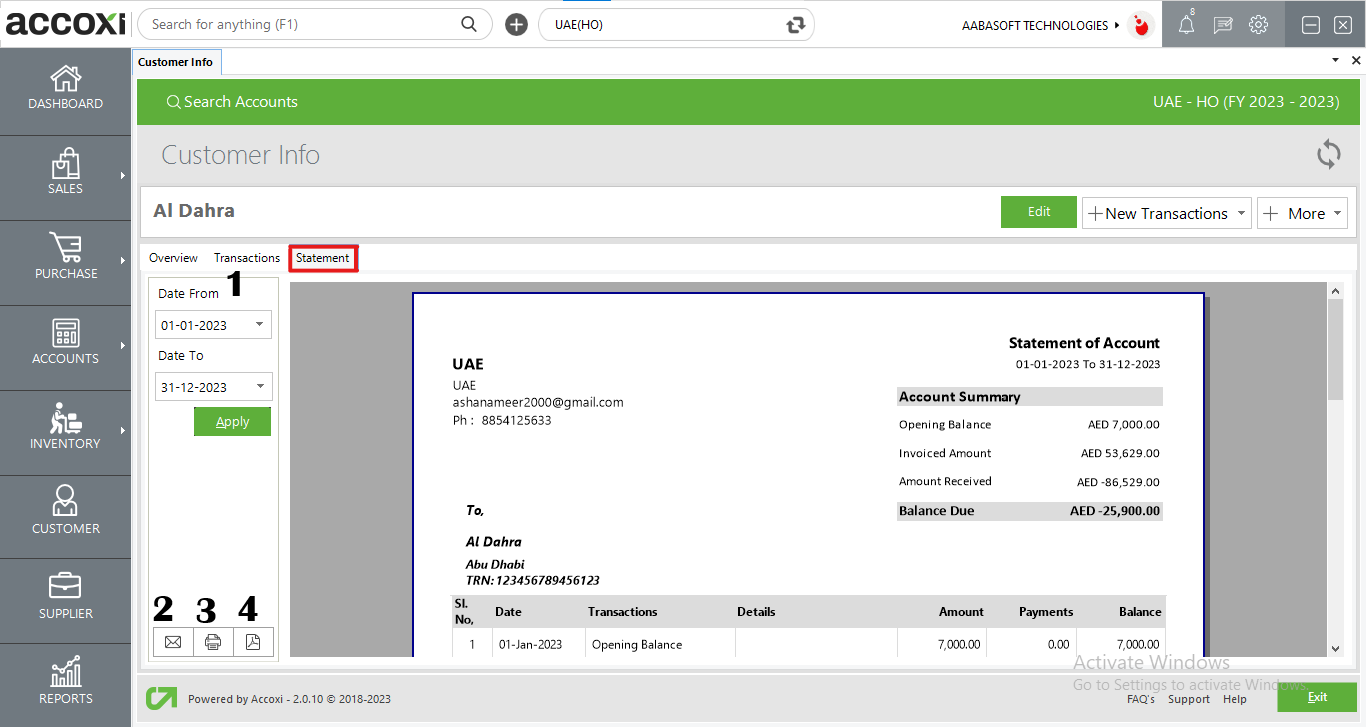
The Statement module generates a detailed statement regarding the invoices and payments received from the customer, including information such as date, transaction type, details, amount, payments, and balance. The statement provides a clear overview of the customer's outstanding balance after displaying all transactions.
Users can filter the statement based on specific timeframes and utilize options such as emailing, printing, or saving as a PDF, available in the bottom left corner.
The closing balance of the customer is visually represented, either in red or green, to denote payable or receivable, respectively.
This feature manages page navigation and page size. Users can set the page size to 10, 20, 50, or 100. Enter the page number in the box and click on the Go button to navigate to the intended page.
Below the pagination control, there is an Exit button. Click the Exit button if you wish to leave the Customer Search Page.