Payments received in ACCOXI - How it works

The Payments Received module in Accoxi facilitates functions such as settling outstanding dues from customers, recording advances received from customers, and adjusting opening balances for customers. In ACCOXI, the Payments Received module handles the receipt of payments from customers for completed sales transactions.
Key Features:
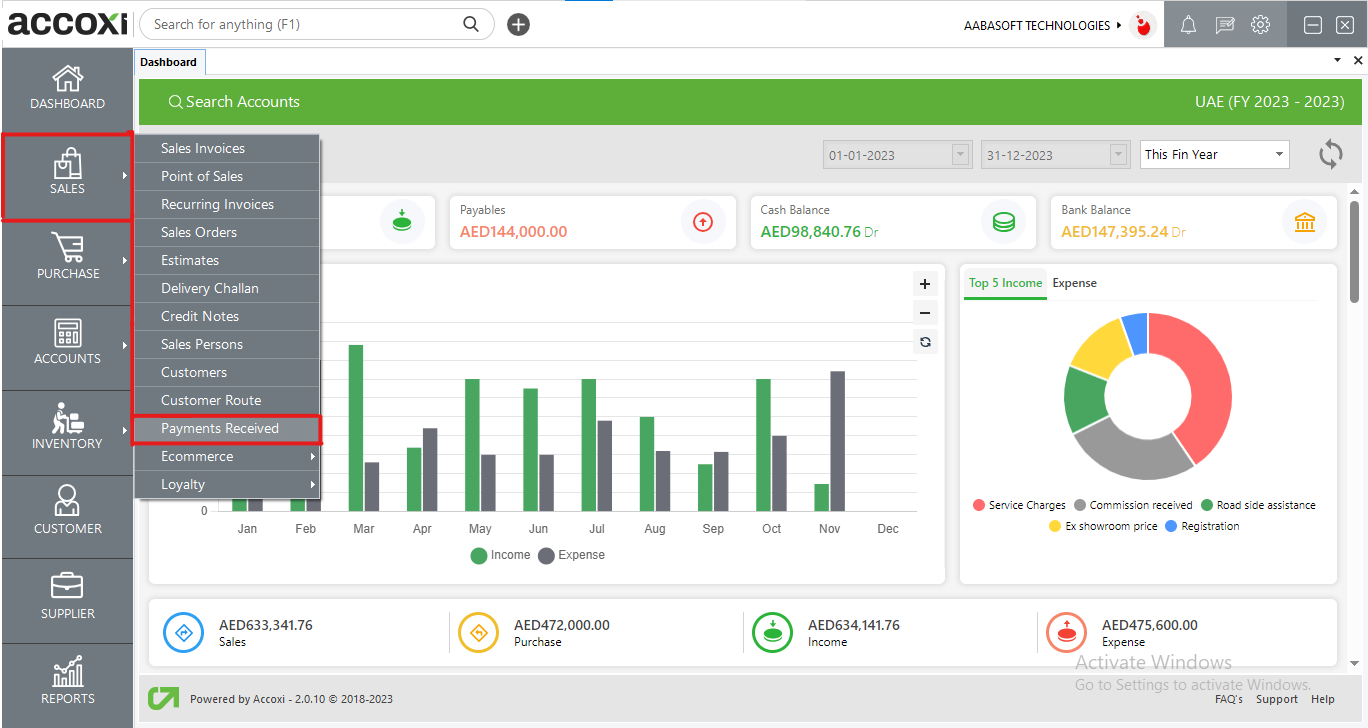
Users can access the Payments Received window through the Sales Module => Payments Received. In this window, users can record new customer payments, document advance payments, and adjust the opening balances of customers.
PAYMENTS RECEIVED SEARCH
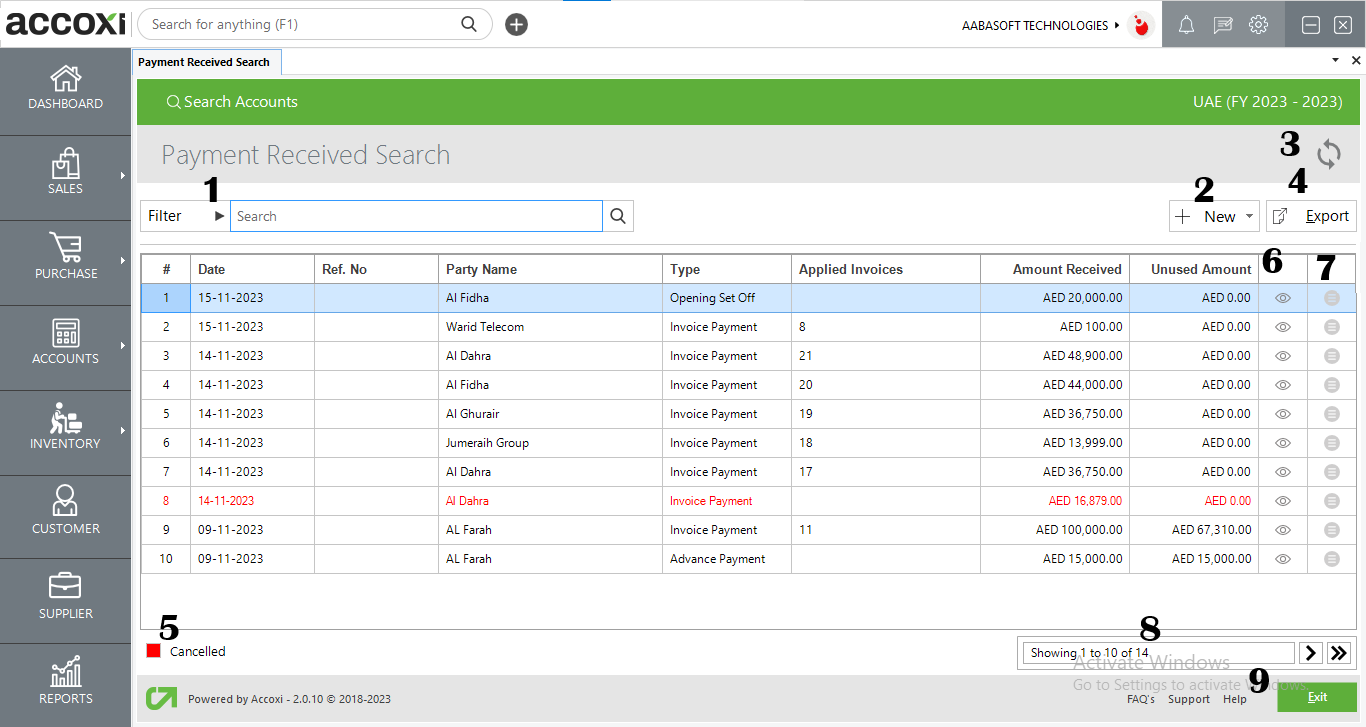
The Payments Received Search provides a comprehensive view of all received payments in a single window, equipped with features such as filtering, exporting, editing, printing, and more.
DATA AVAILABLE IN THE PAYMENT RECEIVED SEARCH TABLE
|
Field |
Description |
|
# |
Here, the table displays the serial number of the data. |
|
DATE |
The date of the payment received transaction is indicated here. |
|
REF NO. |
The reference number for the payment received transaction is displayed in this column. |
|
PARTY NAME |
The party name associated with the payment received transaction is displayed in this section. |
|
TYPE |
The type of transaction, whether it is an invoice payment, opening set off, or customer advance, is indicated in this section. |
|
APPLIED INVOICES |
The invoice number from where the amount is received is displayed in this column. Users can double-click the "Applied Invoice" column. An "Applied Invoice" pop-up window will be opened, and users can click the "Eye" button to view the invoice. |
|
AMOUNT RECEIVED |
The amount received from the transaction is displayed in this column. |
|
UNUSED AMOUNT |
The unused amount of customer advancement is shown in this section. |
The new option in the "Payments Received" window provides users with access to the customer payment menu, the customer advance option, and the opening setoff option.
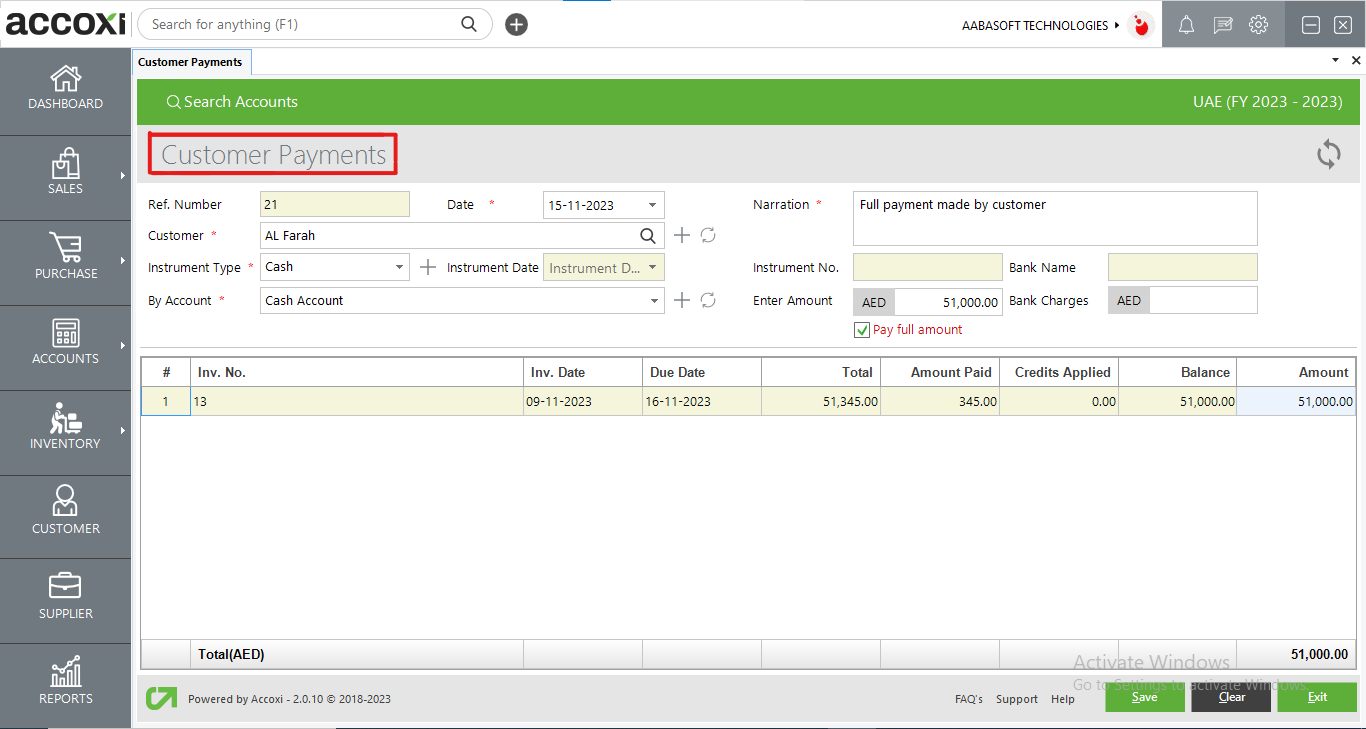
The purpose of the customer payment function is to document and record payments received from customers for their outstanding dues.
To initiate a new customer payment, follow these steps:
|
Field |
Description |
|
Ref Number |
The reference number for the customer payment is generated automatically. This feature proves beneficial for data filtering and facilitates easy identification. |
|
Customer |
The user needs to select the customer making the payment from the customer drop-down list. Additionally, the refresh button allows the user to update the customer drop-down list and view any changes made to the list. |
|
Phone Number |
is automatically retrieved by ACCOXI when the user selects a customer. |
|
Date |
The user is required to choose the date of the transaction. ACCOXI automatically fetches the current date as the default. |
|
By Account |
Users need to select the mode of the account, either cash or through the bank. The "+" button allows the addition of a new ledger account, redirecting the user to the new ledger window. The refresh button aids in updating the "By Account" drop-down list, enabling users to view any changes made in the list. |
|
Narration |
Provide a narration for the transaction. |
|
Instrument Type |
The user needs to choose the type of instrument used for payment. If the instrument is cash, the subsequent columns, such as Instrument Number, Date, and Bank Name, will be disabled or blocked. |
|
Instrument NO. |
If the payment is made through bank instruments, input the instrument number. |
|
Instrument Date |
Specify the payment date of the instrument. |
|
Bank Name |
Provide the name of the bank through which the payment is made. |
|
# |
Display the serial number in the grid. |
|
Inv. Number |
Represents the invoice number of credit transactions conducted with the customers. |
|
Due Date |
The due date column signifies the payment due date for the transaction made with the customer. |
|
Total |
Indicates the total amount of the invoice. |
|
Amount Paid |
The column displays the due amount paid by the customer. |
|
Credits Applied |
This column represents any amounts applied as credits. |
|
Balance |
The column reflects the balance amount after adjusting the amount paid, and any applied credits. |
|
Amount |
Input the amount being paid by the customer in this column. |
|
Pay Full Amount |
Users have the option to select the "Pay Full" option if the customer is paying the entire amount due. |
|
Save |
Clicking this button saves the payment transactions and directs the user to Send Mail window and the Payment Received View window. |
|
Clear |
This option is available to clear all the data entered in the Customer Payment window. |
|
Exit |
Clicking this button allows exiting the current window without saving the entered data. |
SEND MAIL WINDOW
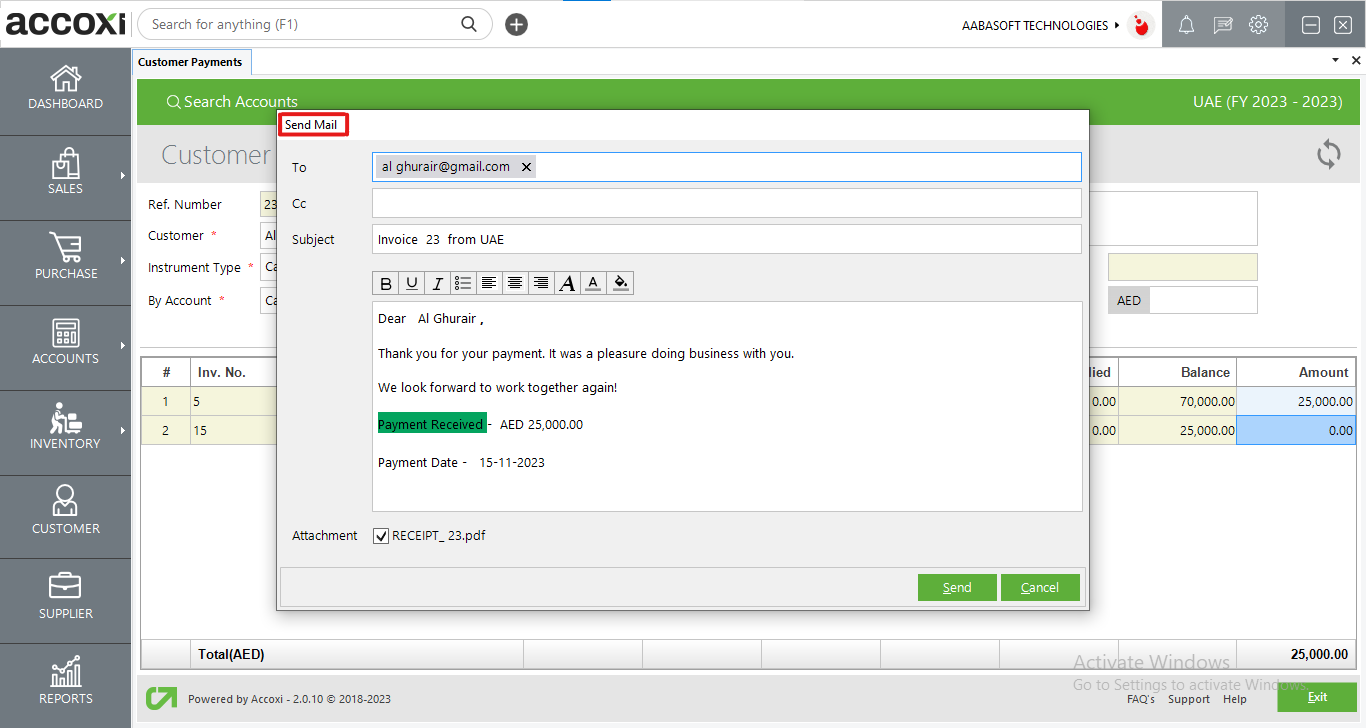
Clicking the save button in the customer payments window redirects the user to the Send Mail window. This allows the user to send an email to the customer or stakeholders regarding the received payment. The Send Mail window automatically fetches the customer's email as the default "TO" address, but users can also send the email to any other recipient if needed.
|
Field |
Description |
|
To |
Showing the recipient's address in the mail, by default, will appear as the customer's email address. |
|
CC |
To include additional recipients for the email, you can manually add their email addresses in the mail composition window. This way, you can send the mail to both the default customer email address and any other recipients you specify. |
|
Subject |
The email composition window will be auto-populated with the invoice number and the organization's name. |
|
Content |
The content for "Payment Received" is in a predefined format, but users have the flexibility to modify it in the Email Template Settings. |
|
Font And Paragraph Edit |
These options can be utilized to edit the font and paragraphs. |
|
Attachment |
Users have the capability to attach PDF files to the email. |
|
Send |
Simply click the "Send" button to dispatch the email. |
|
Cancel |
To close the window without saving, click the "Cancel" button. |
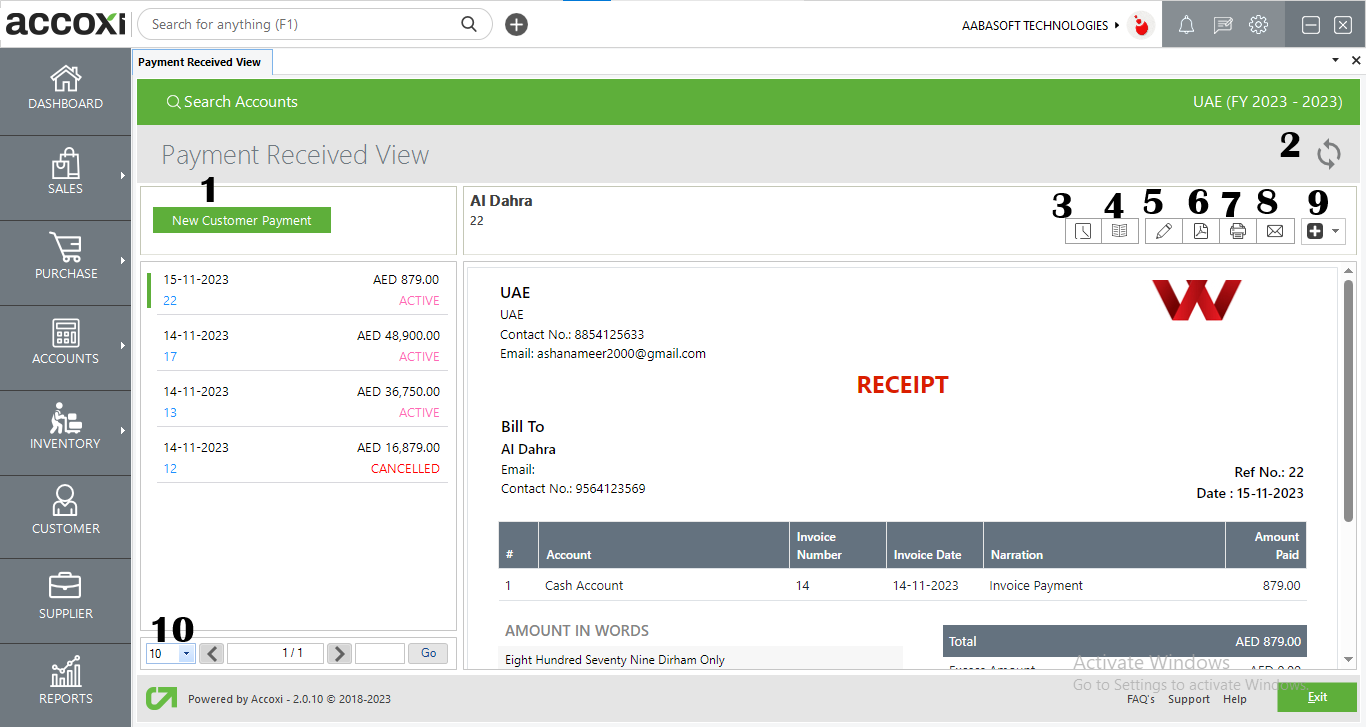
MENU’S AVAILABLE IN PAYMENTS RECEIVED VIEW
|
Field |
Description |
|
1. New Customer Payment |
Initiating a new customer payment redirects the user to the window for creating a new customer payment. |
|
2..Refresh |
If the most recent data is not visible, select the refresh icon located at the top left corner of the page to retrieve the updated information. |
|
3.History |
This menu facilitates users in obtaining the historical details of customer payments.
OPTIONS AVAILABLE IN THE HISTORY WINDOW
o Comments and History: Displays all edits and alterations made to the customer payment, including the date of changes. Users can input comments related to the received payment.
o Payments: Provides details about received payments, including the date of payment, reference number, invoice number, account type, and amount. |
|
4.View Journal |
This menu presents the journal view of the transaction. The journal view displays both the debit and credit aspects of the amount. |
|
5. Edit |
The Edit menu allows the user to modify or correct the details entered in the Payments Received section. |
|
6. Export To PDF |
If the user wishes to convert the Payments Received to PDF format, the Export to PDF option is available. After clicking Export to PDF, a Save As directory option will appear, allowing the user to choose the location for saving the PDF file. |
|
7. Print |
The Print menu enables the user to print the Payments Received if needed. Upon clicking the Print button, it will redirect to print options where the user can select the printer, the number of copies, and other related settings. |
|
8. Email |
Upon saving the Payments Received window, a Send Mail window will appear. In this window, the user can send an email to the customer (with ACCOXI fetching the customer's email as the "TO" address by default) or to any other specified person. |
|
9. More Features |
In the "More Features" option, the user can choose to cancel the receipt. Upon clicking "Cancel," a validation message will appear. The user can then click "YES" to proceed with canceling the receipt or "NO" to cancel and close the option. |
|
10. Pagination Control |
This feature manages page navigation and page size. The page size can be configured to 10, 20, 50, or 100. By entering the page number in the box and clicking the "Go" button, it navigates to the specified page. |
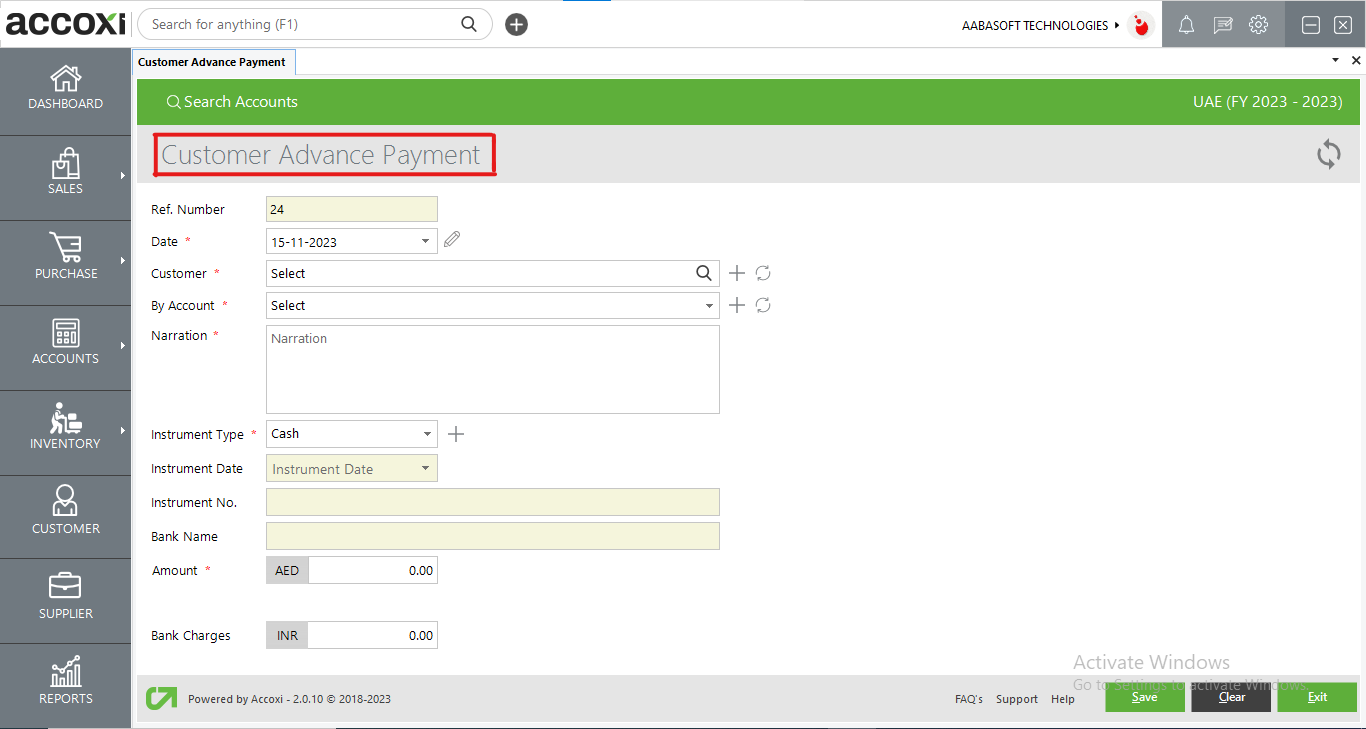
The Customer Advance option involves recording transactions related to any advances made by the customer.
To create a new customer advance, follow these steps:
|
Field |
Description |
|
Ref Number |
The reference number for the customer advance payment is generated automatically. This feature proves useful when filtering data for easy identification. |
|
Customer |
The user needs to select the customer making the payment from the customer drop-down list. Additionally, a new customer can be created instantly by clicking the '+' sign on the right side of the bar. The refresh button aids in updating the customer drop-down list, allowing users to view any changes made in the list. |
|
Date |
The user is required to choose the date of the transaction. By default, ACCOXI automatically fetches the current date as default. |
|
By Account |
Users should select the mode of the account, which includes options like cash or through the bank. The '+' button can be utilized to add a new ledger account, redirecting the user to the New Ledger window. The refresh button assists the user in updating the By Account drop-down list, enabling them to view any changes made in the list. |
|
Instrument Type |
The user needs to select the type of instrument used for the payment. If the instrument is cash, the subsequent columns like Instrument Number, Date, and Bank Name will be disabled or blocked. |
|
Instrument NO. |
Input the instrument number if the payment is made through bank instruments other than cash. |
|
Instrument Date |
Specify the instrument date if the payment is made through bank instruments other than cash. |
|
Bank Name |
Provide the name of the bank through which the payment is being made. |
|
Narration |
Input a narration for the transaction made. |
|
Amount |
Input the advance amount being paid by the customer in this column. |
|
Bank Charges |
Input any bank charges incurred in this column. |
|
Save |
Clicking this button saves the recorded advance payments and redirects to the Payment Received View window. |
|
Clear |
This option can be used to clear all the data entered in the Customer Advance Payment window. |
|
Exit |
This button is used to exit from the current window without saving the entered data. |
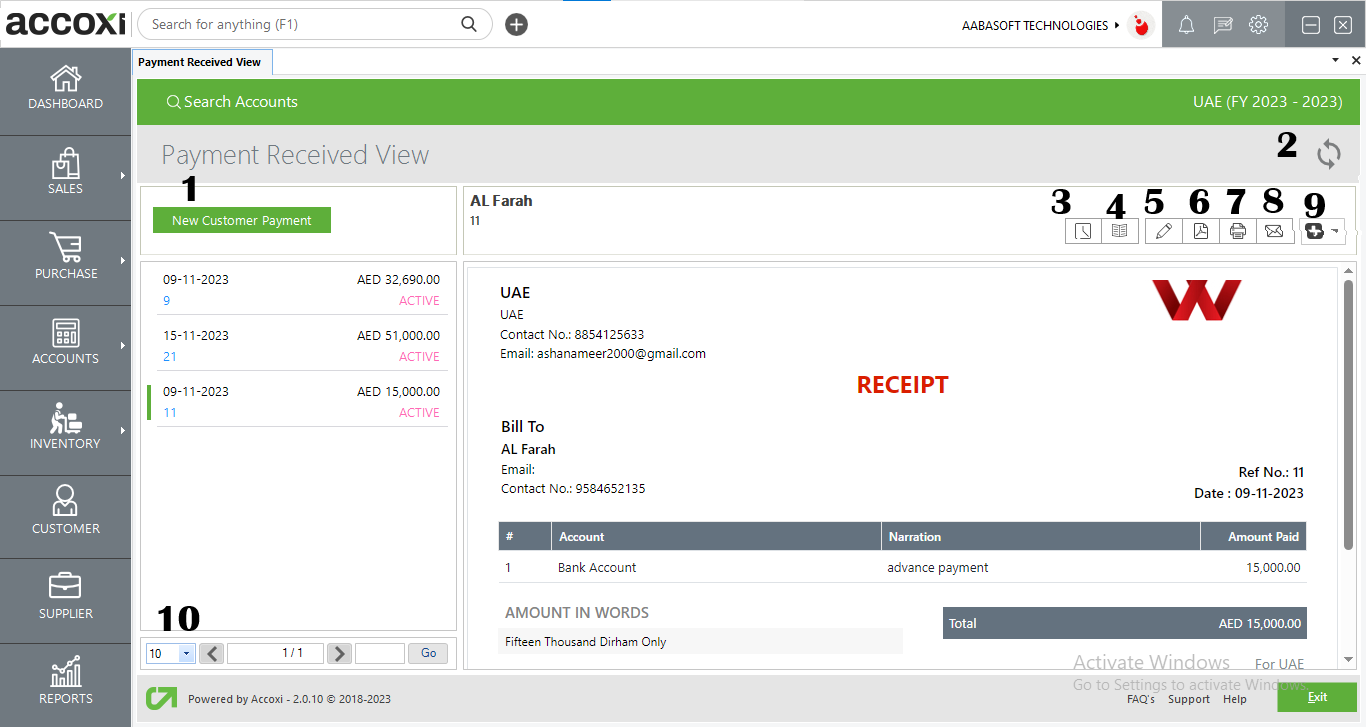
OPTIONS AVAILABLE IN PAYMENT RECEIVED VIEW:
|
Field |
Description |
|
1.New Customer Payment |
Initiating a new customer payment redirects the user to the new customer payment window. |
|
2..Refresh |
If the most recent data is not displayed, click on the refresh icon at the top left corner of the page to retrieve the new data. |
|
3. History |
This menu assists the user in obtaining the historical details of customer payments. OPTIONS AVAILABLE IN THE HISTORY WINDOW
|
|
4. View journal |
This menu displays the journal view of the transaction, illustrating both debit and credit aspects along with their corresponding amounts. |
|
5. Edit |
The Edit menu allows the user to edit or correct the details entered in the Payments Received section. |
|
6. Export To PDF |
If the user wishes to convert the Payments Received to PDF format, the Export to PDF option is available. After clicking Export to PDF, a Save As directory option will appear, allowing the user to choose the location for saving the PDF file. |
|
7. Print |
The Print menu enables the user to print the Payments Received if needed. Upon clicking the Print button, it will redirect to print options where the user can select the printer, the number of copies, and other related settings. |
|
8. Email |
Upon saving the Payments Received window, a Send Mail window will appear. Here, the user can send an email to the customer, with ACCOXI fetching the customer's email as the "TO" address by default, or to any other specified person. |
|
9. More Features |
In the "More Features" option, the user has the ability to cancel the Payments Received receipt. Upon clicking "Cancel," a validation message will appear. The user can then click "YES" to proceed with cancelling the receipt or "NO" to close the option and not cancel. |
|
10. Pagination Control |
This feature manages page navigation and page size. The page size can be set to 10, 20, 50, or 100. By entering the page number in the box and clicking on the "Go" button, it navigates to the specified page. |
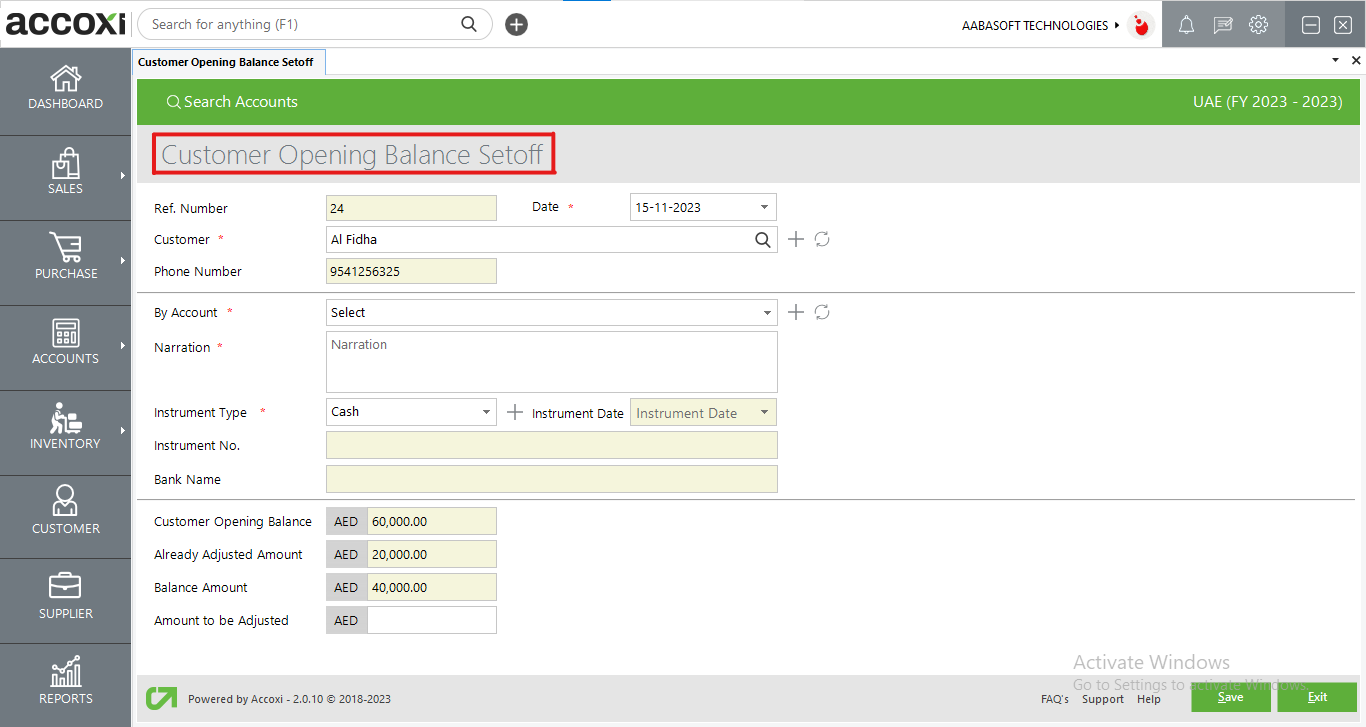
The opening set-off option involves adjusting or setting off any previous year's opening balances or the opening balance of the customer.
To perform the Opening Balance Set-off, follow these steps:
|
Field |
Description |
|
Ref Number |
The reference number for the Customer Opening Balance Set Off is automatically generated. This feature proves useful when filtering data for easy identification. |
|
Customer |
The user needs to select the customer whose opening balance is to be adjusted from the customer drop-down list. Additionally, a new customer can be added by clicking the '+' button, which will redirect the user to a new customer window. The refresh button assists the user in updating the customer drop-down list, allowing them to view any changes made in the list. |
|
Phone Number |
It is automatically retrieved by ACCOXI when the user selects a customer. |
|
Date |
The user is required to select the date of the transaction. By default, ACCOXI automatically fetches the current date as default |
|
By Account |
The user needs to select the mode of account payment, either cash or through the bank. The '+' button can be used to add a new ledger account, redirecting the user to the New Ledger window. The refresh button aids in updating the By Account drop-down list, enabling the user to view any changes made in the list. |
|
Narration |
Input the narration for the opening set-off. |
|
Instrument Type |
The user needs to select the type of instrument used for the payment. If the instrument is cash, the subsequent columns like Instrument Number, Date, and Bank Name will be blocked. |
|
Instrument NO. |
Input the instrument number if the payment is made through bank instruments other than cash. |
|
Instrument Date |
Specify the instrument date if the payment is made through bank instruments other than cash. |
|
Bank Name |
Provide the name of the bank through which the payment is being made. |
|
Customer Opening Balance |
It is automatically retrieved by ACCOXI when the user selects a customer. |
|
Already Adjusted Amount |
Displays any previously set-off amounts for opening balances. |
|
Balance Amount |
Displays the remaining balance of the customer after previous adjustments. |
|
Amount To Be Adjusted |
Customers can input the new amount to be adjusted in this column. |
|
Save |
Clicking this button saves the opening balance set-off and directs the user to the Customer Opening Set Off View window. |
|
Exit |
This button is employed to exit from the current window without saving the entered data. |
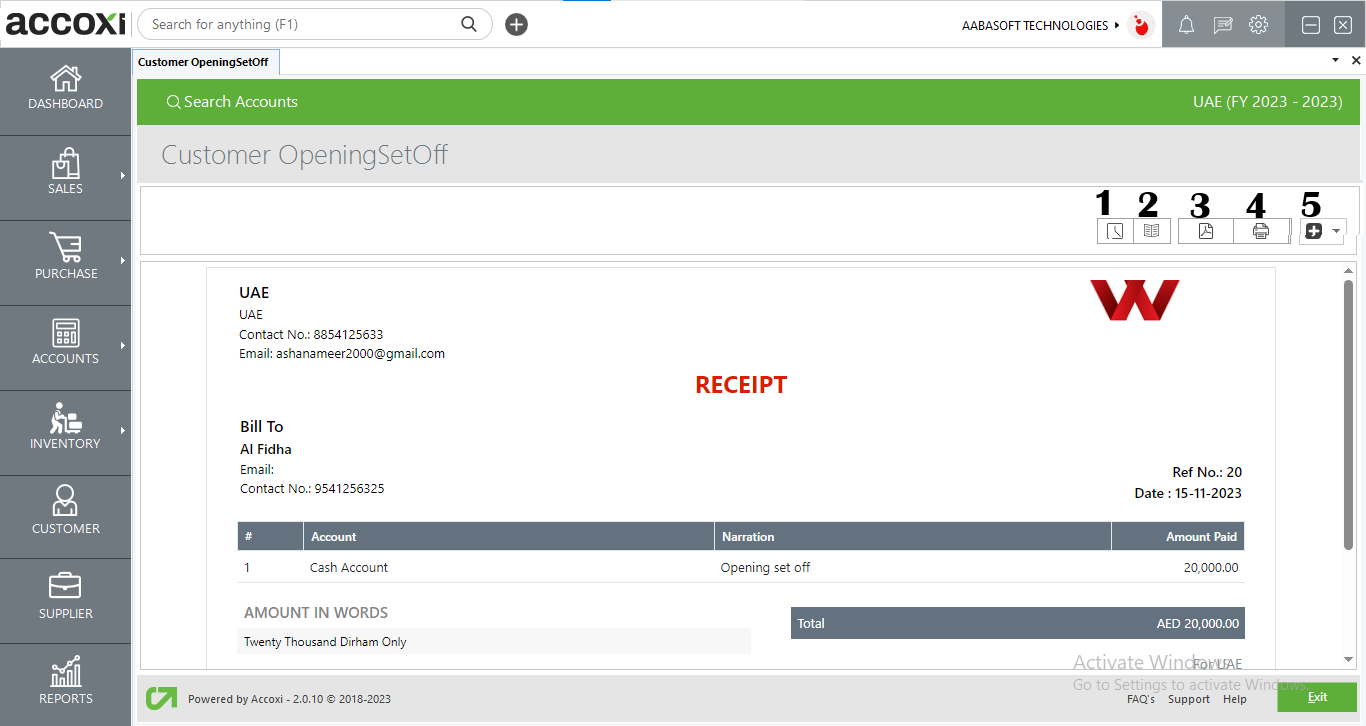
MENU AVAILABLE IN CUSTOMER OPENING SETOFF VIEW:
|
Field |
Description |
|
1.History |
This menu allows users to access the historical details of customer opening set-offs. In the history window, the "Comments and History" option displays all edits and alterations made to the set-off, including dates. Users can also input comments related to the set-off within this section. |
|
2. View journal |
This menu provides a journal view of transactions, displaying both debit and credit aspects along with their corresponding amounts. |
|
3. Export To PDF |
Users can convert the customer opening set-off to PDF using the "Export to PDF" option. Upon selecting this option, a "Save As" directory prompt will appear, allowing users to choose the location for saving the PDF file. |
|
4. Print |
The "Print" menu facilitates the printing of the customer opening set-off. Upon clicking the Print button, users will be redirected to print options, where they can choose the printer, specify the number of copies, and configure other printing preferences as needed. |
|
5. More Features |
In the "More Features" option, users can cancel the customer opening set-off. Clicking "Cancel" triggers a validation message, prompting the user to choose "YES" to cancel the receipt or "NO" to cancel and close the option. |
3. Refresh
To view the latest data, click on the refresh icon located in the top left corner of the page to fetch the updated information.
4. Export
To export the payment received search list to Excel format, click the "Export" button near the +New button at the top right corner. Choose the file location and click "Save" to initiate the export process.
5. Color filter
Cancelled payment received entries will be visually distinct in the payment received search window, marked in red to facilitate easy identification for the user.
6. View icon
The icon serves to redirect the user to the corresponding transaction view window.
7. More option
The "More" icon provides options to edit, view, export to PDF, and print payment received details. The "EDIT" option redirects to the corresponding transaction edit window for data updates. The "View" option leads to the detailed view of the transaction. For PDF conversion, users can choose the "Export to PDF" option. The "Print" menu facilitates printing of corresponding transactions, if needed.
8. Pagination Control
This feature manages page navigation and size, allowing users to set the page size to 10, 20, 50, or 100. Users can input a page number in the box and click the "Go" button to navigate directly to the specified page.
9. Exit
Located below the pagination control, the exit button serves to exit the payment received search page. Simply click on the exit button if you wish to leave the page.