An Overview of the Salary Module of Accoxi

A salary is a form of payment from an employer to an employee, which may be specified in an employment contract. In Accoxi, a separate form is maintained to enter salary transactions. It enables the user to create a new payment, record and can search previous Salary payment details.
This Video explains how to use Salary Form Feature in Accoxi. Accoxi is top notch cloud accounting software in India which enables the user to create a new payment, record and can search previous Salary payment details which also maintains a separate form for salary transactions. Logon to your free billing software, Accoxi and choose the salary options from Accounts Module which open up to a Salary Search where you can view the list of Salary accounts and Salary paid accounts that the user created, payment details, total amount of salary, balance to pay, paid amount, current status of salary forms etc.

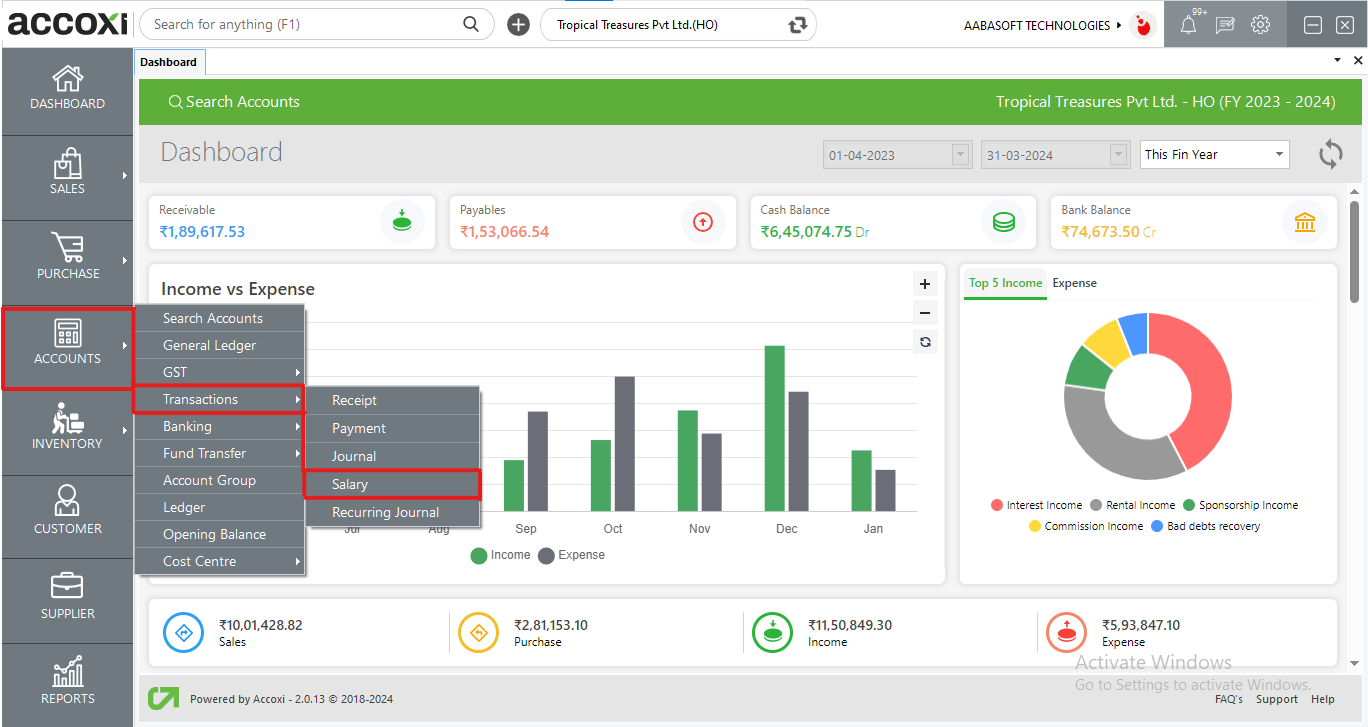
Open the Accounts module, select Transactions and click on Salary
When the user clicks the Salary option, then it opens to Salary Search.
Salary search consists of various menus and it shows the list of Salary accounts and Salary paid accounts that the user created. It shows the details regarding the payment and the user can identify the total amount of salary, paid amount, and balance to pay. It also shows the Account name, date, ref no, and current status of the Salary form. The status may be of paid, partially paid, active, or canceled.
Menus Available in Salary Search
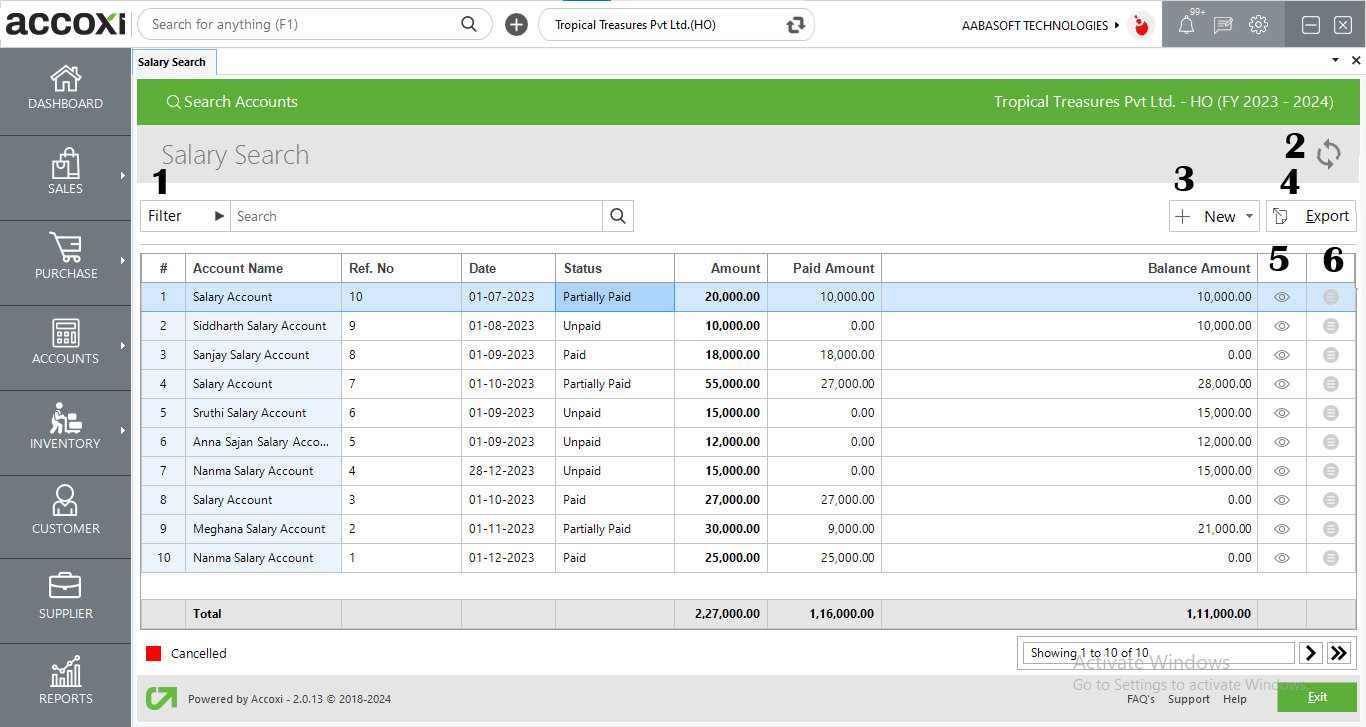
1. Filter
The filter of Salary search can be done in two ways-Either users can directly enter the account name into the search bar near the filter option or by clicking the filter dropdown. The user can filter the data by voucher number, Account name, date, or status. If the user clicks on the By Date option, then needs to enter the starting date and end date. Users can also filter the data by the status of the Salary, which includes Active or Cancelled.
2. Refresh
If the latest data is not displayed, click on the refresh icon on the top left corner of the page to fetch the new data.
3. +New
Add a New menu that includes two options, Salary and Salary Payment Search. This menu is used to create a new Salary form or to get Salary Payment Search.
a. Salary
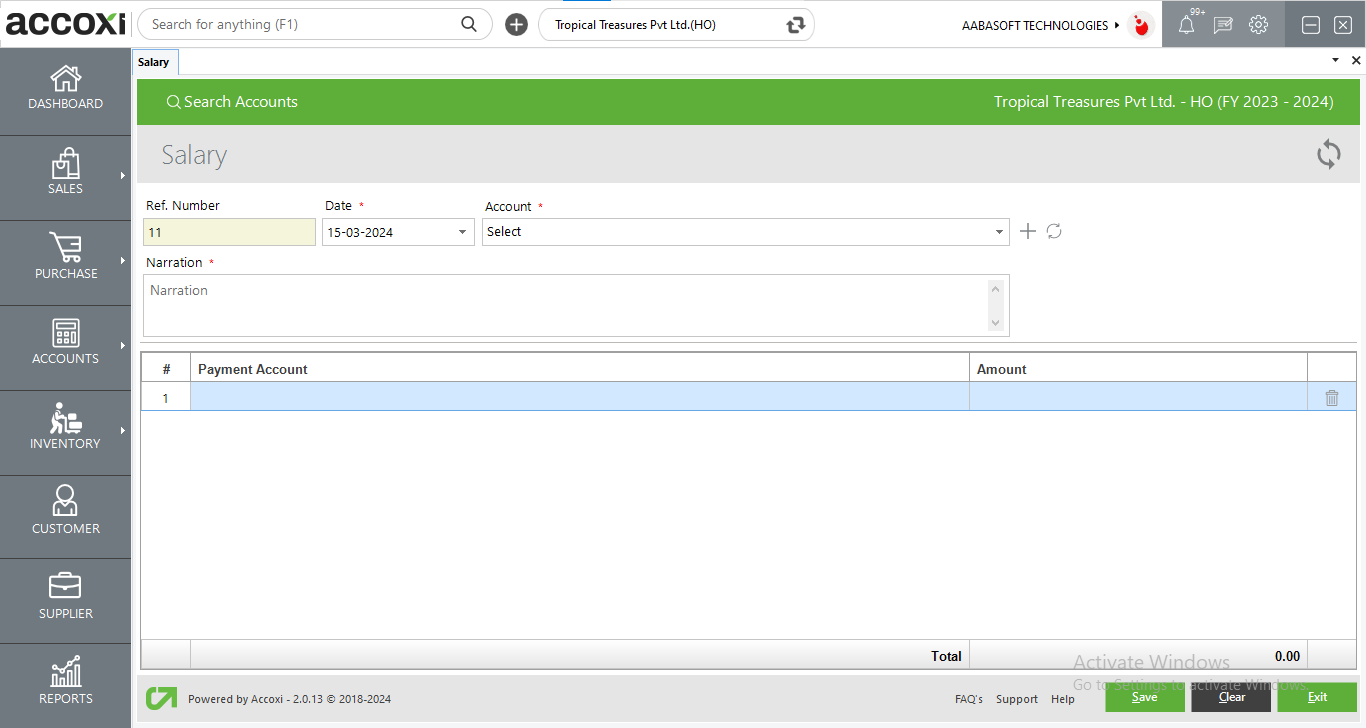
It is the menu option to create a new salary form. By clicking on the Salary menu a new form will appear and the user needs to enter the details on the appropriate field to create a new account.
Steps to Create a New Salary Voucher
|
Fields |
Description |
|
Ref Number |
Reference number helps the user to identify transactions in records. It will automatically appear on the form and the user can’t edit the reference number, as it will be the continuation of the previous Salary form. |
|
Date |
The date will automatically appear on the date field and it may be the current day date. If the user wants to change the date, it can be done by clicking on the date menu and can select the required date |
|
Account |
Here the user needs to choose Account for creating a salary form. By clicking on the select option, a list of available accounts will appear and you can choose the Account. If the user wants to add a new account, it can be done by clicking on the + menu. |
|
Narration |
Here user can add additional explanations regarding the Salary account. |
|
Payment Account |
Need to select the payment account of the salary in this field. Users can choose multiple payment accounts for one salary form. Underpayment account, if the user chooses TDS payable then a new column will appear on the right side as a TDS section and need to add an appropriate section with selected TDS payable. |
|
Amount |
Enter the amount in the amount field that the user wants to Pay. |
|
Delete |
This menu helps the user to delete the unwanted Payment accounts that are entered in the field. |
|
Save |
Click on the Save menu to save the details that were entered and to create a Salary account. |
|
Clear |
The clear menu is for clearing or removing the entire data that entered by the user. |
|
Exit |
The exit menu is used to go to the previous page without saving the Salary form. |
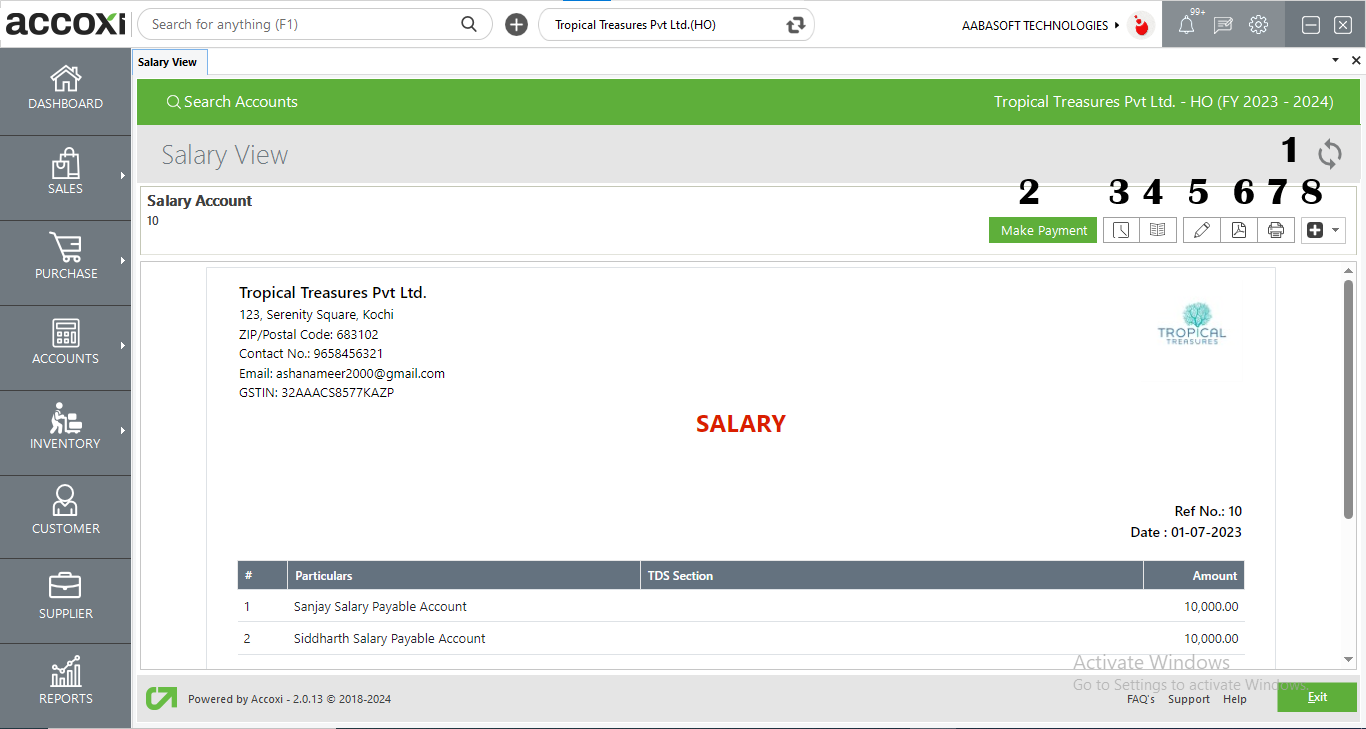
After clicking the Save menu, the Salary View form appears on the screen.
Salary View
It enables the user to view the Salary form that has already been created. It consists of various menus and it shows the total amount of payment.
|
Fields |
Description |
|
1. Refresh |
If the latest data is not displayed, it can be done by clicking on the refresh icon on the top right corner of the page to fetch the new data.
|
|
2. Make Payments |
This menu is used for making payments of the Salary. By clicking on this menu, Salary Payment form will appear.
|
|
3. History |
This menu helps the user to obtain the history details of the Salary form.
There are two tabs in the history. They are, Comments & history and Payments.
The comments & history tab shows the edits or correction work if any done with date wise and users can add comments on the comment box if required.
The payment tab of the history menu shows the complete details of payment history. The user gets the payment details including date, payment no, reference no, payment mode, and total paid amount.
|
|
4. View Journal |
It is the menu that shows the journal view of the transaction.
|
|
5. Edit |
The Edit menu helps the user to edit or correct the details that are entered in the Salary form and can save again after it. When clicking on the edit menu, the screen will go to the previous window of the new Salary form.
|
|
6. Export to PDF |
This menu enables the user to export the created Salary form to PDF format and can save in the system.
When the user clicks on the PDF menu, a new tab will appear to save the file. Then the user can select the location to save the file, can set a name, and click on the save button to save the file in PDF format.
|
|
7. Print |
If the user wants to take the printout of the created Salary form, it can be done by using the menu Print on the top right side of the Salary View.
When the user clicks on the print menu, a new tab will appear on the screen and it contains the details regarding the print. Users can set the page range, page height, and width and can enter the required number of copies here. By clicking on the Print button, the user gets the printout of the Salary form.
|
|
More options |
More options menu include three more options, Cancel, Create Duplicate & cost centre allocation.
The cancel option enables the user to cancel the created salary form. If the user wants to create one more copy or duplicate copy of the created salary form, then it can be done by using Create Duplicate menu. If the user wants to allocate the salary to any department, this option can be used.
|
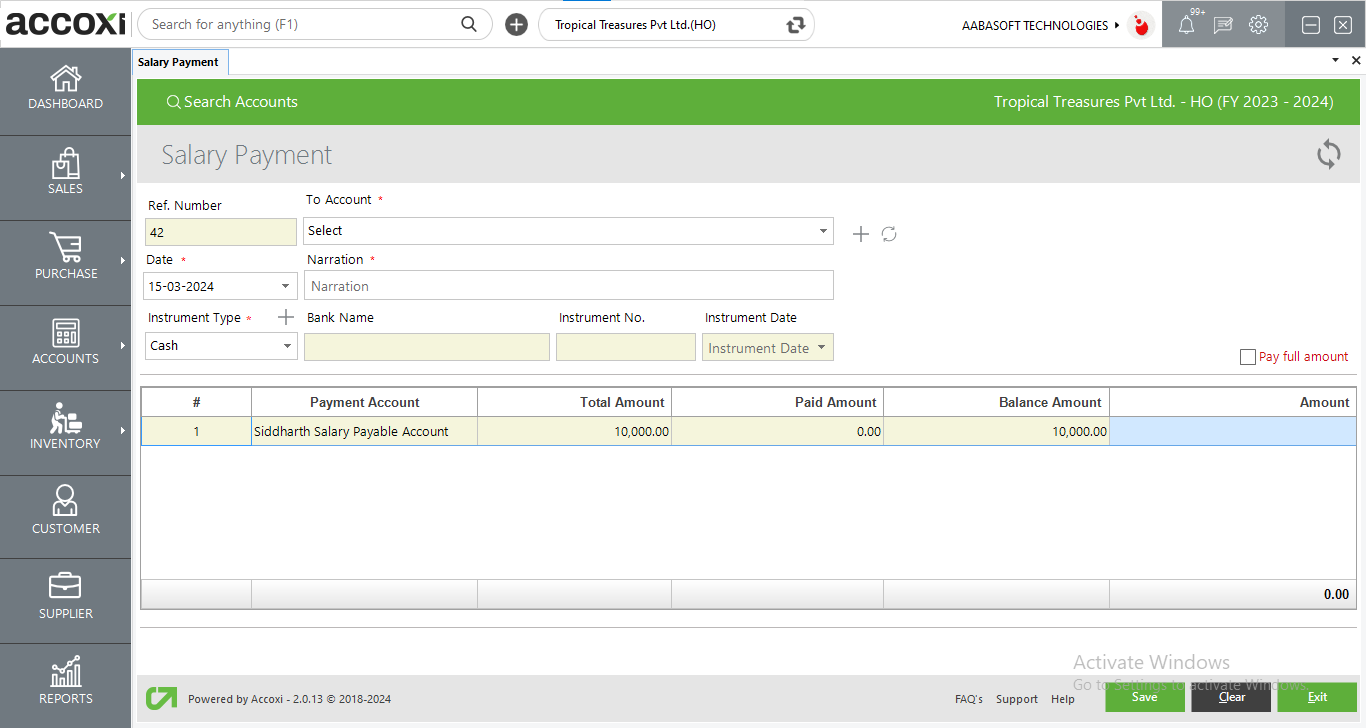
Salary Payment
Steps to Make Payment of Salary
|
Fields |
Description |
|
Ref Number |
Reference number helps the user to identify transactions in records. It will automatically appear on the form and the user can’t edit the reference number, as it will be the continuation of the previous payment form. |
|
To Account |
Here the user needs to select the account type for the payment. Either in a Bank account or Cash. If the user wants to add or create a new Account, it can be done by clicking on the + menu. |
|
Date |
The date will automatically appear on the date field and it may be the current day date. If the user wants to change the date, it can be done by clicking on the date menu and can select the required date. |
|
Narration |
Here user can add additional explanations regarding the payment. |
|
Instrument Type |
Users need to select the instrument type that is used to make payment. It includes cash, bank transfer, cheque, etc. The user needs to enter the instrument number, instrument date, and bank name in the case of every instrument type payment excluding cash payment. |
|
Bank Name |
Users can enter the Bank name on this field excluding the case of cash payment. The bank name will depend on the instrument type and this field will be blocked if the payment term is by cash. |
|
Instrument number |
This field is to enter the instrument number of the payment instrument. If the user selects the instrument as cash, then the instrument number field will be blocked and not need to enter any number. Users can enter the instrument number on this field excluding the case of cash payment. |
|
Instrument date |
This field is to set the date of the payment instrument. Users can select or set the date on this field excluding the case of cash payment. |
|
Pay full amount |
It is the option that appears on the right side of the page, using that if the user can make the Salary payment in full. By marking on the Pay full amount menu, the user can make full payment. |
|
Total Amount |
This field shows the total amount of salary. |
|
Paid amount |
If the user paid any amount as salary, then it will appear on this field. |
|
Balance amount |
This field shows the balance payment amount of Salary after payment. |
|
Amount |
Enter the amount in the amount field that the user wants to pay. If the user selects the Pay full Amount option, then this field will be blocked. |
|
Save |
Click on the Save menu to save the details entered and to create the payment. |
|
Clear |
Clear menu is for clearing or removing the entire data that is entered by the user. |
|
Exit |
The exit menu is used for go to the previous page without saving the payment form. |
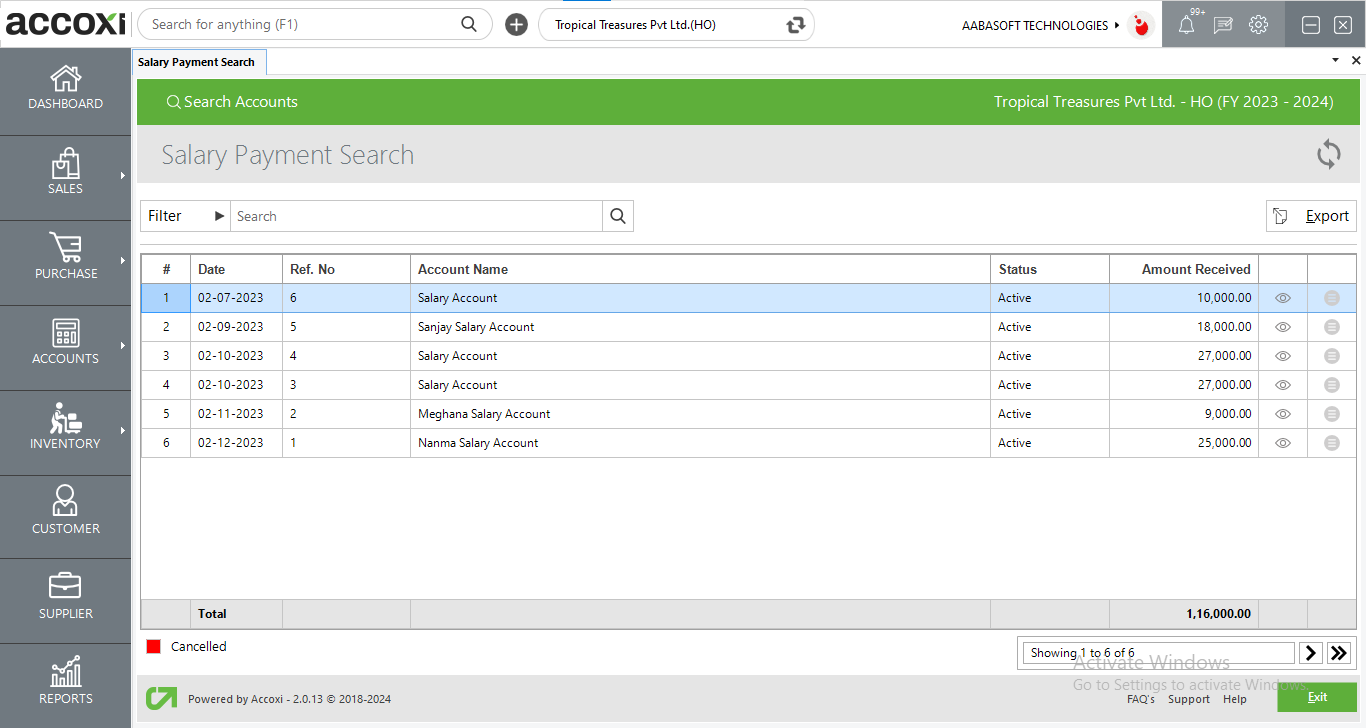
b. Salary Payment Search
This menu provides the details of Salary Payments. By clicking on the Salary Payment Search menu, it will open the list of salary payments. User can search the payment details here, and can easily identify the canceled payments also. It shows the details of Salary Payment include the date, account name, the amount received, and status.
|
Fields |
Description |
|
Filter |
Filter of Salary Payment search can be done in two ways-Either user can directly enter the account name into the search bar near filter option or by clicking the filter drop down. The user can filter the data by voucher number, Account name, by date or by status. If the user clicks on the By Date option, then need to enter the starting date and end date. User can also filter the data by the status of the Salary, it include Active or Cancelled. |
|
Refresh |
If the latest data is not displayed, click on the refresh icon on the top left corner of the page to fetch the new data. |
|
Export |
The Payment list can be export to Excel format. Click the Export button at the top right corner near the +New button. Select the file location and click on save. |
|
View |
View menu enable the user to view the Payment made form that already created.
|
|
More settings |
This menu includes edit, view, export to PDF and print the Payment form
a. Edit Edit menu helps the user to edit or correct the details that entered in the Salary payment form and can save again after it. When click on the edit menu, the screen will goes to previous window of Salary payment.
b. View View menu enable the user to view the Payment form that already created.
c. Export to PDF This menu enable the user to export the Salary Payment f form to PDF format and can save in the system.
d. Print If the user want to take the print out of the created Payment form, it can be done by using the menu Print on the top right side of the order view.
|
|
Cancelled |
User can easily identify the cancelled payments by using color format. Cancelled payments are indicates with red color. |
|
Pagination control |
It controls the page navigation and the page size. Page size can be set to 10, 20, 50 or 100. And by giving page number in the box and clicking on Go button. It jumps to the said page. |
|
Exit |
Exit menu is using for go to the previous page. |
4. Export
The Payment made list can be export to Excel format. Click the Export button at the top right corner near the +New button. Select the file location and click on save.
5. View
View menu enable the user to view the Payment form that already created.
6. More Options
This menu includes edit, view, export to PDF and print the Payment form
a. Edit
Edit menu helps the user to edit or correct the details that entered in the Salary payment form and can save again after it. When click on the edit menu, the screen will goes to previous window of Salary payment.
b. View
View menu enable the user to view the Payment form that already created.
c. Export to PDF
This menu enable the user to export the Salary Payment f form to PDF format and can save in the system.
d. Print
If the user want to take the print out of the created Payment form, it can be done by using the menu Print on the top right side of the order view.
7. Cancelled
User can easily identify the cancelled payments by using color format. Cancelled payments are indicates with red color.