In ACCOXI, you can create invoices for purchase that you made with your suppliers.
Purchase invoice is a commercial document or bill presented to a buyer by a seller or service provider for payment within a stated time frame that indicates what has been purchased, in what amount and for what price. A purchase invoice can be used to prove that something was bought and how much was paid for it. In ACCOXI, you can create invoices of purchases that you made with your suppliers.
The following video takes you to create purchase invoices for purchases made from the suppliers. adjusting balances on invoices, integrating invoices through paperlez, and other features.
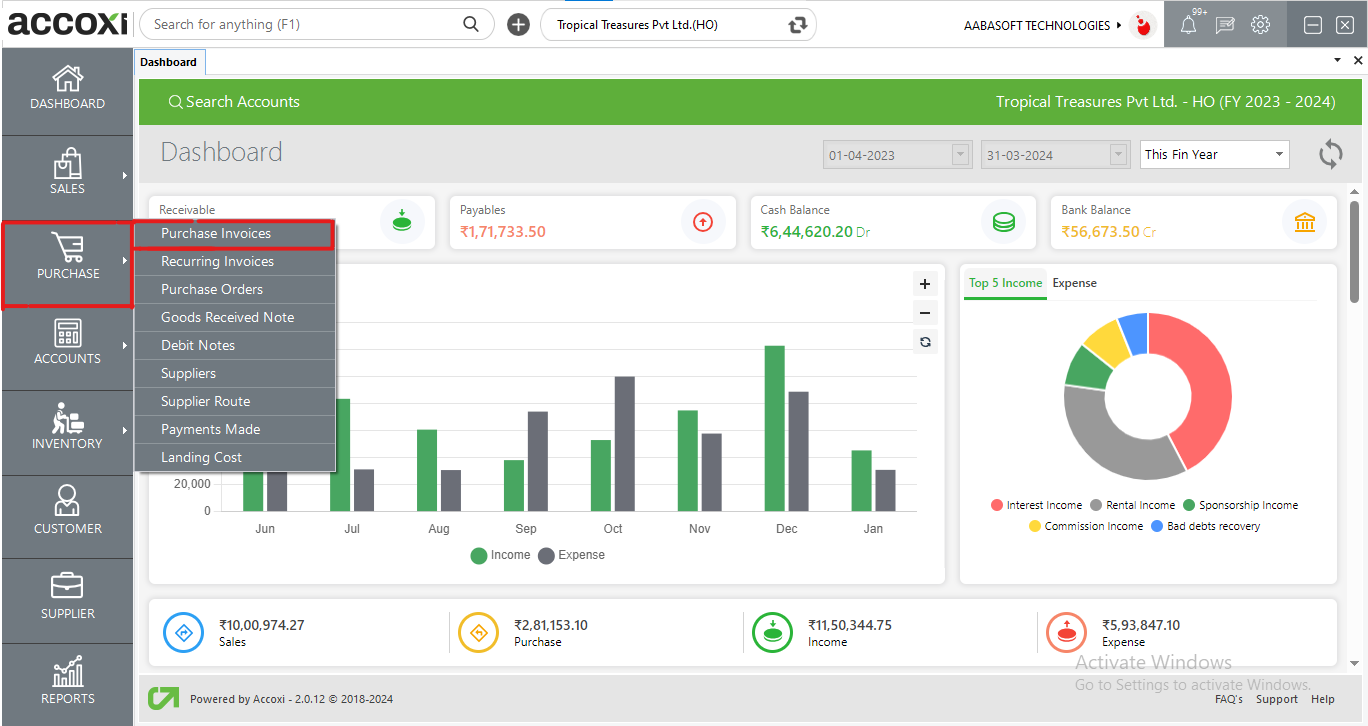
When we click on purchase module it gives the user access to various purchase related functions and purchase invoices to access the purchase invoice function.
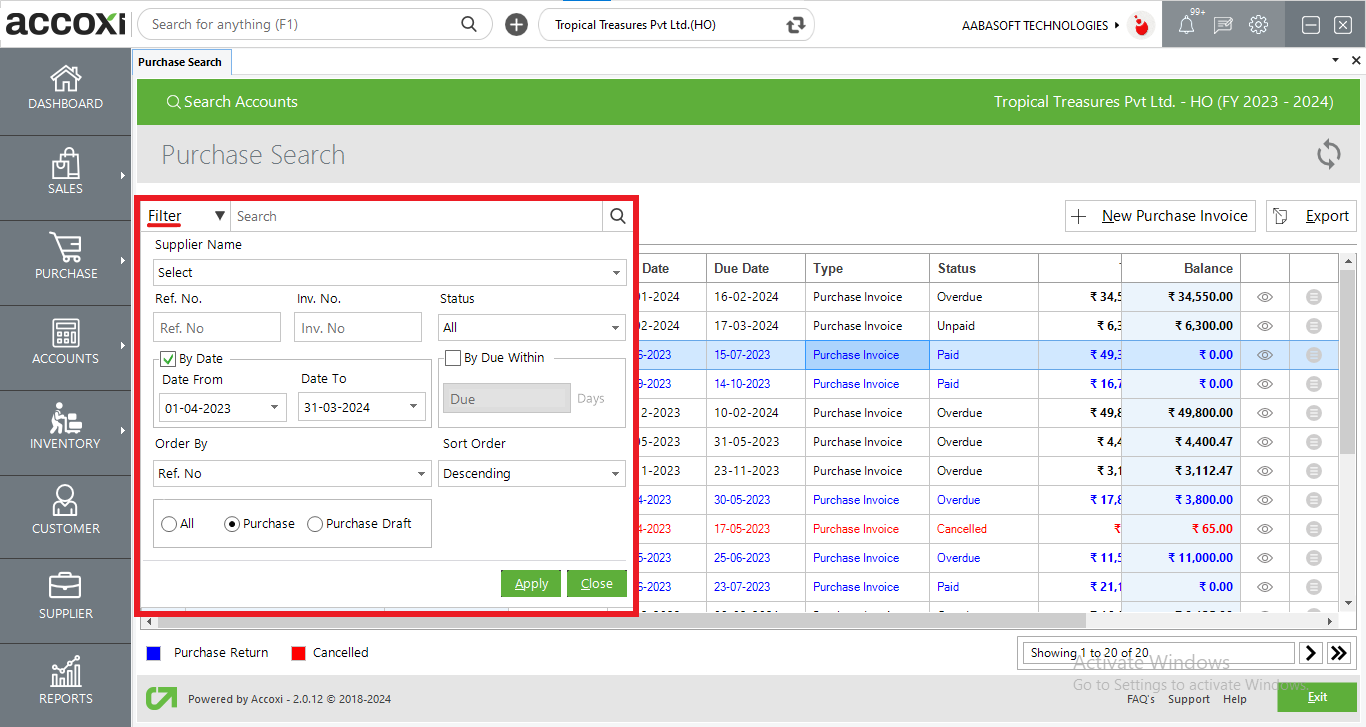
Purchase/Bill Search
Purchase/bills search shows the list of purchases, invoices and bills of the business.
DATA AVAILABLE IN PURCAHSE / BILLS SEARCH TABLE:
|
FIELD |
DESCRIPTION |
|
# |
Serial number of the data available in the table |
|
Supplier name |
Shows the supplier name of the transaction |
|
Invoice number |
Displays the invoice number of the transaction |
|
Ref. no. |
Shows the reference number of the purchase invoice |
|
Invoice date |
Shows the invoice date of the transaction |
|
Due date |
Displays the due date of the payment of the invoice |
|
Type |
Shows which type of invoice i.e. purchase invoice or bill |
|
Total |
The total amount of the transaction is displayed in this column |
|
Amount paid |
The amount paid against the invoice is displayed in this column. By clicking the amount paid user can view all the history of the payments made against this invoice like advance payments, debit notes etc. It can be viewed in the amount paid pop up window |
|
Balance |
The balance amount after paying against an invoice will be displayed in this column |
|
Status |
The status of the invoice is displayed in this column the status will be “paid, overdue, partially paid etc.” |
Menus Available in Search
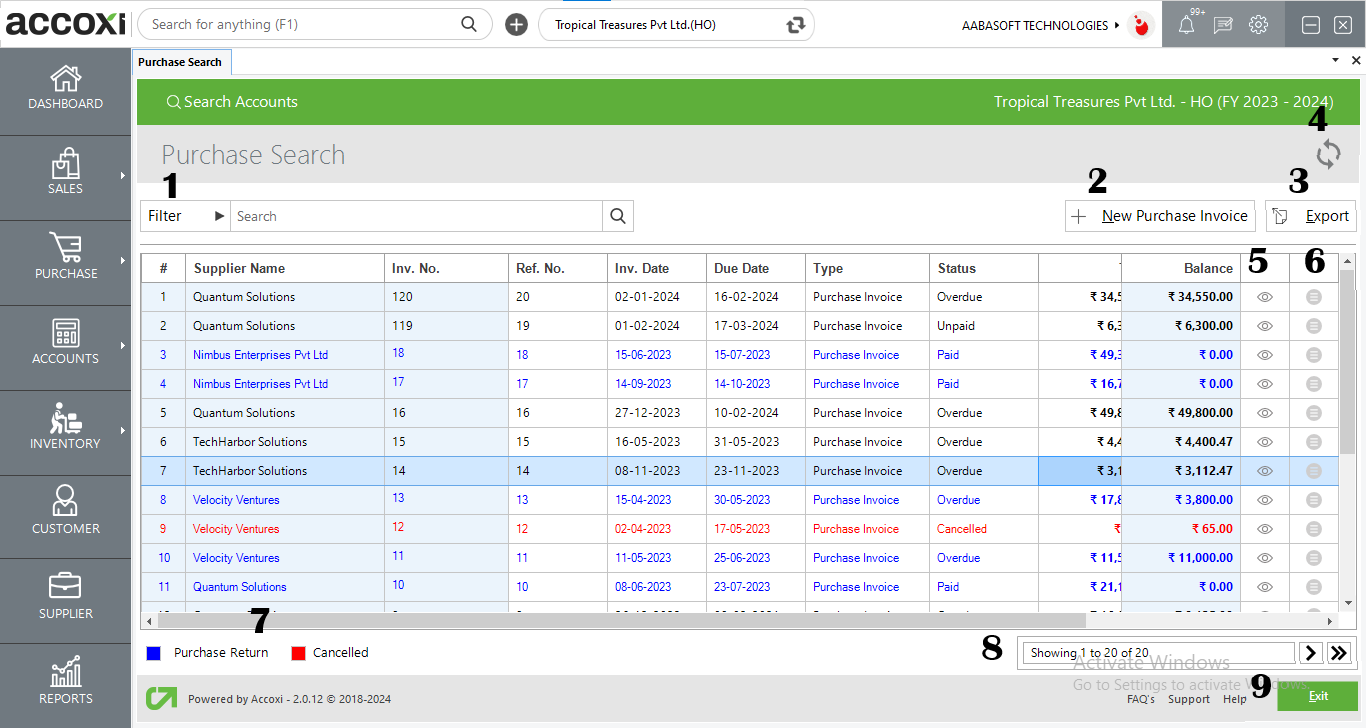
1. Filter option
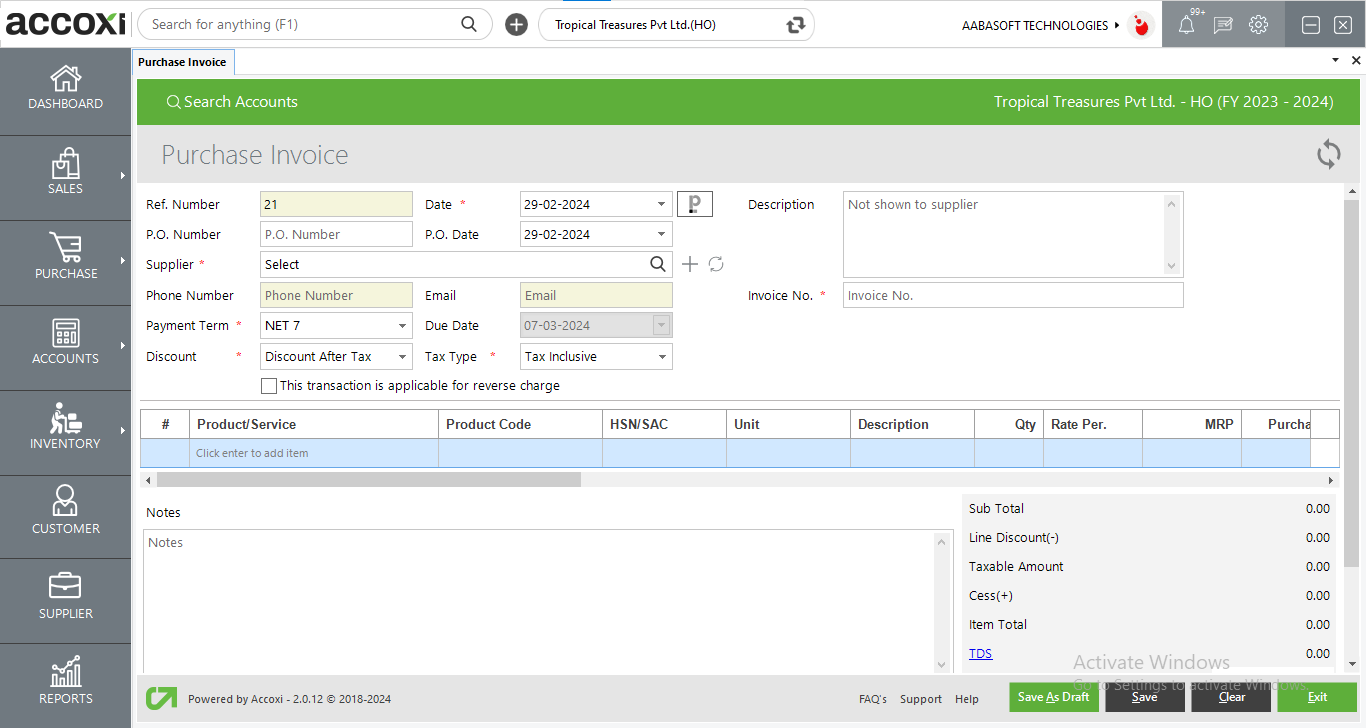
2. New Purchase Invoice
The new purchase invoice button opens into the purchase invoice form where the user can add a new invoice. Some fields are marked in red where the details are to be entered compulsorily. Users can set a new voucher format. For certain suppliers, it can be set in the voucher settings menu. And by setting so, new purchase invoice can be created according to that voucher format. The same concept can be seen while creating a sales invoice
|
Fields |
Description |
|
Ref number |
The reference number is Automatically generated. So this column is blocked. |
|
Date |
Enter the date of the purchase invoice. But by default, the date will be set as the date of entering the transaction into ACCOXI. |
|
Paperlez Icon |
This option allows users who have integrated paperlez in Accoxi to attach or associate documents to purchase invoices. A tab will be opened showing all the documents uploaded in Paperlez and users can choose the required documents to be attached with the invoice by associating the document. |
|
Invoice number |
Entering the invoice number of the transaction is mandatory. If the user tries to save the invoice without entering the invoice number, a validation message will appear |
|
Supplier |
Select the supplier from the drop-down menu |
|
Phone number |
Will be automatically filled when we select the supplier |
|
Description |
Enter the description of the purchase |
|
Payment term |
The Payment Term Which Is Already Set With The Supplier Will Be Shown Here. User Can Change The Term If You Want |
|
P.O number |
Enter the purchase order number here |
|
P.O date |
Enter the purchase order date |
|
|
It will be automatically filled when we select the supplier
|
|
Tax type |
Select tax type |
|
Discount |
Select type of discount |
|
Reverse Charge Applicability |
The recipient of the goods or services is liable to pay the tax instead of the provider of the goods and services. The user can enable this option |
|
Product or service |
Enter the product here. By pressing the enter key it will give you the details of all products that you entered |
|
Batch |
Select the batch of the product by clicking on the batches column |
|
QTY |
Enter the quantity of the products and save |
|
ITC |
Users can choose whether the transaction is eligible under ITC or not |
|
Blocked columns |
If a product is entered in the table, the product’s product/service code, HSN/SAC, and unit columns will be blocked because these data are inserted while we create the product. When the quantity is entered tax%, taxable amount, tax amount, and the item total will change according to that. |
|
TDS |
TDS can be entered in this section in two ways Firstly the user can select tax name from the drop-down menu and in the amount column the calculated % of tax amount will be shown and the user cant edit that column Second way is the user directly using the amount column to enter the TDS amount.
|
|
Discount |
This column is to add any discounts given on purchases. This may be an after-tax/before-tax discount that can be selected previously. User can enter the amount in this column and it will be deducted from the item total. |
|
Other charges |
This column is to add any other expenses associated with the purchase. |
|
Round off |
This column is to round off small amounts and the round-off may be downward, upward, or nearest. This is selected from the preferences menu à organization settings. |
Menu’s available in purchase view
After saving the purchase invoice it will redirect to the purchase view option where the user is available with various options like print, payment, journal etc.
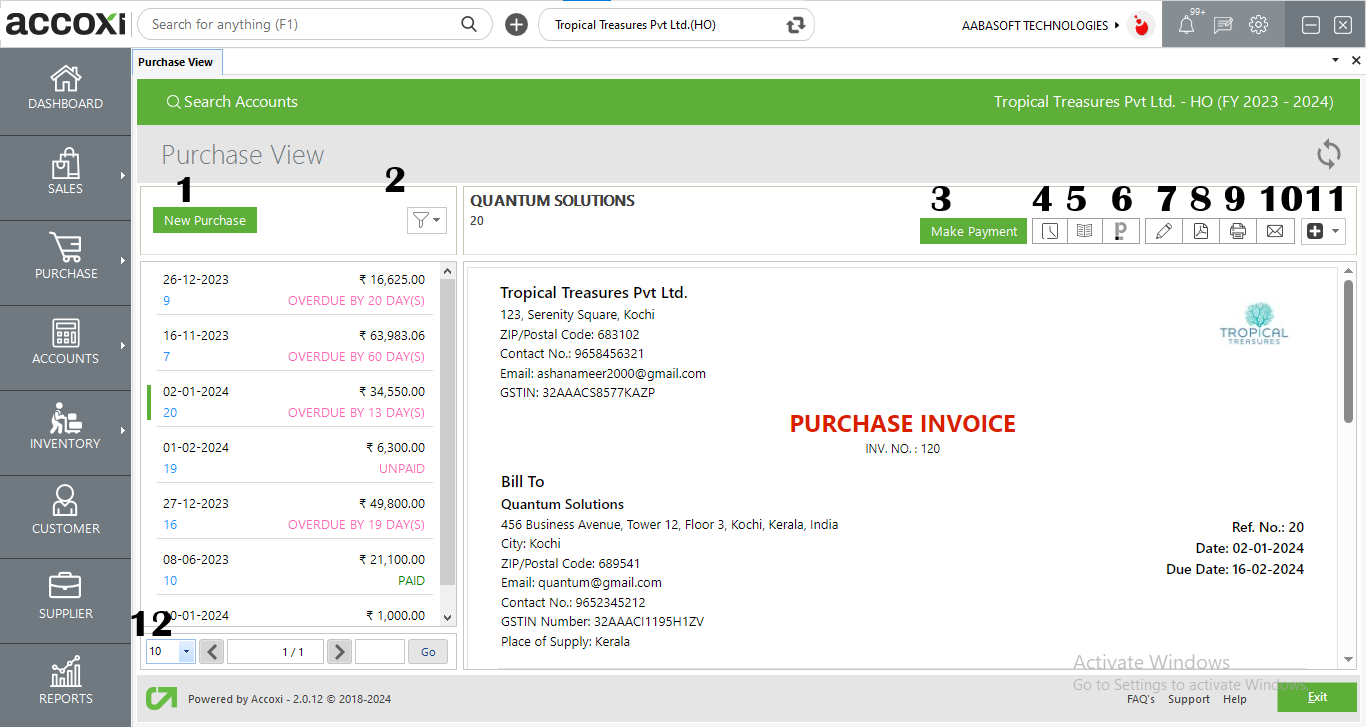
the new purchase option redirects the user to purchase invoice creation to create a new purchase invoice
The filter menu enables the user to filter the purchase invoice of the supplier data according to partially paid, unpaid, overdue, overdue by today, canceled, and draft.
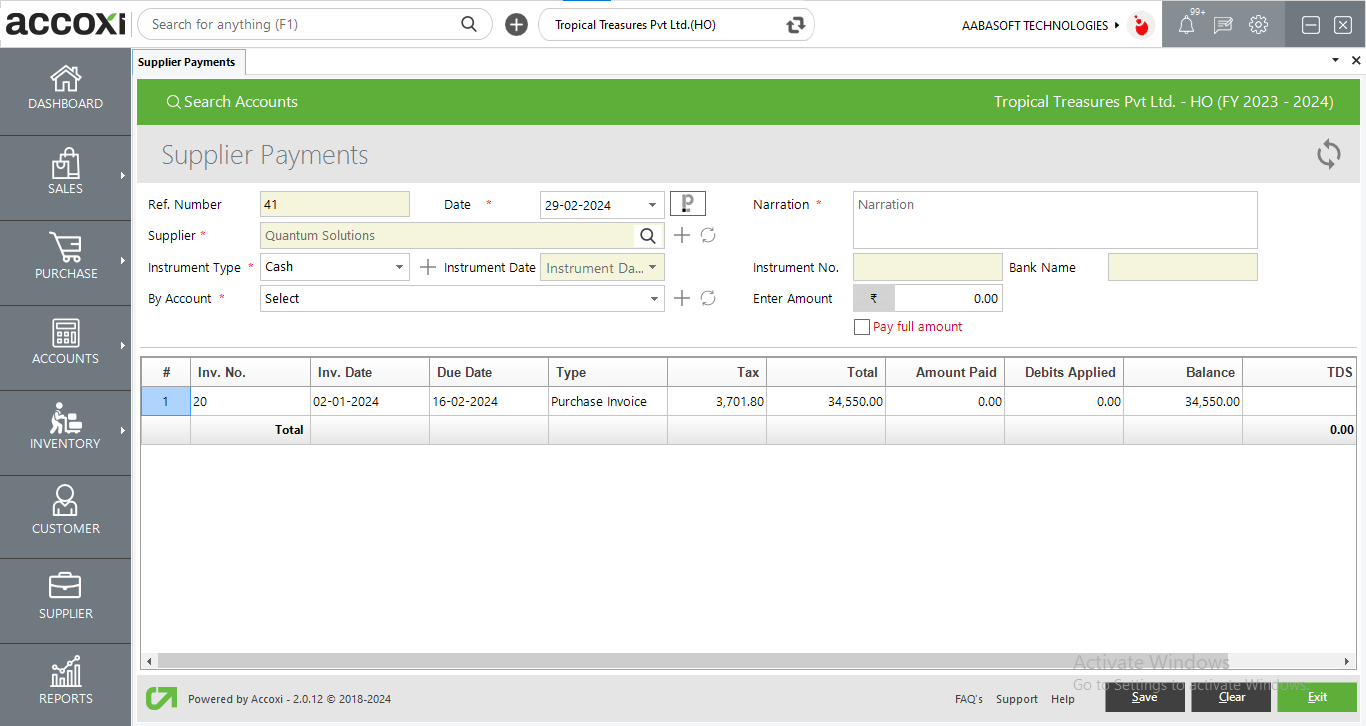
This is used to make payments to the supplier for the invoice created.
Steps to make payment
|
Fields |
Description |
|
Ref number |
Will be automatically filled when we select make payment from invoice view
|
|
Date |
Enter the date of the payment |
|
Paperlez Icon |
This icon is available for Paperlez app users and this is the option to search Paperlez documents from Paperlez tab. While clicking on the paperlez icon, it opens to Paperlez documents page and the user can search the associated documents from the page. |
|
Supplier |
Will be automatically filled when we select make payment from invoice view
|
|
Narration |
Enter the narration of the payment |
|
By account |
Select from which account amount is to be paid from |
|
Instrument type |
Select the type of instrument to be used to pay the supplier If the user selects a cash account the instrument number, date, and bank name column will be blocked. |
|
Instrument number |
Enter the instrument number |
|
Instrument date |
Enter the instrument date
|
|
Bank name |
Enter the name of the bank |
|
TDS |
Enter the TDS amount on this field |
|
Debits Applied |
This table shows the debits applied in this transaction |
|
Amount column |
Enter the amount to be paid you can also pay partially |
|
Pay Full amount option |
by clicking it the amount will be paid fully |
|
Save |
Click on the Save button to save the details that is entered. After clicking save, the payment made view will appear. |
|
Clear |
The clear menu is for clearing or removing the entire data entered by the user. |
|
Exit |
Exit menu is used to exit from the payment window without saving the supplier payment form |
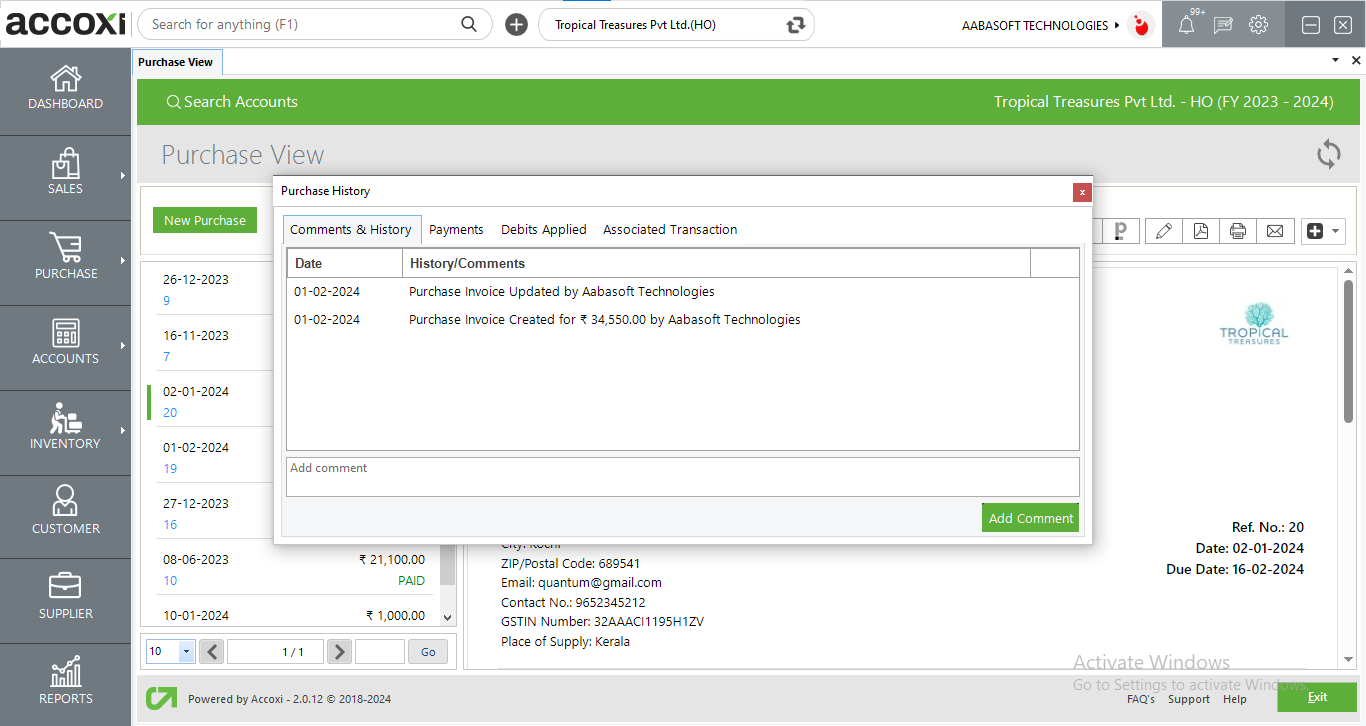
This menu helps the user to obtain the history details of the PURCHASE INVOICE.
OPTIONS AVAILABLE IN THE HISTORY WINDOW
1. Comments and history
Shows all the edits and alterations of the purchase invoice with the date of the changes made
2. Payments history
Shows the details about the payments made with the date of payment, reference number, instrument number, payment mode, and amount.
3. Debits applied
Details of the Debits applied using the debit note are shown here with the date, debit note number and debit applied.
It is the menu that shows the journal view of the transaction. The Journal view shows both debit and credit aspects with the amount.

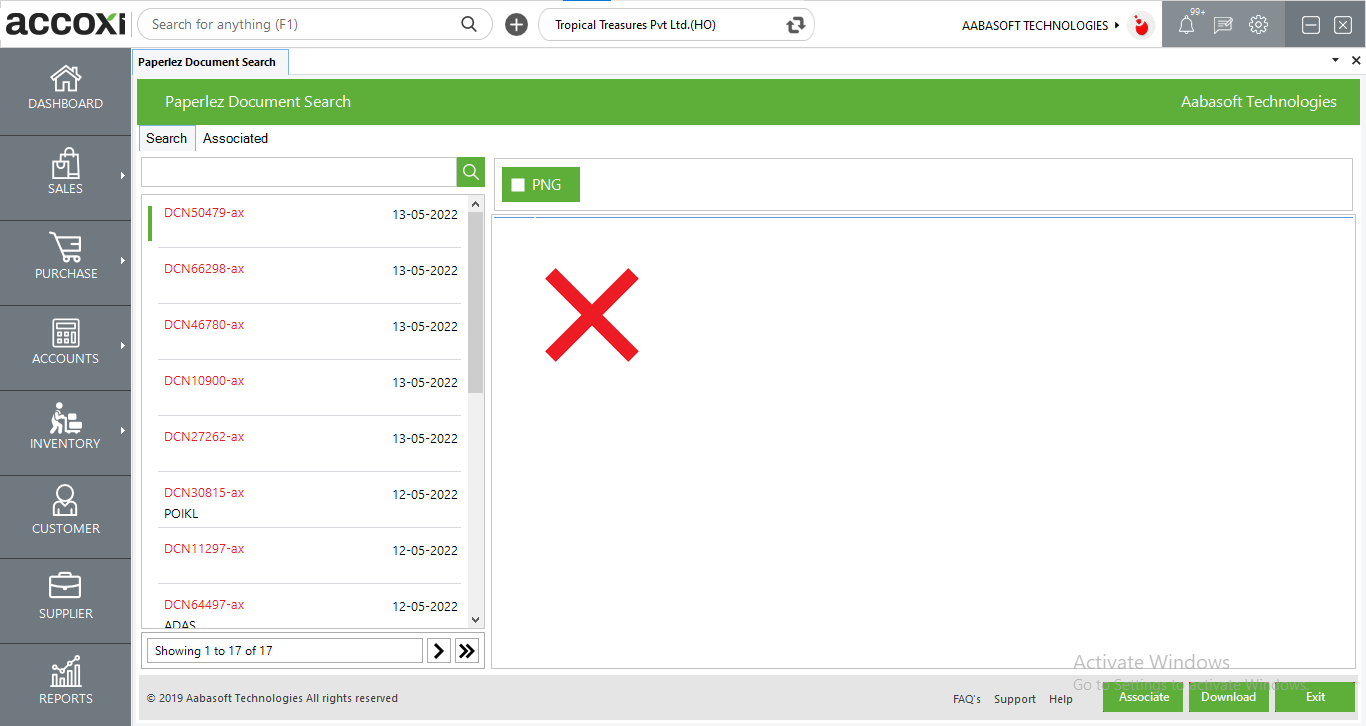
This option allows users who have integrated paperlez in Accoxi to attach or associate documents to purchase invoices. A tab will be opened showing all the documents uploaded in Paperlez and users can choose the required documents to be attached with the invoice by associating the document.
|
Fields |
Description |
|
Search Tab |
shows all the document lists uploaded in paperlez
|
|
Associated tab |
Displays the list of all Associated Documents to the particular invoice |
|
PNG/PDF |
Users can choose the file format before associating |
|
Associated |
To attach the paperlez document to your invoice, the user needs to click on associate. |
|
Download |
This will download the paperlez document to your system. |
The Edit menu helps the user edit or correct the details entered in the purchase invoice and can save again after it. user will be redirected to the purchase invoice creation module user can edit the price change customer and once they click update, the updated invoice will be generated.
If the user wants to convert the purchase invoice to PDF format, then the export to PDF option is available.After clicking export to pdf, a save as directory option will appear and the user can opt for the pdf file saving location
The print menu helps the user to print the created purchase invoice if required. After clicking the print button it will redirect to print options where the user can select the printer, the number of copies to be taken, etc.
The user can send the created purchase invoice to the suppliers or to anyone through Email by using the Email button. By clicking the mail button it will redirect the user to the mail format window where the “TO” mail address automatically appear with the mail id of the supplier.”

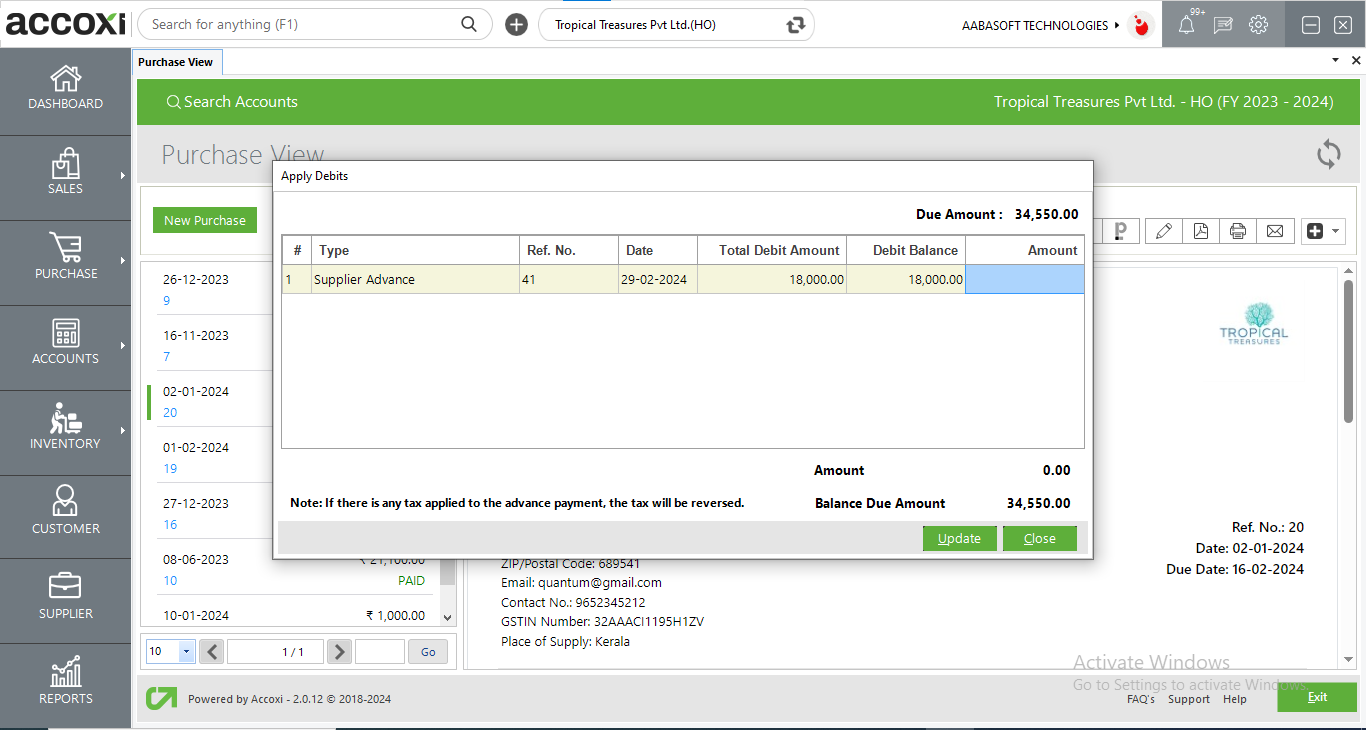
Gives access to more features to the invoices like apply debit note supplier advance etc.
a.Apply debits :
Debits are unapplied balance amounts of suppliers from supplier advances or debit notes. Debits are amounts that the supplier has to owe to the customer.
Applying the debits function is useful to adjust any purchase return balances to the invoice.
Users can adjust the amount to be received from the customer using the debit note created.
This can be done by entering the adjustment amount in the amount column. The user can’t enter the amount of more than the debit balance.
Steps to apply debits:
|
Fields |
Description |
|
Amount |
Enter the amount to be adjusted
|
|
Update |
To save the changes |
b. Balance adjustment: this function is used to adjust any balances paid to the supplier. If the supplier gives you any allowances or extra discount you can adjust the amount in this function.
Steps to use Balance adjustment:

|
Fields |
Description |
|
Ref. number |
Reference number of the adjustment
|
|
Date |
Enter the date of adjustment |
|
Account |
Select the account of adjustment |
|
Balance |
The remaining balance to be paid to the supplier appears here |
|
Amount |
Enter the amount to be adjusted |
|
Description |
Enter the description regarding the adjustment |
|
Save |
Saves the changes |
c. Landing Cost: "Landing cost" typically refers to the total cost incurred in bringing a product or shipment to a particular location or market. It includes various expenses such as manufacturing or production costs, transportation costs, customs duties, taxes, tariffs, insurance, handling fees, and any other expenses associated with getting the product to its final destination. Calculating the landing cost is crucial for businesses to accurately determine the total cost of goods sold and set appropriate pricing strategies.
Clicking on this feature redirects you to the landing cost option, where you can generate and allocate the landing costs to the items listed in the purchase invoice.
d. cost centre Allocation: The cost centre feature presents a popup window facilitating the allocation of purchase expenses to designated cost centres. This allows for precise tracking and management of expenses within different segments of the organization. Users can efficiently assign costs to relevant departments or projects, enhancing financial transparency and accountability.
e. Convert to sale feature: Gives permission to convert the purchase invoice into a sales invoice. This means redirects to sales invoice and the value will be as per the sales rate.
f. Convert to Stock Transfer: The "Convert to Stock Transfer" function simplifies the process of converting a selected purchase invoice into a stock transfer. When initiated, this feature automatically populates the stock transfer option with pre-filled data in the product grid, streamlining the task and facilitating smoother workflow.
g. Create recurring: If the purchase is recurring in nature user can create a recurring invoice by clicking create recurring option. This will redirect the user to a recurring purchase window
h. Create debit note: The create debit function is readily available in the invoice view. By clicking the create debit note it will redirect user to debit note window where purchase return against the selected invoice can be created
i. Create duplicate: This function is an easy tool to copy invoices. This will redirect user to purchase invoice window with the same data that user entered previously
j. Cancel invoice: The cancel option enables the user to cancel the prepared purchase invoice
It controls the page navigation and the page size. Page size can be set to 10, 20, 50 or 100. And by giving page number in the box and clicking on Go button, user can jump to the said page.
3.Export
The purchase invoice list can be exported to Excel format. Click on the Export button at the top right corner near the +New button. Select the file location and click Save.
4.Refresh
If your latest data is not displayed, click on the refresh icon on the top left corner of the page to fetch the new data.
5.View icon: This icon redirects the user to invoice view window
6.More option
You can edit, view, make payment, export to pdf and print the invoice details if required using the more icon.
7.Color Filter
Purchase return and cancelled invoices are represented either in red or green to denote return and cancelled.
8.Pagination Control
It controls the page navigation and the page size. Page size can be set to 10, 20, 50 or 100. And by giving page number in the box and clicking on Go button, user can jump to the said page.
9.Exit
Below the pagination control, there is exit button. If you want to exit the supplier search page click on exit button.
Yes. You can make payment while creating the purchase invoice.
Yes. You can convert the created purchase invoice in to sales invoice.
Yes. You can cancel the created purchase invoice by following steps.