In ACCOXI, you can create invoices for purchase that you made with your suppliers.
A purchase invoice is a formal document or bill issued by a seller or service provider to a buyer, specifying the items purchased, quantities, and prices. This document serves as a request for payment within a designated time frame and acts as evidence of a transaction, detailing what was bought and the corresponding payment. In ACCOXI, users have the capability to generate purchase invoices for transactions with suppliers, effectively documenting purchases made with them. A Purchase Bill is the document provided to the customer as a receipt for the product they've bought. The vendor refers to this document as a Sales Bill since they are selling the product. Conversely, the customer terms it a Purchase Bill as they are making a purchase from the vendor. In Accoxi, users can create bills to monitor payments owed to suppliers, and there's also the option to generate recurring bills for purchases occurring at regular intervals. This functionality enhances tracking and management of periodic procurement transactions. Accoxi has seamlessly integrated both Bills and Purchase Invoices into a unified interface. This comprehensive approach streamlines the management of expenses, product purchases, and services by combining them into a single invoice. This consolidation not only simplifies the process but also saves a significant amount of time for users.
Accoxi's Purchase Invoice boasts several key features:
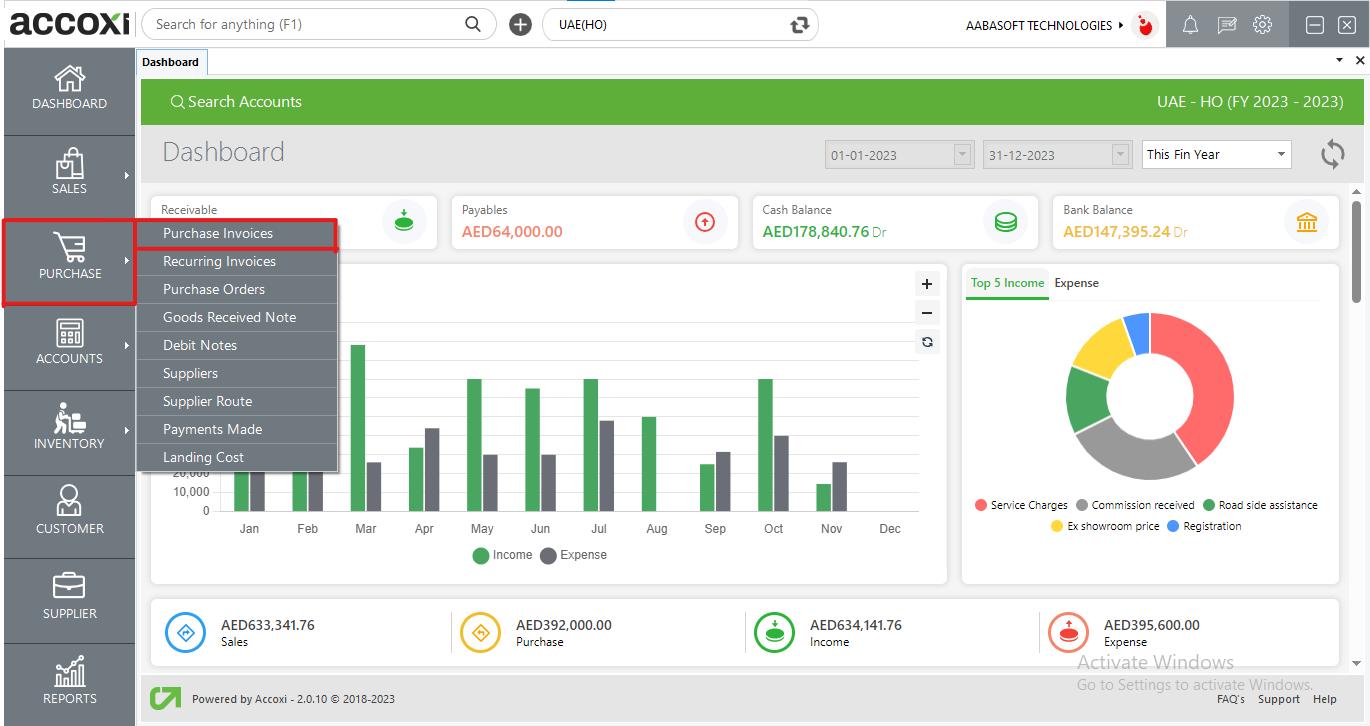
The purchase module provides users with access to various purchase-related functions. Within this module, users can specifically access the purchase invoices function by clicking on it. This feature allows users to manage and interact with purchase invoices efficiently.
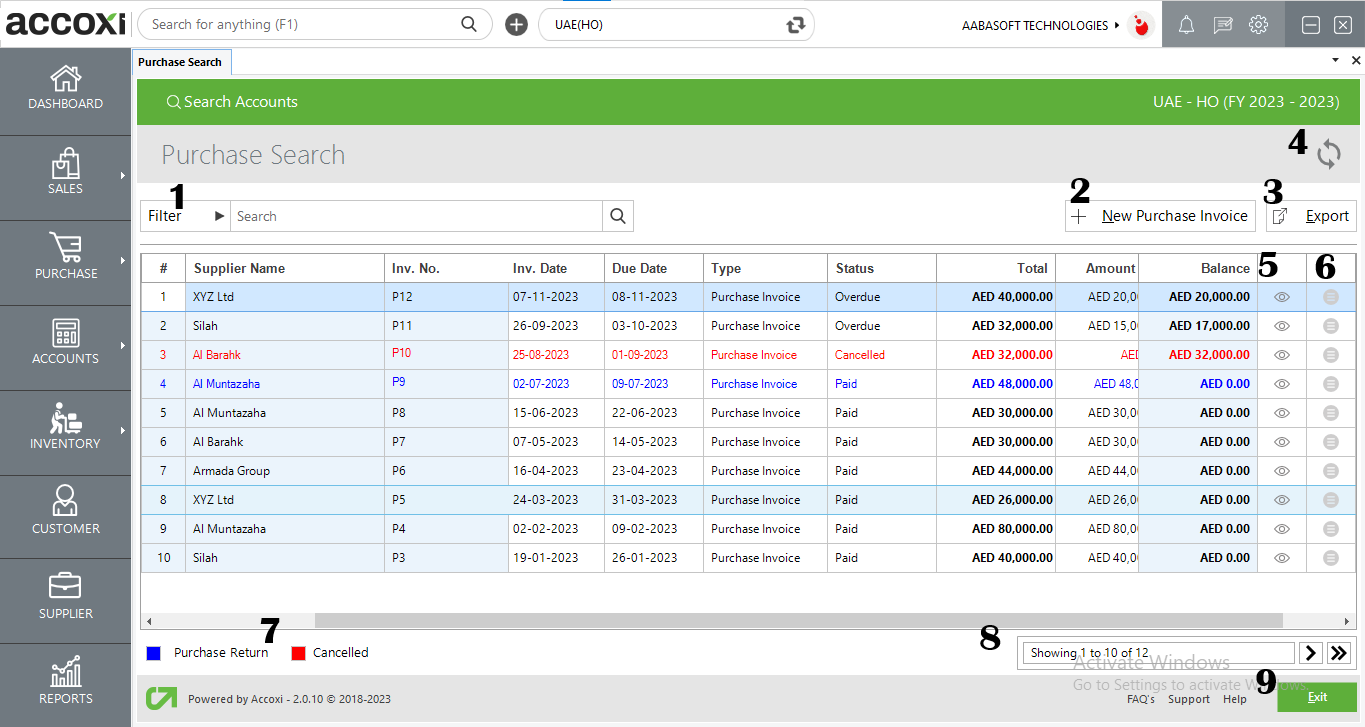
Purchase/Bill Search
The purchase/bills search function displays a comprehensive list of purchases, invoices, and bills associated with the business. This feature provides users with a convenient way to search and access relevant information related to their procurement and financial transactions.
DATA AVAILABLE IN PURCAHSE / BILLS SEARCH TABLE:
|
Field |
Description |
|
# |
The serial number associated with the data present in the table. |
|
Supplier Name |
Displays the supplier's name for the transaction. |
|
Invoice Number |
Shows the invoice number associated with the transaction. |
|
Ref. No. |
Displays the reference number of the purchase invoice. |
|
Invoice Date |
Indicates the invoice date of the transaction. |
|
Due Date |
Shows the due date for payment of the invoice. |
|
Type |
Indicates the type of invoice, i.e., purchase invoice. |
|
Total |
The column displays the total amount of the transaction. |
|
Amount Paid |
The column shows the amount paid against the invoice. Clicking on the amount paid allows the user to view the entire payment history, including details such as advance payments, debit notes, etc. This information is accessible through the "Amount Paid" pop-up window. |
|
Balance |
The column displays the remaining balance amount after payments have been made against the invoice. |
|
Status |
This column shows the status of the invoice, which could be "Paid," "Overdue," "Partially Paid," etc. |
Menus Available in Search
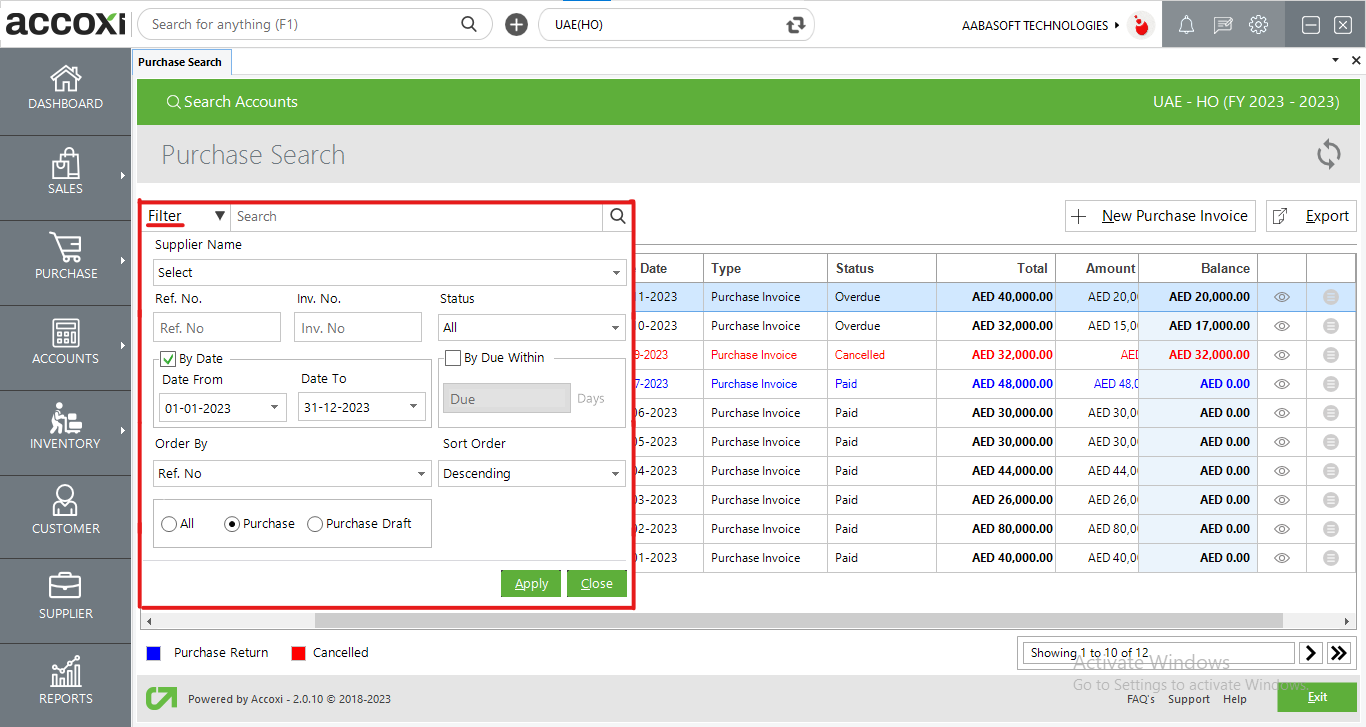
1. Filter option
the key points summarizing the purchase/bills search filter features:
These features collectively enhance the search and filtering capabilities within the purchase/bills module, providing users with versatile options for data retrieval and analysis.
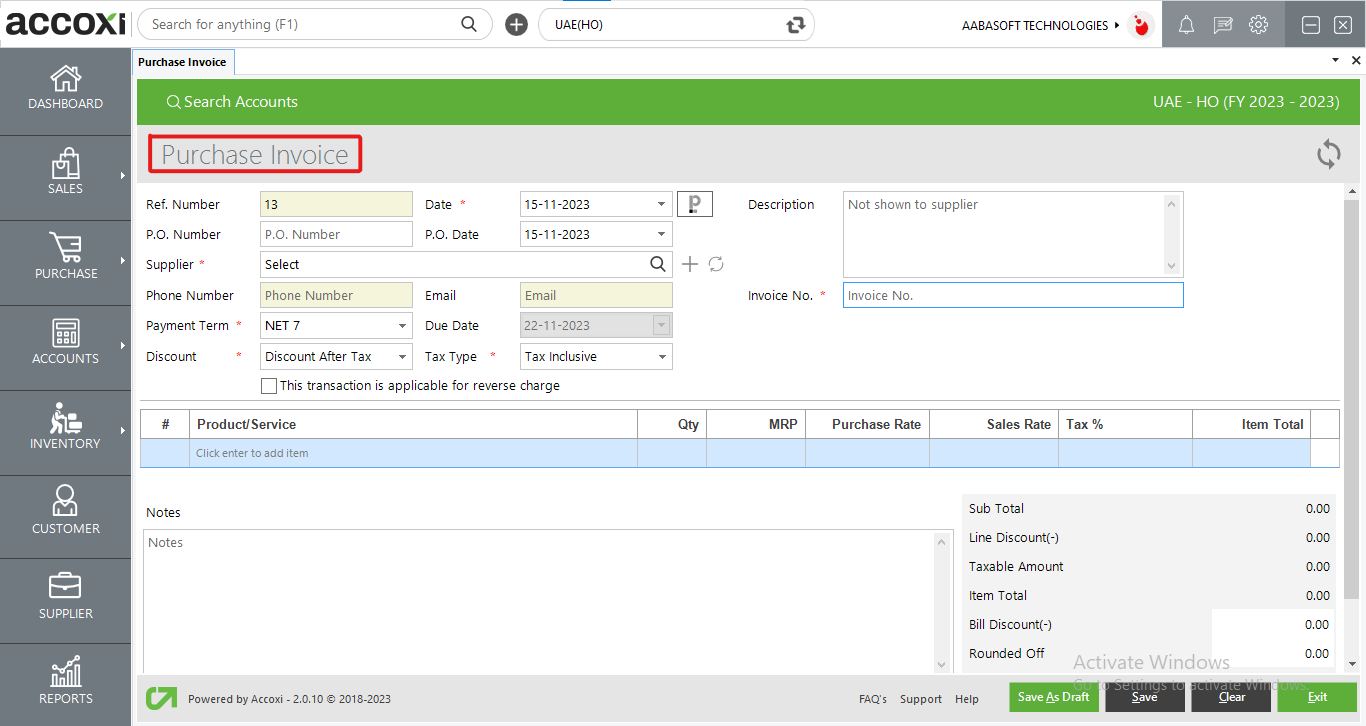
2. New Purchase Invoice
Clicking the "New Purchase Invoice" button opens the purchase invoice form, allowing users to input details for a new invoice. Certain fields in the form are marked in red, indicating their mandatory nature. Users can set a new voucher format, and for specific suppliers, this format can be configured in the voucher settings menu. This customization enables the creation of new purchase invoices according to the specified voucher format. The same concept applies when creating a sales invoice.
To create a new purchase invoice, follow these steps:
|
Field |
Description |
|
Ref Number |
The reference number is generated automatically, and this column is locked. |
|
Date |
Specify the purchase invoice date. By default, the date will be set as the entry date into ACCOXI. |
|
Paperlez Icon |
This feature enables users with Paperlez integration in Accoxi to attach or associate documents with purchase invoices. Opening a tab displays all the documents uploaded in Paperlez, and users can choose the necessary documents to be attached to the invoice by associating them. |
|
Invoice Number |
Entering the invoice number for the transaction is mandatory. If the user attempts to save the invoice without providing the invoice number, a validation message will appear. |
|
Supplier |
Choose the supplier from the dropdown menu. |
|
Phone Number |
Will be automatically populated upon selecting the supplier. |
|
Description |
Provide a description for the purchase. |
|
Payment Term |
The payment term already established with the supplier will be displayed here. Users can modify the term if desired. |
|
P.O Number |
Input the purchase order number in this field. |
|
P.O Date |
Specify the purchase order date. |
|
|
It will be automatically populated upon selecting the supplier. |
|
Tax Type |
Choose the tax type. |
|
Discount |
Choose the type of discount. |
|
Reverse Charge Applicability |
The recipient of the goods or services is responsible for paying the tax instead of the provider. The user can enable this option. |
|
Product Or Service |
Input the product, service, or account here. Pressing the Enter key will provide details for all entered products. |
|
Batch |
Choose the batch of the product by clicking on the Batches column. |
|
QTY |
Specify the quantity of the products. |
|
Blocked Columns |
If a product is entered in the table, the Product/Service Code, HSN/SAC, and Unit columns will be locked, as this data is inserted during product creation. Upon entering the quantity, Tax%, Taxable Amount, Tax Amount, and Item Total will adjust accordingly. |
|
Discount |
This column is for adding any discounts offered on purchases. It could be an after-tax or before-tax discount that the user has selected previously. The user can enter the amount in this column, and it will be deducted from the item total. |
|
Round Off |
This column is for rounding off small amounts, and the round-off method can be downward, upward, or nearest. The selection is made from the Preferences menu in Organization Settings. |
Menu available in purchase view
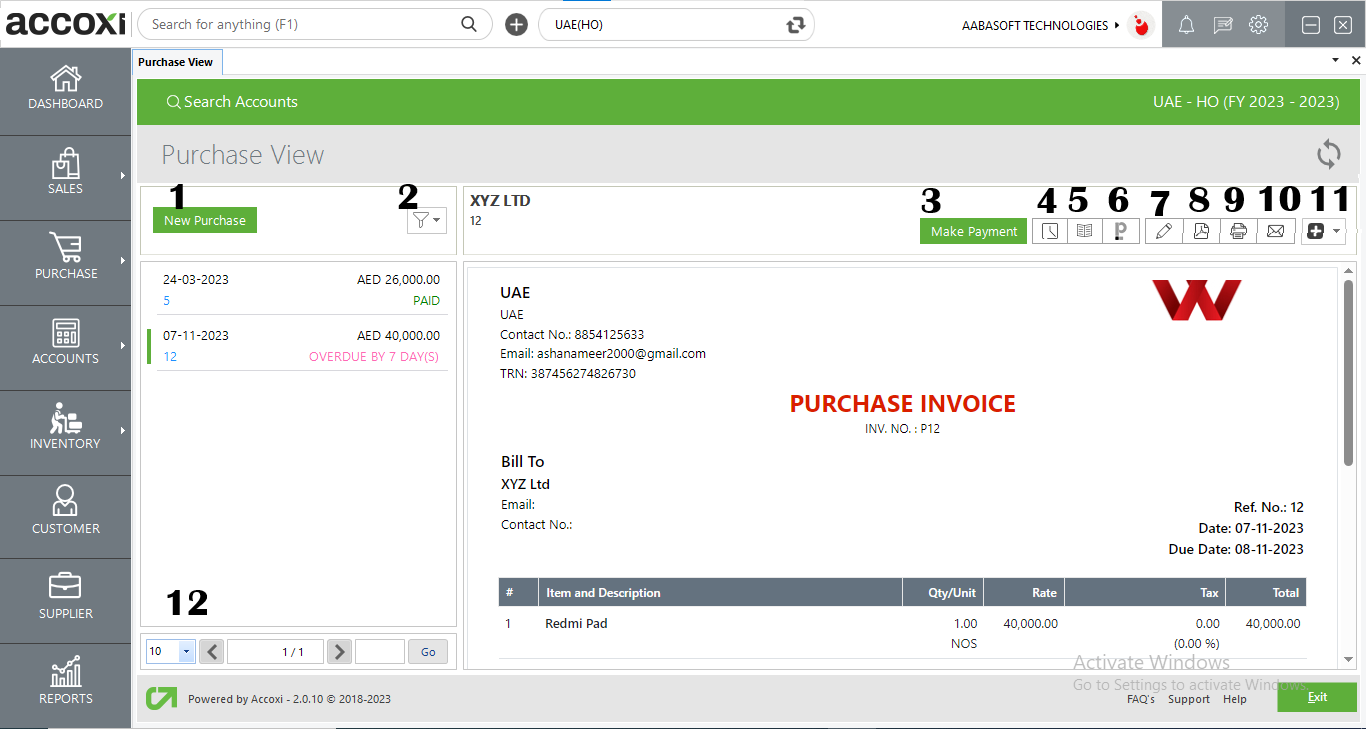
1. New Purchase
The "New Purchase" option redirects the user to the purchase invoice creation page for generating a new purchase invoice.
2. Filter
The filter menu allows the user to categorize supplier purchase invoice data based on criteria such as partially paid, unpaid, overdue, overdue by today, cancelled, and draft.
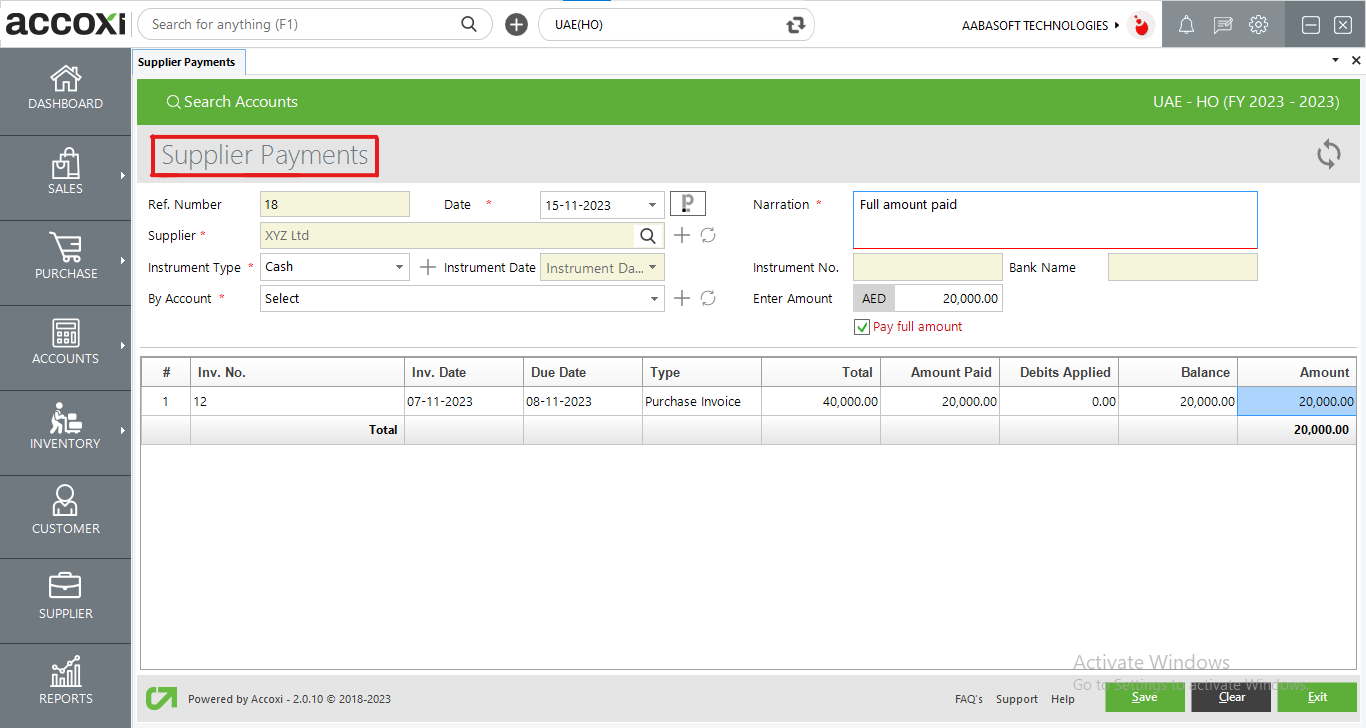
3. Make Payment
This is utilized to make payments to the supplier for the created invoice.
Steps to make a payment:
Enter the amount and click "Save."
|
Field |
Description |
|
Ref Number |
It will be automatically populated when you choose to make a payment from the invoice view. |
|
Date |
input the payment date. |
|
Paperlez Icon |
This icon is exclusively accessible for Paperlez app users, serving as the option to search for Paperlez documents within the Paperlez tab. When clicked, the Paperlez icon directs users to the Paperlez Documents page, where they can conduct searches for the associated documents. |
|
Supplier |
It will be automatically populated when you choose to make a payment from the invoice view. |
|
Narration |
provide the narration or description for the payment. |
|
By Account |
Choose the account from which the payment amount is to be deducted. |
|
Instrument Type |
Choose the type of instrument to be used for supplier payment. If the user selects a cash account, the Instrument Number, Date, and Bank Name columns will be disabled. |
|
Instrument Number |
input the instrument number. |
|
Instrument Date |
provide the instrument date. |
|
Bank Name |
input the name of the bank. |
|
Invoice No |
Displays the purchase invoice number. |
|
Invoice Date |
Indicates the purchase invoice date. |
|
Due Date |
Indicates the due date of this transaction. |
|
Total |
It represents the total amount of the invoice. |
|
Amount Paid |
If there are any other payments made against this invoice, that amount will be displayed in this field. |
|
Debits Applied |
This table displays the debits applied in this transaction. |
|
Balance |
It represents the remaining balance amount to be paid. |
|
Amount |
This is the field where the user can input the amount of the payment made. |
|
Pay Full Amount Option |
Clicking on it will fully pay the specified amount. |
|
Save |
Click the "Save" button to store the entered information. Once saved, the view for the payment made will be presented. |
|
Clear |
The "Clear" option is used to erase or remove all the data entered by the user. |
|
Exit |
The "Exit" option is utilized to leave the payment window without saving the supplier payment form. |
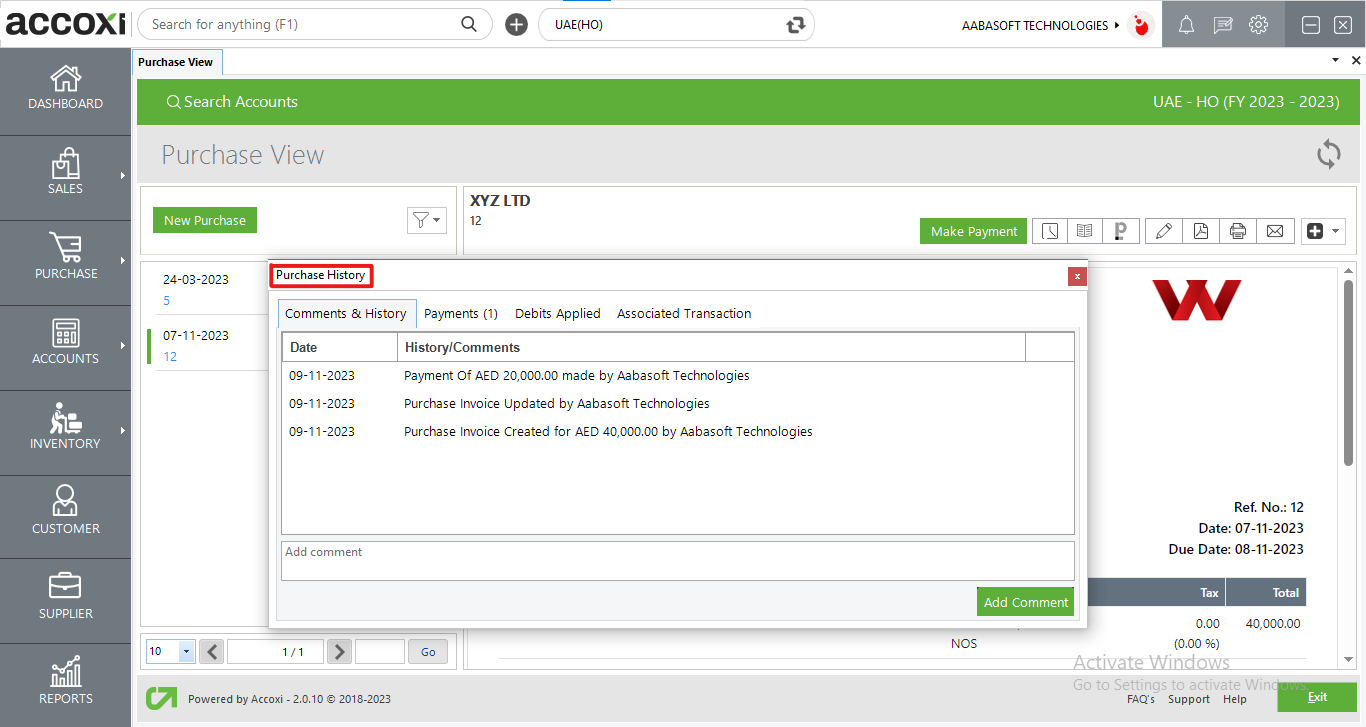
OPTIONS AVAILABLE IN THE HISTORY WINDOW
Displays all the edits and modifications made to the purchase invoice, along with the corresponding dates of the changes.
Provides information about the payments made, including the date of payment, reference number, instrument number, payment mode, and amount.
This section displays the details of debits applied through the use of debit notes, showcasing the date, debit note number, and the applied debit amount.
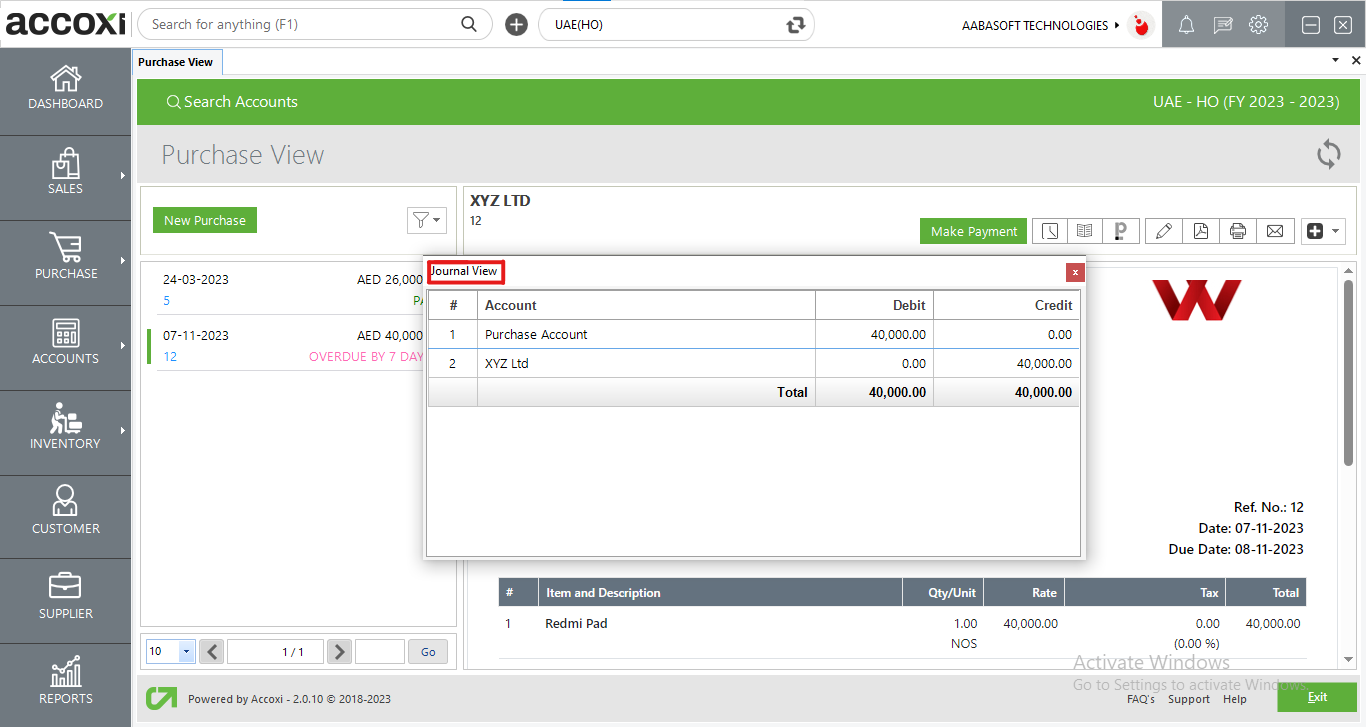
5. View Journal
This menu presents the journal view of the transaction, displaying both the debit and credit aspects along with their respective amounts.
6. Paperlez Integration
This option enables users who have integrated Paperlez in Accoxi to attach or associate documents with purchase invoices. Clicking on this option will open a tab displaying all the documents uploaded in Paperlez. Users can then select the necessary documents to be attached to the invoice by associating them.
7. Edit Option
The "Edit" menu allows the user to make corrections or modifications to the details entered in the purchase invoice. After editing, the user can save the changes. By selecting the "Update" option, the user will be directed to the purchase invoice creation module where they can edit the price, customer, and other details. Once the update is clicked, the system will generate the updated invoice.
8. Export To PDF
If the user wishes to convert the purchase invoice to a PDF format, they can use the "Export to PDF" option. After clicking on "Export to PDF," a "Save As" directory option will appear, allowing the user to choose the location for saving the PDF file.
9. Print
The "Print" menu assists the user in printing the created purchase invoice if necessary. Clicking the print button will redirect the user to print options where they can select the printer, specify the number of copies, and make other relevant choices.
10. Email
The user can send the created purchase invoice to suppliers or others via email using the "Email" button. Clicking the email button will redirect the user to the email format window where the "TO" email address will automatically appear with the supplier's email ID.
11. More Option
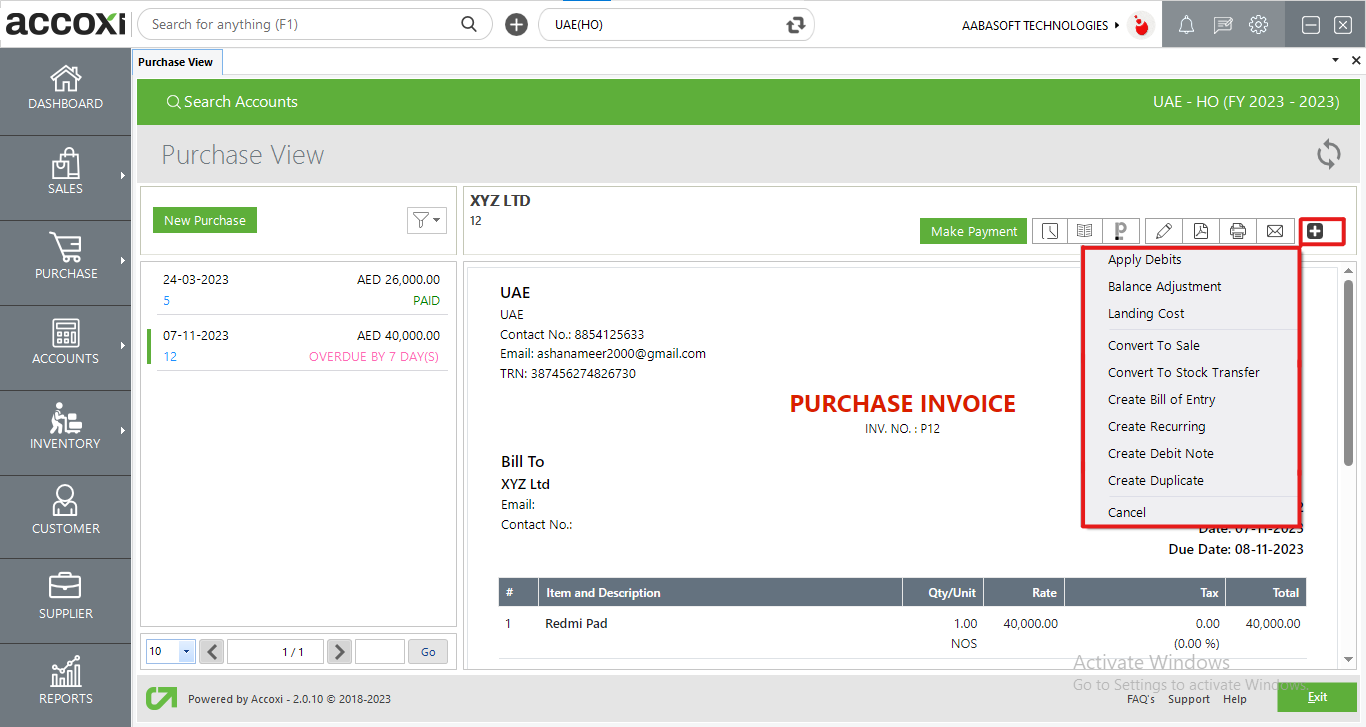
a. Apply debits:
Debits represent unapplied balance amounts owed by suppliers, stemming from supplier advances or debit notes. These amounts indicate what the supplier owes to the customer.
Applying debits is beneficial for reconciling any balances from purchase returns to the invoice. Users can adjust the amount to be received from the customer by utilizing the created debit note. This adjustment is made by entering the adjustment amount in the appropriate column. It's important to note that the user cannot input an amount exceeding the debit balance.
To apply debits, follow these steps:

If the user attempts to add an amount that exceeds the debit balance, a validation message will be displayed.
|
Field |
Description |
|
Amount |
input the amount to be adjusted. |
|
Update |
To save the changes. |
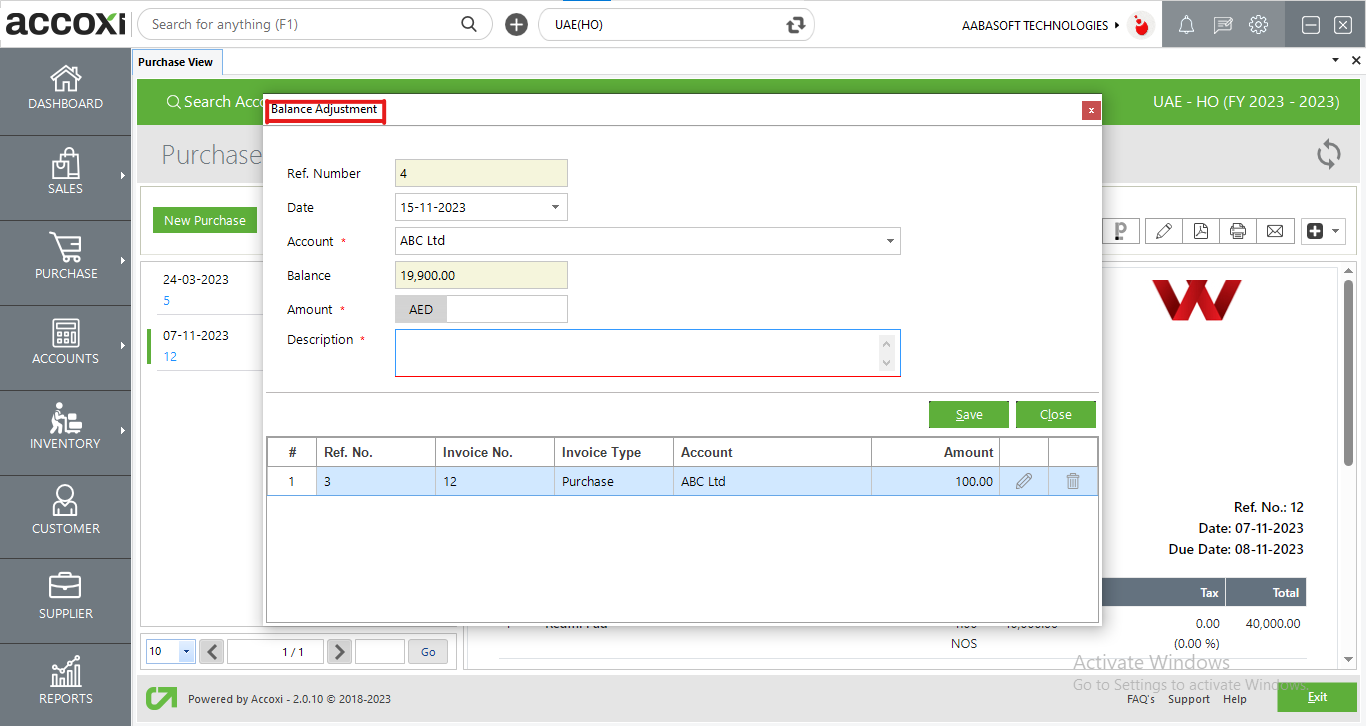
b. Balance adjustment:
This function is utilized to adjust any balances paid to the supplier. If the supplier provides allowances or additional discounts, you can adjust the amount using this function.
To use the Balance Adjustment function, follow these steps:
|
Field |
Description |
|
Ref. Number |
Indicates the reference number of the adjustment. |
|
Date |
Input the date of the adjustment. |
|
Account |
Choose the account for the adjustment. |
|
Balance |
The remaining balance to be paid to the supplier is displayed here. |
|
Amount |
Input the amount to be adjusted. |
|
Description |
Provide a description related to the adjustment. |
|
Save |
Click on "Save" to save the changes. |
c. Convert to sale feature:
Grants permission to convert the purchase invoice into a sales invoice. This entails redirection to the sales invoice, and the value will be determined by the sales rate.
d. Create recurring:
If the purchase is recurring, the user can create a recurring invoice by clicking on the "Create Recurring" option. This action will redirect the user to a recurring purchase window.
e. Create debit note:
The "Create Debit" function is conveniently accessible in the invoice view. Clicking on the "Create Debit Note" option will redirect the user to the debit note window, allowing the creation of a purchase return against the selected invoice.
f. Create duplicate:
This function serves as a convenient tool for copying invoices. It redirects the user to the purchase invoice window with the same data that was entered previously.
g. Cancel invoice:
The "Cancel" option allows the user to cancel the prepared purchase invoice. Upon clicking the Cancel button, a cancel window appears, displaying default supplier details such as the supplier's name, transaction invoice number, and amount. The user is required to enter the reason for cancellation and then click "OK" to cancel the transaction.
It manages page navigation and page size settings. The page size can be configured to display 10, 20, 50, or 100 entries. Users can input a page number in the designated box and click the "Go" button to navigate directly to the specified page.
3. Export
To export the purchase invoice list to Excel format, follow these steps:
4. Refresh
To ensure the display of the latest data, click on the refresh icon located at the top left corner of the page to fetch the new data.
5.View icon
This icon directs the user to the invoice view window.
6.More option
You can edit, view, make a payment, export to PDF, and print the invoice details if required using the "More" icon.
7.Color Filter
Purchase return and cancelled invoices are indicated by either red or green, signifying return and cancellation, respectively.
8.Pagination Control
It manages page navigation and page size settings. The page size can be configured to display 10, 20, 50, or 100 entries.
9.Exit
Below the pagination control, there is an exit button. If you wish to exit the supplier search page, click on the exit button.