Manual guide on the Landing Cost in Accoxi.

Landing cost refers to the total cost incurred to acquire and import a product or goods and have them ready for sale at their final destination. This cost encompasses various expenses associated with the procurement, transportation, and customs clearance of the goods. The landing cost calculation typically includes the purchase price of the goods, freight charges, insurance, customs duties, taxes, and any other costs directly related to bringing the goods to their final location. In Accoxi, you have the ability to input various expenses associated with the acquisition or importation of goods. This system allows you to allocate these expenses to each item on the invoice.
Key Features of Landing Cost:
1. Expense Allocation:
2. Purchase Price Integration:
3. Freight and Transportation Costs:
4. Insurance Considerations:
5. Itemized Allocation:
6. Profitability Analysis:
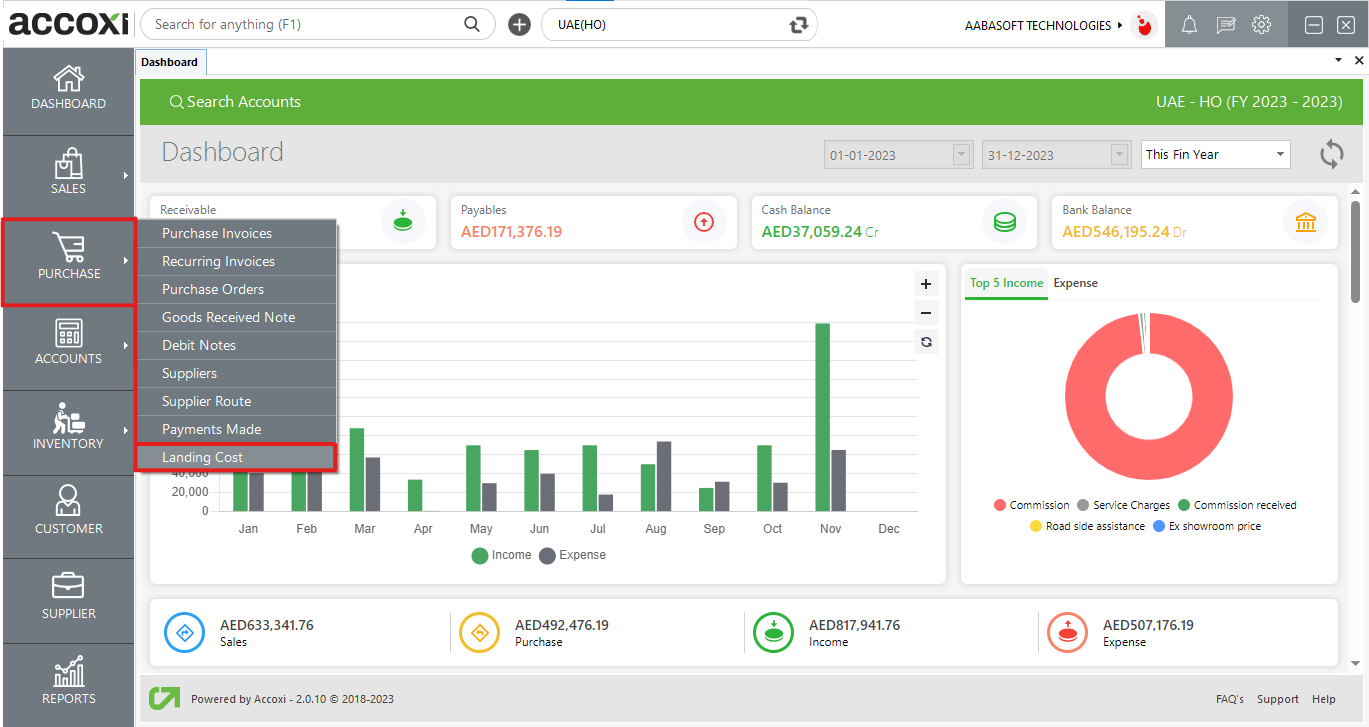
To access the Landing Cost functionality in the Purchase module, follow these steps:
By following these steps, you can easily access the Landing Cost feature within the Purchase module of Accoxi and proceed with the necessary actions.
LANDING COST SEARCH
The Landing Cost search function presents a detailed list of all created landing costs. This list includes comprehensive information about each landing cost entry, providing a clear overview of the expenses associated with the purchase or importation of goods. Users can review, analyze, and manage these entries as needed for effective financial tracking and decision-making.
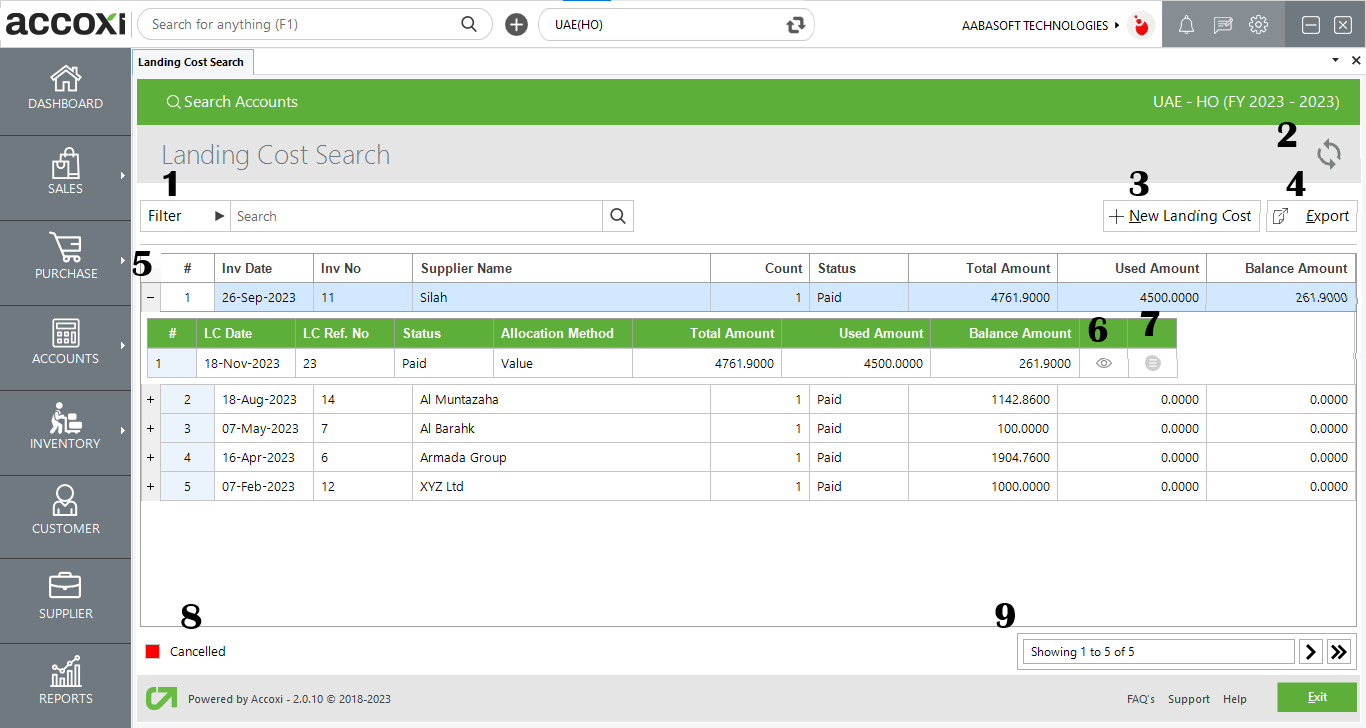
Data Available in Landing Cost Search Table:
|
Field |
Description |
|
# |
The "#" symbol indicates the number of transactions |
|
Inv Date |
Displays the date of the purchase invoice. |
|
Inv No |
Displays the selected purchase invoice number. |
|
Supplier Name |
Displays the selected supplier. |
|
Count |
It displays the number of landing costs created against a purchase invoice. |
|
Status |
During a landing cost transaction, the status will be shown as "Paid." |
|
Total Amount |
It displays the taxable value of the landing cost transaction. |
|
Used Amount |
It displays the amount allocated to the items in the landing cost transaction. |
|
Balance Amount |
It denotes the amount that still needs allocation to the items. |
|
+ |
Clicking on the "+" icon provides additional details about the landing cost. The following fields are accessible when selecting this icon: |
|
# |
The "#" symbol denotes the count of landing costs created for the same purchase invoice. |
|
LC Date |
This represents the Landing Cost Date. |
|
LC Ref No |
This is the Landing Cost Reference Number generated by the system as a unique identifier. |
|
Status |
The status appears as "Paid" when creating a new landing cost. |
|
Allocation Method |
When allocating landing costs to items in the invoice, you have the option to choose the allocation method as either quantity or value. The selected method will be indicated here. |
|
Total Amount |
The field displays the taxable value of the landing cost transaction. |
|
Used Amount |
It indicates the amount allocated to the items in the landing cost transaction. |
|
Balance Amount |
It displays the remaining amount yet to be allocate to the items. |
|
View |
The "View" icon provides you with the option to review the created Landing Cost. Clicking on it will redirect you to the Landing Cost creation screen, displaying the entered data. |
|
More Option |
The "More" option offers you functionalities such as Edit, Allocation, and Cancel. |
The Landing Cost filter offers users two efficient search methods. Users can either directly enter the supplier's name in the search bar near the filter option or use the filter drop-down. The filter options include the invoice number, supplier name, status, and date.
When applying date-based filtering, users can specify the starting and ending dates of the purchase invoice. Additionally, status-based filtering categorizes data into statuses such as partially paid, unpaid, overdue, paid, cancelled, unsettled, enabling users to quickly identify and manage Landing Cost based on their status.
If the most recent data is not visible, users can click on the refresh icon located in the top-left corner of the page to retrieve the latest information.
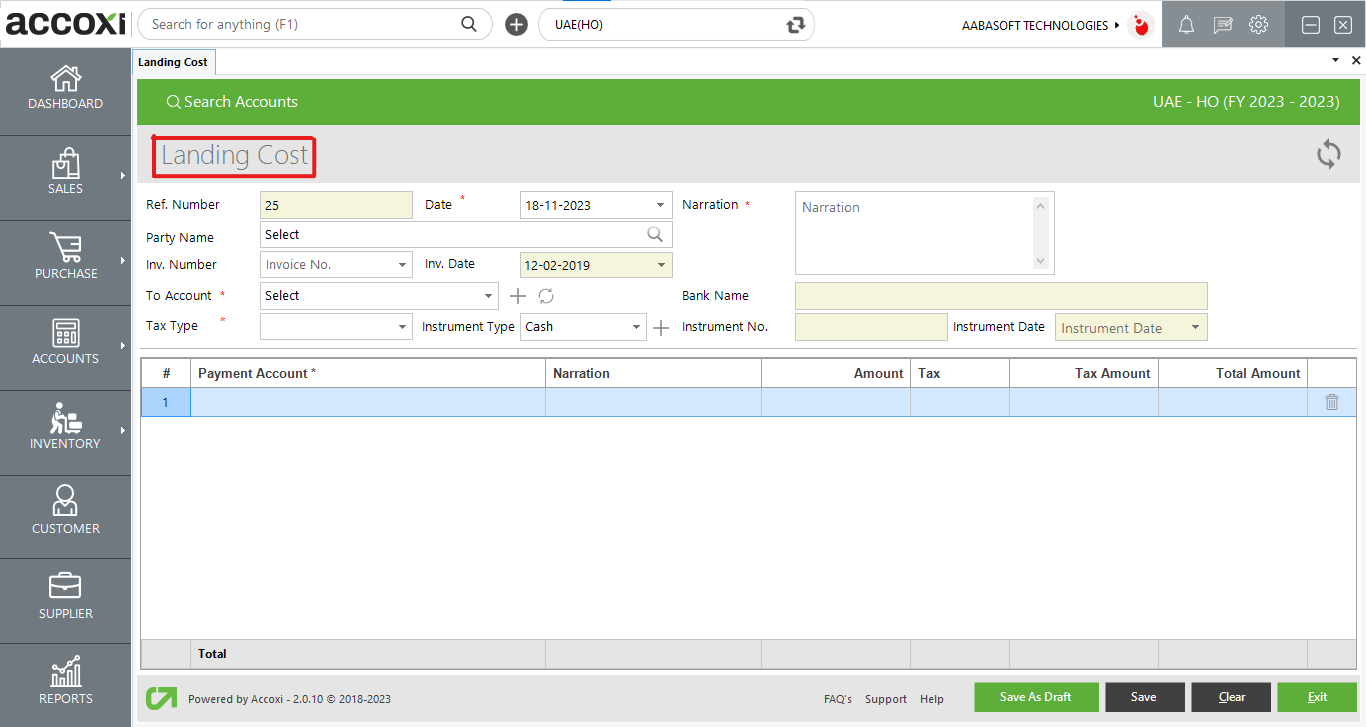
This feature is utilized to initiate the creation of a new Landing Cost. By selecting "Add New + Landing Cost," a new window will appear, presenting the Landing Cost form for completion.
Steps to Create a Landing Cost:
Once all necessary information is entered, click on "Save" to complete the Landing Cost creation process.
|
Field |
Description |
|
Ref no |
The reference number associated with the Landing Cost is a system-generated unique identifier. Users cannot edit the Reference Number, as it is designed to maintain a sequential sequence from the preceding transaction. |
|
Date |
The Date field will automatically be populated with the current date. If the user wants to change the date, they can click on the Date menu. A dropdown calendar will appear, allowing the user to select the desired date for the transaction. This field is mandatory. |
|
Party Name |
Choose the supplier name that is associated with the purchase invoice for which the expense is incurred. |
|
Inv Number |
A list of purchase invoices associated with the selected supplier will be displayed in this dropdown. You can then choose the specific invoice to which this expense is incurred. |
|
Inv Date |
The date of the selected purchase invoice will be presented here. |
|
To Account |
You have the option to choose the account to which this expense is associated, and it can be either a cash account or a bank account. Additionally, there is a "+" icon that allows you to create a new account. |
|
Tax Type |
The "Item Rates" feature provides a dropdown menu with options for selecting "Tax Inclusive" or "Tax Exclusive. |
|
Instrument Type |
Select the instrument type, such as cash, cheque/DD, etc. Additionally, there is a "+" icon that allows you to create a new instruments. |
|
Bank Name |
Input the name of the bank if it's relevant to the transaction. |
|
Instrument no |
If the payment is made through bank instruments, input the instrument number. |
|
Instrument Date |
You can enter the instrument date if it is applicable. |
|
Narration |
You can input additional information related to this landing cost in this field. |
|
# |
The "#" symbol indicates the number of line items |
|
Payment Account |
Various accounts are listed in the dropdown menu of the payment account field. You can choose the expense account from this list. |
|
Narration |
You can input any information or remarks regarding this line item in the provided field. |
|
Amount |
You can input the amount of the expense in this field. |
|
Tax |
It displays the list of tax percentages defined for your organization. You can choose the appropriate tax percentage from the dropdown menu. |
|
Tax Amount |
The tax amount is calculated based on the entered amount and the selected tax percentage. Additionally, it is influenced by the chosen tax type. |
|
Total Amount |
It represents the total value, inclusive of the tax amount. |
|
Delete |
The delete icon is utilized to remove a line of an item from the transaction. |
|
Save as Draft |
The "Save as Draft" option enables the user to save the progress as draft without finalizing the transaction. |
|
Save |
Upon entering all the details, clicking the "Save" option enables the user to create a new landing cost |
|
Clear |
The "Clear" option allows the user to delete or eliminate all the entered data, effectively clearing the entire input. |
|
Exit |
The "Exit" option is available for navigating to the previous page without saving the landing cost. |
Landing Cost View
Clicking on the view icon in the landing cost search screen will display the landing cost screen, presenting the data entered during the saving process.

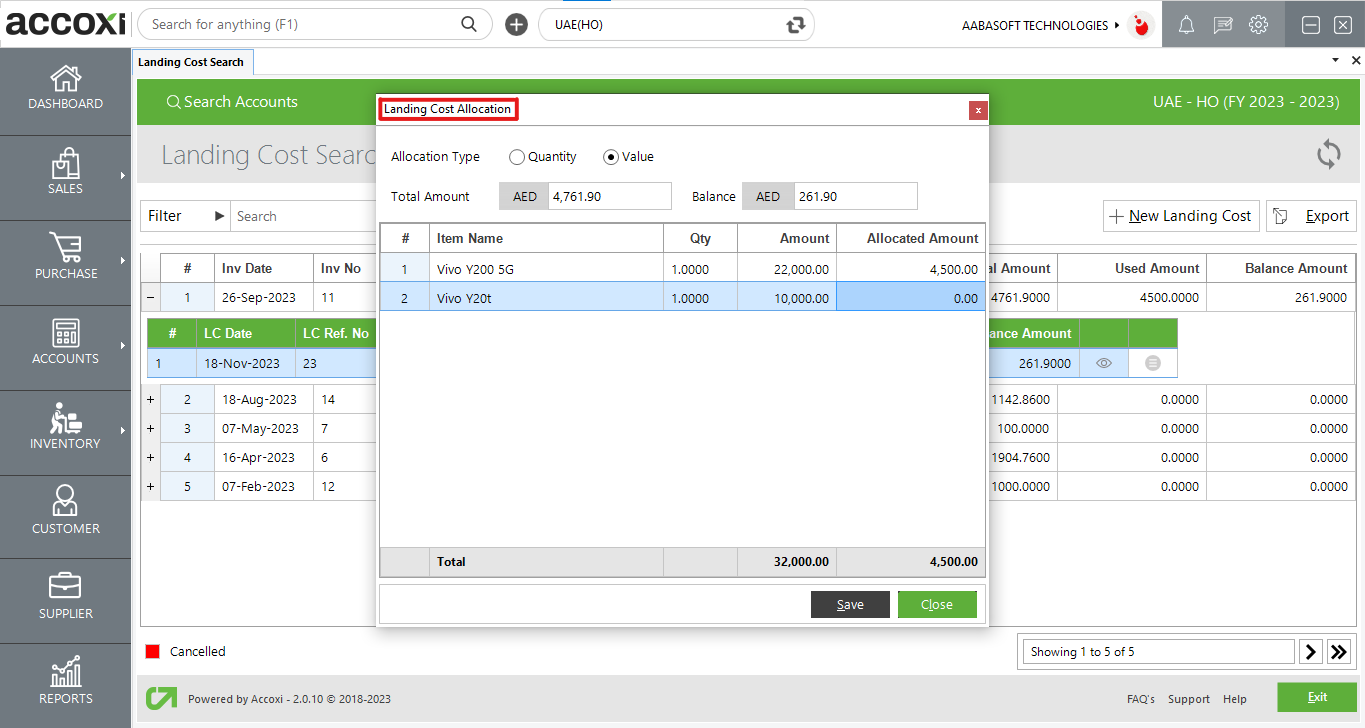
Landing Cost Allocation
When clicking on the "Allocating Landing Cost" option in the "More" button within the search window, a pop-up screen will appear. In this screen, you can allocate the expenses to the items in the selected invoice. It allows for manual allocation of the total expense amount to each individual item within the respective purchase invoice.
|
Field |
Description |
|
Allocation Type |
The allocation type includes Quantity or Value. You can choose the type of allocation process based on either quantity or value. |
|
Total Amount |
This field displays the total value of expenses recorded as the landing cost. |
|
Balance |
The Balance field indicates the amount that is pending to be allocated to the items. |
|
# |
The "#" symbol indicates the number of line items |
|
Item Name |
The "Item Name" field displays the items that were purchased in the selected invoice. |
|
Qty |
The "Qty" field displays the quantity of the item that was purchased. |
|
Amount |
The "Amount" field reflects the total value of the item which is showing in the purchase invoice. |
|
Allocated Amount |
You can input the amount of the allocated expense for the line item in this field. |
|
Total |
The total value of the item, and allocated amount, will be displayed. |
|
Save |
Upon entering all the details, clicking the "Save" option enables the user to allocate the landing cost to items in the invoice. |
|
Close |
The "Close" option is available for navigating to the previous page without saving the allocation. |
The Landing Cost list is exportable to Excel format. Click the Export button located at the top right corner, near the +New button. Choose the file location and click on save.
Clicking on the "+" icon provides additional details about the landing cost. The following fields are accessible when selecting this icon:
#, LC Date, LC Ref No, Status, Allocation Method, Total Amount, Used Amount, Balance Amount, View, More Option
The "View" icon provides you with the option to review the created Landing Cost. Clicking on it will redirect you to the Landing Cost creation screen, displaying the entered data.
The "More" option offers you functionalities such as Edit, Allocation, and Cancel.